 Needs Pictures: 0
Results 16 to 30 of 36
-
24th May 2022, 02:53 PM #16

I wouldn't think a span of 150mm by 85mm would be a problem for a full size router (i.e. not a trim router) but if you think it would be a problem, you can always bolt a wider auxiliary base out of MDF. I'd rather do that then trust parallel guides and fences when it comes to routers.
And if you're only taking 2mm off, I reckon any full size router should be able to do that in one pass. Certainly more than 0.4mm. What router do you have that lets you adjust the accuracy to a tenth on a mm? I have the Festool OF1400 and I could perhaps eyeball half a mm but not with any great degree of consistency.
-
24th May 2022 02:53 PM # ADSGoogle Adsense Advertisement
- Join Date
- Always
- Location
- Advertising world
- Posts
- Many
-
24th May 2022, 03:04 PM #17
 GOLD MEMBER


- Join Date
- Aug 2011
- Location
- bilpin
- Posts
- 3,559

The SHARP pencil line becomes a datum. You dont have to cut down to it, just the same distance above in each case. Then you can scribe a line around the leg, if you want to be fussy and cut to that. Your ability or dexterity with a pencil is irrelevant - the pencil shaft is flat against the underside of the bench. All you are doing is pushing it. It doesnt get much easier.
-
24th May 2022, 04:07 PM #18
 .
.


- Join Date
- Feb 2006
- Location
- Perth
- Posts
- 27,790
-
24th May 2022, 04:17 PM #19
 SENIOR MEMBER


- Join Date
- Oct 2019
- Location
- Brisbane, Australia
- Age
- 43
- Posts
- 519
-
24th May 2022, 04:33 PM #20
-
24th May 2022, 05:41 PM #21

Use casino quality playing cards; they're stiff enough to push between the leg and the top and as a bonus each one is exactly 0.01" thick. No need to measure; just count!
My initial post was a little rushed; obviously the tallest leg won't need shimming while the shortest one will; you have to take the shims from the shortest legs and cut their thickness from the tallest to bring them level.Nothing succeeds like a budgie without a beak.
-
24th May 2022, 06:26 PM #22
 GOLD MEMBER


- Join Date
- Aug 2011
- Location
- bilpin
- Posts
- 3,559

Packing is for holidays.
-
24th May 2022, 06:39 PM #23
 SENIOR MEMBER


- Join Date
- Feb 2016
- Location
- Perth WA Australia
- Posts
- 829

If it were me i'd glue a shim of suitable thickness to the bottom of the workbench, if you wanted you could use a contrasting wood to make it bit of a feature. If you don't have a thin ripping jig clamping a board to your table saw can be used in a pinch.
However if you're keen on making the legs co-planer with each other here's what i'd do.
1) Dress some timber (or use sheet material) that is long enough to span the workbench base, you'll need 2 spanning the front/back and 4 for the width. With the intention of creating a platform for your router around each leg
2) Clamp/secure these to the legs so that they sit higher than the legs
3) Use winding sticks to make sure there is no twist in any direction
4) Using a pattern bit/flush cut bit, set your router to the depth of the lowest leg
5) Remove material from legs as required
In a nutshell you're "flattening" a board using a technique similar to those that flatten end grain chopping boards/stumps. This will also eliminate any tearout in the legs as they'll be supported by the frame
-
24th May 2022, 07:12 PM #24

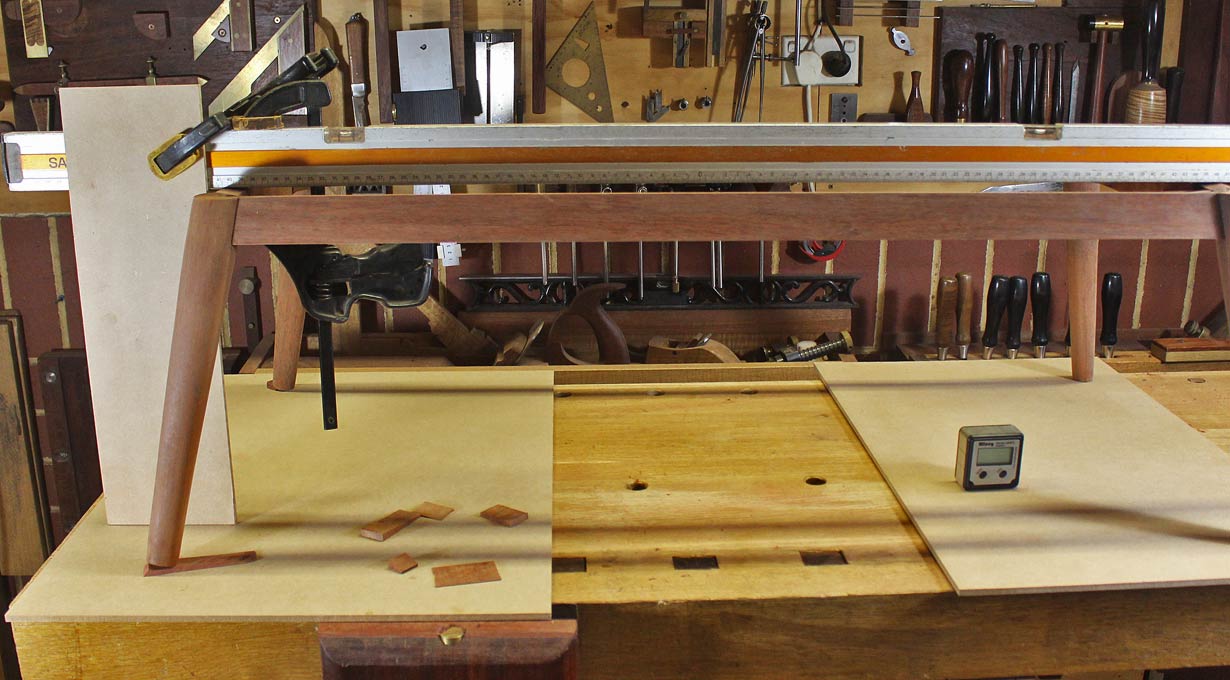
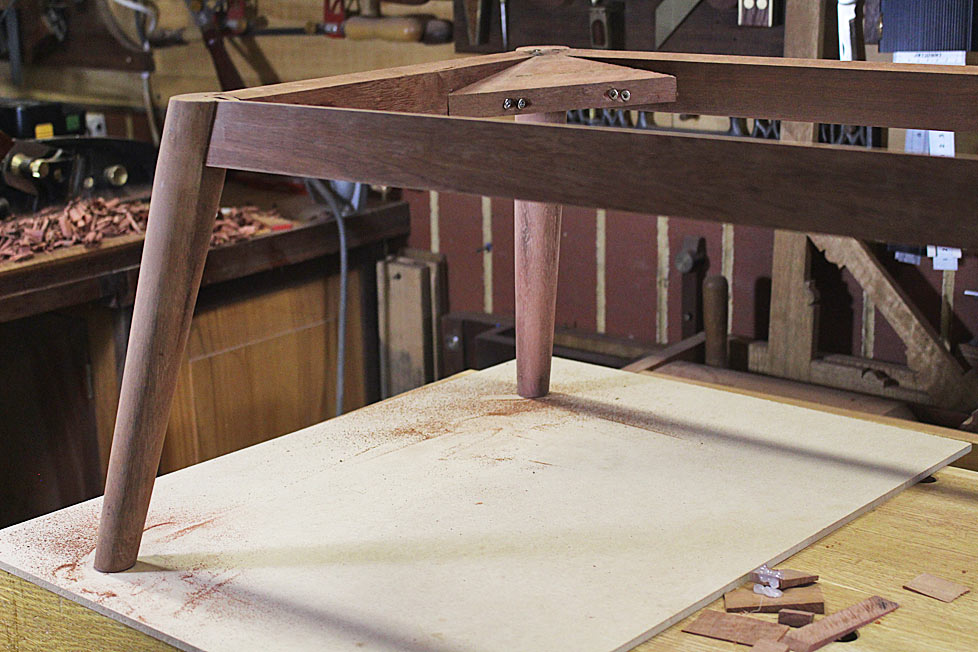
One way to level the legs is to begin with a flat surface, and find the levels from leg-to-leg (length and sides) ..

Use wedges under the legs to get them all coplanar. Hot glue the wedges so they do not move Ö

Now you have a choice whether to measure the height of each leg and cut them to the length of the shortest.
Or scribe the bottom of each leg Ö

.. and saw off the waste ..


Regards from Perth
DerekVisit www.inthewoodshop.com for tutorials on constructing handtools, handtool reviews, and my trials and tribulations with furniture builds.
-
24th May 2022, 09:00 PM #25

Hi Derek,
That's a good explanation on how to level a table to sit on a perfectly flat floor, but his workbench is very rigid and will not flex if the floor is uneven which is why I said it needs scribing to the floor where it is going to live, however it seems the OP is happy to shim the bench level rather than mess around cutting the legs.
What he his unhappy with is the top of the legs where they will meet the bench top, he doesn't want to shim any gaps there and that's why other members are suggesting routering the top of the legs using some sort of jig.
Hi Tonzeyd,
Your item 3) Instead of winding sticks and sighting them it would be better to use string between each opposite corner leg (which would make an "X" shape) pull the string tight and when the 2 strings meet (touch) in the middle of the "X" there will be no twist.
-
24th May 2022, 09:32 PM #26
 Visit www.inthewoodshop.com for tutorials on constructing handtools, handtool reviews, and my trials and tribulations with furniture builds.
-
24th May 2022, 11:45 PM #27
 SENIOR MEMBER


- Join Date
- Oct 2019
- Location
- Brisbane, Australia
- Age
- 43
- Posts
- 519

Thanks Derek
I am sure you probably noticed a bit of best-form-of-flattery in the build!
The leg structure is I think about 80 kilograms so it will be quite the work-out maneuvering it.
I was scratching my head thinking on how to find any surface that will bear the load and be sufficiently flat for the purpose... wound up realising well it's the benchtop. The whole thing should go on the garage floor on some sticker blocks.
I think this proves a principle that I think you've articulated (I hope I have it right) - sometimes the fastest method of construction really is to avoid errors and need for tune-ups at later stages...
-
26th May 2022, 03:17 PM #28

I use a varient of Derek's method for aligning legs, which I think is a little simpler.
First: I level the top with wedges under the legs, and then hot glue them, exactly as Derek does.
Second: I make a "cutting thicknesser" with a U-shaped centre hole, from a piece of sheet material - MDF, plywood, melamine - sometimes increasing the thickness by laminating (when needed).
Third: Using a flush cut saw and the "cutting thicknesser,I saw about 80% through each leg sequentially. It is important that you do not cut right through as the legis will then wobble.
Fourth: Then I finish sawing right through all legs using the saw kerf as a guide.
Aligning Legs.jpg
Hope that these sequential diagrams explain it.
It is really fast and close to idiot proof.
-
26th May 2022, 03:33 PM #29
 Senior Member


- Join Date
- Nov 2019
- Location
- Melbourne
- Age
- 36
- Posts
- 156

Sorry if i miss the point completely,
But if you're looking to shorten the tops of the legs that are proud, why not simply strike a line with a square all the way around and pare down to it with a chisel?
If the soles of the legs arnt all flat on the floor its totally normal, I would get some 2nd hand rubber gym mats and lay them on the ground, which is nice underfoot too when you work at the bench.
If it's still way out, I just put a little contact cement on a small offcut of leather and use that to shim the legs. If you ever move the bench onto a perfectly flat floor, then you can just peel it off and you're good to go.
I tend to think of the way that requires the least effort. Jigs are possible, but surely not necessary?
Cheers,
Siggy
-
27th May 2022, 10:21 AM #30
 GOLD MEMBER


- Join Date
- Apr 2019
- Location
- NSW
- Age
- 38
- Posts
- 1,132
Similar Threads
-
Bench Legs
By mark in forum THE WORK BENCHReplies: 2Last Post: 25th August 2017, 05:37 PM -
Looking for turned legs for dining table and bench seat
By Dronavalli in forum WOODTURNING - GENERALReplies: 1Last Post: 28th August 2015, 03:49 PM -
Attaching bench top to the legs. Why does everyone use mortise and tennons?
By TimberNut in forum THE WORK BENCHReplies: 19Last Post: 15th September 2011, 10:44 AM -
Above Bench Height Adjustment
By steveo55 in forum TRITON / GMCReplies: 3Last Post: 22nd June 2009, 09:52 AM -
Cutting tapers on thick stock legs
By gilbo in forum WOODWORK - GENERALReplies: 10Last Post: 16th May 2007, 05:16 PM


 Thanks:
  Likes:
  Picture(s) thanks:


 Reply With Quote