

 Thanks: 0
 Likes: 0
 Needs Pictures: 0
 Picture(s) thanks: 0
Results 1 to 13 of 13
Thread: Gazebo stage 2
-
12th November 2007, 08:44 PM #1
 Senior Member


- Join Date
- Mar 2007
- Location
- Canberra
- Age
- 63
- Posts
- 291
 Gazebo stage 2
Hi all,
Have made some progress - slowly as Saturdays only come around once a week (retirement - sigh).
Pics 1 and 2 show the lattice installed. Pic 3 shows the king post I made with the underneath plate. With my original plan of 150 x 50 rafters, the king post would have been too large to make from one bit of timber, but I found some LOSP treated pine that was finger-jointed and laminated – it was 230 x 30, so the king post became a possibility (plus the gal steel brackets I was going to use would have looked fugly). Got a length of 90 x 90, cut it to rough hex shape with my bandsaw (fantastic machine, don’t know why I didn’t get one years ago) and finished if off with a handplane. The plate will be screwed to the base of the post and the rafters will have a notch cut at the bottom of the upper part that sits on the base plate.
-
12th November 2007 08:44 PM # ADSGoogle Adsense Advertisement
- Join Date
- Always
- Location
- Advertising world
- Age
- 2010
- Posts
- Many
-
12th November 2007, 08:46 PM #2
Senior Member
- Join Date
- Mar 2007
- Location
- Canberra
- Age
- 63
- Posts
- 291
Pic 1 shows the rafters in place – they do look a bit large but bear in mind that the cleats and batterns for the mini-orb colorbond will take up about half the height of each rafter. Pic 2 shows the end detail of the rafter – the colour is actually primer – I needed to get these up so I could measure accurately for the batterns, so other than a first coat to get things started the painting will be done in-situ (standing on the top of a step-ladder – dammit). I realise the triple-grips are on the inside of the wall rather than the outside, but due to the way I made the panel frames, there wasn’t enough timber to fix on the outside, plus I figure it is stronger this way as the weight is pushing the triple-grip against the wall (I’m open to correction on this point). Pic 3 shows the king post with the plate – I sealed around each join with flexible filler to stop water getting in. BTW, is there a proper name for the round, pointy, decorative thingo sitting on the top of the king post?
-
12th November 2007, 08:48 PM #3
Senior Member
- Join Date
- Mar 2007
- Location
- Canberra
- Age
- 63
- Posts
- 291
I’ve had a real revelation about roofs doing this gazebo and I take my hat off to those of you who build these things for a living! I started cutting out the cleats, which will sit at the bottom of the rafters, as in pic 1 below (rough cut joints with odd sized timbers, just to give me a clue about the angles). I knew I was going to see some compound joins as the rafters rise at 20 degrees and the join betweed 2 rafters is 60 degrees. But I was surprised to see that the cleats were sitting at an odd angle to each other. It made sense when I looked at the finished rafters on the gazebo, but there appears to be an offset of around 8 degrees. I like maths-type puzzles and I muddled around with this one for a couple of weeks, but I eventually gave up and made the small model shown below so I could just copy the angles.
Pic 2 shows exactly what I mean – the top of the small timber cleat shows clearly against the white of the battern – the white above the cleat shows the odd angle when the battern is placed between 2 cleats on neighbouring rafters. The other thing I discovered is that my roof panels will not be 60 degrees at the top – the rafters meet at 60 degrees but that is parallel to the ground – I simulated this by holding a 60 degree set square against the rafters in the little model… as I tilted the set square to match the 20 degrees of fall of the roof panel, the angle grew smaller – I’m guessing it will be around 56 degrees. There must be some mathematical way to calculate the angle, but I’ll stick to the model and just copy it.<O </O
</O
-
12th November 2007, 09:18 PM #4
A QLD boy living in GER
- Join Date
- Apr 2006
- Location
- Germany
- Posts
- 526
Looking very nice. Very nice indeed.
 Is it wrong to be in love with a sawbench?
-
12th November 2007, 11:48 PM #5
SENIOR MEMBER
- Join Date
- Apr 2005
- Location
- Sydney
- Age
- 64
- Posts
- 1,619
That looks awesome Chumley.
Some very neat and fancy joinery there.It's called a finial. The same as you often see at the peak of a gable. Originally Posted by Chumley

Basically the same as calculating compound angles, such as a hip. I could do it, but I'd have to have a think about the specific trig formula. Originally Posted by Chumley
edit: Why don't you just use Blocklayer's calculator?
It gives you all the dimensions as well if you plug your measurements in. Originally Posted by Blocklayer's gazebo calculator
He's got some handy calculators there.
edit2: OK, I was bored so I decided to check up on Blocky's calculator. Someone may get something out of this anyway;
Trig is pretty simple if you memorize one word; SOHCAHTOA, and you understand Pythagorean theorem which states that: In any right triangle, the square on the hypotenuse is equal to the sum of the squares on the other two sides. 3^2 + 4^2 = 5^2, giving the old 3,4,5 triangle.
So all you have to do is break up a roof into right angled triangles, and you can work out any angle or dimension. I worked out the angle at the apex of the roof plane like so:
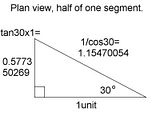
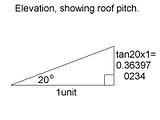
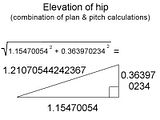
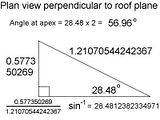
And the formula in one hit would be: (tan30/(sqrt (1/cos30^2+ tan20^2)))sin^-1*2= 56.962476562679
Of course it's virtually instantanious plugging the numbers into a program, but with the formulae you can work out any complex angle on a roof that may be an irregular shape. I suppose there's other programs that could do that as well though.
Sorry about the thread hijack Chumley, but I thought you may be curious since you were pondering about it. I'm not intending to detract from the great job you're doing on your gazebo.
It looks fantastic, and I'm looking forward to seeing the finished product.
-
14th November 2007, 08:10 AM #6
Senior Member
- Join Date
- Mar 2007
- Location
- Canberra
- Age
- 63
- Posts
- 291
Thanks for the kind words.
Pawnhead, thanks too for the explanation - I'll try to wrap my head around it -- I did look at Blocklayers calculator, but it got a bit complex and I thought I'd try to think it out myself. BTW, I like your new picture!
Cheers,
Adam
-
14th November 2007, 10:56 AM #7
GOLD MEMBER
- Join Date
- Aug 2004
- Location
- Coffs Harbour
- Posts
- 2,019
Your gazebo is looking good.
I am impressed with how you worked out the angles.
Retirement does have its attractions. Weekend and afternoons can make a job last a long time.Scally
__________________________________________
The ark was built by an amateur
the titanic was built by professionals
-
14th November 2007, 11:26 AM #8
Senior Member
- Join Date
- Mar 2007
- Location
- Canberra
- Age
- 63
- Posts
- 291
Thanks Scally, it's nice to be able to have something to show rather than just watching everyone else make things.
Blocklayer, I just spent another half hour with your calculator -- I finally figured out what was wrong -- I didn't fully understand that the angle of the roof is different to the angle of the rafters -- makes very clear sense once you get your head around it. Now I have my figures from your calc printed out I can check them against my model -- this will make life much easier when I come to cut the roofing sheets.
Super tool - thanks!
Cheers,
Adam
-
14th November 2007, 12:40 PM #9
SENIOR MEMBER
- Join Date
- Apr 2005
- Location
- Sydney
- Age
- 64
- Posts
- 1,619
He doesn't post all that frequently but he was here just recently. Shoot him a PM so he's aware of the thread.
Those calculators of his would come in handy for a lot of people. I've got his site bookmarked
-
14th November 2007, 03:52 PM #10
Senior Member
- Join Date
- Mar 2007
- Location
- Canberra
- Age
- 63
- Posts
- 291
Pawnhead,
Will do.
Adam
-
15th November 2007, 06:24 PM #11
Sir
- Join Date
- Oct 2005
- Location
- Wonga Beach North QLD
- Posts
- 345
Thanks Chumley
Thats the sort of feedback I need to improve the calculators.
(You blokes build the gazebos etc, and I'll build the calculators)
Took me a while to figure out the different angles to. It must trick lots of gazebo builders.
So I've highlighted where the angles are in the results with a yellow background and a stop sign and it says
'Realise roof angle is steeper than rafter angle. This tricks LOTS of people!'
Do you reckon that would have made it easier for you if it was there in the first place?
Your gazebo is looking great. Thanks for helping with the calculator while you build it.
-
16th November 2007, 01:11 AM #12
SENIOR MEMBER
- Join Date
- Apr 2005
- Location
- Sydney
- Age
- 64
- Posts
- 1,619
Well that's still a bit confusing I reckon. Originally Posted by Blocklayer
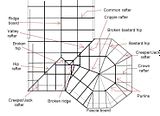
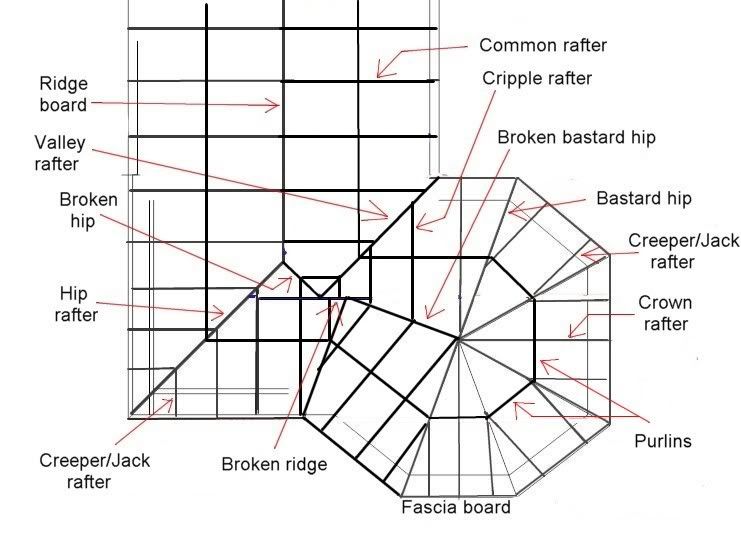
The 'roof angle' is called the 'pitch', and with 'rafter', it depends on which rafter you're talking about.
I'd say something like this;
The 'pitch' is a term that describes the angle of the roof from the horizontal plane.
The pitch of the roof rafters, (crown rafters, or creeper rafters in the case of a gazebo), is steeper than the pitch of the hip rafters.
-
16th November 2007, 08:36 AM #13
Senior Member
- Join Date
- Mar 2007
- Location
- Canberra
- Age
- 63
- Posts
- 291
If I saw it first thing in the morning I might've gone for a flat roof! Never realised there were so many different bits to a roof. Oh well, never too old to learn - just have to forget something else to make room... Originally Posted by Blocklayer
Cheers,
Adam

 Reply With Quote


Similar Threads
-
Stage Three of Shed Overhaul Complete
By Ticky in forum WOODWORK - GENERALReplies: 6Last Post: 4th November 2007, 08:36 PM -
Gazebo Roof Centre Brackets (steel)
By Blocklayer in forum WOODWORK - GENERALReplies: 4Last Post: 28th October 2007, 08:29 PM -
Gazebo - stage 1
By Chumley in forum WOODWORK - GENERALReplies: 13Last Post: 23rd October 2007, 03:15 PM -
Progress pics?
By Chumley in forum WOODWORK - GENERALReplies: 7Last Post: 13th September 2007, 08:22 PM -
2nd Stage Dusty - Tsc10 Dust Mods
By dazzler in forum DUST EXTRACTIONReplies: 10Last Post: 12th April 2006, 11:16 PM
