

 Thanks: 0
 Likes: 0
 Needs Pictures: 0
 Picture(s) thanks: 0
Results 1 to 15 of 28
Thread: Marking gauges?
-
12th November 2008, 04:08 AM #1
 Novice


- Join Date
- Nov 2008
- Location
- Vancouver Island
- Posts
- 23
 Marking gauges?
Apologies if this has been covered before and I just haven't found it.
I'm starting out as a novice at making small fancy boxes. I have a cheapie marking gauge but not much success using it. It came with a plain pointed pin to do the marking. Cross-grain it just tears a ragged trough and along the grain it wanders. I've done my best to grind & sharpen the marker pin to more of a blade. That's an improvement but still doesn't perform the way I'd like, especially in softer woods. It's tough to come up with the eyesight & dexterity to make a sharp accurately shaped blade, from such a skinny little piece of metal.
I've been eyeballing those Lee Valley gauges that have a sharp disk instead of a needle or blade. They look mighty attractive if it weren't for the price. As a longtime impecunious improviser I'm toying with the notion of trying to sharpen a small washer and making a gauge it could be fixed to; but I seriously doubt I'd make a better job of that than of the sharpened pin.
What's the general experience/opinion about marking gauges in general and the LV type - manufactured or "hand made" (isn't that what manufactured means?) - in particular?
Thanks in advance for your comments.
"The most powerful drive in the ascent of man is his pleasure in his own skill" - J. Bronowski: The Ascent of Man.
-
12th November 2008 04:08 AM # ADSGoogle Adsense Advertisement
- Join Date
- Always
- Location
- Advertising world
- Posts
- Many
-
12th November 2008, 07:21 AM #2
Moderate Moderater
- Join Date
- Feb 2006
- Location
- Lindfield N.S.W.
- Age
- 62
- Posts
- 5,643
One workaround is to replace the pin in your marking gauge with a blade. if you make the end of the of the blade into a V and grind a bevel on both arms of the V you will be able to run the gauge either way. Another trick is to make sure the bevels are on the same side of the blade and the flat side of the blade faces the fence of the gauge - this makes it easier to measure the distance.
For a blade, I do as Derek Cohen suggested for making marking knives and use a broken jigsaw blade - grind off the teeth first then shape the V and finally grind the bevels.Cheers
Jeremy
If it were done when 'tis done, then 'twere well it were done quickly
-
12th November 2008, 07:26 AM #3
Senior Member
- Join Date
- Sep 2006
- Location
- Bookham, Surrey, UK
- Age
- 79
- Posts
- 137
Why not have a go at making your own? Here's a design that works really well (I pinched it from a friend, who based it on an old one he saw in a second-hand shop).
Start with the wedge and main part of the body. The body is made up of four laminations, glued up around the wedge (wax the wedge well so you can get it out)
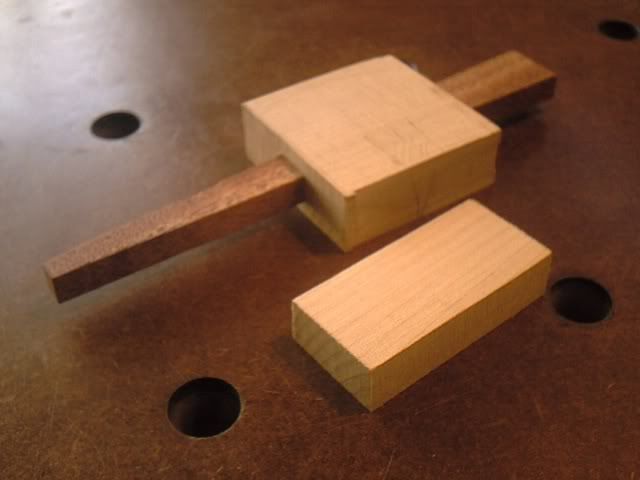
Then cut the hole for the stem and saddle and glue on the base piece
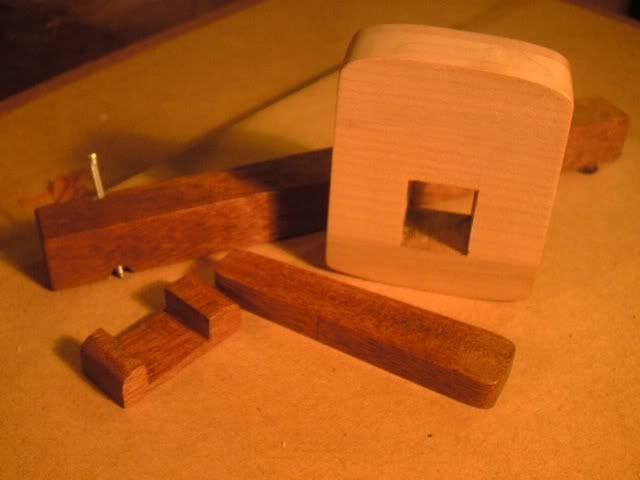
The saddle is the important piece. It spreads the pressure from the wedge in two directions so that it locks really solidly and easily, yet the wedge can me knocked out by tapping on the bench. The pin is a masonry nail, ground to whatever shape you wish
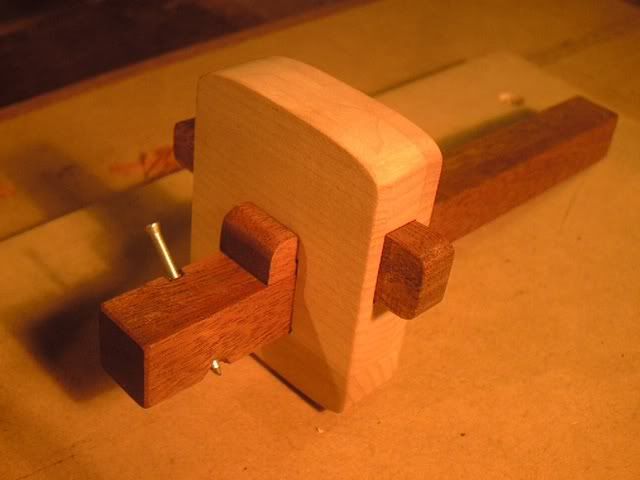
Here are two that my friend made
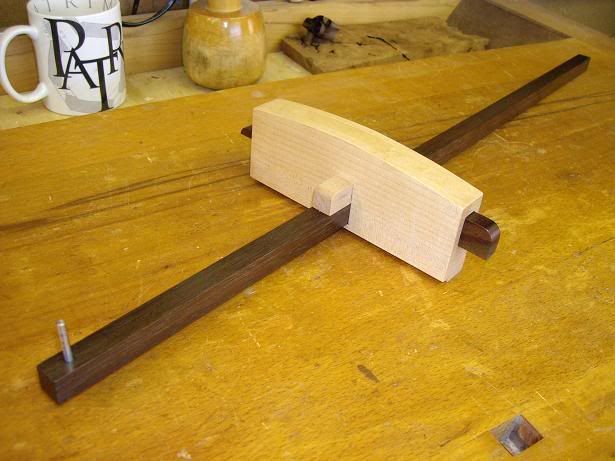
They cost next to nothing because you can make them from workshop scraps and you can have enough gauges so that you can leave them set until the job is finished.
Cheers
Paul
-
12th November 2008, 07:39 AM #4
Dehydrated Hydrographer
- Join Date
- Jun 1999
- Location
- Westleigh, Sydney
- Age
- 77
- Posts
- 9,550
You need a cutting gauge to mark across the grain, as you have discovered. As said previously, a sharpened jigsaw blade is the go. You could probably buy a marking gauge, remove the pin & chisel out a slot for the blade to be held in place by a wedge. Or, make one similar to Paul's with a blade.
-
12th November 2008, 08:48 AM #5
Senior Member
- Join Date
- Aug 2007
- Location
- Perth - SOR
- Age
- 77
- Posts
- 482
If using a blade it is a good idea to have the business end slightly radiused rather than a vee shape - this way irrespective of which way you are marking (l-r or r-l) the angle of attack to the fibres is more gradual and seems to do a better job.
Denn
-
12th November 2008, 08:57 AM #6
What... you mean it's not 1792?
- Join Date
- Oct 2006
- Location
- Melbourne
- Posts
- 5,271
If you make the 'point' rounded, it will be less 'grabby' as you pull (or push) it from a low angle to near vertical. Originally Posted by jmk89

I would situate the flat of the blade away from the fence so the bevel draws the fence towards the workpiece. That way you won't experience any wander. Originally Posted by jmk89
.
I know you believe you understand what you think I wrote, but I'm not sure you realize that what you just read is not what I meant.
Regards, Woodwould.
-
12th November 2008, 09:23 AM #7
Novice
- Join Date
- Nov 2008
- Location
- Vancouver Island
- Posts
- 23
Great suggestions
Well, it's interesting that no one suggested just shelling out for the Lee Valley graduated brass wonder. I've come to the right place! Thanks for all the ideas.
One of the things I love about these forums is: I can get a whole variety of suggestions then cut & paste from them, combining the bits I like most to suit my sometimes odd preferences.
Those gauges from Paul Chapman look really good to me: economical, practical AND pretty - but I wouldn't use the nail. I'd probably go with Jeremy's ground-down jig blade but with Denn's curve at the business end. And until I get around to making those pretty ones, I can modify the trashy gauge I have, as AlexS suggested.
Maybe I'll engrave all your names on the final version
Thanks all.
PS - just saw Woodwould's post. I think I like his idea of putting the flat of the blade on the outside, to pull the work towards the fence. Thanks WW.
"You look at the Amish and you see the past, but you might also be looking at the future." - ?Garrison Keeler
-
12th November 2008, 09:49 AM #8
Novice
- Join Date
- Nov 2008
- Location
- Vancouver Island
- Posts
- 23
Paul's wedge
Paul, thanks for the very helpful photos. You said:
I didn't fully understand that bit. My assumption is that the wedge can only be tapered in one direction, and the saddle is not tapered at all, so the pressure wouldn't really be spread in 2 directions? I'm not trying to be picky/pedantic - just hoping to make sure I understand..... The saddle is the important piece. It spreads the pressure from the wedge in two directions.......
Thanks, Edzell
-
12th November 2008, 01:25 PM #9
Senior Member
- Join Date
- Aug 2007
- Location
- Perth - SOR
- Age
- 77
- Posts
- 482
Much to learn about marking gauges - look here; http://www.woodworkersjournal.com/ar...rkingtools.cfm
Denn
-
12th November 2008, 07:41 PM #10
Senior Member
- Join Date
- Sep 2006
- Location
- Bookham, Surrey, UK
- Age
- 79
- Posts
- 137
Originally Posted by edzell
Hi Edzell,
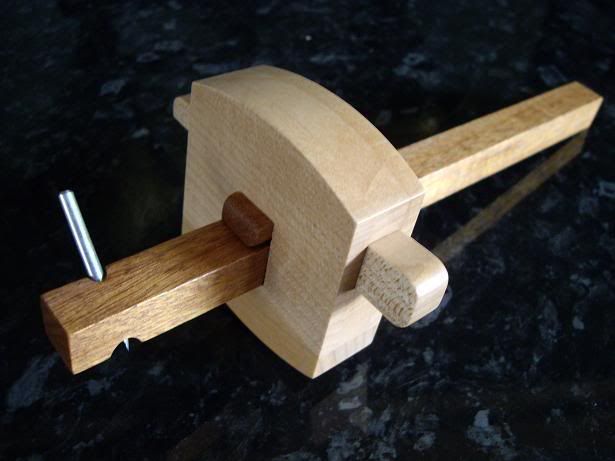
What seems to happen is that the wedge applies pressure across the stem while the saddle applies pressure along the stem. That's the best way I can describe it. Anyhow, it really does work. I have several commercially available gauges, but that home-made one has become my favourite because it works so well. Very easy to set one-handed and it locks solidly with very little pressure
Just one small point - if you look at the similar one my friend made, the saddle has two small chamfers planed on it. That's so you can slide the pin up past the saddle. When I took the final photo of mine I hadn't yet planed the chamfers.
Cheers
Paul
-
12th November 2008, 08:41 PM #11
1/16"
- Join Date
- Mar 2007
- Location
- Adelaide South Australia
- Posts
- 544
I don't know if how to hold a marking gauge has ever been raised before but these pics show the way I was taught for max control.
The little finger under the bar and the thumb over the spur give good control in push or pullDon't force it, use a bigger hammer.
Timber is what you use. Wood is what you burn.
-
12th November 2008, 09:08 PM #12

 GOLD MEMBER
- Join Date
- Apr 2006
- Location
- Hobart
- Posts
- 5,126
Hi Edzell
As several members have already said a cutting gauge is preferred by most to a marking gauge. The only difference is whether it has a pin or a blade.
The gauge is and must be a precision instrument. Any movement defeats it purpose. And among many woodworkers it is a right of passage to make ones own cutting gauge. It demonstrates that you have achieved the skill base to make such a precise tool. A real feel good project, or a disaster.
The Lee Valley gauges look like good value. I particularly like the rosewood and the brass ones; but that's just my taste.
If you really want to look at the rolls royce of cutting gauges have a look at Chris Vespers work on www.vespertools.com.au . Every piece is fully hand made and looks better in the hand than in pictures. Todays exchange rate is Aus$1.00 = US$0.67. Would love to work with tools that pretty.
Cheers
Graeme
-
13th November 2008, 04:17 AM #13
Novice
- Join Date
- Nov 2008
- Location
- Vancouver Island
- Posts
- 23
Rat52
Thanks for the tip, Rat52. Is that a Lee Valley brass-rod gauge lying on your bench in the background? Do you think it has much/any advantage over the more traditional types?
Cheers, Edzell.
-
13th November 2008, 05:09 AM #14
Novice
- Join Date
- Aug 2007
- Location
- Warwickshire, UK
- Posts
- 22
Paul's gauge really does work a treat. I had the pleasure of handling it at a get together this summer, and commented at the time that the 'ultimate' gauge either cost £120 (for one of Mr Vesper's confections) or the price of a masonry nail.
Cheers
Steve
-
15th November 2008, 12:05 AM #15
Senior Member
- Join Date
- Jan 2008
- Location
- Vevey, Switzerland
- Posts
- 407
Originally Posted by rat52
I tried putting the little finger under the bar as you suggested and it really does work better, thanks for the tip.Cheers, Glen

 Reply With Quote


Similar Threads
-
screw gauges
By Ivor in forum WOODWORK - GENERALReplies: 27Last Post: 26th February 2009, 07:38 PM -
Wot I did on my hols - marking gauges
By IanW in forum HOMEMADE TOOLS AND JIGS ETC.Replies: 18Last Post: 19th September 2008, 06:52 PM -
Sturdee's marking gauges.
By Sturdee in forum HOMEMADE TOOLS AND JIGS ETC.Replies: 57Last Post: 26th April 2005, 08:40 PM -
Marking gauges
By Arron in forum HOMEMADE TOOLS AND JIGS ETC.Replies: 9Last Post: 16th July 2004, 08:14 PM -
Marking Gauges
By AlexS in forum HOMEMADE TOOLS AND JIGS ETC.Replies: 5Last Post: 10th October 2003, 07:40 PM
