

 Thanks: 0
 Likes: 0
 Needs Pictures: 0
 Picture(s) thanks: 0
Results 1 to 9 of 9
Thread: mortising chisel technique
-
9th June 2009, 07:35 PM #1
 Member


- Join Date
- May 2009
- Location
- California
- Posts
- 75
 mortising chisel technique
Anyone have any tips on cutting mortises by hand. I have a mortising chisel, a marking gauge and marking knife. I have been practicing a little bit, but I don't really know what I am doing so much.
So far, my mortises have been kind of rough, not very clean. Do you need to using another type of chisel to clean up the mortise after gauging it out?
-
9th June 2009 07:35 PM # ADSGoogle Adsense Advertisement
- Join Date
- Always
- Location
- Advertising world
- Posts
- Many
-
9th June 2009, 07:52 PM #2

 GOLD MEMBER
- Join Date
- Apr 2006
- Location
- Hobart
- Posts
- 5,195
Not being an expert chiseller, I usually cut most of the mortise out either:
* With a forstner bit in a drill press (best method), or
* With a router and a spiral bit.
Next the mortising chisel must be absolutely sharp - if it won't cut paper without snagging then its not sharp. Have a look at the sharpening forum, if necessary.
Finally, I stand a very small set square on edge on top of the piece being mortised to ensure that I have the mortising chisel vertical all the time. Do not try and cut too much at a time.
After many failed or sloppy mortise & tenon joints I felt really good when I finally cut a decent one.
Cheers
Graeme
-
9th June 2009, 09:22 PM #3
Be inspired. Be creative. Be bold.
- Join Date
- Apr 2001
- Location
- Perth
- Posts
- 10,872
I doubt that my mortice chisels will slice paper, but they are sharp. The reason is that they all have a primary bevel of 20 degree (to facilitate ease of entry into the wood), and secondary bevel of 35 degrees (to reinforce the edge).
To Use a mortice gauge (either twin knives or pins): mark with a pencil where you want to locate the mortice - just one outside line. At the centre of this line, tap the chisel so that the edge marks inside the line and perpendicular to it.
Now use this mark to set your mortice gauge (with either knives or pins inside the groove). Now you can mark off the mortice and the mating tenon.
If you are only using a single blade marking gauge, then run the gauge along the edges of the groove made above. Do both lines from the same face.
Make sure the scored lines go as deeply as you can. These will help ensure a clean shoulder.
One way to start is to pare out the top of the mortice (to a depth of about 1/16") using the mortice chisel held bevel down. This will help define the mortice and keep the chisel from wandering as you start.
Begin chopping from the centre outwards. I'd orientate the chisel with the back towards myself. This allows for a forward scooping action.
Do one direction, stopping about 1/4" short of the final end. Then do the other side. Chop to the depth you need (usually about 3/4- 1"), then finish off by paring away the final 1/4" ends. This way you avoid bruising the end of the mortices.
Don't try and chop too deeply at one. It really depends on the hardness of the wood. Add a piece of masking tape to the chisel to act as a depth gauge. You may want to set up a guide (such as a square standing on the bench) to help you orientate the chisel in the vertical. Keep the board clamped to the bench top, not in the vise.
Regards from Perth
DerekVisit www.inthewoodshop.com for tutorials on constructing handtools, handtool reviews, and my trials and tribulations with furniture builds.
-
9th June 2009, 11:04 PM #4
Tom
- Join Date
- May 2006
- Location
- Sydney
- Age
- 49
- Posts
- 261
Hi Derek,
I note you suggest an angle of 20° for the primary and 35° for the bevel. I have a few Kirschen mortise chisels which came with a 30° primary bevel and have always maintained the angle at this level. Would I see a noticeable improvement with 20? I mostly cut mortices in Australian hardwood, so the mortice chisel takes a solid thumping.
For the original post, mortice & tenon joints are no different to dovetails. The more you practice, the better you get. Initially, try using haunched joints and that way the edges are covered. Make sure the tenon is the same thickness as the chisel (i.e one cut on the mortice and you have tenon thickness). If the joints are too sloppy, you can use the same technique as per dovetails - cut slivers of wood to pad the joint out.
When I was at the ww show I saw Terry Gordon cutting some m&t joints with incredible precision. He used a shoulder plane to clean the tenons, which appeared to work very well.
Good luck,
Tom
-
10th June 2009, 12:05 AM #5
Be inspired. Be creative. Be bold.
- Join Date
- Apr 2001
- Location
- Perth
- Posts
- 10,872
I have mostly Ward vintage oval bolstered mortice chisels, with a couple of Ray Iles D2 versions thrown in. I also mainly work Aussie hardwoods.
Here are two Wards (1/2" and 1/4") flanking a RI (1/4") ...
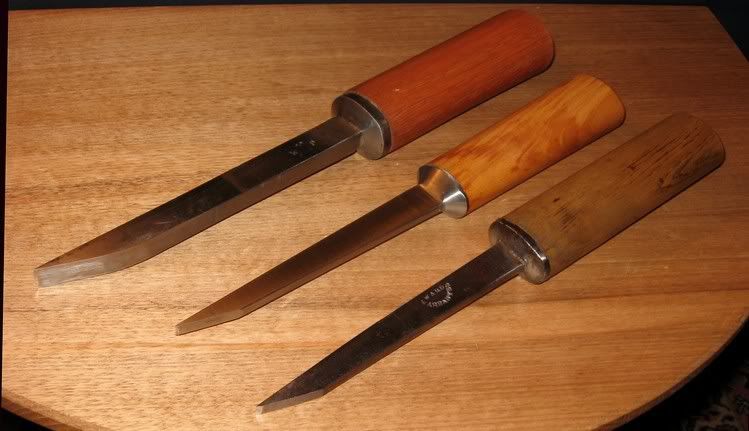
You can see the way the bevel end looks. Nice and pointy! Yes, you can expect this configuation to be easier to use than a primary bevel at 30 degrees.
Regards from Perth
DerekVisit www.inthewoodshop.com for tutorials on constructing handtools, handtool reviews, and my trials and tribulations with furniture builds.
-
10th June 2009, 09:46 AM #6
What... you mean it's not 1792?
- Join Date
- Oct 2006
- Location
- Melbourne
- Posts
- 5,271
I learnt to chop mortices solely with a chisel. I realise many people drill out the waste first, but my (recent) experience of doing this is that it's pedestrian (which is all well and good if you're not making a living from your woodwork), but also, if the diameter of the holes is the same as the width of the mortice, then it's much more difficult to keep the drill bit within the scribed lines unless you have a drill press table and fence. Keeping the holes about two thirds the width of the mortice makes for more accurate mortices.
I use, more or less, the same method as described by Derek, though I used to set my marking gauge by the width of the chisel. Nowadays, I have a set of accurately machined twin blades which replace the single disc on the end of a Veritas marking gauge.
My mortice chisels are pig-stickers whose deep blades can adequately support a 20° primary grind and a 30° to 35° bevel (depending on the timber being chopped). Ray and Sam Iles' modern pig-sticker chisels incorporate a 20° grind and a 35° bevel. I wouldn't grind as low a primary angle on non-pig-sticker chisels; I would probably aim for 25° with a 30° to 35° bevel or even just a straight 30° or 35°.
I start chopping about 3/16" from the left end of the mortice and advance (bevel leading) to within 3/16" of the right end of the mortice. The glory of a pig-sticker's oval handle is that it makes it simple to maintain the blade's alignment with the mortice and a couple of vertical cuts at the ends complete the job. No other chisel is necessary as there should be no paring or cleaning up required.
A pig-sticker in the right hands can complete a mortice in less time than it would take to drill out the waste..
I know you believe you understand what you think I wrote, but I'm not sure you realize that what you just read is not what I meant.
Regards, Woodwould.
-
10th June 2009, 02:35 PM #7
GOLD MEMBER
- Join Date
- Apr 2006
- Location
- Hobart
- Posts
- 5,195
 Originally Posted by derekcohen

Good Morning Derek
If you sharpen your chisels following your sharpening advice you actually can cut paper.
Thanks again for clear, concise and usable advice.
Cheers
Graeme
PS: Wish I could chisel a mortise as fast and accurate as my drill press can drill a hole, Woody.
-
10th June 2009, 02:55 PM #8
Darksdr&Gardenr
- Join Date
- Jan 2007
- Location
- Grange, Brisbane
- Age
- 53
- Posts
- 1,642
What's the chances some of you (WW and Derek!) could video yourselves doing this process? It'd help us novices enormously. Please... And I promise not to time you to see who's faster! Originally Posted by Woodwould
Cheers, Richard
"... work to a standard rather than a deadline ..." Ticky, forum member.
-
10th June 2009, 03:01 PM #9
What... you mean it's not 1792?
- Join Date
- Oct 2006
- Location
- Melbourne
- Posts
- 5,271
Derek's probably the man for this as I only have two hands. Originally Posted by rhancock

I'm sure there's bound to be a clip of someone cutting a mortice on You Tube..
I know you believe you understand what you think I wrote, but I'm not sure you realize that what you just read is not what I meant.
Regards, Woodwould.

 Reply With Quote


Similar Threads
-
Mortising Chisel Technique
By spongebrain in forum HAND TOOLS - UNPOWEREDReplies: 0Last Post: 9th June 2009, 07:24 PM -
Chisel technique, or how to stop cutting my fingers
By gonty in forum HAND TOOLS - UNPOWEREDReplies: 10Last Post: 24th April 2009, 07:27 AM -
mortising chisel
By sprightlyone in forum GENERAL & SMALL MACHINERYReplies: 2Last Post: 26th March 2008, 06:38 PM -
mortising chisel
By gilbo in forum WOODWORK - GENERALReplies: 5Last Post: 8th May 2007, 06:03 AM -
Who owns a wood mortising chisel kit?
By Hellacopter 1 in forum HAND TOOLS - POWEREDReplies: 17Last Post: 28th August 2004, 01:34 PM
