

 Thanks: 0
 Likes: 0
 Needs Pictures: 0
 Picture(s) thanks: 0
Results 31 to 45 of 79
Thread: An Oak side table.
-
3rd April 2009, 08:27 AM #31
 Golden Member


- Join Date
- Oct 2006
- Location
- Dandenong Ranges
- Age
- 47
- Posts
- 816

Hi WW,
This is amazing work.
Looking forward to following the progress.
Cheers,
Af.___________________________________________________________
"The things I make may be for others, but how I make them is for me."
-
3rd April 2009 08:27 AM # ADSGoogle Adsense Advertisement
- Join Date
- Always
- Location
- Advertising world
- Age
- 2010
- Posts
- Many
-
4th April 2009, 01:17 PM #32
What... you mean it's not 1792?
- Join Date
- Oct 2006
- Location
- Melbourne
- Posts
- 5,271
I didn't get anything done on the table on Thursday as hoped, but yesterday I fitted the drawer bottom and glued the drawer runners in place. The runners are slightly proud of the rest of the drawer to allow for final fitting.
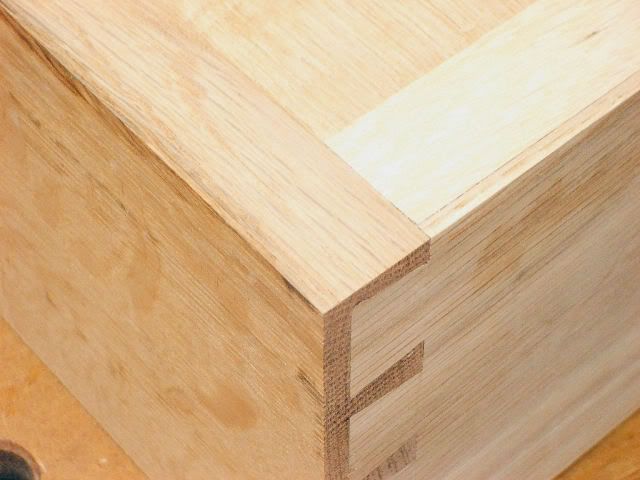
I rubbed the drawer guides together and rubbed them into the table. Drawer guides were often done this way with no actual joints to locate them in the table frame.
The drawer stops at this date are just wooden blocks rubbed onto the frame behind the drawer sides.
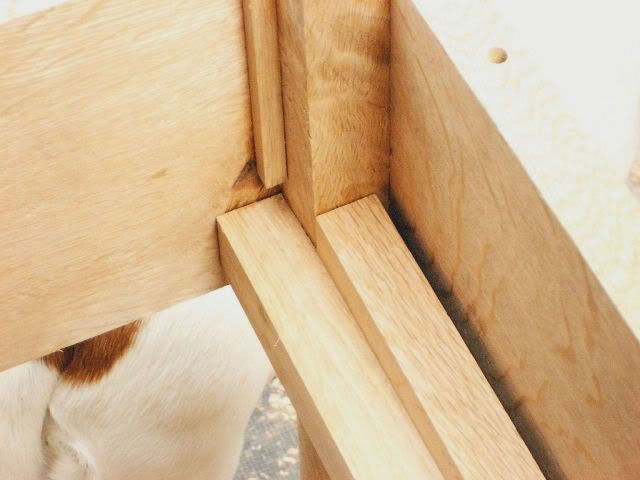
Sometimes the drawer guides were nailed with a single hand cut nail at each end for security. I will do this once I gat my gas bottle refilled. I didn't notice the dog's bum in the frame until I uploaded the pictures, but at least her tail's down!
This morning I aligned the table top with the frame and drilled the holes for the pegs that attach the top to the table (around 5°) in line with the rail. The pegs achieve imense grip on their own, though the slight inclination virtually guarantees the table top will never lift off. If the pegs are inclined, then the angle is alternated with each peg.
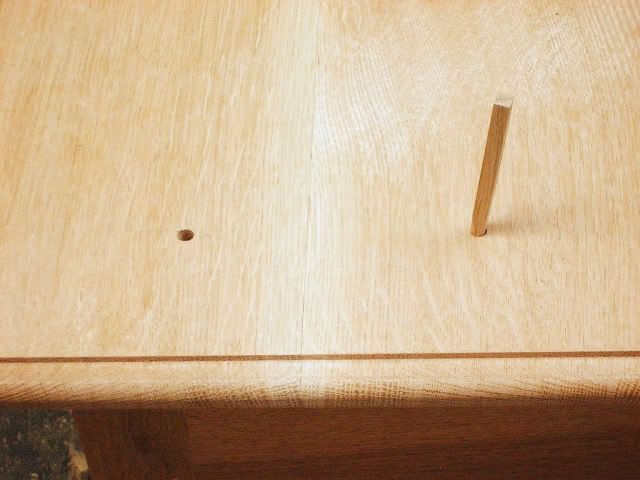
The pegs are accurately sized to the holes, but just the material in the corners of the pegs make them quite stubborn to drive home. They can sometimes stop short of their desired depth due to friction, so I usually stick the pointed end of each peg into my mouth to wet it immediately before hammering it in.
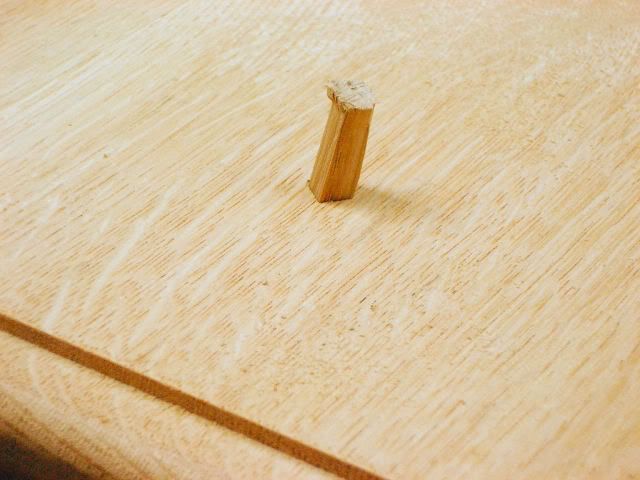
This peg, though wet, still hung up, but there's sufficient length extending into the rail to be of little concern. You may notice that this peg has made the round hole perfectly square. The peg is made from heart wood, but the top is predominantly immature wood and therefore the harder peg has dictated the shape of the hole.
By comparrison, the same heartwood pegs that were used to draw-bore the legs to the rails were no match for the extremely dense Brown Oak of the legs and the resultant shape of the pegs are virtually round where they protrude.
An aside: After college, my first workshop was shared with another collegian who once restored a c.1680 heavy Oak Charles II table. The top necessitated removal for some reason and I recall this chap, with the table laying on its side, belting the living suitcase out of the underside of the inch-thick top with a padded sledge hammer in an effort to remove it from the frame. He eventually tormented it sufficiently to be able to slide a hacksaw blade between the top and the frame and sever the reluctant pegs.
I lightly planed the drawer runners to make the drawer slide nicely yet ensure the drawer front doesn't catch on the apron rail, nor rub on the table top. Later I will trim the pegs and finish the top and thumbnail moulding. After that, it's onto staining and finishing..
I know you believe you understand what you think I wrote, but I'm not sure you realize that what you just read is not what I meant.
Regards, Woodwould.
-
4th April 2009, 03:26 PM #33
Be inspired. Be creative. Be bold.
- Join Date
- Apr 2001
- Location
- Perth
- Posts
- 10,826
Hi Woodwould
This is wonderful work - both the cabinetry and the story. I am always entranced by such stuff. Your work is wonderful. Keep it coming!
Regards from Perth
DerekVisit www.inthewoodshop.com for tutorials on constructing handtools, handtool reviews, and my trials and tribulations with furniture builds.
-
4th April 2009, 04:25 PM #34
What... you mean it's not 1792?
- Join Date
- Oct 2006
- Location
- Melbourne
- Posts
- 5,271
Thanks Derek - kind words indeed.
.
I know you believe you understand what you think I wrote, but I'm not sure you realize that what you just read is not what I meant.
Regards, Woodwould.
-
4th April 2009, 07:53 PM #35
SENIOR MEMBER
- Join Date
- Apr 2003
- Location
- Tolmie - Victoria
- Age
- 68
- Posts
- 4,010
WW,
Do the pegs allow the top to expand and contract adequately?- Wood Borer
-
4th April 2009, 10:50 PM #36
What... you mean it's not 1792?
- Join Date
- Oct 2006
- Location
- Melbourne
- Posts
- 5,271
Generally, they do. The tops of some pieces of pegged furniture exhibit splits and joints that have come apart, but they're usually ones well in excess of three hundred years old, it's hardly surprising - and one never knows what they've been through in that time. Houses then weren't sealed like they are nowadays. There were openings in the walls without glass for a start and the interiors of houses were just as damp as the exteriors, so low moisture content of timber and shrinkage weren't great concerns. Originally Posted by Wood Borer

There are plenty of pegged tops that survive perfectly intact due to the timber slowly tempering. Tops that were nailed, originally, or subsequently, often fail because nails are unforgiving. Wooden pegs come and go along with the top as humidity and heat vary and are therefore less likely to cause splitting due to shrinkage. The greatest danger to furniture these days is the modern, hermetically sealed house with central heating and large sun-facing windows.
I wouldn't be surprised or disapointed if one of the joints of my table doesn't open a little bit (it's traveling to the UK to a totally different climate). Bi-anual applications of 'antique wax' blends any imperfections and creates highlights, shadows and patina. It's all par for the course with furniture of this period and is what gives it such great character..
I know you believe you understand what you think I wrote, but I'm not sure you realize that what you just read is not what I meant.
Regards, Woodwould.
-
4th April 2009, 11:47 PM #37
GOLD MEMBER
- Join Date
- Mar 2005
- Location
- In the shed, Melbourne
- Age
- 52
- Posts
- 6,883
Only just found this thread now and am going to thoroughly enjoy following your progress.
-
6th April 2009, 09:14 AM #38
SENIOR MEMBER
- Join Date
- Aug 2003
- Location
- Pambula
- Age
- 58
- Posts
- 12,779
Is that drawer runner a glued-in strip of hardwood?
"I don't practice what I preach because I'm not the kind of person I'm preaching to."
-
6th April 2009, 10:17 AM #39
What... you mean it's not 1792?
- Join Date
- Oct 2006
- Location
- Melbourne
- Posts
- 5,271
Yes, they're strips of the immature Oak. The idea is that if/when they wear, you just 'ping' them off, glue in new ones and plane them for a nice sliding fit again. The guides are made of heartwood and so don't wear at nearly the same rate as the runners, thus they seldom require replacing. Originally Posted by silentC
Having said that, I've probably only had to replace drawer runners on about half or less of the antique pieces I've restored from 'this' period. They last pretty well, especially in tables like this whose drawers only see occasional use and don't carry heavy contents.
Chests of drawers that are in constant daily use and contain heavy clothing are the usual candidates for runner replacement.
Later pine runners, guides and drawer linings are very quick to wear..
I know you believe you understand what you think I wrote, but I'm not sure you realize that what you just read is not what I meant.
Regards, Woodwould.
-
6th April 2009, 10:26 AM #40
SENIOR MEMBER
- Join Date
- Aug 2003
- Location
- Pambula
- Age
- 58
- Posts
- 12,779
OK, nice idea. I suppose it also makes it easy to have a bit of clearance at the front so that the back of the drawer front doesn't collect the apron. I should do that with the drawers I've just finished. The sides are from Victorian ash, which is fairly soft. I'm sick of the sight of the thing though and want it out of my shed
 "I don't practice what I preach because I'm not the kind of person I'm preaching to."
-
6th April 2009, 11:42 AM #41
 GOLD MEMBER
- Join Date
- Mar 2004
- Location
- Brisbane (western suburbs)
- Age
- 77
- Posts
- 12,133
On a very old (Aust.) cedar bookcase/chest that I repaired for a friend, the drawer runners were Hoop pine and very badly worn. I discovered the person who made it had anticipated this, & had fitted the runners by stub tenons into the back of the dividers, and the backs of the runners were screwed into a notch in a stile that had been incorporated into the carcase for the purpose. The mortices in the dividers were elongated, so it was a very simple matter to whip out the old & put in some new - there was a smidgin of glue at the front to keep the runner in place.
The drawers were also very badly worn (soft, thin cedar so what would you expect?). I notice WWs slips are good & wide - plenty of bearing surface - should never need repair! I would have added some slips to the drawers I repaired, but as it was a pretty significant piece of furniture, I thoght I better do the absolute minimum, so just straightened them & added some cedar to replace what had ben worn away. Someone else can 'discover' those easily-replaced runners in another 100 years...
Cheers,
Cheers,IW
-
6th April 2009, 11:51 AM #42
SENIOR MEMBER
- Join Date
- Aug 2003
- Location
- Pambula
- Age
- 58
- Posts
- 12,779
My runners can all be removed. I got the design from an old WW text book. The back end sits in a mortice in the leg or the centre stile of the back panel with a screw to hold it in place. The font has a stub tenon that locates in a mortice in the back of the rail.
"I don't practice what I preach because I'm not the kind of person I'm preaching to."
-
6th April 2009, 11:59 AM #43
GOLD MEMBER
- Join Date
- Mar 2004
- Location
- Brisbane (western suburbs)
- Age
- 77
- Posts
- 12,133
Good practice, Silent - someone will bless you in the future, too, I hope. I'm afraid I don't always make runners as easily removable myself, despite my experience with the above-mentioned repair. Sometimes the design just doesn't allow it, so instead I go with wide runners & extra pieces glued onto the drawer bottoms, to maximise bearing surface. The drawers I've seen that are really worn have always been super soft material and bearing surfaces only 12mm wide. On big, deep drawers that are going to be loaded with stuff! Originally Posted by silentC
Cheers,IW
-
6th April 2009, 12:09 PM #44
zelk
- Join Date
- May 2006
- Location
- sydney
- Posts
- 694
Hi WW,
I only discovered your thread, I find the theory reasoning for the methods/techniques used, very interesting. Your quality of work is admirable and makes people enthusiastic about woodwork.
I am curious as to how and if you are going to fix that leg. Quite frankly, I dislike the idea of cutting and rotating the foot. I would like to remind you of something you said in one of my threads https://www.woodworkforums.com/showpo...postcount=74:D.
As the leg is asymmetrically turned, you have no choice but to either remake or rotate the leg. Plugging the resultant mortise holes, so it's not visible, could be fun and challenging. As the repair is on the side of the table, it will be less visible than that misaligned leg.
regards,
Zelk
-
6th April 2009, 12:40 PM #45
What... you mean it's not 1792?
- Join Date
- Oct 2006
- Location
- Melbourne
- Posts
- 5,271
The eighteenth century was known as the Golden Age of Furniture for good reason. Originally Posted by IanW
This will probably put the cat amongst the pigeons, but furniture design and manufacture went into serious decline from around 1820 and primarily for that reason, and until quite recently, the cut-off date for antiques allowed entry into antiques fairs was 1820 (even though items are generally regarded as antique if one hundred years old or older.
The big blousy Victorian chests you describe Ian were so poorly made. They were the Ikea and Freedom of their day. Veneers went from being sound, thin boards and practical alternatives to solid wood, to virtually transparent films. The reason was two-fold; the Victorians prided themselves in their ingenuity, inventiveness and productivity and making tissue-thin veneer was a revolutionary coup for the machine-cut veneer manufacturers. Plus they could obviously extract more sheets of veneer from a given log when it was cut so thinly.
Incidentally, one of the largest and most productive veneer mills at the time was situated in Collins Street in Melbourne. They sold run-of-the-mill and exotic veneers to the rest of the world. Actually, Australian Red Cedar was exported around the world at that time too, but the English cabinetmakers only thought it fit for linings rather than show wood as used here for chests of drawers and other furniture.
Victorian furniture is holding its own alright nowadays because it's still relatively affordable and it fills a gap in the demand for "old furniture", but before I left the UK in 1992, it was very much considered the poor cousin and was looked down upon the same as if it were post War utility furniture.
As you discovered Ian, the quality of construction of Victorian case furniture was somewhat lacking and the choice of materials was, in most parts, seriously flawed..
I know you believe you understand what you think I wrote, but I'm not sure you realize that what you just read is not what I meant.
Regards, Woodwould.

 Reply With Quote


Similar Threads
-
Round side table
By Tex B in forum WOODWORK PICSReplies: 7Last Post: 19th August 2008, 06:50 PM -
Side table
By Trace in forum WOODWORK PICSReplies: 2Last Post: 17th February 2006, 11:50 AM -
Lounge Side Table
By growl in forum WOODWORK PICSReplies: 23Last Post: 24th August 2005, 06:18 PM -
Side table
By Gumby in forum WOODWORK PICSReplies: 17Last Post: 15th August 2005, 08:21 PM -
Blackwood Side Table
By rhizome in forum WOODWORK PICSReplies: 12Last Post: 30th March 2005, 04:43 PM
