

 Thanks: 0
 Likes: 0
 Needs Pictures: 0
 Picture(s) thanks: 0
Results 1 to 15 of 79
Thread: An Oak side table.
-
9th March 2009, 02:48 PM #1
 What... you mean it's not 1792?


- Join Date
- Oct 2006
- Location
- Melbourne
- Posts
- 5,271
 An Oak side table.
This table is one of the reasons I decided to take up my tools again; there are a great many pieces of furniture that I wanted to make and never got around to when I was fit, able and had a fully equipped workshop. The table is to be a present for one of my children who has a milestone birthday approaching soon and my children are all old enough now to appreciate good furniture and not give it away when they move house!
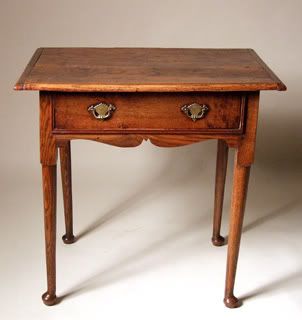
This original table c.1740 (above) is typical of a form commonly made in the early to mid 18th century. The lower portions of the legs are round and tapered, terminating in what are known as 'pad feet'. Together the tapered legs and pad feet are sometimes referred to as 'club legs'.
There is a single long drawer in the front of the table above a shaped apron. The perimeter moulding on the drawer may be a later addition, but at any rate, I will not be copying it. I'm undecided about incorporating the narrow cleated ends on the table top as by this date, they were not archetypal.
The frame is usually flush with the legs at this date and the rails are secured with square pegs using the draw-boring technique whereby the peg holes in the tennons are off-set towards the shoulders so as the pegs are driven into the legs, they strain the shoulders of the tennons ever tighter into the faces of the mortises. The square ends of the pegs bite into the legs, deforming both pegs and legs, which affords unparalleled grip and prevents the pegs from working loose.
Oak was the timber used for the best furniture in this period, although in less fashionable towns and rural centres, any of the staple English furniture timbers (Ash, Elm, Walnut – and to a lesser extent, Cherry, Pear and other fruitwoods) were employed.
I sourced some English Oak locally and after planing it, the stuff for the legs turned out to be the loveliest Brown Oak and it all exhibits wonderful medullary rays.
I am normally a metric man, but when making period furniture, I revert to the old imperial system of measurement because small metric measurements don't quite cut it. For instance, a 6mm astragal moulding does not look correct; a trained eye can differentiate between 1/4" (6.4mm) and 6mm. Alright, 6.5mm is close, but when the width of all my chisels are in fractions of inches, it seems pointless mixing the two systems.
Some fine cabinetmakers may raise an eyebrow at my selection of timber grade and cabinet making skills. Until just prior to the industrial revolution, sawn timber was very hard won (and even in rural areas well into the 19th century), as anyone who has seen pictures or film of a pit saw can imagine. Little was wasted and all but the highest paid city joyners could afford the 'prime cuts'. To 17th and early 18th century joyners, a sound knot was immaterial as far as the integrity of the piece of furniture was concerned, but nonetheless, when second grade timber was used, it was normally for backboards in pieces of furniture whose common place was against a wall. To that end, I purposely used a board with a knot in it for the backboard of my copy.
As to my skill as a cabinetmaker, I have won many a prize in competitions, but any appearance of sloppy joints in this copy is deliberate and calculated. As mentioned above, the rails of this table are flush with the legs, but timber is constantly on the move with the climate and 'flush' therefore becomes a relative term. I have made some of the tennons looser than others so as to allow the tension created by the draw bored pegs to slightly misalign the rails with the legs in a natural looking, shrunk-over-time manner. This creates very minor steps which will eventually show up as slight shadows when the table is finally 'antiqued'.
All surfaces will be hand planed, but not scraped or sanded as these were processes not yet in practice in the early 18th century. I've noticed that the freshly honed blade I used developed a miniscule nick within a few moments of planing the legs. This is good! If I need to resharpen the blade, then I will, but not specifically because of the nick.
I turned the legs using different off-sets at each end to achieve the blend between taper and pad foot.
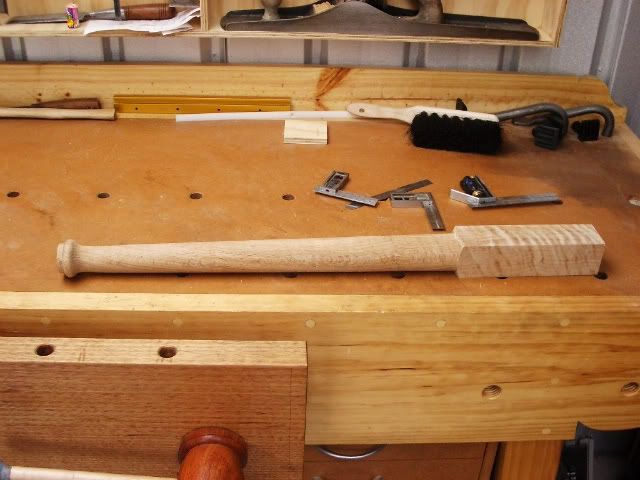
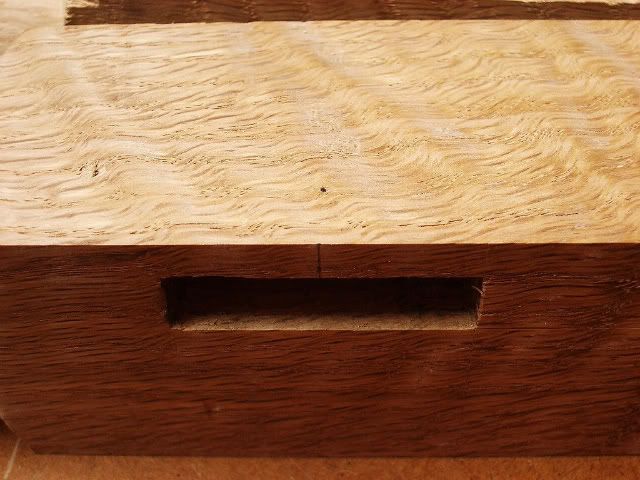
I recently set up a table and fence on my drill press for use in conjunction with a mortising attachment. However, the very first attempt at cutting the mortises in one of the Oak legs saw the plastic ring that adapts the attachment to the drill press, disintegrate and render the attachment useless! The mortising attachment will work again (once I have an aluminium or steel adaptor made for it), but its demise meant I had to chop the mortises by hand – and people here talk about Aussie hardwoods being tough! Even with a big old brute of a 'pig sticker', freshly honed to a steep 35 degrees, the Oak repelled virtually every blow and took chunks out of the meticulously prepared chisel edge. Anyway, a couple of days, and several packets of tablets later, the mortises were all done (I ended up drilling most of the waste out first) and I was ready for the next stage.
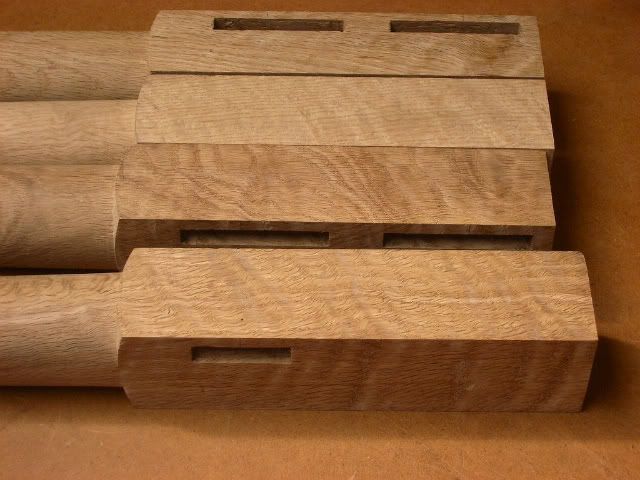
I marked and cut the tennons on the rails and fitted them to their respective mortises. Then I began setting out the hole centres for the pegs which hold the whole table together.
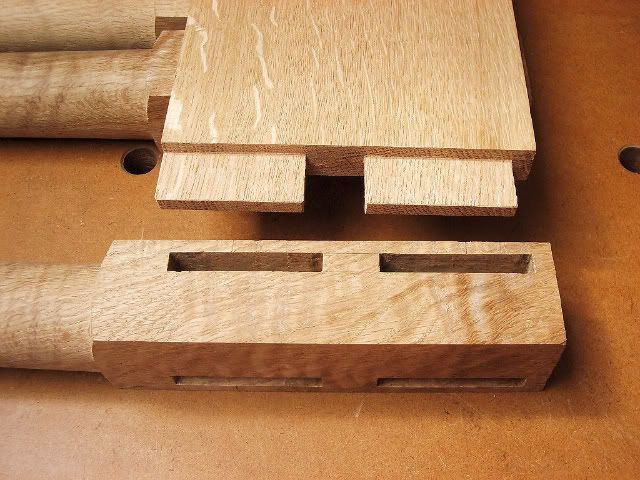
I marked the midway point of each mortise on the mortise faces of the legs and used a square set at 3/8" to transfer the hole centre marks to the adjacent outer faces of the legs.
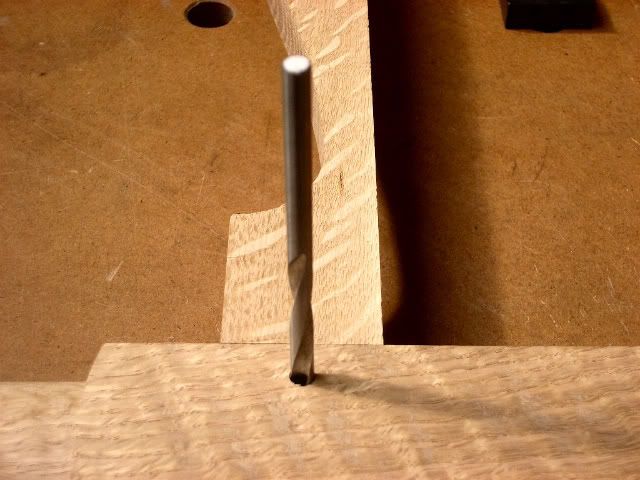
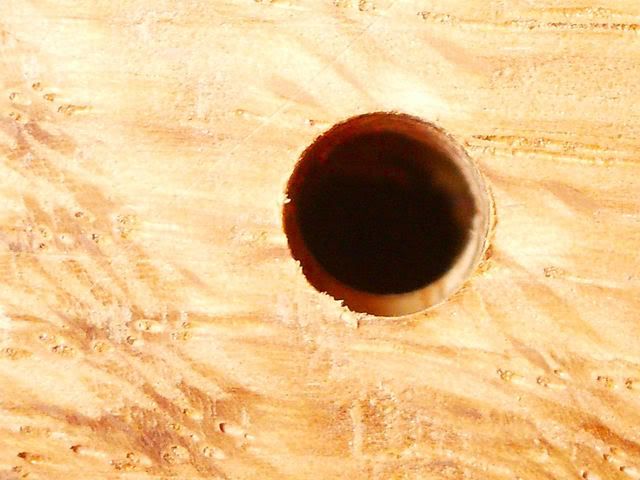
I carefully drilled the holes with a 1/4" brad point bit.
Each rail was then refitted to its individual mortise and the brad point drill bit was inserted into the peg holes and pressed into the tennons, thus leaving feint but visible marks.
The rails were withdrawn again and new centre marks were made with a sharp pencil 3/64" closer to the tennon shoulders.
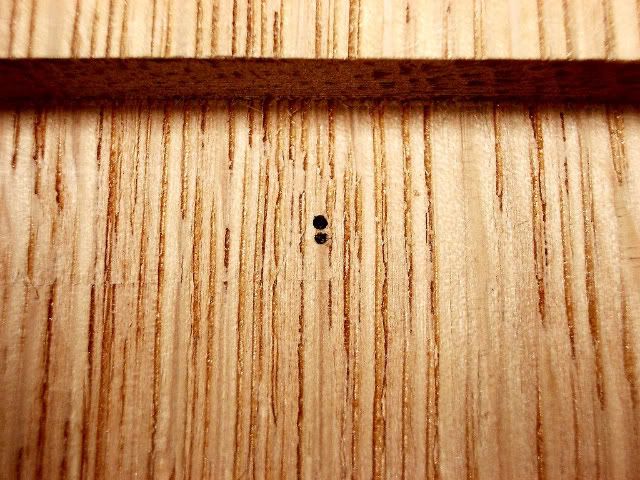
These new, off-set hole centres were then drilled through with the 1/4" bit.
I have read on the net of much larger off-sets being used in contemporary work, but I fail to see the purpose. It's quite a struggle for a tennon to be drawn even 3/64" and anything more (using components of these dimensions) will inevitably lead to damage. Either the peg will break when hammered home due to the unforgiving resistance caused by the large off-set, or the end of the tennon (on the outer side of the peg hole), will break free and the drawing effect will be lost – not to mention the sheared bit of tennon will probably jam against the bottom of the mortise, thwarting all efforts to drive the tennons home.
A tennon shoulder need only be drawn slightly to effect the tightening mechanism and it appears, both historically and through my own implementation, that 3/64" is the minimum amount the holes can be successfully off-set (in Oak at least) when drilling by hand – as would have been done several hundred years ago. Of course, with a drill press and modern tooling, much finer tolerances are possible, but that's not the objective, nor the point here..
I know you believe you understand what you think I wrote, but I'm not sure you realize that what you just read is not what I meant.
Regards, Woodwould.
-
9th March 2009 02:48 PM # ADSGoogle Adsense Advertisement
- Join Date
- Always
- Location
- Advertising world
- Posts
- Many
-
9th March 2009, 03:12 PM #2
Awaiting Email Confirmation
- Join Date
- Feb 2008
- Location
- Peakhurst
- Age
- 67
- Posts
- 1,173
Wouldwood,
Absolutly beautiful. One day I'll get there but in the mean time I can still look.
-
9th March 2009, 03:13 PM #3
What... you mean it's not 1792?
- Join Date
- Oct 2006
- Location
- Melbourne
- Posts
- 5,271
The pegs are riven from straight grained Oak, preferably heart wood.
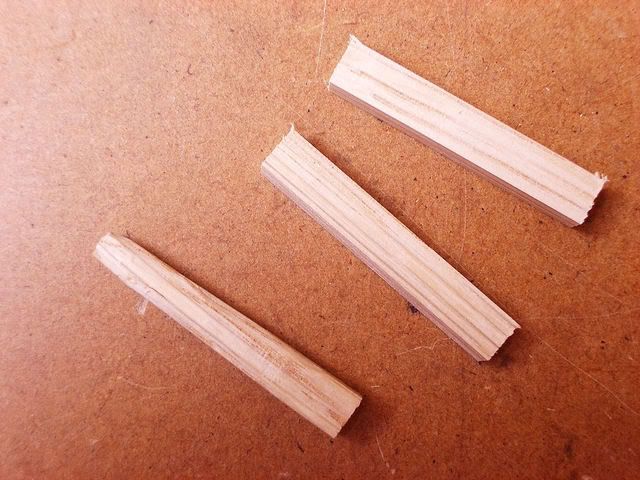
One end is pared to an octagon using a chisel and then a lead is chiselled on the end to allow the peg to engage the off-set hole in the tennon. Without this lead, the peg would snag on the edge of the tennon hole and damage would ensue.

I knocked the frame together this afternoon in the glorious sunshine and hammered in the pegs. The pegs compress and roughly conform to the roundness of the holes in the legs.
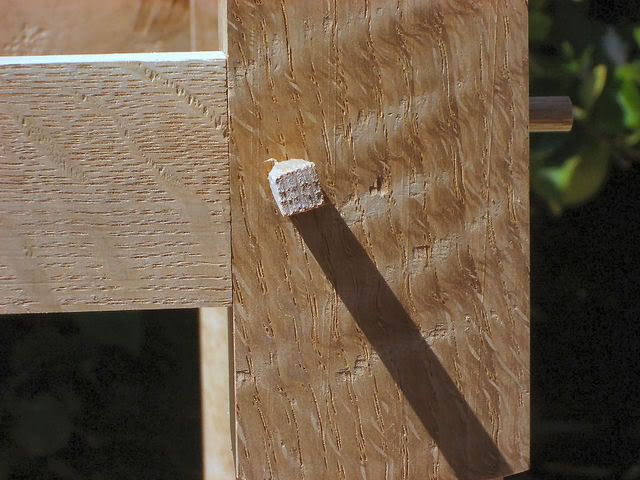
I sawed the excess off the pegs and that's the frame done.
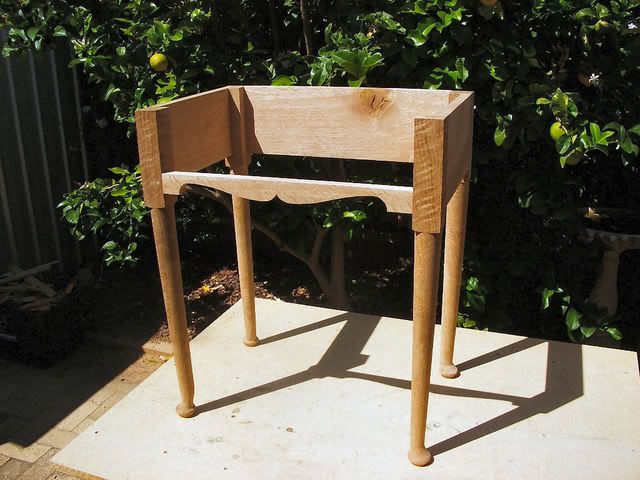
Can anyone spot the mistake? .
.
I know you believe you understand what you think I wrote, but I'm not sure you realize that what you just read is not what I meant.
Regards, Woodwould.
-
9th March 2009, 03:16 PM #4
GOLD MEMBER
- Join Date
- Mar 2004
- Location
- Brisbane (western suburbs)
- Age
- 77
- Posts
- 12,133
Nice WIP, WW. I read your discussion about the offset for draw-boring with great interest. I have tried it a few times over the years, but was never sure what offset to use. I always thought it might vary with the wood, but after reading your post & thinking about it, it would only be a very limited difference if any at all. Three 64ths is a pretty big distance, and I guess you are not implying that the shoulder would actually move that much into the leg? I would have thought that the accomodation as the pin is driven home would occur mostly as deformation of pin and drilled holes, pulling the shoulder up very tightly, but not crushing the fibres of the leg by 3/64"??
Anyway - you've piqued my interest - I need to find a project where drawboring would be appropriate & have a play.......
Cheers,IW
-
9th March 2009, 03:19 PM #5
GOLD MEMBER
- Join Date
- Mar 2004
- Location
- Brisbane (western suburbs)
- Age
- 77
- Posts
- 12,133
Have you rotated the back right leg 90 degrees? Originally Posted by Woodwould

 if you have................
At least disassembly should be a bit easier than a glued joint!IW
-
9th March 2009, 03:23 PM #6
SENIOR MEMBER
- Join Date
- Aug 2003
- Location
- Pambula
- Age
- 58
- Posts
- 12,779
I think I can but I'm not sayingCan anyone spot the mistake?
It's nice to see something off a lathe that isn't a pen Looks great. I wish I was able to turn up four items that all looked so similar.
"I don't practice what I preach because I'm not the kind of person I'm preaching to."
Looks great. I wish I was able to turn up four items that all looked so similar.
"I don't practice what I preach because I'm not the kind of person I'm preaching to."
-
9th March 2009, 03:32 PM #7
What... you mean it's not 1792?
- Join Date
- Oct 2006
- Location
- Melbourne
- Posts
- 5,271
Ian, if I were pegging Mahogany or Walnut, then I would use an off-set of 1/32" (but still use Oak pegs). As you say, the tennon shoulders can't possibly move 3/64" - there is a combination of compression of the rail's shoulder, the leg face, the peripheries of the two distinct holes and the snaking deformation of the peg as it navigates the off-set holes. The springy nature of wood acts like a Nylon washer under a bolt head, keeping the whole assembly loaded.
You're correct, the rear right leg is 90 degrees out of kilter! I've actually seen the same mistake made several times on antique country pieces. While it's no excuse, I may actually leave it! On the other hand, I may rectify it - I'll leave it until the finishing stage before I decide..
I know you believe you understand what you think I wrote, but I'm not sure you realize that what you just read is not what I meant.
Regards, Woodwould.
-
9th March 2009, 03:37 PM #8
GOLD MEMBER
- Join Date
- May 2004
- Location
- Epping.Vic
- Age
- 58
- Posts
- 1,094
WOW
 Woodwould fantastic WIP its looking really good. The pics are excellent.
Just wondering if you would be able to cut and rotate the bottom bit of the foot.Can anyone spot the mistake?Regards
Al .
You don't know, what you don't know, until you know it.
-
9th March 2009, 03:40 PM #9
GOLD MEMBER
- Join Date
- Mar 2004
- Location
- Brisbane (western suburbs)
- Age
- 77
- Posts
- 12,133
Bummer!! Wish I could say I have never done anything similar myself...... Originally Posted by Woodwould
And all the time you said to yourself, "Now just be careful & mark the faces to be morticed, then put them all together & check before picking up the chisel....."
That's why I like 4-square bench legs, or symmetrically-turned legs - they are always identical (though there is inevitably a blemish, somewhere, that one tries to hide by turning it inside, which somehow finds its way to the front of the front leg instead. )
)
Well, I have to say, it would just bug me too much to leave as-is.... Have you enough stock to make another leg, or would you have to plug one of the mortises??
Cheers,IW
-
9th March 2009, 03:48 PM #10
What... you mean it's not 1792?
- Join Date
- Oct 2006
- Location
- Melbourne
- Posts
- 5,271
Oops! You snuck your post in between mine and I missed it. Thanks for the kind words. You should give this a go; it's more carpentry than cabinetmaking and is simple and rewarding. Originally Posted by The Bleeder
Which reminds me -
Q. What are the (traditional) differences between a carpenter, a joyner, and a cabinetmaker?
A. Nails, dowels and dovetails!
Unfortunately joiners and carpenters have now merged trades and use nailguns. As for modern cabinetmakers, they too use nailguns and make kitchens out of chipboard and MDF..
I know you believe you understand what you think I wrote, but I'm not sure you realize that what you just read is not what I meant.
Regards, Woodwould.
-
9th March 2009, 03:54 PM #11
What... you mean it's not 1792?
- Join Date
- Oct 2006
- Location
- Melbourne
- Posts
- 5,271
Originally Posted by IanW
 Ha! I always mark the top of the legs FR (front right), FL (front left) etc. and I still cocked it up. I've noticed lately I've been making many stupid, simple mistakes in everything I do. I don't know whether it's down to medication or old age.
The 'bad' leg annoys me because I made a mistake, but it's tempered by my having seen the same mistake on antique furniture, so I'm still undecided. There's no more stock for legs, so that rules that option out..
I know you believe you understand what you think I wrote, but I'm not sure you realize that what you just read is not what I meant.
Regards, Woodwould.
-
9th March 2009, 03:56 PM #12
What... you mean it's not 1792?
- Join Date
- Oct 2006
- Location
- Melbourne
- Posts
- 5,271
Originally Posted by Al B
Thanks! Rotating the foot is one option I'm considering. It would be undetectable under all the gunge that the bottom of back legs typically exhibit on furniture of this era..
I know you believe you understand what you think I wrote, but I'm not sure you realize that what you just read is not what I meant.
Regards, Woodwould.
-
9th March 2009, 04:03 PM #13
GOLD MEMBER
- Join Date
- Mar 2004
- Location
- Brisbane (western suburbs)
- Age
- 77
- Posts
- 12,133
Hmm, I do something similar - put them together as they will be on the table & mark out a triangle on top. Sometimes, little gremlins come along in the night & deliberately change the marks. In your case, it would be leprechauns, of course. Originally Posted by Woodwould

Well, if you can't remake the leg, that probably settles it - I thought about rotating it & plugging the 'wrong' mortise after I wrote that, but it would be on the 'show' side. That would be like advertising to the world you had made a boo-boo. At least the way it is, you will have to point out the error to 90% of people, which gives you the oportunity to say you made it like that deliberately to be just like 'the original'. Originally Posted by Woodwould
It's good for the newbies here to see that even us older (mature?) woodies can make the occasional blunder.....
Cheers,IW
-
9th March 2009, 11:31 PM #14
 almost a woodworker
- Join Date
- Feb 2007
- Location
- blue mountains
- Posts
- 4,891
Woodwold,
I dont often chime in on you'r posts as I would not be able to offer anything. I just like to see your work. Keep it coming. Learning by looking.
Regards
John
-
10th March 2009, 12:01 AM #15
Senior Member
- Join Date
- Jun 2008
- Location
- Perth. WA
- Posts
- 377
I sometimes think that the greatest skill a woodworker has lies not in knowing how to make something, but in knowing how to fix it once he's buggered it up!
Nice work. Thanks for sharing.Pugwash.
Never criticise Australia Post. One day they might find out where you live.
www.clivequinn.com


 Reply With Quote


Similar Threads
-
Round side table
By Tex B in forum WOODWORK PICSReplies: 7Last Post: 19th August 2008, 06:50 PM -
Side table
By Trace in forum WOODWORK PICSReplies: 2Last Post: 17th February 2006, 11:50 AM -
Lounge Side Table
By growl in forum WOODWORK PICSReplies: 23Last Post: 24th August 2005, 06:18 PM -
Side table
By Gumby in forum WOODWORK PICSReplies: 17Last Post: 15th August 2005, 08:21 PM -
Blackwood Side Table
By rhizome in forum WOODWORK PICSReplies: 12Last Post: 30th March 2005, 04:43 PM
