

 Thanks: 0
 Likes:
  Needs Pictures: 0
 Picture(s) thanks: 0
Results 1 to 15 of 15
Thread: twisted table top
-
18th February 2013, 08:00 AM #1
 Intermediate Member


- Join Date
- Sep 2009
- Location
- Orange
- Posts
- 47
 twisted table top
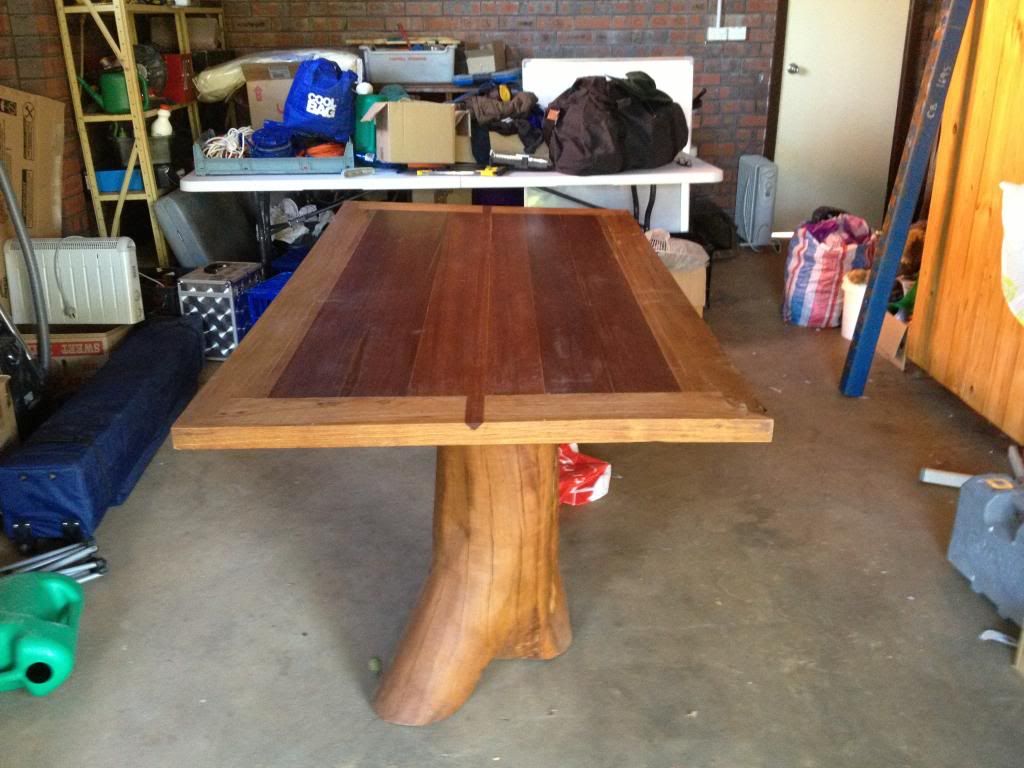
Hello all,
I have a table top that my father and I built a few years ago that is in need of some straightening. From what I have read here and elsewhere it seems we may have had too much clamping pressure when we made it. It has bee sitting on its edge in a shearing shed for the last year and a bit - so that may have made thins worse.. I have six lengths of box steel that I am considering using to squash it back into shape, but I thought I should find out what the done thing is first....
Here are some pics:

-
18th February 2013 08:00 AM # ADSGoogle Adsense Advertisement
- Join Date
- Always
- Location
- Advertising world
- Posts
- Many
-
18th February 2013, 10:50 AM #2
 Burnt Out Chip
- Join Date
- Feb 2009
- Location
- moonbi nsw Aus
- Age
- 69
- Posts
- 2,065
Good morning.
You seem to have done a nice job of joining your planks together to make your table. By the photos I think that you not only used too much clamping pressure but the actual pieces may have had a slight twist in them that has been exaggerated by as you added each piece. With a single leg you can't pull it into shape as you may be able to with 4 legs and perimeter frame.
What may be worth trying is to twist the top in the opposite direction and leave it there for say a month and see if it has gone back flat. It may work. Failing that you would have to disassemble the table top to components then remachine all surfaces and try again.Just do it!
Kind regards Rod
-
18th February 2013, 11:49 PM #3
GOLD MEMBER
- Join Date
- Aug 2009
- Location
- Armadale Perth WA
- Age
- 55
- Posts
- 4,524
Can the base be detached?
What about laying it on a flat surface (floor?) ... weighing it down with everything available ... and letting it flatten.
Paul
-
19th February 2013, 08:39 PM #4
Intermediate Member
- Join Date
- Sep 2009
- Location
- Orange
- Posts
- 47
I can't think of anything heavy enough... One idea I had was to bolt three lengths of box steel to the slab in the garage, lay the table on top then lay three more lengths of box steel on top. I would then need to find six clamps strong enough to pull the box steel together and the table top flat.
-
21st February 2013, 10:47 PM #5
Mildly Moderate
- Join Date
- Nov 2007
- Location
- Albury Well Just Outside
- Posts
- 13,315
I have been watching this as I like to see what you come up with. Personally I have no idea other then remake the top.
-
22nd February 2013, 12:30 AM #6
GOLD MEMBER
- Join Date
- Aug 2009
- Location
- Armadale Perth WA
- Age
- 55
- Posts
- 4,524
Extreme solution ... a couple sheets of plywood then park one wheel of the car on one corner.

Paul
-
22nd February 2013, 09:14 AM #7
 GOLD MEMBER
- Join Date
- Aug 2011
- Location
- bilpin
- Posts
- 3,559
Ah, the good old shearing shed blues.
In this case it may be an idea to use the shearing shed to solve the problem.
Assuming the shed floor is slatted, you could stand the table on the slatted floor, set a prop under each of the lower corners and a sash clamp to each of the high corners with the end of the clamp going through the slats to a joist.
Wind the clamps up a bit more each day until the table comes back into line. If table tends to spring back when clamps are released, you may have to wind the clamps on so the top goes a bit past level to compensate for spring back.
A bit of steam may help to speed the process up. An electric jug or urn under the table would produce enough steam. Hang a sheet over the table to help retain the moisture.
If all fails, you will have the best looking classing table in the district.
-
4th March 2013, 03:54 PM #8
Intermediate Member
- Join Date
- Sep 2009
- Location
- Orange
- Posts
- 47
table.jpg
I've had minimal time to experiment so I have just weighted down the corners with its own legs and some box steel. I'm going to have to put something on the other corners as they have lifted a few mm in the last day or so. I'm thinking I might make some weights by pouring quickset into some plastic lined milk crates.
How long should I leave it like this for?
-
4th March 2013, 04:02 PM #9
GOLD MEMBER
- Join Date
- Mar 2008
- Location
- Townsville, Nth Qld
- Posts
- 4,236
Have you thought of using pairs of steel cauls across the table, one under, one over, and clamp two together with clamps either side of the table. You would need at least 6 pairs of cauls for the length of that table.
regards,
Dengy
-
4th March 2013, 04:06 PM #10
Intermediate Member
- Join Date
- Sep 2009
- Location
- Orange
- Posts
- 47
I had thought of using the box steel pictured to do just that by bolt three to the floor and then clamping the other three on top. Problem is both the steel and the slab aren't mine to go drilling into.. Originally Posted by Dengue

-
19th May 2013, 03:41 PM #11
Intermediate Member
- Join Date
- Sep 2009
- Location
- Orange
- Posts
- 47
the results
So after a few months of squashing, this is the result:
Table Photos by deesalie | Photobucket
As you can see the twist have been greatly reduced. You can also see that the flattening out has opened up a fair few cracks. Being severely colour blind I would like to ask for some help in determining the correct colour filler for each crack.
I'm assuming the best approach would be to completely remove the old filler first? This was home made filler using saw dust from the adjacent timbers. There is only one place that this actually got close to the correct colour. This time I'd like to get it right.
So who can suggest a make and colour of filler for each crack?
Thanks!
-
19th May 2013, 06:23 PM #12
Dehydrated Hydrographer
- Join Date
- Jun 1999
- Location
- Westleigh, Sydney
- Age
- 77
- Posts
- 9,550
It's very hard to get an exact colour match. Sometimes it's better to use a darker colour and make a feature of it.
If you do want to match it, I'd try various proportions of venetian red, ochre and burnt umber powder tints in epoxy or casting resin. Do a bit of experimenting first and keep a record, so you can re-create it.
If I were doing it, I wouldn't try to match it, I'd use mainly burnt umber with the slightest touch of ven. red, to make it look like a gum vein.
And yes, remove the old filler first.
Edit: I seem to remember that you can use artists oil paints instead of powder tints, but I've never tried it. Probably cheaper to buy a couple of tubes than powder tints that will last you and your grandkids lifetimes.
-
20th May 2013, 08:01 PM #13
Intermediate Member
- Join Date
- Sep 2009
- Location
- Orange
- Posts
- 47
Thanks Alex. With my colour blindness any attempt at mixing colours will end badly. I bought a couple of different colours of Timer Mate. The Walnut is almost a perfect match for the darker boards, while the others are a bit iffy. I might end up with a dedicated shelf for the stuff.
Don't know if its a good filler but they certainly provide a good range of colours.
If my eyes worked properly then I would give the epoxy trick a crack.
-
20th May 2013, 11:58 PM #14
Retired
- Join Date
- May 2012
- Location
- Canberra
- Posts
- 1,820
Two solutions I can think of.
First, with the twist, steam it and steam it hard. Build caulks and clamp it down hard. Build a tent with painters throwdown plastic (thick stuff) and seal it up. Go to Kmart and get one of their $10 electric roasting pans. Fill it up and steam it. Keep the water up and steam it and steam it. Give it six to ten hours. Clamp it hard.
I did this with a table about a quarter the size with a hideous bend and it dekinked it.
As for the gaps, easy. Bunnings sells cheap ROS's with built on dust collectors. Sand the underside, collect the dust, add wood glue... Presto, instant match filler.
-
21st May 2013, 12:06 AM #15
Intermediate Member
- Join Date
- Sep 2009
- Location
- Orange
- Posts
- 47
I'm actually pretty happy with thew amount of twist I've already to get out. When you sit at the table you really cant notice, only when you look along the length from table height.
When I originally built the table I did the sawdust & wood glue trick, but found that when dries the colour completely changed. Its going to take long enough to get the old filler out, so I'm just wanting to get this table to a tolerable state so my family has somewhere to eat.

 Reply With Quote


Similar Threads
-
Twisted box
By AlexS in forum BOX MAKINGReplies: 9Last Post: 25th December 2012, 08:06 AM -
A bit twisted
By gawdelpus in forum WOODTURNING - PEN TURNINGReplies: 7Last Post: 30th January 2010, 11:15 PM -
Twisted Table top Old (Recycled) Teak
By Henkpas in forum WOODWORK - GENERALReplies: 5Last Post: 7th July 2008, 12:06 AM -
Twisted saw
By Frank&Earnest in forum BANDSAWSReplies: 18Last Post: 14th May 2008, 12:24 PM -
bitter and twisted
By Gra in forum WOODIES JOKESReplies: 4Last Post: 4th February 2006, 12:37 AM
