

 Thanks: 0
 Likes: 0
 Needs Pictures: 0
 Picture(s) thanks: 0
Results 1 to 14 of 14
-
21st March 2013, 10:07 PM #1
 Novice


- Join Date
- Oct 2010
- Location
- Sydney, Australia
- Posts
- 23
 understanding wood requirements for plans
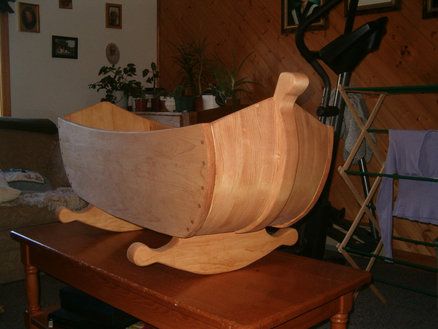
hi im new to working with wood based on plans and I really want to make a cradle as a surprise for my wife for our first baby...
I'm going to be building a noah's ark cradle / toybox I bought the instructions from a magazine in the states. I'm based in sydney..
I'll convert the inches to mm etc but I was wondering what they meant when they mentioned a pine product like so below:
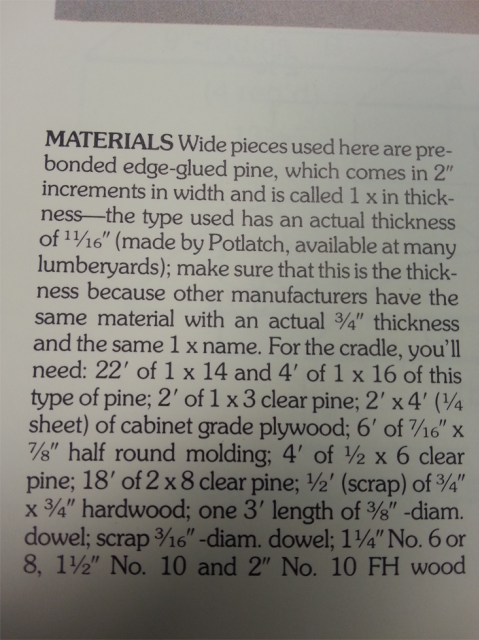
Wide pieces used here are pre-bonded edge glued pine, which comes in 2" increments in width and is called 1 x in thickness - the type used has an actual thickness of 11/16"
For the cradle, you'll need: 22' of 1 x 14 and 4' of 1 x 16
so what is confusing me is "You'll need 22' of 1 x 14 and 4' of 1 x 16"
i know that's saying i need 22 feet but do you happen to know what the wording 1 x 14 means sorry?
this is one someone made in the states a while back
thanks so much for your help
tom
-
21st March 2013 10:07 PM # ADSGoogle Adsense Advertisement
- Join Date
- Always
- Location
- Advertising world
- Posts
- Many
-
21st March 2013, 10:32 PM #2
SENIOR MEMBER
- Join Date
- Jan 2010
- Location
- Range View, Australia
- Posts
- 656
After dressing, gluing and sanding 14 x 1 works out 14 x 3/4 or around 350mm x 20mm.
Cheers, Bill
-
21st March 2013, 10:40 PM #3
Novice
- Join Date
- Oct 2010
- Location
- Sydney, Australia
- Posts
- 23
sorry but when it says I need 22' of 1x14 is the 1x referring to the name of the product or do.i neee 22 feet in length of a 1 inch by 14 inch length of pine?
if you look at the photo bucket photo in the first few scentences of the page you'll see what I mean
the confusion is coming from the fact that in their opening paragraph of materials they mention a product is named 1 x? so im just confused as to what they're talking about as we dont have that product range in australia that I know of
thanks again
tom
-
21st March 2013, 10:42 PM #4
 Burnt Out Chip
- Join Date
- Feb 2009
- Location
- moonbi nsw Aus
- Age
- 69
- Posts
- 2,065
The Yanks terminology with timber sizing is; thickness X width ie 2" X 4" .where here in Australia we say; 4" X 2".
Your plans are calling for 1 X 14 or 14" X 1" Fourteen inches wide X one inch thick.
Quote Wide pieces used here are pre-bonded edge glued pine, which comes in 2" increments in width and is called 1 x in thickness - the type used has an actual thickness of 11/16"
I noticed in Bunnos that they sell wide boards of Radiata that are made up from strips 1½" wide and at least ¾" thick. Or to be metriced 38mm X 19mm.
You may have to add your own timber to make it wider because I think it was only 300mm wide.
You are also going to have a frustrating time converting because we won't have the same sizing as theYanks doJust do it!
Kind regards Rod
-
21st March 2013, 10:47 PM #5
Novice
- Join Date
- Oct 2010
- Location
- Sydney, Australia
- Posts
- 23
cheers chambezio!!
so it says I need 22' of 1 x 14 so thats over 6 meters of pine that's 1 inch thick by 14" wide is that right?
seems like alot of wood!
-
21st March 2013, 11:01 PM #6
The Laird
- Join Date
- Jan 2007
- Location
- Katoomba NSW
- Posts
- 4,774
Something isn't right there.
As well as 22' of 1x14 you need 4' of 1x16 and 18' of 2x8 and assorted short pieces .
Are you sure that is the correct materials list?
-
21st March 2013, 11:02 PM #7
Burnt Out Chip
- Join Date
- Feb 2009
- Location
- moonbi nsw Aus
- Age
- 69
- Posts
- 2,065
Yes it says that but in actuality have a good look at the cutting list and you will find that the list might say 3 pieces of 3foot long, 2 pieces of 2 foot long etc. All they are saying is that total is 20'/6mts. You would find it hard to get wide boards 6metres long.
I mentioned you will have frustrations
Just do it!
Kind regards Rod
-
21st March 2013, 11:18 PM #8
Novice
- Join Date
- Oct 2010
- Location
- Sydney, Australia
- Posts
- 23
Here's the whole first page. . I couldn't really work it out.. any help would be awesome thanks so much for the help so far
!!
!!Last edited by DJs Timber; 22nd March 2013 at 07:45 AM. Reason: Remove copyright images
-
21st March 2013, 11:57 PM #9
SENIOR MEMBER
- Join Date
- Dec 2005
- Location
- Canberra
- Posts
- 3,260
My suggestion would be:
1) Take US bill of materials; throw it away and never speak of it again.
2) Look at photos/plans; work out approximate metric sizings (ie 'a cot is about 600mm long and 400mm wide') and scribble them down (check the actual size against the intended mattress and build to suit that...you don't want too much of a gap)
3) Buy wood to suit and build.
I'd say the legs and front/back carved/curved bits could all be made out of hand selected lengths of pine framing (find the nice clear bits) or head into the DAR pine if you want to flash a little more cash, and the sides and bottom made from pine shelving (I think that's close to 19mm thick).
I'd say you'd need roughly 3-6 meters of shelving (depends on how high/wide the cot is) and maybe 6-8 meters of frame/DAR.
-
22nd March 2013, 08:05 AM #10
Dances with splinters
- Join Date
- Jul 2005
- Location
- Oberon, NSW
- Age
- 63
- Posts
- 13,360
Yeah, that's not the clearest cutting list I've ever seen.
The US seems to rate their sizes according to what the timber would be if "undressed." ie. before they plane it down to final dimensions. So, 1 x 14 = 1" x 14" undressed or something close to 3/4" x 13 3/4" when dressed.
Confusing, innit?
When converting plans I normally take the WxH dimensions as given in inches, eg. 1x14 = 1" x 14", convert them to metric and then deduct 7-8mm (1/4") to get my final dimensions.
Don't get too anal about sourcing or machining wood 'accurate to the mm.' If you need 3/4" thick then a stock piece at 18-19mm straight off the shelf will do just fine. Need 4" (13 3/4") wide? Then 350mm wide off the shelf is close enough. In reality, buying a pair of 180mm wide and joining them is often the better practice... it's cheaper, more easily sourced and gives you an extra cm of wiggle room.
It's always a good idea to buy a bit more than the plans call for just in case you screw up a piece, you discover an internal fault in a piece, or you just want some scrap to test your finishes on.
- Andy Mc
-
22nd March 2013, 08:48 AM #11
Novice
- Join Date
- Oct 2010
- Location
- Sydney, Australia
- Posts
- 23

thanks guys! sorry this is my first project that isn't a box..
thanks so much for your help makes me wish id done more woodwork at school! and there aren't many places except for mens sheds to get a mentor of some kind community colleges around my area dont do woodwork!
-
22nd March 2013, 09:59 AM #12
Novice
- Join Date
- Oct 2010
- Location
- Sydney, Australia
- Posts
- 23
I was re-reading those plans again last night and thinking about cutting of those curves for the front and back.. It says to cut each of the rounded pieces from 2 x 8 so would i measure the chord length and then use a beam compass or something with a radius set to 9" on another guide bit of wood or something and find where it intersects both ends of the chord
plan.jpg
plan-for-compass.jpg
would that be a good approach or would you happen to have any other suggestions?
-
22nd March 2013, 11:30 AM #13
Senior Member
- Join Date
- Jan 2008
- Location
- Vevey, Switzerland
- Posts
- 407
I'd cut out a semicircle, or a quadrant would do, from cardboard, fit it to the chord lengths and trace round it. Originally Posted by thomen
 Cheers, Glen
-
22nd March 2013, 11:46 AM #14
Novice
- Join Date
- Oct 2010
- Location
- Sydney, Australia
- Posts
- 23
sounds perfect I'll do that!
Thank you
Tom

 Reply With Quote


Similar Threads
-
Understanding Building Plans
By Mini in forum WOODWORK - GENERALReplies: 2Last Post: 2nd October 2012, 08:30 PM -
New Jointer - Understanding
By Fesmac in forum HAND TOOLS - POWEREDReplies: 9Last Post: 23rd February 2012, 10:41 PM -
Need help understanding this recipe ...please.
By JDarvall in forum FINISHINGReplies: 22Last Post: 7th March 2010, 06:06 AM -
Understanding Engineers
By chrisb691 in forum WOODIES JOKESReplies: 12Last Post: 10th November 2007, 08:47 AM -
"Understanding Wood Finishing" by Bob Flexner
By TassieKiwi in forum FINISHINGReplies: 3Last Post: 28th July 2004, 05:17 PM
