

 Thanks: 0
 Likes: 0
 Needs Pictures: 0
 Picture(s) thanks: 0
Results 1 to 15 of 27
Thread: Kanna - Adventures in dai making
-
2nd April 2012, 06:01 PM #1
 planing away


- Join Date
- Nov 2011
- Location
- Vancouver
- Posts
- 26
 Kanna - Adventures in dai making
My journey into the world of Japanese planes started with the restoration of a hira kanna. Tool in hand, I quickly learned how a kanna rewards its user's attention to detail with outstanding performance.
Eager to try my hand at dai making, I decided to create a jointer dai for a 68mm wide kanna blade I had. It was an exciting project to take on, given the many unknowns there were to work out along the way.
The jointer style kanna is termed rokudai or nagadai. I chose an old piece of hard maple to mill for the dai. Although I have never seen a dai made from maple (white oak and red oak are typically used,) I figured that maple has a good enough density and wear resistance to warrant a try.
Dai making is something of a labour intensive process. Hollowing out the blade cavity, squaring the sides, and conditioning the profile of the sole all take time to get right, especially for a beginner like me.
The finished dai measures 405mm long by 86mm wide by 37mm high. The sole length used for jointing usually ranges from 350mm to 600mm. For comparison, a Stanley No. 7 clocks in at 560mm.
Attachment 203760
The rokudai has more material to right of the blade, because that side is a bearing surface when used for edge planing. The right side also has a shallower sole bevel, which ensures good purchase on the planing beam.
Attachment 203762
Attachment 203755
Toshio Odate planes an edge in his workshop, from The Workshop Book
Attachment 203763
To condition the sole, I started by flattening it with 150 grit sandpaper on top of a 12" granite tile. I bought the tile at a home store for the princely sum of $5, and it makes a fine reference surface. To form the hollows I went with 220 grit sandpaper, taping the landings so as not to accidentally remove material there. There is some conflicting advice on the web regarding sole profiles, but Chris Hall's series of five blog posts "Smile and Wave" helped weed out the good from the bad from the ugly. I chose a double wave profile, which calls for four landings or touch points.
Attachment 203758
Attachment 203759
Every question that came up throughout was answered in Toshio Odate's book, which covers the dai making process on pages 96-98.
Here are some other links I found helpful in the build process: An article by Toshio Odate on tuning, Japan Woodworker tips on tuning, a blog post by Mafe on tuning, Japan Blade's tuning tips, a Woodtreks video on kanna, a dai seminar writeup, and a dai seminar photo gallery.
Tool Specs: Hard maple, 405x86x37mm. Blade angle 40deg, blade width 68mm. 1265g with blade. Infeed length 247mm.
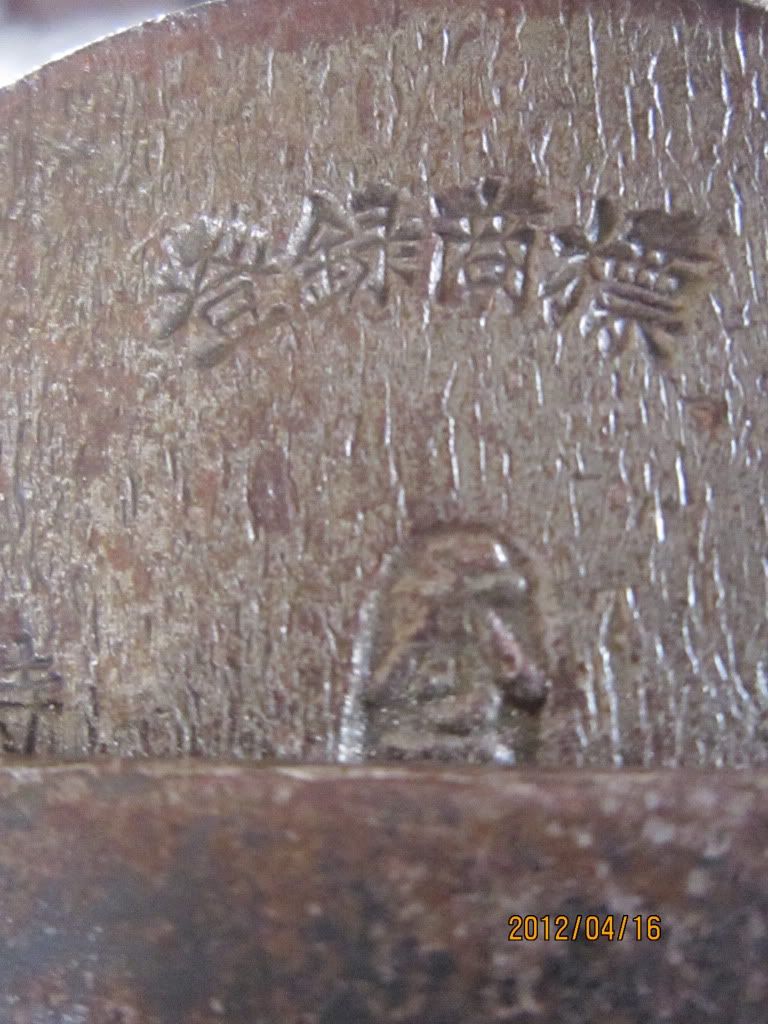
The only thing I know about the blade is that it is stamped Muneshige, so I'd be interested if anyone can tell me more about it.
Attachment 203757
Attachment 203756
Attachment 203761
For insight into an expert's approach to dai making, there are many photos on the web and even video of Isao Inomoto at work. [ame="http://www.youtube.com/watch?v=WdHeYUP27FY"]Inomoto[/ame]
-
2nd April 2012 06:01 PM # ADSGoogle Adsense Advertisement
- Join Date
- Always
- Location
- Advertising world
- Posts
- Many
-
2nd April 2012, 08:39 PM #2
Boucher de Bois
- Join Date
- May 2010
- Location
- Wellington, NZ
- Posts
- 551
Deeply impressive stuff. That looks fantastic!
But how does it work?
-
2nd April 2012, 11:14 PM #3
Senior Member
- Join Date
- May 2007
- Location
- Sydney
- Posts
- 145
Fissionchips,
That looks damn nice!
And yes, I think we need some action photos...
Regards
Derek
-
3rd April 2012, 08:14 AM #4
planing away
- Join Date
- Nov 2011
- Location
- Vancouver
- Posts
- 26
Thanks guys, glad you enjoyed seeing the project. How could I forget the all-important action shot? I'll get to work and see what I can whip up!
-
3rd April 2012, 10:28 AM #5
 Fossil Member
- Join Date
- Jan 2005
- Location
- Perth
- Posts
- 1,181
Hi Fissionchips,
Good write-up, well done.
Looking forward to the 'action' shots and your impression on the performance.
Cheers
Pops
-
3rd April 2012, 12:11 PM #6
Shaped With A Rasp
- Join Date
- Nov 2007
- Location
- Lawrencetown, NS, Canada
- Posts
- 587
Nice job (on the restoration, too). I second Pops call for some shaving pics.
Steve
-
3rd April 2012, 02:05 PM #7
planing away
- Join Date
- Nov 2011
- Location
- Vancouver
- Posts
- 26
In honour of spring finally arriving, here's a rare cross-bred 'excelsior' sheep for your perusal.
Attachment 203839
I did some tests on pine and fir with promising results. I'll need to refine my jointing skills with better wood and a good work surface. Then this plane will really shine! The blade has a very low 22deg bevel from its previous owner, and while I'm hesitant to grind 3mm off the blade to get back to 29deg, I think it'll need a lower relief angle to prevent dig in on some woods.
-
3rd April 2012, 11:51 PM #8
Shaped With A Rasp
- Join Date
- Nov 2007
- Location
- Lawrencetown, NS, Canada
- Posts
- 587
Is that what they call a "shave horse?"
Your bevel is pretty shallow, even for softwood, but rather than go steep in one step, try to gradually increase it over a few sharpenings. I know that's difficult to do freehand without rounding the bevel. Maybe (gasp) use a honing guide until you get enough bevel to register on freehand. It would be a shame to waste edge steel just to get a steeper bevel, plus you'd end up having to do uradashi sooner than otherwise (although something you'll have to deal with eventually and a necessary skill to acquire). Just keep the shavings thin until the new bevel is well established so as not to stress the edge too much.
I don't know about MuneShige, unless he's the same one who got kicked out of the shovel makers guild (just couldn't get a handle on things. Kanna are just little shovels without handles after all).... just kidding But looks like kamaji for the back, so made for the 'real' woodworkers.
Anyway, a great way to learn about using and maintaining a fine Japanese tool (and make a bit of stuff along the way).
-
4th April 2012, 05:55 PM #9
Bowl Turner
- Join Date
- Apr 2007
- Location
- Adelaide Hills, South Australia
- Posts
- 4,330
Agreed, I think I can see a folding pattern in the iron, which might indicate an above averge blade. My best blade had the best swirl pattern. Originally Posted by Sheets

Well done on the dai.
Neil
-
13th April 2012, 11:32 AM #10
planing away
- Join Date
- Nov 2011
- Location
- Vancouver
- Posts
- 26
Well I finally got a chance to stretch the legs on the plane.
Attachment 204804
I picked up a load of wood on the weekend for quite a deal.
This hunk of fir will make a great Japanese workbench once I get it flattened.
Attachment 204805
Sheets, I took your advice and set a new bevel angle for the blade. At 30deg I can get the endurance I need out of the edge. I also widened the mouth to about 1mm.
And that stack of wood below the plank? 100 feet of 5/4 maple
-
13th April 2012, 01:15 PM #11
Shaped With A Rasp
- Join Date
- Nov 2007
- Location
- Lawrencetown, NS, Canada
- Posts
- 587
Nice haul. Those are lovely big boards. You are going to be a busy fellow for quite a while. Besides the workbench, do you have a particular project(s) in mind?
-
14th April 2012, 01:31 AM #12
Fossil Member
- Join Date
- Jan 2005
- Location
- Perth
- Posts
- 1,181
Hi Fissionchips,
What Sheets said. Nice pile of boards you have there. Will be looking forward to the maple projects and the bench.
Cheers
Pops
-
14th April 2012, 03:44 AM #13
planing away
- Join Date
- Nov 2011
- Location
- Vancouver
- Posts
- 26
Sheets, the shape of the wood will surely help to decide what gets made. For the live edge pieces I'm thinking of benches and small tables. I'm interested in simple designs that will give me a chance to try out various types of joinery and surface finishes.
Pops, I'll be sure to post a follow-up as things progress.
-
16th April 2012, 04:28 PM #14
Member
- Join Date
- Dec 2010
- Location
- japan
- Posts
- 84
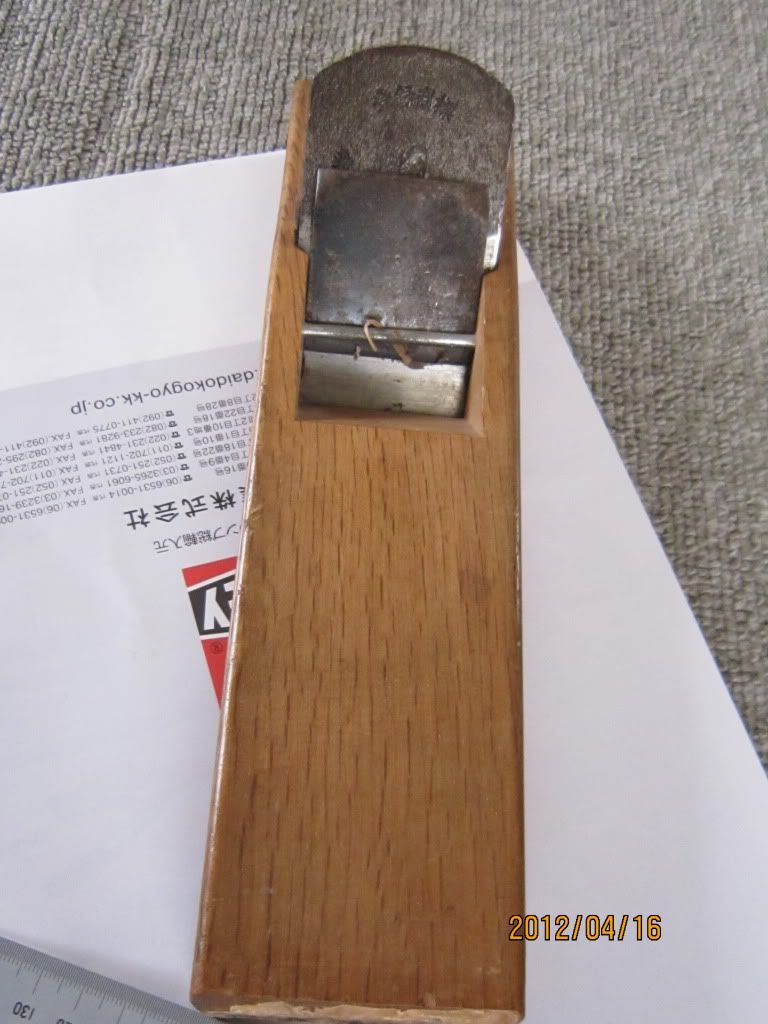
just recently i have also bought kanna from used shop.i paid only 1200 japanese yen.here is the pictures.hope you guys will like it and i would learn from you how to keep it safe and work
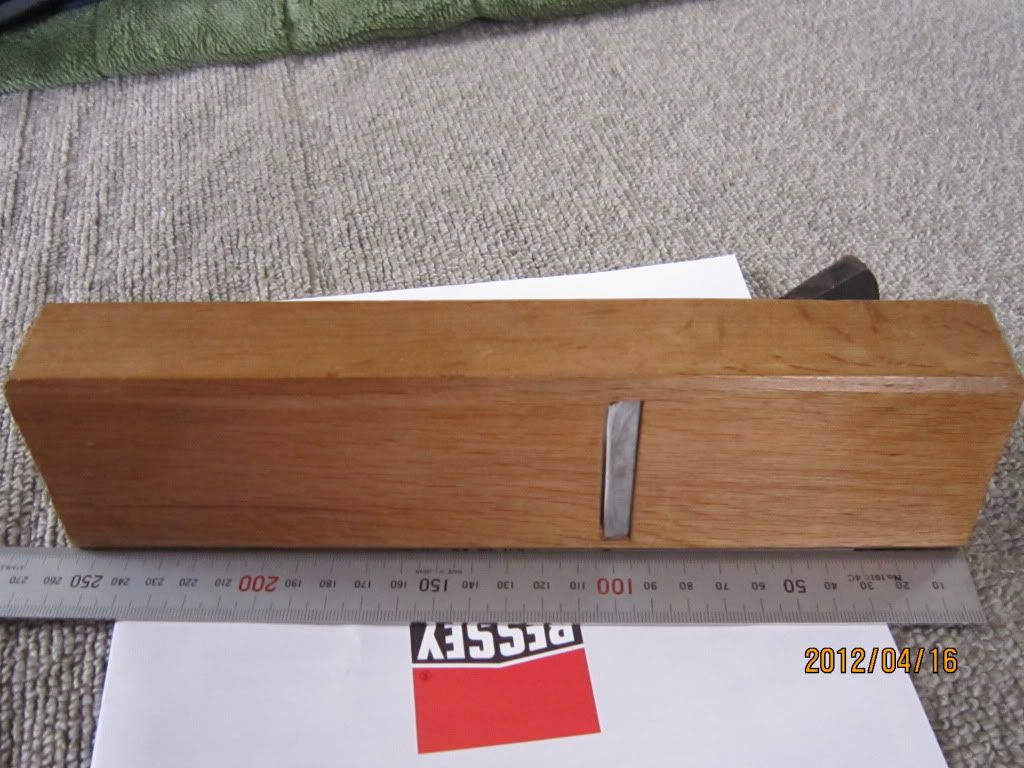
and shinwa square at 500 japanese yen
next time i will buy chiesels
-
18th April 2012, 12:39 PM #15
Senior Member
- Join Date
- Mar 2010
- Location
- Sydney
- Posts
- 103
Hillpanther,
I don't know if you took the photos before setting up the kanna but the uragane (thanks Des) needs to be tapped down until it is around a mm from the blade edge.
Very nice Kanna.
Regards,
Gadge

 Reply With Quote

Similar Threads
-
looking for 1st kanna
By cassca in forum JAPANESE HAND TOOLSReplies: 16Last Post: 20th February 2012, 07:50 AM -
someone have a dai - kanna making tutorial
By correntinos in forum JAPANESE HAND TOOLSReplies: 10Last Post: 25th March 2010, 02:44 PM -
Kanna vs Genno
By Sheets in forum JAPANESE HAND TOOLSReplies: 12Last Post: 25th March 2010, 02:04 PM -
Joy of a tuned kanna
By Des.K. in forum JAPANESE HAND TOOLSReplies: 3Last Post: 30th April 2007, 07:18 PM -
Kanna
By LineLefty in forum HAND TOOLS - UNPOWEREDReplies: 11Last Post: 17th June 2004, 09:18 PM
