

 Thanks:
  Likes:
  Needs Pictures:
  Picture(s) thanks:
Results 16 to 27 of 27
-
18th February 2011, 08:11 PM #16
 Trailer Bloke & Mild Mannered Moderator


- Join Date
- May 2007
- Location
- Tooradin, Vic.
- Age
- 52
- Posts
- 1,885

Good pick up!!
Front 3/4 shunt, should be able to off-load a couple of wheels and tyres, rear diff, boot/spoiler, LED taillights, and a fair bit of interior trim.Too many projects, so little time, even less money! Are you a registered member? Why not? click here to register. It's free and only takes 37 seconds!
 Doing work around the home? Wander over to our sister site, Renovate Forum, for all your renovation queries.
-
18th February 2011 08:11 PM # ADSGoogle Adsense Advertisement
- Join Date
- Always
- Location
- Advertising world
- Age
- 2010
- Posts
- Many
-
19th February 2011, 08:19 PM #17
Senior Member
- Join Date
- Jul 2008
- Location
- Sydney
- Posts
- 244
The rear suspension is undamaged and the spoiler and tail lights are good as well.
The interior is shot. When the roof was cut off they shoved all the doors they cut off inside and destroyed the leather. The drivers seat has had 100mm removed from the side, probably by the door on the way past. Both front air bags went off and the driver's curtain bag and seat bag went off. All seatbelts have fired so the stalks are pulled tight to the floor. Says a lot about good car design the way it held together. I wouldn't want to have been in the other car, it was a Mazda as I found half a hubcap wedged in the folded metal.
At this stage I have a complete set of wheels (the spare is a front so I have two fronts and two backs to sell.
Two doors are repairable as is the rear bumper. There are a few switches and sundries that survived but the dashboard is crushed by around 200mm and only the sound system and navigation looks like it will salvage. I've got the instruments out and they look good but may have had water in them whilst it was in the salvage yard. Time will tell.
I've removed the wiring loom complete and plan on plugging it all back together than seeing what we can get working.
I won't try and get things like the magnetic suspension running as one corner of the car is missing.
Should be a few more days before I get the engine out and then I can take the remains to the tip.
-
19th March 2011, 09:59 PM #18
Senior Member
- Join Date
- Jul 2008
- Location
- Sydney
- Posts
- 244
Update time.
I've now parted out the Commodore and sold off what I didn't want and taken the rest to the tip. Total cost of the engine, transmission, wiring and computer is $3500.00 Even SWMBO thinks that's a good effort.
I've now grafted a Nissan Patrol transfer case to the back of the transmission and it looks almost as if GM put it there. I'm really happy with that.
I also have an L300 van. $550.00 on Ebay with no rego and a shot engine. Perfect my my purposes.
I plan on chopping the van this coming week but it all revolves around buying a MIG welder and learning to use it so I can stick the van back together. Token Tools look like my source for the MIG.
I'm currently working on shortening a Patrol rear axle by 300mm to fit under the van. I used a Patrol as they are as tough as a Ford 9" and cheap as chips, with big disc brakes. The Patrol transfer has the handbrake mounted on it so the diff didn't need a handbrake on it.
My next big challenge is working out how to make the rear of the chassis 200mm narrower. The chassis sweeps from 650mm apart at the front suspension to 950mm at the rear. I plan of using heat and brute force to first bend the chassis inwards, then weld in a crossmembe and bend it back outwards so it's around 750 apart. I know the chassis will grow in length but that's not too hard to overcome.
The wheelbase will remain unaltered as I'm using the Patrol trailing arms and panhard with coil over shocks so I can place it where ever I want.
The wheels will have to be 6 stud but I can use L200 (Triton) front hubs on the L300 stubs which will give me 6 stud each end. All I need to do is work out what front brakes to runs and we're away.
I'll try and sort out how to post photos and throw some up.
-
24th November 2011, 09:01 PM #19
Senior Member
- Join Date
- Jul 2008
- Location
- Sydney
- Posts
- 244
It's amazing what 8 months can bring.
Attached are some pretty average photos of how the van (or is that ute) now looks.
Proportionally I think I've got it right.
I hope to have the computer reset so I can start it up next week and take it for a test run on a local industrial estate.
The van finished up with Nissan Patrol brake rotors each end with a Patrol master cylinder so it has plenty of brakes. I machined the L200 rotors (I use L200 hubs) so they would be an interference fit insde the Patrol rotors then bolted it all together, I needed to make new caliper mounts but that was some simple engineering in 12mm plate.
The Patrol handbrake isn't acceptable in other than a 4x4 so I have AL-KO trailer calipers fitted to the rear to satisfy the rules.
I've removed the standard dash and installed a dash from a later model L300, which was a mission to do. The new dash accepts air conditioning and as I'm old I figured why not. Changing the dash gave me an adjustable steering column with power rack and pinion in lieu of the old unassisted worm and nut system.
The Holden exhaust was chopped and rewelded and fits under the car well with all the Holden cats and mufflers so that will keep EPA happy.
Every panel has been cut/modified and welded back together. I've gone through 2 "F" bottles of gas and almost 15kg of wire so far. I love my MIG, and Yonee was right even I can use it.
I'm currently wiring the car and have it set up for central locking, power windows and as it has the door handles removed (shaved) remote door opening as well. The tailgate (the bottom half of the L300 tailgate modified to hinge at the bottom) is also opened electrically as I'm using two front door locks to latch the tailgate.
I ended up buying another van as the fisrt one was hiding a bit of rust. $1,200.00 off ebay but it took a dash to Melbourne to bring it home on a trailer. The first van gave up lots of steel and sundry parts to allow me to complete the body.
Once it's running and driving I'll remove the body and sort a few chassis bits out the drop the body back on and get it finished and painted. I've decided to farm out the finishing of the bodywork and paint as I don't really have the right garage for painting cars.
So far The only things I haven't done myself is shorten and re-spline the axle shaft, I shortened the housing myself, and the engine wiring as I can't find any information on the Web or in Forums on doing it so I ended up paying for that.
Speaking of the rear axle I chopped 355mm off the passengers side so the diff centre lines up with the transfer case output shaft. As the diff rotates backwards (due the engine facing the wrong way) I used a front diff centre with the hemisphere from a rear diff with front diff gears. This would normally give a high pinion set up (I use this in my Rover) but as the diff centre had to be inverted it becomes a low pinion which allows the tailshaft to clear everything. I was luck that a stadard rear tailshaft for the Patrol fitted perfectly. I couldn't flip the diff housing as the driver's side is the long side of the diff and it wouldn't have worked if it was flipped.
Finished weight looks like it will be around 1250-1300kg and it will have 425 flywheel horsepower at registration that will be bumped to around 500 horsepower with a tune.
I'll post up better photos when I get it out of the garage
-
26th November 2011, 08:59 PM #20
Member
- Join Date
- Nov 2011
- Location
- sunny adelaide
- Posts
- 64
i love to see stuff like this im a car tragic for most of my life .i built a ac cobra replica a few yrs ago and while it had some frustrating times i enjoyed building it .
pity that had to get sold due to a divorce lol ive raced speedway for many yrs and have built many chassis cars over the yrs . ive just done a rollcage for a friend in a early commdore body for dirt circuit . my own project atm is a full space frame car with quick change diff fabricated front arms and coil overs all round .
i have a fibreglass ve commadore body to go over it and just tossing up on what engine to use i have my old trusty 308 on the enginge stand but im leaning towards a turbo fg falcon motor as soon as one comes up at the right price .
in the mean time i have a tandem car trailer to build watch out for pics as it progresses ..
good luck with ya van keep up with the pics as you go along i will follow this thread with interest .
cheers dean
-
26th November 2011, 09:49 PM #21
Senior Member
- Join Date
- Jul 2008
- Location
- Sydney
- Posts
- 244
Dean,
I know the deal with Divorces. Lost a 911 Porsche and racing Trimaran in the mid '80"s but now have a sensible wife who likes fast cars (her DD is an SLK55 Benz) and she gives me enough leash to explore my fantasies (with cars anyway).
I haven't documented the build to date as I just dont's top long enough to take photos and my garage is such a disaster I'm embarassed for it to appear in photos.
The build has been carried out with the usual handtools (drilsl, angle grinders, sanders) plus a Token Tools MIG a very old 10" MACSON lathe and a '30's drill press that won't stop working. I will say I have every imaginable variation on a metric spanner (thank God the LS3 is metric) plus good jacks and axle stands. It's amazing what you can do if you set your mind to it.
I don't like farming stuff out to others so prefer to do it myself. It may not be as pretty (particualarly the welds) as other's would produce but I can stand back and say "I did that" which to me is priceless.
Looks like Monday or Tuesday are now the start up days as the weather is looking good.
Once running I'll post some pics.
-
5th March 2012, 06:35 PM #22
Senior Member
- Join Date
- Jul 2008
- Location
- Sydney
- Posts
- 244
This is a thread I posted on a US Forum so it may repeat some stuff but here goes.
Being a Baby Boomer I spent my pocket money as a teenager buying American Hot Rod Magazines in the late 60’s and lusted after an A100, just like the Little Red Wagon. Now I’m old and retired and can afford to import one the rules we have over here says I can’t have an engine in it larger than 5.7litres or around 318cu”. So why bother?
Given I can’t have what I want I looked around to see what I could have.
After looking at my options I came up with the Mitsubishi L300.
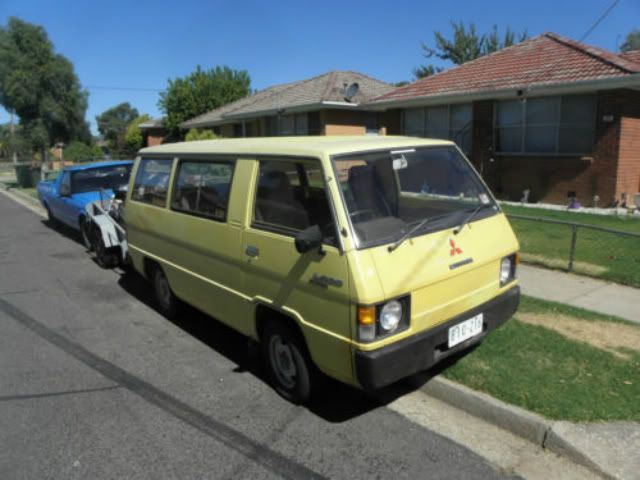
These have a separate chassis that suits my ICV build better than a monocoque vehicle.
I purchased a 2008 HSV GTS with a 6.2litre Ls3 putting out 420hp with a 6 speed auto for $6,500 as an insurance wreck. After selling off what I didn’t want for $3,000 this gave me a very cheap engine and trans.
Following the wreck were two of the above vans (my neighbours weren’t too happy) and I went from there.
After attacking the vans with a 9” angle grinder and my MIG I came up with a pickup with reasonable proportions.
In the process I narrowed the rear of the chassis 200mm (8”) to fit the 10” wheels and 28x12x15 tyres. This necessitated a new diff housing which came from a Nissan Patrol and is as tough as a Ford 9” but comes with 11” disc brakes from the factory and are available here for a few hundred dollars. I narrowed the short side of the housing by 345mm (around 13”) and flipped the centre in the housing, as the drive is counter rotating. I used a front diff centre fitted with the LSD from a rear diff (straight bolt in, so the rear axles would fit) to give me a low pinion diff rotating the correct way for my drive. I couldn’t just flip the diff as I needed the long side on (our) driver’s side of the car.
The original van had leaf springs but I changed to a 4 bar and panhard from the Patrol as they work well and are next to free. Rear springs are a set of front springs from the 2nd van and they seem to work well.
Front suspension is a well-designed independent system with smallish disc brakes from the factory. I upgraded the brakes with hubs from Mitsubishi an L200 which bolts straight on and has 6 lug wheel mounting to match the Patrol, plus Patrol rotors and callipers which when combined with the Patrol master cylinder gave me good brakes at nominal cost. I had to machine the front rotors and make new dogbones for the callipers but nothing too hard.
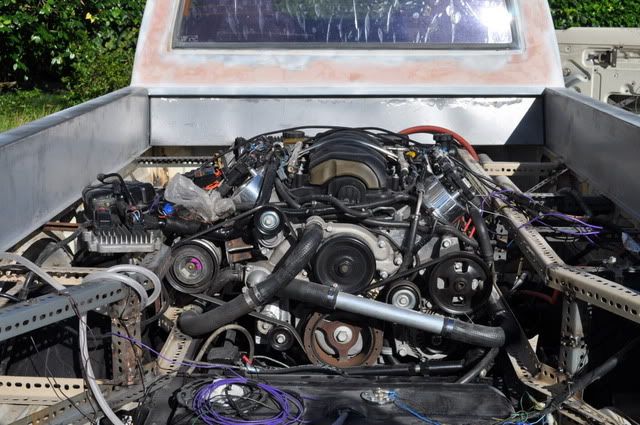
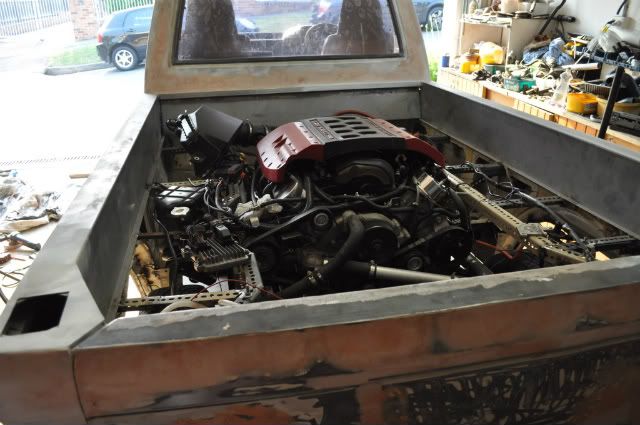
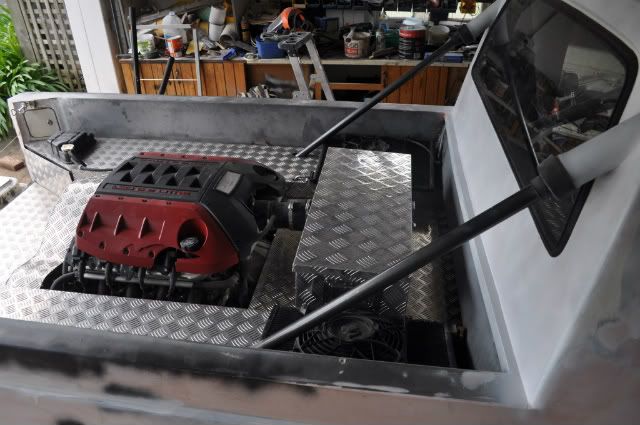
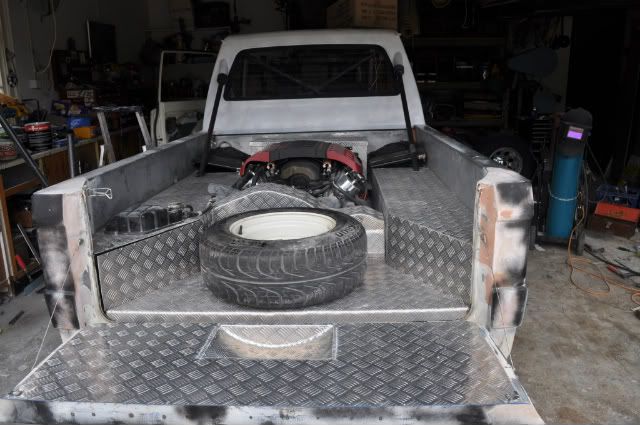
The engine sits in the rear tray (rather than under the front seats) with the harmonic balanced right above the rear axle centreline. In the above photo it is temporarily wired for its test drive around our driveway.
With the engine sitting facing the wrong direction I needed to send the drive to the diff somehow. I used a Patrol transfer case and drive a standard length Patrol rear tail-shaft from the front drive output of the transfer. This sends the drive down beside the engine to the offset diff. The diff centre is exactly under the air-conditioning compressor in the above photo.
I made a simple 10mm (3/8”) steel adaptor plate to bolt the trans to the transfer case and had a short spud shaft made to transfer the drive.
You may also notice the intake manifold has been spun 180 degrees as the engine looked a bit silly with the throttle body at the rear. This was much more involved than I originally thought and took quite a few days and lots of grinding and machining to get to work. I don’t recommend it.
The interior of the car has had a later dash fitted with a custom set of instruments. I’ll be using two original driver’s seats as they mount easily and are already approved so it makes it easy for my compliance testing. My engineer has specified a roll cage as he is concerned about the strength of the upper seat belt mounts now the body has been chopped down. The rear braces for the bar will run through the rear cab wall and be sealed by some toilet fittings designed to couple the flush pipe from the cistern to the bowl.
The load area is finished in aluminium checker-plate which whilst I’m not a fan of it is the only way I could see of doing it and not having “pie dishes” visible in the floor.
At this stage we’ve test driven the vehicle on a private road and it’s pretty quick as it only weighs around 1250kg or 2750lb so it has around 300hp per tonne power weight ratio. The load area is basically full of engine and transmission.
Weight distribution is looking like 40/60 front/rear so it won’t be any worse than a Porsche 911 in basic handling but a long way short in adhesion.
Those headlight rims that look a lot like A100 ones are in fact genuine A100 rims I imported.
As the car is no longer legally a Mitsubishi I get to call it what I want and I’m leaning toward FARGO. The reason behind this is my name is Rod Garnett and FARGO would be an acronym for F*%king Awesome Rod Garnett Original. Plus my late dad drove a FARGO when I was born. I know self-praise is no praise but it just appeals to me.
At this stage the only things I haven’t personally done are make the spud shaft for the transmission, re-configure the wiring and shorten and re-harden the axle shaft. All other fabrication has happened in my garage and been done by me personally. I dislike “farming” stuff out and of the 3 items above the wiring was done incorrectly and I couldn’t start the engine until I sorted it out. The bending and welding of the roll cage will be number 4 that I haven’t done.

This is an early photo during “mock up” of how I wanted the car to look. You will notice I have parts of the pillars of the van taped to the sides of the cab to get the angles and proportions to what I think are acceptable. You can also see the side sliding door, doorhandle, fuel door and sliding door track that all needed to have metal cut/shaped so I could MIG them in. I’d never MIG’ed before this vehicle. Also in the photo is the top half of the lift up tailgate that became the rear wall of the cab. You may just be able to discern the cut across the roof where I used the rear of the van roof and door frame to form part of the rear wall of the cab. Not so obvious is the front turn indicator that has been removed plus the door key lock and rear view mirror mounts.
Additionally the front of the rear wheel arch needed to be moved forward 2” to clear the wheel and allow the wheel to sit in the centre of the opening.
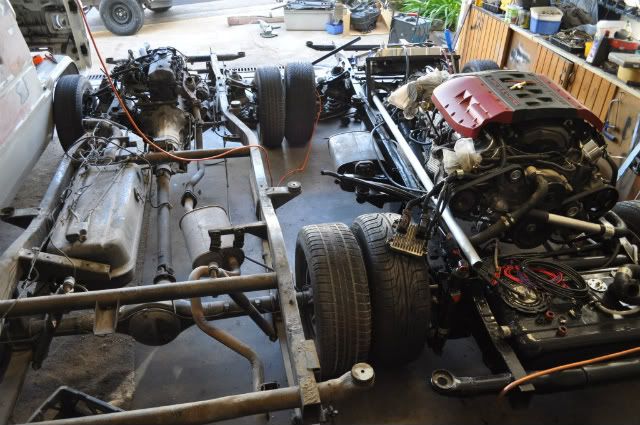
In this photo you can compare the original chassis with its 4 cylinder engine with the (almost) finished product.
The chassis was narrowed from just behind the front wheels to make it an almost straight line to the rear of the chassis. This necessitated removing the cross members, narrowing the chassis by “pie cutting” bending, re-welding and plating the rails with 3mm (1/8”) steel on both sides of the rails from the front suspension to the rear suspension mounts. All body mounts then needed to be extended to return them to the original mounting points for the body. New cross members were formed by sliding thick tube over the stubs of the old cross=members and plug welding in about a dozen points on each end. There isn’t a “K” member and I shouldn’t need one for an ICV. There are now more cross-members under it than when it left the factory.
You will notice the fuel tank was moved to the rear to allow the exhaust to exit both sides of the vehicle. The tank is from a HX ute and I had to build a sump for the EFI pump to live in. I used a dead cat converter that I cut in half and filled the outlet in then welded it into the tank. The fuel pump is in the front corner so it won’t drag on the road should the car get up on its rear wheels. I sealed the tank after my welding using POR15’s tank sealant and it was brilliant.
The steering was originally worm and nut so the front cross member needed the rack and pinion mounts off a later model van grafted on in the right spot to avoid bump steer.
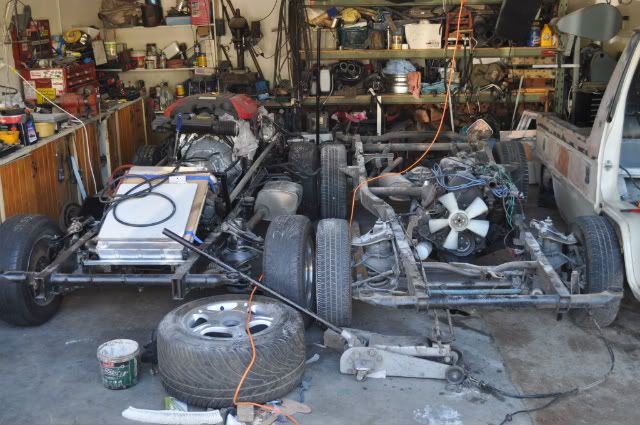
A different view showing the layout of the radiator where the original engine wheezed its way through life. Excuse my messy workshop. My main tools of destruction are a drill press, a 10”lathe and bench grinder all older (and more worn) than me. Both chassis’ and the body shell just fit in the garage with about a foot to spare!
For anyone curious the wheel on the floor is off a McLaren F1 road car. One of those things specialist motor insurer’s end up with! It just happens to be the same proportions as the M/T’s I’m using so it was handy for mocking up.
In this photo you can see the sides of the tray have been fitted with some sheet steel I had bent to join the body sides and roll over the top and allow a place for the checker plate to sit when installed.
The rear corners were made from 3mm plate and have a rectangular cut out in them so I can get into work on the tailgate locks, rear lights and fuel filler. The fuel filler is located inside the tray behind a factory fuel door grafted into the body. This means I can lock the fuel filler from grubby fingers. The rectangular holes are covered by flush fitting plates held down by elastic bungee cord. Easy to fit/remove and won’t fall off.
I removed the original steel dash (that looked like it came out of the Ark it was so dated) and replaced it with a dash from a 1990’s Mitsubishi van. This necessitated cutting the old steel dash out and making all new mounts for this dash then getting it all assembled and working. As part of the dash transplant I gained a tilt steering wheel and power rack and pinion steering in lieu of the old unassisted worm and nut on the original van. The instrument cluster I built myself and it has 6 round instruments that aren’t obstructed by the steering wheel plus warning lights for all the usual items.
The dash I made was a piece of 3mm Perspex that I shaped to the original binnacle then drilled the holes in it for the gauges. I then drilled holes for the warning lights and after painting it all black I used the warning light symbols from the original dash and glued them behind the Perspex. I used “grain of wheat” light globes inserted into metal sewing thimbles that I then glued behind each warning light. A day or so wiring and I had it working. The front Perspex cover I made by heating some 1mm Perspex in the oven (my wife was out shopping) and then shaped it to fit the curve of the dash. Once assembled it looks quite “factory”.
Whilst working on the inside I fitted air conditioning, door poppers, central locking and power windows.
I made a mount for the gear shift to bring it into nice reach as it has a tiptronic function I will use. I had to shorten the throw of the shifter as it would have hit the radiator which lives where the original engine was, which then meant shortening the shift lever on the transmission by a proportional amount. The shift lever on the transmission needed to be rotated 180 degrees to make the transmission operated in the reverse direction as the lever and transmission are now facing 180 degrees from each other rather than the same direction.
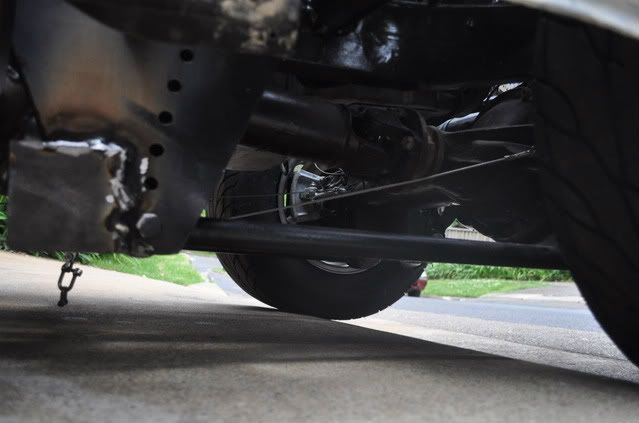
The lower trailing arm is in the bottom of the shot. The top trailing arm is hidden behind the chassis rail. The corrugations in the rail are from the factory not me. You can see how far the diff centre is offset plus the cable operated disc callipers. These callipers are required as the handbrake on a non-4x4 must operate directly on the wheels and not through the driveline like a Patrol handbrake. This means the car has 6 disc callipers on it.
The diff centre is a serious bit of kit. One advantage of this centre is it comes with a good factory locker standard and I can fit an air locker into it and have the comfort of an open diff (means it will be driveable in the wet) and the equivalent of a full spool when I want it. The axles are almost 2” thick and are not know for breaking in tough 4x4 situations.
All in all every panel has been cut and welded to some extent. The tailgate is the bottom half of the top hinged tailgate from the van. I filed the number plate area so it’s flat and mounted the top hinges on the bottom of the tailgate. I built a 2x2” frame inside the tailgate then added 3mm steel checkerplate so that it was strong enough to sit or walk on. The tailgate weighs 35kg or 80lb. I’m thinking of building a new lighter tailgate as I thought I would need to walk on it to get in the tray to work on the engine but it’s quite easy to work from the side of the tray.
To secure the tailgate I’m using two front door bear claw latches and I originally had it electrically operated but I changed it to mechanical for reliability as the locks need a good pull to release. If I build a new tailgate I’ll change the locking mechanism to something easier to fit and simpler to maintain. Not sure what it will be but something will come to me.
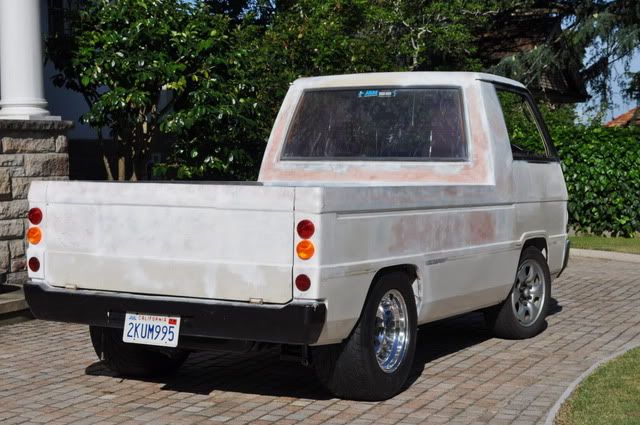
The bumper has had a number plate recess cut into it so the plate is legible if the tailgate is down.
The tail lights are designed to look “industrial” as this is what US pick-ups had. I know the right hand side ones are closer together but that just needs adjusting when being finally fitted.
-
7th March 2012, 11:50 PM #23
SENIOR MEMBER
- Join Date
- Nov 2004
- Location
- Port Pirie SA
- Age
- 52
- Posts
- 6,908
Cool this thing will be a beast!
(been watchin ya on Oz rodders...)....................................................................
")
-
7th August 2012, 10:46 PM #24
Senior Member
- Join Date
- Jul 2008
- Location
- Sydney
- Posts
- 244
Since the last update (almost 6 months ago) the rear has been sheeted in with 2.5mm aluminium checker-plate. I chose checker-plate as I figured it wouldn't show any bends from walking on it. It turns out you don't need to get in the tray to do anything as everything is within reach from outside.
I also wasn't happy with the rear window in the cab. The cab wall was the old tailgate from the van and when I installed it I stood it more upright to improve the cab's lines which resulted in the window being too tall and the bottom of the window sitting 50mm below the side windows which made it look a bit wonky. Well to me anyway!
To overcome that I chopped the rear cab wall out of a Mazda Bravo and welded it into the window opening of the cab and it improved the lines no end.
My engineer required a half roll cage be fitted so this has been made to fit inside the cab with the rear braces passing through the cab wall via 65mm exhaust pipe and being sealed with flush cones as used on old fashioned toilet suites.
I sent it off for paint in early June and finally today they put the top coat on the body. I'm really impressed with how well the body turned out considering it has around 100metres of MIG welding on it and I did most of the body work. The repairer's fixed a couple of minor problems before painting it.
I hope they painted the doors, tailgate and bumpers this afternoon so I can supervise the laying down of the satin black highlights where the grill goes and the black window frames tomorrow afternoon after taking my wife to lunch. There's alwas a price to pay for building new toys!
Then it's wait a few days for the paint to harden up, a bit of buffing and load it up on the trailer and bring it home.
Here's a shot immediately after the the booth started to cool down so the finish is straight off the gun.

I figure it will take 2 months to reassemble the vehicle and have it ready for engineering tests so mid/late October could see it close to being registered.
During all the work I shifted the radiator as it was under the cab and I had to lift the body to remove it so it now lives under one side of the tray. The space occupied by the radiator will now be occupied by the spare for the front wheels. I originally planned on using 6 stud wheels each end but couldnt find any front wheels with an acceptable offset so had to revert to 5 stud wheels which means I need to carry 2 spares.
The colour is now called "What the F Yellow" as my 17 year old said when its painted you will either say "What the F was I thinking or WOW" To me WOW is it.
Right now I couldn't be happier with the way it's turning out and I can't wait to get it all together.
Over the last 2 months I've put on weight from not having a project in the garage to work on so hopefully I'll trim down a little int he process.
-
8th August 2012, 02:23 AM #25
GOLD MEMBER
- Join Date
- May 2011
- Location
- Murray Bridge SA
- Posts
- 3,339
A neat and well executed job. If it ever gets stolen heaven forbid it will be easy to recognise as YOURS.
Congratulations
Kryn
-
19th September 2012, 09:07 PM #26
Senior Member
- Join Date
- Jul 2008
- Location
- Sydney
- Posts
- 244
Well progress has been slow but I've now got it up and running and looking good.
DSC_0015.jpg
And the rear tray is looking pretty good.
DSC_0019.jpg
These photos were taken at Eastern Creek on a test day.
The car went well with a few minor problems but I guess that was to be expected.
It failed the noise test 94db instead of 90db but nothing a different muffler wouldn't fix.
I took it to Canberra last week for engineering appraisal and the engineer liked it and I'm currently building door intrusion bars for it. Once they're completed I can move on to EPA testing of the engine then it's back to Eastern Creek for the full lane change and braking test.
The Engineer FEA'd the chasis and it passed plus the seat belt mounts and he's currently working on the intrusion bars. We need to fit the bars int he doors and allow the windows to go up and down which isn't easy. Hopefully tomorrow we'll have the final FEA on the bars and I can get into them. I have the bars part built but needed to change a couple of things so it's back to the computer to confirm what i'm doing is right.
I expect it to pass EPA without any problems and I feel the handling should be fine.
With a bit of luck I should be driving it on the raod by the end of October.
-
23rd July 2013, 06:12 PM #27
Senior Member
- Join Date
- Jul 2008
- Location
- Sydney
- Posts
- 244
Long time without any updates on this.
The car registered as a 2013 Homebuilt Individually Constructed Vehicle in May after 7 months of engineering tests and RMS inspections.
It appeared at Motorex in Sydney over the weekend and there's a photo shoot with Street Machine tomorrow.
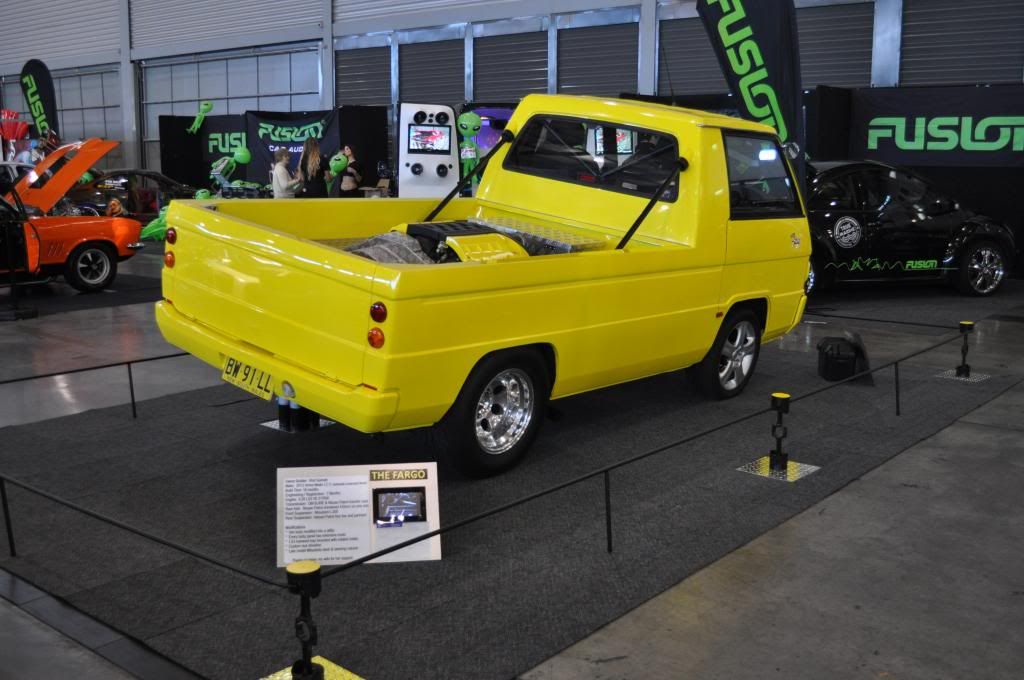
The car attracts a lot of attention and has had countless photos taken over the last 8 weeks.
It now has 1,000klm on it and all seems to be going well.
Is it fast? Don't know what times it will do at the drags but after the photo shoot and a bit of dyno time I'll run it and see.
I'm expecting high 11's to low 12's.
I drive it as a daily driver and take it to the shops.
Sure creates interest when cruising down the road.


 Reply With Quote

Similar Threads
-
Another project finished
By Dano48 in forum METALWORK FORUMReplies: 8Last Post: 22nd May 2010, 01:53 AM -
Just finished my latest project...
By Denim in forum WOODWORK - GENERALReplies: 6Last Post: 1st July 2009, 02:21 PM -
first project almost finished....
By Rattrap in forum FINISHINGReplies: 6Last Post: 18th March 2008, 08:57 PM -
Another project almost finished
By mailee in forum WOODWORK PICSReplies: 8Last Post: 9th February 2008, 03:43 PM -
Another Project Finished
By BobR in forum WOODWORK PICSReplies: 18Last Post: 21st June 2006, 07:14 PM
