

 Thanks: 0
 Likes: 0
 Needs Pictures: 0
 Picture(s) thanks: 0
Results 1 to 11 of 11
-
9th October 2007, 02:32 AM #1
 Be inspired. Be creative. Be bold.


- Join Date
- Apr 2001
- Location
- Perth
- Posts
- 10,826
 The secret to cambering Bevel Up plane blades
My friend Larry is adamant that bevel up planes cannot be cambered as easily as bevel down planes
for the low angle blade profile to have the same projection as the common pitch plane it would have to have more than three times as much camber
Larry has a point. My own experiments have shown that BU planes require more camber than BD planes. It is for this reason that cambering BU planes has been considered a weakness in the design. Hopefully we can put an end to this view now. The fact is it is dead easy to camber a BU blade it still will require a larger camber, but this is not a significant issue as long as you follow one simple rule. Let me show you how it is done.
The Way to Cambering Bevel Up Blades.
Here it is in a nut-shell grind the primary bevel on all plane blades to 25 degrees. Dont try to camber any blade that is greater than this, such as one with a 38- or 50 degree primary bevel (such as those available as optional purchases through Veritas). The latter blades are perceived to be a shortcut to honing, but this is an illusion.
BU planes blades are best prepared with a microbevel. There is no difference if this is added to a 25-, 35, or 45 degree primary bevel. However, the steeper the primary bevel, the more steel to remove when honing/grinding a camber. With a 25 degree primary bevel there is relatively little waste to remove. With a 50 degree bevel well, youll drive yourself insane trying to do so..
What kind of camber do you want?
Cambers vary from a .001 thin shaving on a finish smoother to that of the traditional fore/jack plane used for roughing would have about 1/16" of camber, as Larry notes. Mmm can a BU Jack produce a cambered shaving that thick? Easy-peasy!
To illustrate that there is very little extra effort in preparing the camber on a (bevel up) Veritas Low Angle Jack compared to, say, a (bevel down) Stanley #5 ½, I prepared the following tutorial.
What I do
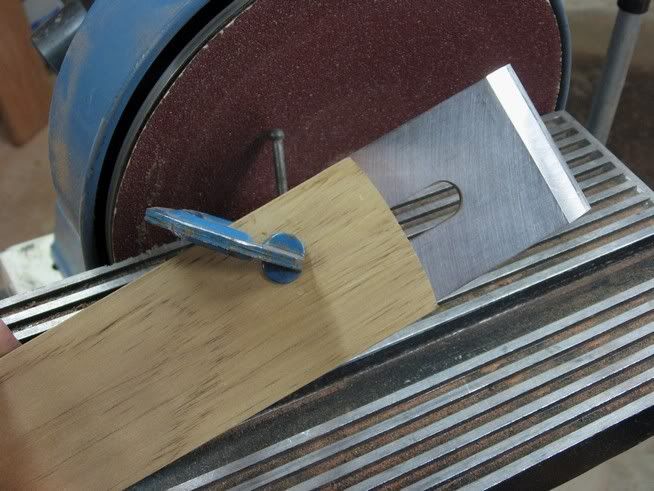
The first step is to start with a blade with a 25 degree primary bevel. I do my flat grinding on a belts sander on which I built a jig similar to a Tormek (this was published in a past FWW magazine). If I have to remove a lot of metal, I will use a 40 or 60 grit belt. This runs quite cool.
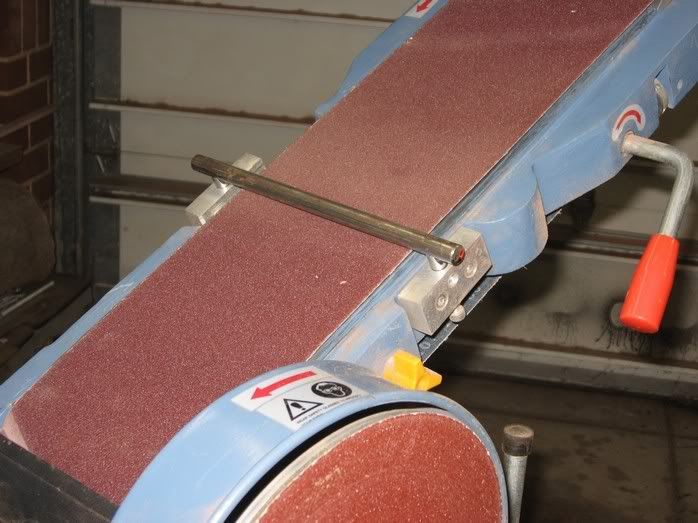
Here is an example of a 25 degree straight grind on the belt sander
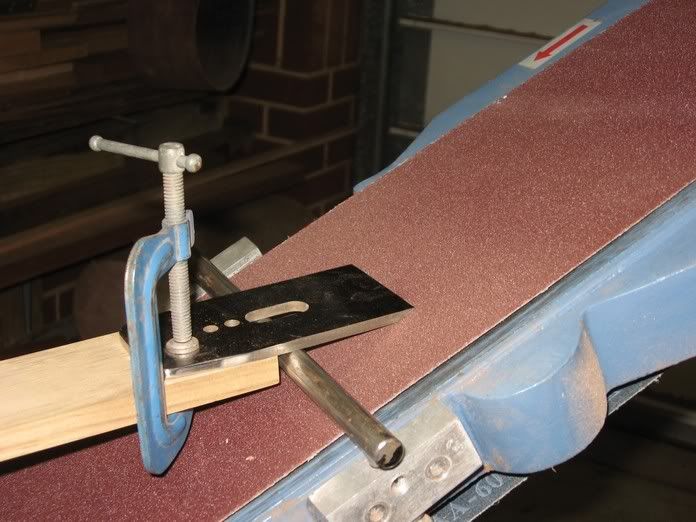
The second step is to construct a template for grinding the camber.
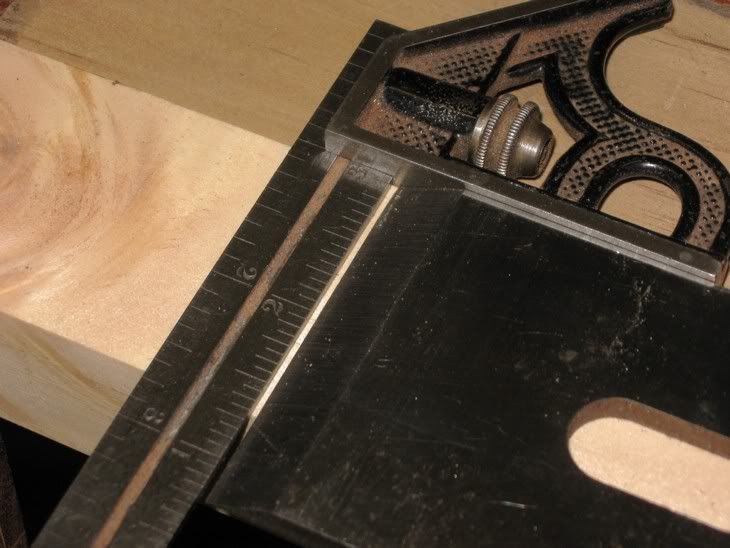
Prepare a block of wood the same width as the blade and mark off 1/16 at each end, then draw an arc across this. Remove the waste, so .
Mmmm I think I took off a bit more than 1/16. Looks like 5/64.
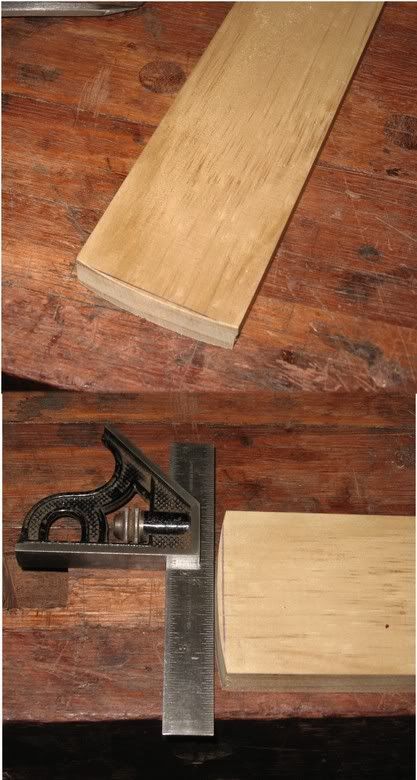
The completed template looks like this ..
and
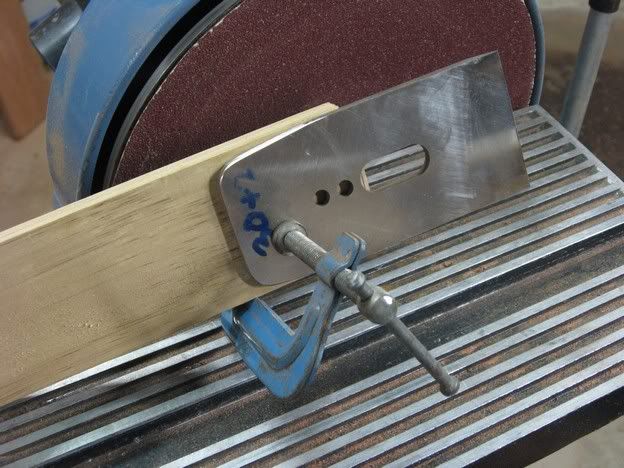
Adjusted to grind a 25 degree bevel, it works like this
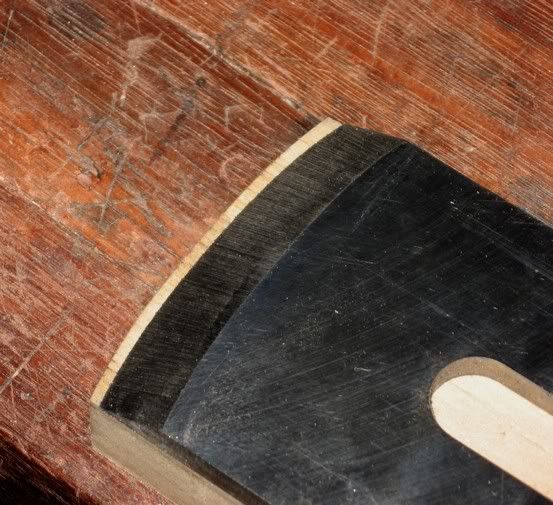
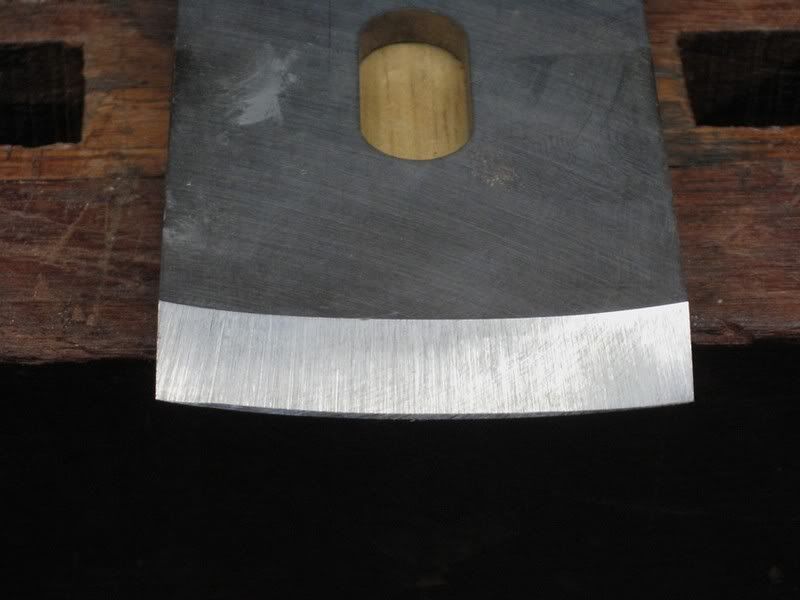
The result is a cambered 25 degree primary bevel .

And, yes Bugbear, the camber does indeed match the template! Look
Honing the Secondary Bevel
The aim is now to add a secondary microbevel of 35 degrees. This will create an included angle of 47 degrees, which is close to the 45 degrees of the typical bevel down cutting angle.
To do this I used a Veritas Honing Guide Mk II (with camber roller) and Shapton waterstones.
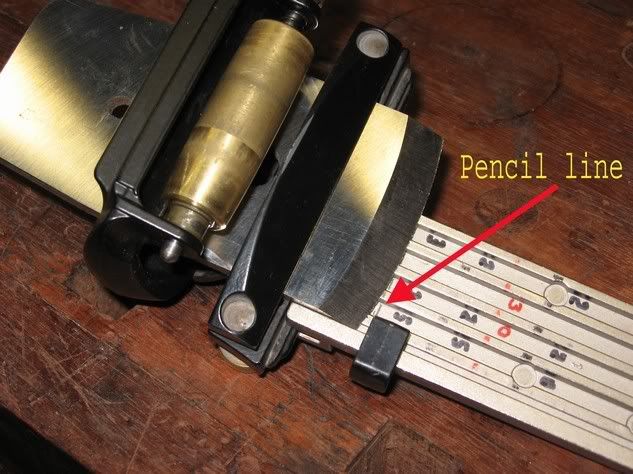
The honing guide requires a little modification. Draw a line at the blade stop to help determine the 35 degree setting. Users of this honing guide will understand this instruction.
 Visit www.inthewoodshop.com for tutorials on constructing handtools, handtool reviews, and my trials and tribulations with furniture builds.
-
9th October 2007 02:32 AM # ADSGoogle Adsense Advertisement
- Join Date
- Always
- Location
- Advertising world
- Posts
- Many
-
9th October 2007, 02:33 AM #2
Be inspired. Be creative. Be bold.
- Join Date
- Apr 2001
- Location
- Perth
- Posts
- 10,826
The Shapton waterstones used were, in order, 1000/5000/8000/12000.

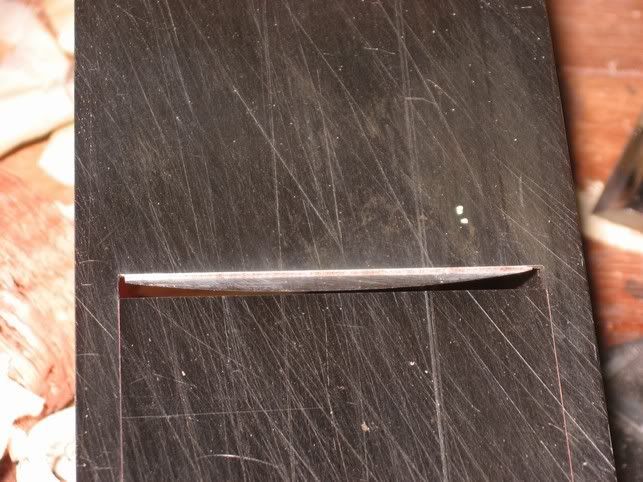
Here is the microbevel that was produced
And here is the camber as seen from the mouth of the LA Jack
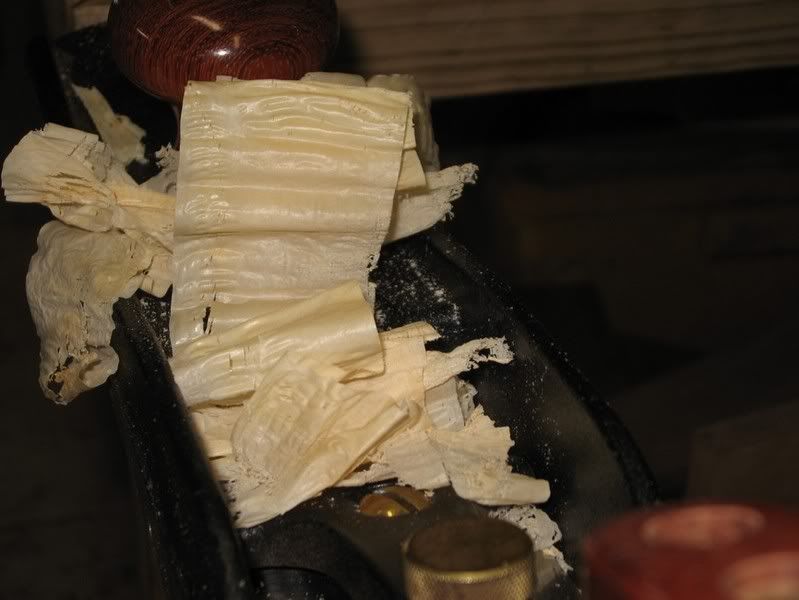
Soooo .. what about the shavings? None of this means anything without any shavings ..
Here is a thinnish shaving
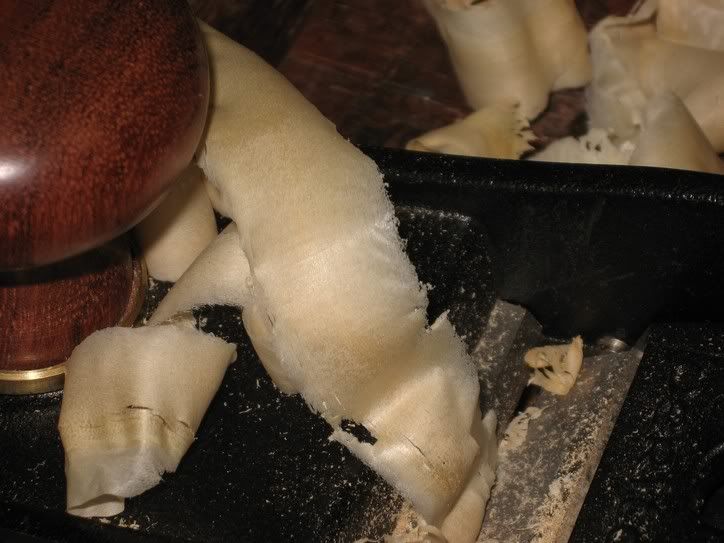
and a thickish one
It is possible to go thicker still, but I did not do so here.
Instead, I took some pictures of cambered shavings on other BU planes .
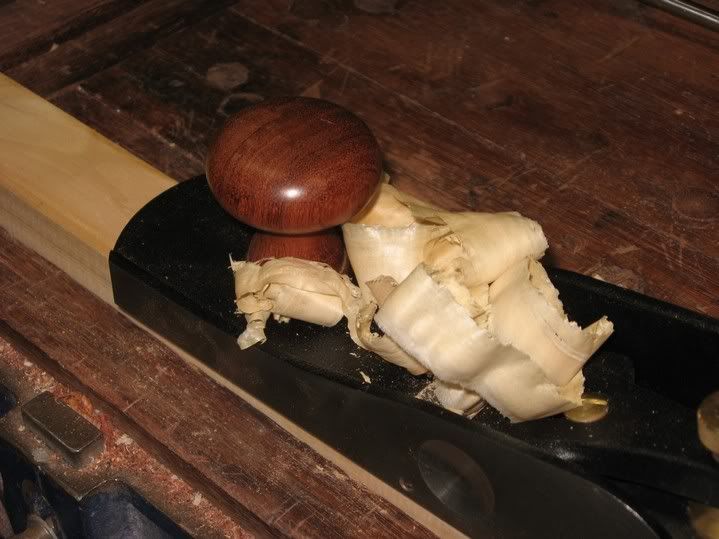
This is one on the Veritas BU Jointer on the edge of a pine board. Look at the thick center and the tapered edges. The shavings are identical to those taken by a cambered Stanley #7. I am sure that David Charlesworth would be proud.
And here is a finely cambered smoother shaving . Tasmanian Oak planed by the Veritas BU Smoother.
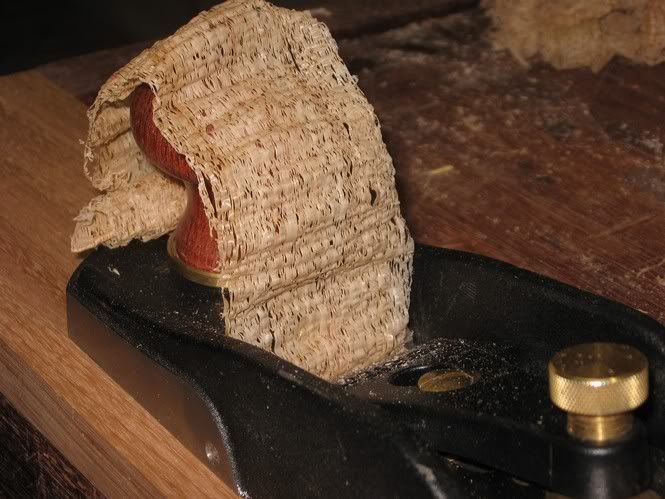
What is relevant to note about these last two shavings is that the secondary bevel on each is 50 degrees. Further, these were created without a template simply by extra pressure on the edge of the blade.
Following the 25 degree primary bevel preparation on the belt sander, the honing guide was set for a 50 degree micro secondary bevel. Ten strokes on the 1000 were enough to create a wire edge across the bevel face. An extra 5 strokes each side was sufficient to create the camber for the smoother, and 10 strokes for the jointer. The 5000 followed with 10 strokes to center, left and right. Ditto 8000 and 12000 stones. The wire edge was removed on the 12000.
In conclusion
I agree with friend Larry that the camber on a BU plane needs to be steeper than on a BD plane. However I do not view this to be a negative factor. It is just a difference in honing, and one that one just accepts as part of the honing method when using these planes. When the secondary microbevel is added to a 25 degree primary bevel, the effort level is low. Camber away without fear.
Regards from Perth
Derek Cohen
October 2007Visit www.inthewoodshop.com for tutorials on constructing handtools, handtool reviews, and my trials and tribulations with furniture builds.
-
9th October 2007, 09:44 AM #3
Dissenting opinion
- Join Date
- May 2005
- Location
- Turramurra, NSW
- Posts
- 2,267
Thanks Derek, another excellent instructional piece.
I am a little puzzled tho, as to how you managed to get a consistent micro bevel with the honing guide on the water stones?
Surely with a cambered edge you're only going to sharpen the apex of the curve? Or do you allow the stones to develop a concave trench?
If the latter you must go thru a fair few stones.Bodgy
"Is it not enough simply to be able to appreciate the beauty of the garden without it being necessary to believe that there are faeries at the bottom of it? " Douglas Adams
-
9th October 2007, 10:07 AM #4
SENIOR MEMBER
- Join Date
- Aug 2003
- Location
- Pambula
- Age
- 58
- Posts
- 12,779
I can answer that one. Derek is using the cambered roller in his Veritas guide, so you can rock the blade from side to side as you hone. The roller is cigar shaped - fatter in the middle than at the ends.
"I don't practice what I preach because I'm not the kind of person I'm preaching to."
-
9th October 2007, 07:30 PM #5
Dissenting opinion
- Join Date
- May 2005
- Location
- Turramurra, NSW
- Posts
- 2,267
Doh! Should have read Derek's prose a bit more rather than just looking at the piccies.
Couldn't really see him buying a new set of stones every year or so.Bodgy
"Is it not enough simply to be able to appreciate the beauty of the garden without it being necessary to believe that there are faeries at the bottom of it? " Douglas Adams
-
26th January 2008, 11:12 PM #6
SENIOR MEMBER
- Join Date
- May 2007
- Location
- Melbourne
- Age
- 58
- Posts
- 832
Derek,
i've only just come across this thread and I can't believe more people have not commented.
Thanks so much your post here, as nearly all of your posts I have seen, is fantastic, well documented and the images are great.
-
27th January 2008, 01:36 PM #7
Skwair2rownd
- Join Date
- Nov 2007
- Location
- Dundowran Beach
- Age
- 76
- Posts
- 19,922
 Bevel up
Derek this is a wonderfully useful tutorial!! Thank you.

-
27th January 2008, 02:57 PM #8
Be inspired. Be creative. Be bold.
- Join Date
- Apr 2001
- Location
- Perth
- Posts
- 10,826
Thanks for the kind remarks. I, too, have been surprised that this has not received more attention. It contains some ground-breaking data, and I was under the impression that there were many with BU planes on the forum ...?
The one update I must mention here is that the jack radius to aim for is 8 1/2", not 5 1/2" - the latter is too tight. 8 1/2" will give you a deep and full-width shaving.
I shall be writing a more formal article in the future. Thanks to Bob for the maths.
Regards from Perth
DerekVisit www.inthewoodshop.com for tutorials on constructing handtools, handtool reviews, and my trials and tribulations with furniture builds.
-
27th January 2008, 08:23 PM #9
 Fossil Member
- Join Date
- Jan 2005
- Location
- Perth
- Posts
- 1,181
Hi Derek,
Another excellent write-up, with great photos, (we like photos, 'cause our reading comprehension ain't so good). Thanks for that.
Was intending to turn an old 5 1/2 into a scrub plane, (one day) so this is going to be very handy. Will have to re-read it a few times to get it into my thick head.
Onya.
Cheers
Pops
-
27th January 2008, 09:00 PM #10
Neander Normite
- Join Date
- Jan 2005
- Location
- Melbourne
- Age
- 65
- Posts
- 11,997
Derek, I confess I'm a little lost here. I saw this thread earlier and meant to research some things but got distracted, so I'll just ask "Why put a camber on a smoother doing a finishing cut instead of just carefully rounding the corners to avoid tracks?". I'm thinking that when doing the final passes you'd want a reasonably flat blade that you can feather the cuts together rather than fine furrows that may appear under a finish. Is this camber 1/64th or less? Thinking I've missed something...

Second question, have you considered hollow grinding the camber? No reason for the question other than curiosity.
-
14th February 2008, 12:01 AM #11
Be inspired. Be creative. Be bold.
- Join Date
- Apr 2001
- Location
- Perth
- Posts
- 10,826
Hi Groggy
My apologies for not replying earlier. Been caught up with stuff.
When you camber a smoother blade, the camber should act to create a fine feathering of the edges of the shaving, such that there are no signs of any transition. So, if your shaving is .001" thick at the centre (an average amount for a smoother), then if the shaving tapers to zero, the feathering is going to be so fine that there will not be any "furrows".
Of course you can hollow grind instead of using a flat grind. However I do not see the point with BU blades since you would likely be adding a microbevel (the only blade that I do not add a microbevel - and hollow grind - is the 25 degree one since I can then freehand the edge). Hollow grinding requires that more metal is removed.
Regards from Perth
DerekVisit www.inthewoodshop.com for tutorials on constructing handtools, handtool reviews, and my trials and tribulations with furniture builds.


 Reply With Quote


Similar Threads
-
The Lee Valley Little Victor reproduction Block Plane
By derekcohen in forum HAND TOOLS - UNPOWEREDReplies: 27Last Post: 7th March 2007, 08:27 AM -
Bevel Up Planes With Back Bevel
By Termite in forum HAND TOOLS - UNPOWEREDReplies: 21Last Post: 17th August 2005, 08:46 AM -
plane blades
By mikmaz1 in forum HAND TOOLS - UNPOWEREDReplies: 6Last Post: 21st September 2003, 11:07 PM -
Plane Blades
By John Saxton in forum ANNOUNCEMENTSReplies: 1Last Post: 6th July 2000, 11:28 PM -
Inst. for Makita plane blades adj.
By barrysumpter in forum HAND TOOLS - POWEREDReplies: 3Last Post: 1st June 2000, 02:54 PM
