

 Thanks:
  Likes:
  Needs Pictures: 0
 Picture(s) thanks: 0
Results 16 to 30 of 35
Thread: Unicorn in depth article
-
25th August 2020, 09:55 PM #16
 Be inspired. Be creative. Be bold.


- Join Date
- Apr 2001
- Location
- Perth
- Posts
- 10,820
 It is relevant to note that steel aside, chisels are a personal choice involving not just edge retention, but balance and control in the hand, as well as design elements, such as the quality and fineness of the side lands, which make detailed work easier or harder.
 Originally Posted by qwertyu

For example, my favourite chisels for dovetailing are Blue Spruce (A2 but thin steel blades), Veritas (PM-V11, light and balanced in the smaller sizes), and a set of vintage Stanley #750s (re-handled and blades remodelled, so hardly original). Their edge-holding varies greatly, with the Veritas best and the Stanley worst. But I love using them all.
With regard to MDF wheels, and other wheels which are hard ... leather, felt, etc ... this is what I wrote recently on the WoodCentral forum ...
I have added a unicorn profile to a variety of chisel steels: O1 and A2 (of course), but also PM-V11, M4 and 3V. The harder, more abrasion-resistant steels simply need a little different technique - more or less pressure, more or less speed, and a more or less abrasive compound.
In other words, the technique, per se, is not different, just that the set ups we use are different, and each one requires a slight variation. Bear with me as I describe my progression to date. This may help another starting out.
I've been using a half-speed grinder all the way through (when I set up the original stitched wheel, it was in a variable speed lathe but at 1425 rpm, the same as a half-speed grinder). The original wheel was a 6" and soaked in green compound, and it cut quite aggressively. Adding a unicorn profile to chisels was still okay, which goes to show how forgiving the method is with chisels.
I started a new system using a new 8" half-speed grinder (I had already planned to get another grinder before David came up with this Unicorn nonsense, one to shape curved blades and lathe chisels). There was a new 3/4" wide stitched denim wheel, initially, and then I added a 2" wide version with eyes on plane blades.
The 2" wide wheel was a mistake. Not only are the denim wheels much harder than the less-stitched cotton wheels, but the 2" wheel was difficult to use as it did not remain flat. The 3/4" wide wheels are the way to go.
Over the past couple of weekend I have been busy with painting doors and restoring the brass hardware. The latter has involved buffing away lacquer and polishing the brass (before re-lacquering and re-installing). I learned something from this buffing: the white compound is far more aggressive than the green compound. One might think that it would be preferable to use a more gentle buffing action, but the hard denim wheels then needed more pressure, and this (I think) created a variable surface on plane blades. I was struggling to unicorn BD plane blades.
All the buffing of brass destroyed the 2" wheel, and I used this as an excuse to get two more wheels, a hard felt wheel and a soft cotton wheel. And a bar of white compound.
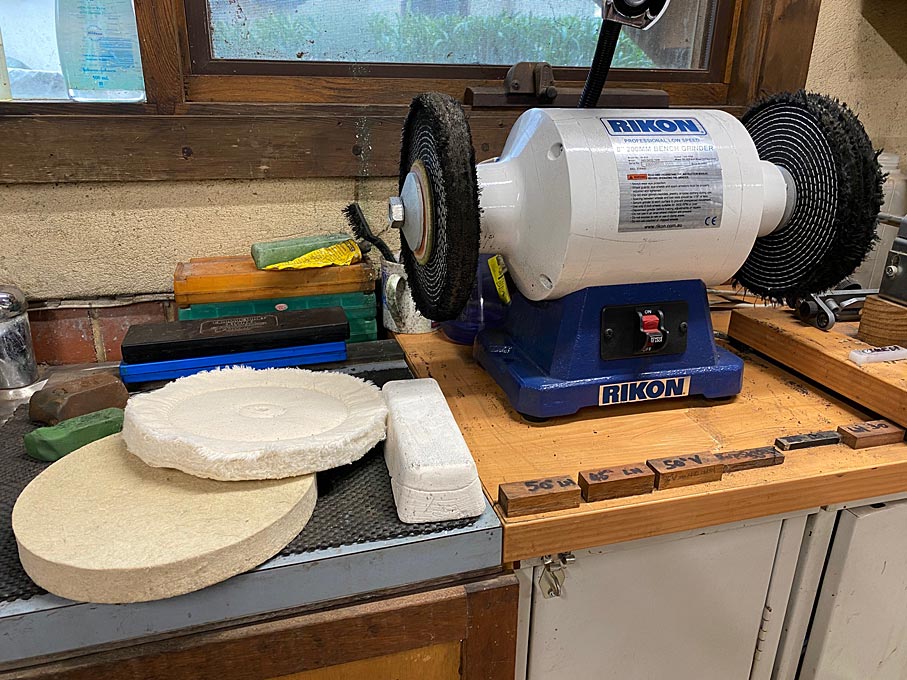
The hard felt was just too aggressive for my liking, and it was the final wake-up I needed to recognise that gentler is better. So now I have the softer cotton wheel on the other side. This is used with the white compound only ...
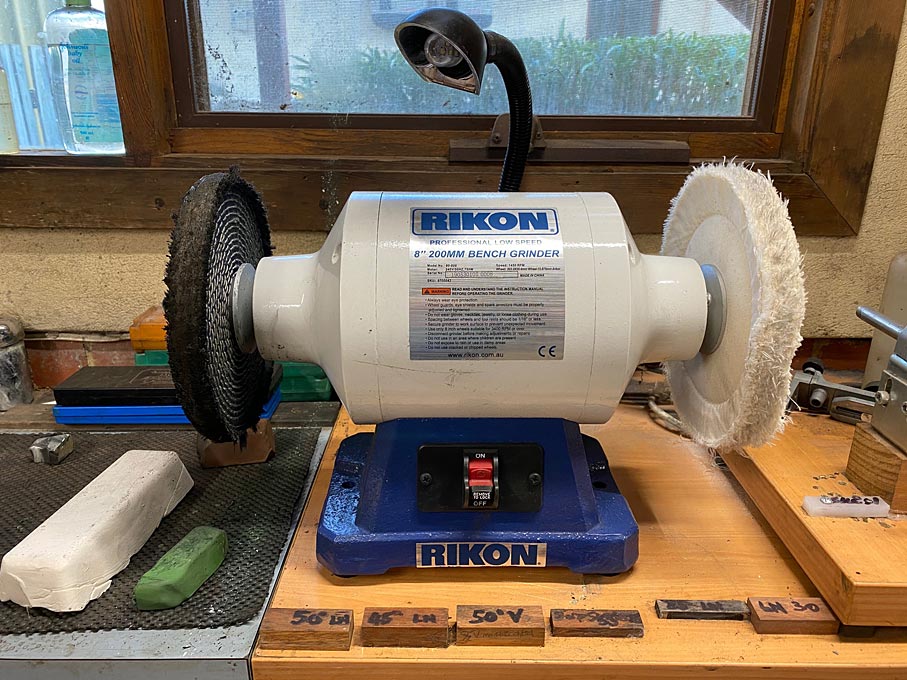
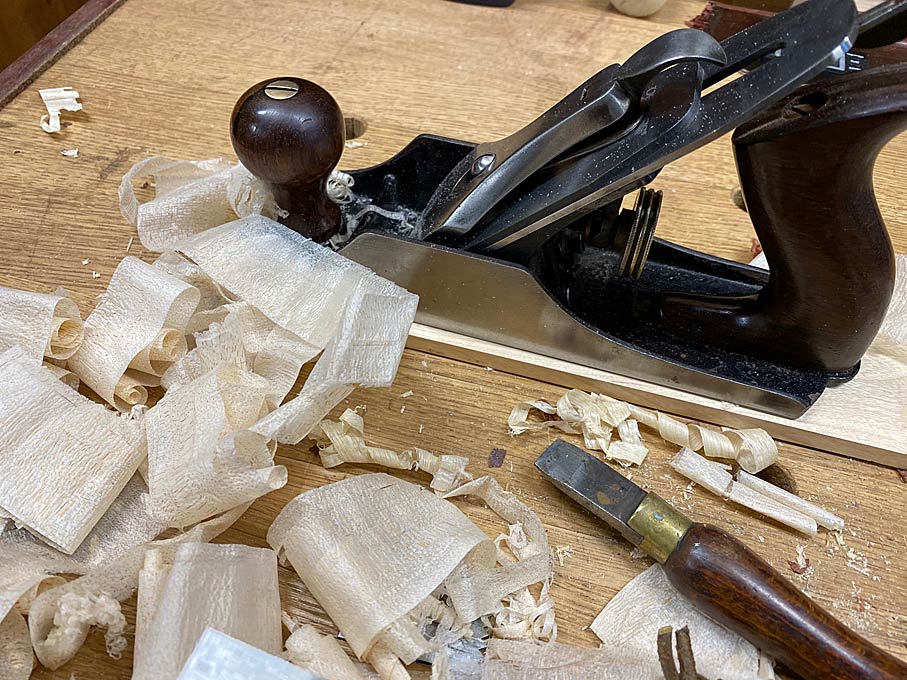
I spent a little time working on the technique for BD plane blades. The plane is a Bedrock #604, and the blade is a custom M4. The wood is Hard Maple ...
The blade has its existing 30 degree hollow grind. This was freehanded on a fine diamond stone (600 grit) to raise a wire, then smoothed a smidgeon on a worn extra fine diamond stone (possibly around 2000 grit. Then over to the wheel ...
I use the bottom of the wheel as it is easier to track the angle of buffing. I start with the primary bevel parallel to the circumference of the wheel. Then gently drop the end of the blade by about 10 degrees and lift the bevel into the wheel. This process lasts about 5 seconds. There is a very fine wire, which is removed on a hardwood-green compound strop.
The result was consistent full-width shavings with the existing very fine camber. I would call this a success.
USA Hard Maple is easy to do this (Jarrah not so much!) ...

Regards from Perth
Derek
Visit www.inthewoodshop.com for tutorials on constructing handtools, handtool reviews, and my trials and tribulations with furniture builds.
-
25th August 2020 09:55 PM # ADSGoogle Adsense Advertisement
- Join Date
- Always
- Location
- Advertising world
- Posts
- Many
-
25th August 2020, 10:12 PM #17
GOLD MEMBER
- Join Date
- May 2009
- Location
- melb
- Posts
- 1,125
Interesting derek. Whats the plan when you need to refreshen the edge? Just go straight to the buffer? (I think some people use a strop but might as well use a buffer?)
Also, when you are buffing the edge, do you (or plan to for future buffs) to do a little more work on the sides to maintain the camber?
edit: also - where did you get your white buffing wheel?
-
25th August 2020, 10:53 PM #18
 SENIOR MEMBER
- Join Date
- Oct 2019
- Location
- Brisbane, Australia
- Age
- 43
- Posts
- 519
qwertyu:
I was wondering the same thing (where you'd ordinarily strop).
If I have understood correctly refresh involves a quick hone on a stone to restore the primary bevel before "unicorning" again.
This is more fiddly than stropping on the go but the selling point seems to be that the stropping is going to be needed less frequently so you're still ahead.
While I stand to be corrected on the "refresh", gotta say that even assuming there's no ability to "refresh", I'm sold at least for chisels. I am astonished by how long a 17-degree bevel on a beater chisel has lasted me.
As an aside, having a grinder handy is no bad thing. I'm also just leaving a loose, cheap soft wheel on the other side of the grinder for friction polishes. I've found myself using it for just about everything at the moment. When you have a bench grinder set up and ready to go it's surprising how often you'll find uses for it.
-
26th August 2020, 03:24 AM #19
Be inspired. Be creative. Be bold.
- Join Date
- Apr 2001
- Location
- Perth
- Posts
- 10,820
One of the issues with plane blades is that wear at the back if the bevel needs to be removed when sharpening. A hollow ground blade has little steel at the edge, and hand grinding (e.g. 600 grit diamond stone) generally takes out the wear when the bevel is re-honed.
The answer is, therefore, that one needs to use a stone after the blade dulls. Where the unicorn method offers an advantage is that the new edge can be buffed after a medium stone and one does not have to go as far as a fine stone.
Regards from Perth
DerekVisit www.inthewoodshop.com for tutorials on constructing handtools, handtool reviews, and my trials and tribulations with furniture builds.
-
26th August 2020, 06:28 AM #20
GOLD MEMBER
- Join Date
- Mar 2010
- Location
- US
- Posts
- 3,107
Am I correct that the final stropping is nearing the angle of the bed on the plane and all of this work is done on the bevel side of a stanley pattern 5? Originally Posted by justonething
IT's sort of a convex bevel - it's really a convex bevel only a couple of thousandth's long where an edge actually fails (pretty uncommon for us to have edge failure more than a couple of thousandths into an edge as a plane stops cutting well once any accumulation of edge damage occurs more than a few thousandths), and then beyond that, we're best off thinning all of the bevels involved.
There is one method that I call the unicorn, and then the rest is just buffing all over the place and anything will work if done right. The unicorn on chisels is buffing over the tip of the chisel after dropping the primary and secondary angles to 20 and 23 degrees, respectively, or perhaps for someone who only wants a single grind, hollow grinding to 23-25, honing on the hollow and then buffing until there's a bright stripe. The unicorn on planes is the same thing on the bevel side of the plane and the back of the plane just finished on a stone. The reduction in the bevels before buffing give you room for clearance, but still, the plane gets less buffing than what one might do on a chisel. A few stripes across the buffer with some force, and not too much more or the edge will be rounded until there are clearance problems. The cut should be crisp and the edge will be very tough and the whole process of using the plane will cease when clearance runs out.
Since coming up with this stuff, references to buff stropping have been sent to me from the past, and that's where you do only light buffing on one or both sides after finishing the edge as normal through regular honing steps. The reason for the "uni" instead of light buff stropping is the unicorn treatment eliminates the need for fine honing and even a pretty significant wire edge is gone.
I developed it to accommodate chisels, but not with the buffer, rather a tiny roll on a slow cutting stone years ago. That still makes a wire edge, but that itself works great on chisels if the wire edge is stropped off. The ability of 80-90 feet per second of a soft buffing wheel to completely clean the edge of any defects and at the same time round over the tip (without doing heavy buffing anywhere else), but only just the very tip - it's just better at it than doing it by hand.
There has been some aversion to honing a plane iron (many people with chisels, too, but for chisels, it doesn't matter as much) to an angle so acute as 23 degrees before buffing, but I have planed a whole lot of material, including wood with dry knots, and no real issue with edge holding. For small contaminants that caused problems with freshly honed blades finished around 33 degrees without buffing, the rounded bevel at the very tip is protective and damage is less.
I put commentary of the two methods for planes - one that I call "uni" and the other "just buffing" - they are for bevel down planes. Uni buffs only one side heavily. "just buffing", buff finishes both sides. Either works well, but they will be much more difficult without narrowing the primary and secondary bevel first to give clearance room. Even if you decide not to use a buffer on planes, you can just add bevels then to the 20 degree primary bevel - it'll be strong enough, so there's really no risk. The damage will still always occur in the first 5 thousandths or so of the edge and it won't "Break off" or anything from the shallow primary.
-
26th August 2020, 06:33 AM #21
GOLD MEMBER
- Join Date
- Mar 2010
- Location
- US
- Posts
- 3,107
For bevel up planes, some urging brings the following:
* if you're buffing heavily, make a secondary bevel somewhere around 5-10 degrees short of your final goal (as derek says, why bother keeping a full primary - in my opinion, and probably in his, making simple adjustments to camber and such on a full steep bevel is a real pain. Making those adjustments to a secondary bevel on a shallow primary, not nearly the same pain).
* your secondary bevel can just be done with a medium stone like a 1000 grit waterstone
* spend appreciable time if needed honing the back of the bu plane blade
* buff the secondary bevel briskly and the iron will be crisp, fully sharpened and will behave like a blade 5-10 degrees higher pitch than the secondary angle was cut
Example - if you have a LV BU plane, and you find that tearout doesn't stop at 55 degrees, but it does at 62. Keep a blade with a normal primary bevel, hone a secondary bevel on the blade, work the back and then buff. You will find the result to be very similar at 62, but sharpening will be faster and there's no wire edge to address.
Just as with anything else, if you still have tearout, add 5 degrees to the secondary bevel and try again
For all of this, remove the unicorn stripe each time when you refresh the secondary. regrind when refreshing the secondary is difficult (or if you grind by hand, grind each time to remove most of the secondary and then redo the secondary. That makes it easier to grind accurately by hand and not create problems to address later).
-
26th August 2020, 06:38 AM #22
GOLD MEMBER
- Join Date
- Mar 2010
- Location
- US
- Posts
- 3,107
you probably won't need to strop refresh. Honing the chisel by refreshing the secondary and then buffing will take 30-45 seconds. Originally Posted by Cgcc
I retempered a japanese chisel the other night. It was overhard and chippy. After retempering, I gave it "the unicorn" and then proceeded to beat it until my forearm was too tired (instead of a dainty 375 steel hammer, I used a 750g steel hammer). I would never abuse a chisel like this in typical work. Out of curiosity, I pressed paraffin against the chisel and the wax melted (low melting point, but still).
Then, when I was addressing final fit of the handle, I realized that the tang from such heavy use had ruined the fit into the handle, and now I need to make another handle.
Most of the damage that we get in chisels (that we'd strop if that's the method of choice rather than resharpening) is due to small chipping and deflection. Once that's eliminated, so to will be the stropping. you should be able to use a chisel until you're tired and still be able to pare wood cleanly with it. stropping realigns deflections, and completes breaking off of damage on harder chisels, but you won't have that stuff to deal with now.
-
26th August 2020, 11:53 AM #23
GOLD MEMBER
- Join Date
- May 2009
- Location
- melb
- Posts
- 1,125
another question - is this suitable for really narrow chisel - say 3mm? putting a 20deg hollow bevel would make it really weak?
-
26th August 2020, 04:45 PM #24
Be inspired. Be creative. Be bold.
- Join Date
- Apr 2001
- Location
- Perth
- Posts
- 10,820
The strength comes from the higher nano bevel, the unicorn profile, and not from the primary bevel. So, a 20 degree primary bevel is converted into a strength since the low primary offers greater/easier penetration than a 30 degree primary.
Regards from Perth
DerekVisit www.inthewoodshop.com for tutorials on constructing handtools, handtool reviews, and my trials and tribulations with furniture builds.
-
26th August 2020, 07:40 PM #25
GOLD MEMBER
- Join Date
- May 2009
- Location
- melb
- Posts
- 1,125
I suppose I meant it snapping half way up the primary bevel.
I have a brand new narex 3mm chisel which has a 25mm bevel. I ended up doing a secondary bevel by hand and buffed it and it was really sharp.
Is there any difference between using 20 vs 25 primary? since the unicorn bevel will essentially be the same once buffed?
-
26th August 2020, 09:29 PM #26
GOLD MEMBER
- Join Date
- Mar 2010
- Location
- US
- Posts
- 3,107
The lower the primary, the smoother the chisel will go through wood as the unicorn will still be less steep with a shallower bevel and secondary behind it.
I wouldn't thln the cross section of a 1/8 chisel, though. Just roll the tip on it a little if the wdge crumbles.6mm up with this modified profile, no problem.
I think the narrow chisel would do ok, but there's no great need for additional slickness through the cut with an chisel that narrow.
-
26th August 2020, 10:38 PM #27
GOLD MEMBER
- Join Date
- Nov 2012
- Location
- SE Melb
- Age
- 64
- Posts
- 1,277
Correct. Originally Posted by D.W.
I don't measure the stropping angle, just felt that it was between 40~45�. I have noticed that increasing the bevel at the tip close to the bed angle gives a better result of very knotty cypress pine that was milled from very thin stock. The grains tend to go everywhere near these knots.
-
31st August 2020, 03:19 PM #28
GOLD MEMBER
- Join Date
- May 2009
- Location
- melb
- Posts
- 1,125
Just watched DW's latest youtube video
The last of the plane blade buffer sharpening - super fine abrasives - YouTube
20deg on grinder
approx 25deg by hand, remove bur
0.3micro aluminium oxide embedded into was on white wheel on grinder
How do you get a camber? Do you concentrate on the edges a little more when buffing on the grinder as I didnt see you do it when you were sharpening by hand
a general grinder + buffing wheel question - I bought a white wheel and needed to buy tapered spindle. Is there a way to get the buffer onto the grinder directly so it takes up less space?
Tapered Spindles | Total Tools
-
31st August 2020, 03:31 PM #29
GOLD MEMBER
- Join Date
- Mar 2010
- Location
- US
- Posts
- 3,107
I concentrate some pressure on the corners or in the circular motion on the washita (if not using the washita, whatever the middle stone is. My objective is to have the smoother set so that on a finish plane final (thinnest) set, the shaving is about 2/3rds of the iron width. ) Originally Posted by qwertyu
As far as the wheel goes, I'm guessing the taper is for quick changing of buffing wheels. This buffer (mine) on the floor is just like a grinder with long straight shafts, so I don't use a taper. I think the taper is probably useful for metal polishing or jeweler's work, but the ability to do quick changes doesn't really matter as much for us when we're sharpening.
-
31st August 2020, 03:51 PM #30
GOLD MEMBER
- Join Date
- May 2009
- Location
- melb
- Posts
- 1,125
I see. Thanks for the info. When you say middle stone - any idea what grit/micron that is? I have a set of those veritas iron plates with diamond paste 14, 7, 3.5 and 1 micron
All the buffing wheels I see have a tiny hole which wont fit around the arbor - if anyone has a suggestion on where to buy a buffing wheel with regular size arbor hole please post it
edit: also do you take youtube requests? Would be great to see a video taking a kitchen knife from dull to unicorn bevel


 Reply With Quote
Similar Threads
-
The Unicorn method
By derekcohen in forum SHARPENINGReplies: 168Last Post: 4th September 2022, 08:55 PM -
Unicorn Spit?
By heffa in forum FINISHINGReplies: 0Last Post: 4th April 2020, 01:25 PM -
Unicorn
By ClaudeF in forum WOODCARVING AND SCULPTUREReplies: 0Last Post: 14th March 2016, 06:21 AM -
UNICORN
By cobalt32 in forum WOODCARVING AND SCULPTUREReplies: 11Last Post: 9th November 2014, 10:13 AM -
Unicorn horn
By ElizaLeahy in forum WOODTURNING - GENERALReplies: 36Last Post: 24th April 2009, 12:31 PM
