

 Thanks:
  Likes:
  Needs Pictures:
  Picture(s) thanks:
Results 31 to 45 of 169
Thread: The Unicorn method
-
3rd August 2020, 01:01 PM #31
 GOLD MEMBER


- Join Date
- Mar 2010
- Location
- US
- Posts
- 3,101

if it's rolling on the edge, it needs more buffing (do you see a bright little stripe?) to be more round, or the secondary bevel needs to be up a few degrees. The hallmark of the method being right is that it cuts easy and after you mallet or pare, you can't feel anything untoward at the edge.
-
3rd August 2020 01:01 PM # ADSGoogle Adsense Advertisement
- Join Date
- Always
- Location
- Advertising world
- Posts
- Many
-
3rd August 2020, 02:53 PM #32
 GOLD MEMBER
- Join Date
- Feb 2016
- Location
- Canberra
- Posts
- 5,124
 Originally Posted by RossM

I meant it from a production perspective.
The video is RAM-PACKED with information. My hassle is the really juicy bits are interspersed with other info.
Nothing wrong with a conversational video (as Ian Hawthornes box making videos are long conversations), but this info seems like an idea that will change how sharpening is done WORLDWIDE FOREVER.
Hence the importance
-
3rd August 2020, 02:57 PM #33
SENIOR MEMBER
- Join Date
- Oct 2019
- Location
- Brisbane, Australia
- Age
- 43
- Posts
- 519
Hi David,
I couldn't see a bright strip because the secondary bevel was bright off the stone and back 1-2mm or so - so the whole front end was bright.
Although a late thought was - I recalled now that I was using a loose wheel instead of a stitched wheel (on the other wheel, that I usually use with black fast-cutting paste). Do you think that could be making a difference? That might have meant I was actually mostly touching up the area behind the edge, as I was conscious of not jamming it in, but the fluffy loose bits might have been making contact a bit far back from the edge and preventing me from getting the effect.
I will have another crack.
-
3rd August 2020, 03:25 PM #34
Be inspired. Be creative. Be bold.
- Join Date
- Apr 2001
- Location
- Perth
- Posts
- 10,820
Imagine that you are looking at a dull blade. The edge will show light, which indicates there is wear (the converse is that the absence of light shows it is sharp or, rather, that the face meets the back cleanly).
Now, after adding the nano bevel via stropping, this light returns. If it is not there, then there is no rounded nano edge. Too much of this and the edge is dubbed. Just enough and the edge remains sharp (or sharper).
Regards from Perth
DerekVisit www.inthewoodshop.com for tutorials on constructing handtools, handtool reviews, and my trials and tribulations with furniture builds.
-
3rd August 2020, 06:43 PM #35
Senior Member
- Join Date
- Aug 2006
- Location
- Ryde, NSW, Australia
- Age
- 63
- Posts
- 131
Thanks for all the information here. It been really interesting and valuable.
I've been putting off buying a bench grinder but I think I may need to do so - and a buffing wheel!
Cheers
-
3rd August 2020, 08:30 PM #36
GOLD MEMBER
- Join Date
- Feb 2016
- Location
- Canberra
- Posts
- 5,124
It is said there is a problem using the technique to do plane blades.
Would doubling the width of the buffer overcome this?
-
3rd August 2020, 10:38 PM #37
Senior Member
- Join Date
- May 2016
- Location
- Perth
- Posts
- 409
Hi David,
What's the method for touch ups? Straight back to the buffing wheel or back to the stones followed by the wheel?
Cheers
Zac.
Sent from my Nokia 4.2 using Tapatalk
-
3rd August 2020, 11:48 PM #38
GOLD MEMBER
- Join Date
- Mar 2010
- Location
- US
- Posts
- 3,101
if you see small damage occurring, then you can buff for a second or two again to try to improve the strength of the edge, but generally, you shouldn't need touch ups between sharpening. Originally Posted by Fergiz01
Unless you have to grind, it's just 15 seconds or whatever it takes on a medium diamond hone and then hit the buffer again.
-
4th August 2020, 12:59 AM #39
GOLD MEMBER
- Join Date
- Mar 2010
- Location
- US
- Posts
- 3,101
There's a little narrower range for the amount and orientation of the buffing, but it will do plane blades OK. Originally Posted by woodPixel
Our experience on woodcentral (where some of the members are in clubs and they're pushing this whole thing at club members) is that most folks can take any chisel (Without all of my suppositions about ideal use) and stick it in a buffer and be better off the first time, but my guess with plane irons is that folks will need to stick with finding the right feel a week or two and then they'll have excellent plane irons.
I'd be surprised if most people make the effort to get the right feel for planes with their setup, but it's worth doing. Speed and type of wheel changes things, so there's no preset angle to tell anyone. As far as wider, I think the 1/2" wheels are ideal for everything. It's not so much the wheel width that's an issue, it's just nailing the right amount of buffing and not forgetting to work the back of an iron on a stone to keep geometry good.
-
4th August 2020, 01:21 AM #40
Be inspired. Be creative. Be bold.
- Join Date
- Apr 2001
- Location
- Perth
- Posts
- 10,820
Zac, you will want to try this with knife, chisel and spokeshave blades ... Originally Posted by Fergiz01
Take a sharp blade and test it. Then take this blade and hold the bevel in line to the circumference of wheel so that the wheel buffs the bevel. Try the edge again. I did this today with spokeshaves I was using, and the edges were sublime. This is not the Unicorn edge. This is just buffing an edge to get sharp.
Now try again. This time increase the buffing angle by 20 degrees, but very lightly and for about 2 seconds. This should leave a very sharp edge that will have a nano bevel (i.e. Unicorn). Remove the wire edge.
Regards from Perth
DerekVisit www.inthewoodshop.com for tutorials on constructing handtools, handtool reviews, and my trials and tribulations with furniture builds.
-
4th August 2020, 02:24 AM #41
Senior Member
- Join Date
- May 2016
- Location
- Perth
- Posts
- 409
Thanks David and Derek,
I'm still waiting for my cloth wheel to arrive and I'm running through the work / sharpening scenarios in my head. I'm doing a bit of a reorganisation of my set up at the moment and the grinding and sharpening station is next.
Cheers,
Zac.
Sent from my Nokia 4.2 using Tapatalk
-
4th August 2020, 03:35 AM #42
GOLD MEMBER
- Join Date
- Mar 2010
- Location
- US
- Posts
- 3,101
Originally Posted by Fergiz01
Have at it once the stuff gets there. Before then, no worries setting up too many scenarios. In general, this is easier than you'll expect it should be. There may be some learning curve to really get things ideal, but it's short and the result is otherworldly.
-
4th August 2020, 05:19 PM #43
 GOLD MEMBER
- Join Date
- Apr 2006
- Location
- Hobart
- Posts
- 5,121
Originally Posted by Chris Parks
Originally Posted by derekcohen
I am one who saw the initial post and sat on it, not sure what to do.
My initial reaction was incredulity, disbelief ....... but the posters were Derek, Chris and DW, all with extremely high credibility.
My second, and continuing, reaction was puzzlement; how could something so simple and so close to traditional wheel buffing yield such superior results? And what if the primary bevel is not 20* - will it also work with 35* bevel on a mortice chisel?
Finally, do I go and buy a buffing wheel, or wait and listen while other Forumites experiment, test and refine the method further?
-
4th August 2020, 05:57 PM #44
Be inspired. Be creative. Be bold.
- Join Date
- Apr 2001
- Location
- Perth
- Posts
- 10,820
Hi Graeme
Here is a picture taken last evening ...
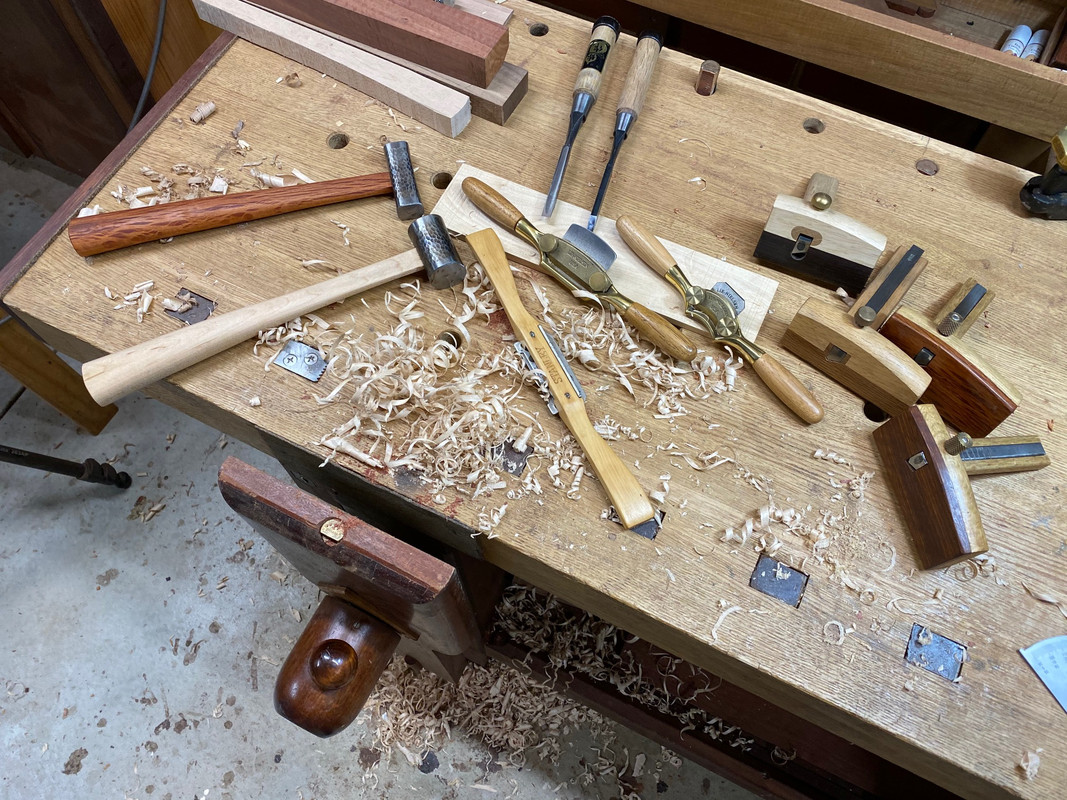
At the rear are two Fujikawa mortice chisels. I spent Sunday preparing the 6mm, which involved flattening the back (which was low at the bevel end) and then changing the bevel from 35- to 30 degrees. That was a lot of work as the steel is very hard - much harder than I expected. Even the "soft" iron was as hard as most tool steel. When it was done, I tested the edge by paring end grain Jacaranda (the softest wood to hand). It did okay but not as well as I hoped (compared to a bench chisel). I gave it a 2" lick on the buffing wheel, and the edge was transformed. Note that I was more interested in sharpness here and had hone to 13000 on a Sigma waterstone.
Yesterday (Monday) I did the 8mm mortice chisel. This was a Lot more work, with a 40 degree bevel! I did not have as much time by this stage, so stopped after a 600 diamond stone on the bevel (the back was polished to about 10000), and then used the buffer along with a nano (Unicorn) bevel. It simply reeled off shavings leaving a smooth, silky finish ....

I made new handles for my two gennous. The previous handles were too skinny for my taste, and these are chunkier. To shape them I used three spokeshaves, two LN (one with a hollow blade) and a Stanley #84. These were buffed on the wheel. The result absolutely transformed their performance into the effortless!
I also honed blades for the cutting gauges, which is an interesting discussion for another time, suffice to note that the edges are sharp.
The point is that none of these have a 20 degree primary bevel. The mortice chisels are 35 degrees. The spokeshaves are 30 degrees. The earlier post of the Marples chisels were 20 degrees, but the Stanley chisel was 25 degrees, as were the block planes I did.
Regards from Perth
Derek
p.s. I have probably mentioned this before, but it is worth repeating for the confused: I have used a Tormek leather buffing wheel for donkey years, and never really been happy with the results on anything, especially curved blades, such as gouges. The wheel on the Tormek is hard, covered in leather with little give. The stitched cloth buffing wheel is a different kettle of fish.Visit www.inthewoodshop.com for tutorials on constructing handtools, handtool reviews, and my trials and tribulations with furniture builds.
-
5th August 2020, 09:32 AM #45
Senior Member
- Join Date
- Aug 2006
- Location
- Ryde, NSW, Australia
- Age
- 63
- Posts
- 131
Derek - i noticed you purchased a second bench grinder for the buffer. I am about to purchase my first bench grinder and wonder if I can get by with one grinding wheel and the buffer (replacing the finer grit wheel). I am only sharpening plane blades and chisels at this stage.
Or would be best to have the two grinding wheels and put the buffer on a drill?
Thanks for any advice.

 Reply With Quote

Similar Threads
-
Unicorn Spit?
By heffa in forum FINISHINGReplies: 0Last Post: 4th April 2020, 01:25 PM -
Unicorn
By ClaudeF in forum WOODCARVING AND SCULPTUREReplies: 0Last Post: 14th March 2016, 06:21 AM -
UNICORN
By cobalt32 in forum WOODCARVING AND SCULPTUREReplies: 11Last Post: 9th November 2014, 10:13 AM -
sharpening knives on waterstones: japanese method vs western method
By J_SAMa in forum SHARPENINGReplies: 5Last Post: 28th December 2012, 04:35 AM -
Unicorn horn
By ElizaLeahy in forum WOODTURNING - GENERALReplies: 36Last Post: 24th April 2009, 12:31 PM
