

 Thanks:
  Likes:
  Needs Pictures: 0
 Picture(s) thanks:
Results 31 to 43 of 43
-
3rd April 2020, 10:23 AM #31
 GOLD MEMBER

- Join Date
- Oct 2018
- Location
- Dandenong Ranges
- Posts
- 1,892

Ian, I must have been replying at the same time as you. I am thinking the same. It's easy to over complicate things. Things often get resolved as you go. Derek, I do have some brass that might serve as an infill but then I would be restricted to sanding to square up plane base
-
3rd April 2020 10:23 AM # ADSGoogle Adsense Advertisement
- Join Date
- Always
- Location
- Advertising world
- Posts
- Many
-
3rd April 2020, 11:18 AM #32
almost a woodworker


- Join Date
- Feb 2007
- Location
- blue mountains
- Posts
- 4,888
Keep it simple. A hardwood sole will last a long time. Not like its in use all day every day. Even when it finally does get out of kilter its no big deal to true up again.
Regards
John
-
3rd April 2020, 04:08 PM #33
GOLD MEMBER
- Join Date
- Feb 2003
- Location
- back in Alberta for a while
- Age
- 68
- Posts
- 12,006
square needs to be square in two directions -- in reference to the reference edge and also in reference to the reference face. Originally Posted by Mountain Ash

unless the face opposite to the reference face is exactly parallel to the reference face, the opposite end wont be square to both faces.regards from Alberta, Canada
ian
-
3rd April 2020, 05:07 PM #34
Be inspired. Be creative. Be bold.
- Join Date
- Apr 2001
- Location
- Perth
- Posts
- 10,820
This shooting board is for moldings and is designed to be used both ways.
Similarly, this mitre jig for my table saw cuts complimentary angles. A lot of time went into getting the sides and end absolutely square.

In both these examples, the absolute accuracy in shooting or sawing one edge is unimportant as the two edges compliment one another to make 90 degrees.
As Ian points out, the platform must have perfectly parallel sides, and the fence across it must be exactly the same from each side to work this way.
Regards from Perth
DerekVisit www.inthewoodshop.com for tutorials on constructing handtools, handtool reviews, and my trials and tribulations with furniture builds.
-
3rd April 2020, 07:53 PM #35
GOLD MEMBER
- Join Date
- Mar 2004
- Location
- Brisbane (western suburbs)
- Age
- 77
- Posts
- 12,117
Orright - MA, I've done the nutting-out for you.

Curiosity got the better of me and I decided it was time I sorted out bed & skew angles, it's something I've been meaning to do for some time so I can add it to the second edition of my 'manual'.
So I grabbed some scrap and cut out a bunch of "blade beds" at different bed angles but the same skew angle. The pic is from the "sole" side and the labels tell the story: 1.jpg
The message is that the increase in mouth angle for a skewed bed as the bed angle is decreased is gradual at first, but increases more rapidly as the bed angle gets lower. The one second from the left was a bit of a lucky guess. I used Derek's 38 degree bed angle and guestimated from the other ones I'd made that a 15* skew should give me a 20 degree mouth, which it did, near enough for practical purposes.
So my suggestion to begin with a 10 degree bed skew was too conservative, you'll need a bit more skew on the bed to get a 20 degree mouth.
This shot will illustrate what I've been rabbiting on about: 2.jpg
The centre bed is the one I'd choose for a skewed woodie. The left bed is a hypothetical 18 degree bed with 10* skew, which gave a mouth of 28*. The bed on the right is 18 * and flat - it wouldn't matter if it was 12 degrees or 18 degrees, you can get a 20 degree mouth by rotating the bed appropriately, as shown.
Since I had the bits there, I decided to mock up a couple of planes to really show the differences, one using the 38* bed & 15* skew, & for the other I made another bed at 12 degrees to mimic the Veritas arrangement. From the sole side, the blade protrudes at 20 degrees (approx!) relative to the sole axis: 4.jpg
Of course the other side tells a very different story: 5.jpg
The skewed, BD configuration is simple to concieve, and simple to make (particularly by the lamination technique). the most difficult part is getting the wedge-retaining bar fitted accurately. However, even if you get it slightly off, it's no big deal to adjust the wedge to fit properly.6.jpg
The low-angle, bevel-up configuration is simply impractical for wood construction & I wouldn't even think about it. Even in steel, it would be a real challenge for the home constructor; you would need either a milling machine to cut the blade bed in the sole, or cut out a large mouth so you can file the bed ramp, which you would then have to fill with a sliding piece to close the mouth (a la Veritas): 7.jpg
Apart from making the manufacture easier, Veritas's design has a big advantage in that the blade wedge remains square - easier to grind and you don't have that fragile leading corner (which gets more pointy & more fragile as the bed angle drops & the mouth angle increases): 3.jpg
So there you have it - a 38 degree bed with a 15 degree skew & you'll have the best of all possible worlds for a BD wooden-bodied shooter....

Cheers,IW
-
4th April 2020, 12:26 AM #36
GOLD MEMBER
- Join Date
- Mar 2010
- Location
- US
- Posts
- 3,112
Without a wear strip right at the mouth, it wont' last long. It's not like planing long grain. I know people often say things will or won't on forums and they have no idea (so you could suspect I'm being one of those guys just hassling your posts), but here's my proof - I offer the advice all friendly -like!! Originally Posted by orraloon
Imgur: The magic of the Internet
This plane is beech.
Metal provides another unsuspected advantage - on the side of the plane. When you have a wooden plane, if you manage to get wax on the side that's on the shooting fixture, it will run away from the cut way too easily. Metal has enough friction to keep the plane in place a little bit better so that you don't have to manhandle the plane laterally to keep it against the cut.
This lack of downforce is the reason that historically, only small work was shot (whereas people often like to do things like drawer ends now - they would've just been planed with a smoothing or trying plane in the vise to a mark - it's easier and faster and a plane will cut for much longer upright with typical downward forces than it will in a shooting fixture).
The speed of throat erosion and the desire for this plane to wander away from the side of the cut due to the slick wooden side is the reason that I made the infill plane shown prior here. The wooden one preceded the metal one. But having not pulled this out for a while, I see it's getting mold on it and I guess It would be wise for me to try my own advice - clean out a recess and insert a metal fixture.
-
4th April 2020, 12:30 AM #37
GOLD MEMBER
- Join Date
- Oct 2018
- Location
- Dandenong Ranges
- Posts
- 1,892
Ian, thank you. Now I have no excuse not to get started, especially considering I bought the beech last week.
-
4th April 2020, 12:32 AM #38
GOLD MEMBER
- Join Date
- Mar 2010
- Location
- US
- Posts
- 3,112
Wow...imgur is proud of themselves. that link title is their doing, not mine.
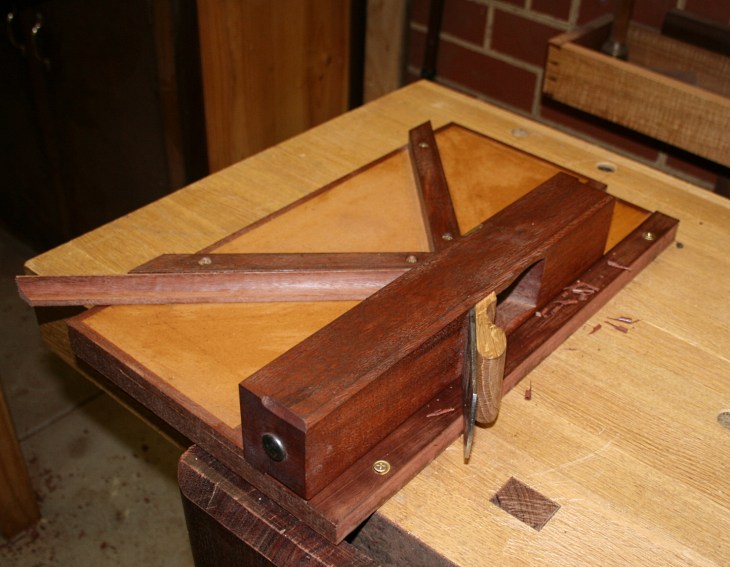
There's no magic behind it, just a three picture gallery of a plane designed to work the way derek's is shown, but in a fixture where the fences are on the ends instead of the middle.
What a novel idea of mine, right? No, of course not - I copied the idea from an old picture that someone had on an english board. The picture was shown, but nobody had ever actually seen the plane, so I made one.
-
4th April 2020, 01:35 AM #39
Deceased
- Join Date
- May 2008
- Location
- Australia
- Posts
- 2,357
Originally Posted by D.W.
DW; was this where the idea came from; The Rogers Patent Miter Planer
-
4th April 2020, 02:17 AM #40
GOLD MEMBER
- Join Date
- Mar 2010
- Location
- US
- Posts
- 3,112
No, but I've seen that before and it may have come up. For someone able to cast and machine, I'd bet that thing works better than the wooden setup. I'll see if I can find the wooden plane drawing or catalog picture that was referenced. I took some liberties with the style.
-
4th April 2020, 04:04 AM #41
GOLD MEMBER
- Join Date
- Mar 2010
- Location
- US
- Posts
- 3,112
Of course, I can't manage to find it. If I do, i'll return here. I'd saved that image on my computer when I built the plane, but have since had a catastrophic failure and lost it. Not a big deal, but I know you like to build planes and you might fancy copying the original as some would probably say it looks better than mine.
-
4th April 2020, 05:00 AM #42
GOLD MEMBER
- Join Date
- Mar 2010
- Location
- US
- Posts
- 3,112
See the following link for the plane that I loosely copied. I think this one is single iron (but it would be cutting only end grain, no problem).
I've pondered solving the minor flaws with mine (as a free moving plane, it's OK, but not great), but not sure how much time I want to spend on a large board and what kind of wood I'd like to waste to make it.
UKworkshop.co.uk My contribution to obscure tool reproduction : Hand Tools - Page 2 - UKworkshop.co.uk
(look at the first like under the picture
-
6th April 2020, 09:10 AM #43
GOLD MEMBER
- Join Date
- Mar 2004
- Location
- Brisbane (western suburbs)
- Age
- 77
- Posts
- 12,117
Folks, I am a very tolerant moderator, minor hijacks & asides are acceptable parts of discussions in any thread in this section as long as they have some relevance. I see no problem with disagreement & debate as long as it's rational & polite; it can be both informative & healthy. But it's not the place for airing pointless animosities which are neither informative nor edifying.....
Cheers,IW

 Reply With Quote


Similar Threads
-
Shooting Boards - which plane?
By woodPixel in forum HAND TOOLS - UNPOWEREDReplies: 45Last Post: 11th July 2017, 03:11 AM -
Lee Valley shooting plane
By groeneaj in forum HAND TOOLS - UNPOWEREDReplies: 29Last Post: 12th August 2013, 12:44 AM -
Shooting board plane advice.
By Too Many Clamps in forum HAND TOOLS - UNPOWEREDReplies: 26Last Post: 20th September 2010, 06:05 PM -
Making a Shooting Board
By GraemeCook in forum HOMEMADE TOOLS AND JIGS ETC.Replies: 7Last Post: 23rd December 2008, 05:38 PM -
Shooting Plane
By jmk89 in forum HOMEMADE TOOLS AND JIGS ETC.Replies: 12Last Post: 4th August 2006, 02:24 PM
