

 Thanks:
  Likes:
  Needs Pictures: 0
 Picture(s) thanks:
Results 31 to 45 of 46
-
13th March 2022, 02:32 PM #31
 SENIOR MEMBER


- Join Date
- Oct 2010
- Location
- NSW
- Posts
- 652
 I learnt the tongue oil trick from a very talented woodturner many years ago. His theory was that the swelling of the fibres packed them together tighter and caused them to be cut rather than be displaced and tear. Whatever, it works! I tend to lick my thumb to apply it.
 Originally Posted by IanW

-
13th March 2022 02:32 PM # ADSGoogle Adsense Advertisement
- Join Date
- Always
- Location
- Advertising world
- Posts
- Many
-
13th March 2022, 06:11 PM #32
 GOLD MEMBER

- Join Date
- Nov 2011
- Location
- Melbourne
- Posts
- 7,008
Why am i imagining new Woodturners bend over there lathes, licking there turnings on a lathe, an explaining to their partners, they read this great tip on a Wood Work forum.[emoji41] Originally Posted by Picko
Cheers Matt.
-
13th March 2022, 06:45 PM #33
GOLD MEMBER
- Join Date
- May 2010
- Location
- Not far enough away from Melbourne
- Posts
- 4,204
I was taught woodworking from about the age of 10 by my Grandfather. Somewhere between ages 11 and 12 probably, I would have been taught shooting. I was taught to use a Stanley 5 1/2 as the shooting plane. Plenty of width for the thicker boards and it had the mass to keep it moving in the cut. I was taught to use the lateral adjuster on the plane if the cut was not straight. I don't do much shooting but when I do I use the method I was taught. Originally Posted by IanW
I got sick of sitting around doing nothing - so I took up meditation.
-
13th March 2022, 09:37 PM #34
Be inspired. Be creative. Be bold.
- Join Date
- Apr 2001
- Location
- Perth
- Posts
- 10,820
Doug, my first shooter was also a Stanley #5 1/2. It works. Then I used a HNT Gordon Trying Plane. It also works (but the 60 degree cutting angle does place a greater emphasis on the blade being super sharp for end grain. Of course, swings and roundabouts - the high cutting angle is great for edge grain) ...

Then I restored a Stanley #62. This was before the Veritas LA Jack ...
This brings back particularly good memories as Rob Lee contacted me to offer a Veritas LAJ to compare against my restoration, which has subsequently led to a long friendship.
I have also made a Strike Block Plane. This has a 37 degree bed, and used bevel down ... creating the same low cutting angle as a LA Jack ...

Regards from Perth
DerekVisit www.inthewoodshop.com for tutorials on constructing handtools, handtool reviews, and my trials and tribulations with furniture builds.
-
14th March 2022, 03:03 AM #35
Member
- Join Date
- Nov 2006
- Location
- Ireland
- Posts
- 84
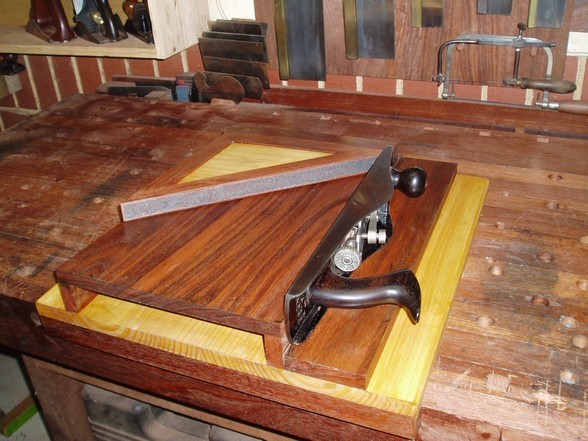
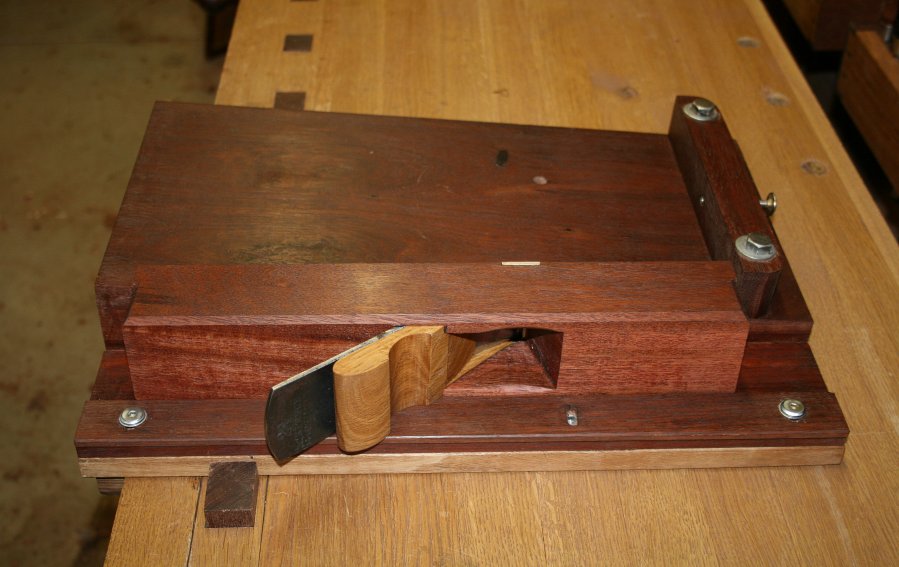
I have one of the Quangsheng LA jacks which I use with handles on various shooting boards.
My handle is a very simple construction, front and back pieces laminated together with a centre a shade thinner than the plane frame so that it slides on snugly.
The inner pieces are notched to fit over the internal plane rib and the back of the blade ramp.
handlesml.jpg 1handles.jpg 2_fits over internal ribs.jpg
I saw this design of handle on Alf's Combi Plane Central site and I think she referenced
Alan Peters as the original inspiration.
You need two handles for right and left hand use with this method of fixing.
I added a small tote style handle to the RH handle so that I'm using the web of my hand to drive the plane forward and my thumb and fingers are just keeping it down and in.
3_RHuse2.jpg
For the reverse use I didn't add a tote on top because I still use my right hand and just pull it towards me.
4_dear_rhuse.jpg 4_dear_lhuse.jpg On a donkeys ear right and left.
-
14th March 2022, 04:59 AM #36
SENIOR MEMBER
- Join Date
- Oct 2019
- Location
- Brisbane, Australia
- Age
- 43
- Posts
- 519
At the risk of joining a steer that is off-topic... it feels necessary for someone to say that the Veritas Shooting Plane is:
1. Absolutely not required to shoot end-grain given the range of options, including fettling and setting up a cheap Bailey-pattern
2. Very expensive
3. Incapable of doing anything well other than shooting, and therefore a large, expensive, single-use tool.
But more importantly:
4. An absolute, unmitigated pleasure that I wouldn't give up for anything.
In fact if forced to minimise planes, I would end up I think just holding onto the shooter and a few cheap Bailey-pattern planes fettled up. In fact if I had my time again it would be my second plane after my No 4 or No 5.
I hasten to add, that is because I do not have a tablesaw or SCMS and generally dock all stock either with a handsaw or rigging up my trusty tracksaw.
I would also like to add re some previous posts... As someone largely self-taught from webpages and Youtube I use techniques from Derek all the time and, topically, used his webpage on shooting board testing to figure out how to set up my Veritas shooter. In relation to D.W., 80% of the time I am sharpening something, it is a chisel dull from chopping and I hit the buffer on advice from D.W.. His research and testing means that now every time I look at any chisel I own, I feel I can pick it up and use it on almost any wood. Every chisel in the drawer is a player, rather than a potential liability.
That is all - just taking a chance to say you are both much appreciated.
Chris
-
14th March 2022, 05:07 AM #37
Member
- Join Date
- Dec 2008
- Location
- Rhode Island
- Posts
- 77
I don't know if its the plane or my superior sharpening skills but I never got shavings like this before. I think it may have to do with new mk2 honing guide. I've never used one before but I think it's saying my freehand sharpening sucked. Or is it the pv11 steel that easier to sharpen.
I have yet to sharpen anything else but I'm looking forward to it.
-
14th March 2022, 03:01 PM #38
GOLD MEMBER
- Join Date
- May 2010
- Location
- Not far enough away from Melbourne
- Posts
- 4,204
At the risk of encouraging a sidetrack to an already sidetracked thread, I think the MK2 honing guide may have been a significant part of the improvement. I was taught to freehand sharpen from a very young age but once I got my hands on a MK2 it opened up a new world of possibilities. Originally Posted by banjopicks
One thing that was a real game-changer was making a jig for my 2" belt grinder which allowed me to mount the Mk2 honing guide, minus the brass roller, on the jig and grind a flat piece of steel to a precise angle, or regrind a chisel or plane blade to a precise angle on the grinder, then replace the brass roller and continue to hone that same precise bevel angle on stones, sandpaper or whatever to polish it up to whatever grit is needed.
It's quick, accurate and removes the minimum possible amount of metal each time it needs grinding.
Thread_Drift.jpgI got sick of sitting around doing nothing - so I took up meditation.
-
15th March 2022, 04:33 AM #39
Member
- Join Date
- Dec 2008
- Location
- Rhode Island
- Posts
- 77
I almost hate to say it but after using my LA jack for a while now even on hard maple both roughing and smoothing, I'm not sure why I would ever pick up one of my other planes. Phew, we're back on topic.
I'm currently rebuilding my tail vise out of some butcher block someone gave me. I don't really know if it's hard or soft but the grain direction is constantly changing. This plane doesn't care. As a smoother, it can't be beat. End grain, can't be beat. My poor Stanley's. Why didn't I appreciate it years ago, I don't know.Dick Hutchings
-
15th March 2022, 05:03 AM #40
GOLD MEMBER
- Join Date
- Mar 2010
- Location
- US
- Posts
- 3,112
It's possible that you may never change your mind on that, but if you stick with doing a lot of hand work long enough, the stanley planes will take over for the BUS stuff. To do true roughing, the BU planes at low angles aren't even capable - the geometry is just way out of what's needed. The tearout control eventually becomes easier with a cap iron and with less planing resistance (if it's not immediately apparent, actually measuring time and how much done between sharpenings, suddenly it appears in a significant amount).
My point earlier for the folks who only want shooters is I don't think anything beyond a stanley 7 could ever be needed or something is wrong (planes work far better on larger end grain in the vise, anyway -they have natural downforce there and will plane -3-4 times as many feet of wood there with less effort from the user).
But...if someone just has to have a shooting plane, there isn't a better one than the LV plane (the skew) unless you want to build something even more robust yourself (not likely).
The difference in cost in the US that I can recall, at least, was about $140. It's money in suspense, so to speak - if you ever change your mind, the difference between the bus gone and the shooter gone via selling to someone else is something like $15.
I've never used the LN or the stanley type - just hated shooting with the BUJ. Never even tried with the BUS. Jack and trying work is done about twice as fast with common pitch wooden planes, which leaves jointing and smoothing.
But it takes some time working by hand to get to that point.
-
15th March 2022, 08:58 PM #41
SENIOR MEMBER
- Join Date
- Sep 2009
- Location
- Newcastle
- Posts
- 549
Pictures of your grinder Mk2 jig please Originally Posted by doug3030
-
15th March 2022, 09:17 PM #42
Be inspired. Be creative. Be bold.
- Join Date
- Apr 2001
- Location
- Perth
- Posts
- 10,820
Not Doug's, but I designed this one in 2005. It was published by Fine Woodworking magazine ...

Article: http://www.inthewoodshop.com/Woodwor...rinderMkI.html
Not long after, I came up with Mk 2 after the first belt sander developed a faulty on-off switch. This took the concept a little further ...

Article: http://www.inthewoodshop.com/Woodwor...erMK%20II.html
Regards from Perth
DerekVisit www.inthewoodshop.com for tutorials on constructing handtools, handtool reviews, and my trials and tribulations with furniture builds.
-
15th March 2022, 09:42 PM #43
GOLD MEMBER
- Join Date
- May 2010
- Location
- Not far enough away from Melbourne
- Posts
- 4,204
Can do. Give me a day or two. Originally Posted by pippin88
I got sick of sitting around doing nothing - so I took up meditation.
-
15th March 2022, 11:03 PM #44
GOLD MEMBER
- Join Date
- May 2010
- Location
- Not far enough away from Melbourne
- Posts
- 4,204
OK, It was a quiet night at home so I went and took some photos... Originally Posted by pippin88
1. Chisel in the MK2 honing guide, standard setup for 25 degree bevel. If you want a different angel just set it as you normally would. The jig is designed to use all the features of the Veritas jig.
jig01.jpg
As normal, remove the tongue from the jig once the angle is set. Also remove the brass roller. You need a tiny alan key to do this, I think it was 1/16"
jig02.jpg
This is the jig that mounts to the grinder to hold the Mk2 device. It mounts to the grinder in the place of the normal tool rest using the split tongue sticking out the back. The holes for the axel on the mk2 go on the thin steel bar on top of the jig
jig03.jpg
Like this, ready to put on the grinder.
jig04.jpg
The grinder (Radiusmaster 2 x 48) with the normal toolrest on it (actually the "normal" toolrest is too small to use for most things and is only designed to get it out of the showroom. I made that much larger toolrest for everyday use, but I digress)
jig05.jpg
The grinder with the standard toolrest removed and the jig in place with the MK2. Note that the grinder is tilted back for ease of grinding with the MK2.
jig06.jpg
Notes:
When fitting the jig to the grinder you need to position the jig so that the steel rod holding the MK2 is positioned the same distance from the grinding belt as if it was being held in the brass roller. This is to ensure that the angle is right. I made a spacer to use to position the jig correctly before the securing screws are tightened. You need to reposition the jig every time you change belts to keep the angle right because different grit belts are different thicknesses. Hopefully I have explained that well enough. It is critical to being able to take the MK2 with the chisel still clamped in position off of the jig, replace the brass roller and go straight to the stones, which is of course the final step of the process.
The grinder will run in both directions. When using this jig I ALWAYS run it backwards (upwards away from the cutting edge). Running it the other way, the edge of the blade tends to catch on the joint in the belt, ruining the belt and potentially requiring new underwear for the operator.
I'm not much of a welder so I made it all out of mild steel plate and 50mm angle iron held together with bolts into tapped holes.I got sick of sitting around doing nothing - so I took up meditation.
-
30th April 2022, 09:19 PM #45
Intermediate Member
- Join Date
- Jan 2021
- Location
- Pascoe Vale, VIC
- Age
- 44
- Posts
- 49
A little update to my dilemma in the first post. I just started a new job early last month with a nice pay increase, so I decided to treat myself and got a Veritas LA jack

I know it goes against some advise in the thread, but this will be my nice to have sexy tool sitting in the corner looking pretty while I ravage my older planes
Looking forward to receiving it some time next week! As always, thank you all for sharing your thoughts.
Azahan

 Reply With Quote


Similar Threads
-
SOLD: Veritas Low Angle Jack Plane
By John Saxton in forum WOODWORK - Tools & MachineryReplies: 3Last Post: 6th December 2021, 07:38 PM -
LV Low Angle Jack Plane Handles
By JasonBF in forum HAND TOOLS - UNPOWEREDReplies: 10Last Post: 15th August 2012, 09:31 AM -
Veritas 5-1/4 Bench Plane Vs Low-Angle Jack Plane
By Wolfs in forum HAND TOOLS - UNPOWEREDReplies: 10Last Post: 30th April 2008, 01:43 PM -
Any LN Low Angle Jack Plane owners out there?
By NewLou in forum HAND TOOLS - UNPOWEREDReplies: 23Last Post: 15th July 2005, 11:24 AM -
Veritas Low Angle Jack Plane
By GregLee in forum HAND TOOLS - UNPOWEREDReplies: 17Last Post: 19th August 2004, 10:50 PM
