

 Thanks:
  Likes:
  Needs Pictures:
  Picture(s) thanks:
Results 46 to 60 of 280
Thread: Axe talk
-
27th January 2016, 03:05 PM #46
 Hewer of wood


- Join Date
- Jan 2002
- Location
- Melbourne, Aus.
- Age
- 71
- Posts
- 12,746

Thanks for that tip Paul. I've gone a long time without doing that but better safe than sorry.
Here's the odd Dept of Defence wedge in the kit. Narrower and thicker than the norm. It's quite hard to drive straight but has the advantage that you can chase it into a log!
Also a modern Plumb hatchet that's does kindling duty. It's several decades old and has a resin eye top. I assume the line across the cheek is the hardening limit and that the pitting is from hand forging. The handle is misaligned and the cheeks asymmetrical. But apart from that ... lol. Time to replace it.Cheers, Ern
-
27th January 2016 03:05 PM # ADSGoogle Adsense Advertisement
- Join Date
- Always
- Location
- Advertising world
- Age
- 2010
- Posts
- Many
-
27th January 2016, 07:10 PM #47
GOLD MEMBER
- Join Date
- Mar 2004
- Location
- Brisbane (western suburbs)
- Age
- 77
- Posts
- 12,127
Didn't have them fancy things on the farm when I were 16, Paul! Originally Posted by Bushmiller


But you're right, you could soon clean up the tops of mushroomed wedges with an angle grinder and a suitable wheel. I would also think you could clean them up successfully by re-forging the tops. This might even be the preferable method, as you could soften the tops back from their work-hardened state & reduce the chance of those flying scalpel blades.
Interesting thought - softening the hammer. Not sure I'd have the confidence to try that, and also not sure which would be better, soft hammers or soft wedges...?
Cheers,IW
-
27th January 2016, 07:59 PM #48
Novice
- Join Date
- Jan 2016
- Location
- Central West NSW
- Posts
- 17
Thats a fine idea. Originally Posted by hiroller
... now I'll have to start looking for a mate for this one ..

-
27th January 2016, 09:01 PM #49
GOLD MEMBER
- Join Date
- Apr 2012
- Location
- Sydney
- Posts
- 1,503
Good idea!
Although, I've seen pictures of some single sided axes where they have left the handle long so that you can tap it out and swap it around.
-
27th January 2016, 09:52 PM #50
Skwair2rownd
- Join Date
- Nov 2007
- Location
- Dundowran Beach
- Age
- 76
- Posts
- 19,922
Found a hatchet like that when we were kids. Dad subpoenaed it and put a handle to it. The hatchet, which we called Originally Posted by carves
a tomahawk, was used exclusively for cutting kindling. Dad would sit for several hours cutting various sized kndling which
was stacked in he wood shed and lasted for many weeks. As each of us 4 boys reached the right age we took over that task.
The tomahawk was sharpened every so often with a file. Funny thing is the thing disappeared after dad died None of us, sister
included have any idea where it went but we all wanted it.
Kerosene was NEVER allowed near any fire to be lit by us! We had to do things properly - one sheet of newspaper,
correctly stacked kindling and ONE match!
-
27th January 2016, 11:22 PM #51
Rusty doesn't mean its dead
- Join Date
- Dec 2010
- Location
- Melbourne, Australia.
- Posts
- 825
Ian, first up thanks for your great responses, I could not agree more with every thing you've said. I've heard a chap call a mallet that hammers his froe to split shingles a beetle as well Originally Posted by IanW
Yes, the terminology changes with who you ask, unfortunately, as I am seeing through the years, there are less and less of these lovely old boys with the required skills and knowledge of how timber was handled back in the day to ask or chat to.
So, I am finding the talk on this part of the forum very interesting and informative, many thanks to your self and everyone here putting up their thoughts, keep it coming.
Over the last 3 years I have been having a good go at making the perfect Maul.
I started of with timber at 15% moisture content, turned the rings to a tight fit, pressed them on with a 50 ton press, furred the end grain over with a mash hammer to stop the rings coming of as well.
I handed one to my Brother who participates in the "wood days" Wood Days' Activities - Cancer in Kids @ RCH - CIKA event, I get a call early in the part saying the rings have come loose, we have put it in a bucket of water to soak, that helped.
The old boys at the event were un-impressed apparently.
This years new approach...
Step 1. Wood Turn the Maul head oversized.
Step 2. Microwave the S%@t out of the timber aim for almost 4% moisture content, or more
Step 3. Heat up the steel rings, not red hot as it will char the timber, just enough for 1+ mm expansion
Step 4. Measure hot steel rings accurately and turn dry timber maul head to 2mm oversized with a slight taper on the fit.
Step 5. Press rings on to maul head using the 50 ton press, don't burn fingers use tongs to hold ( could be interesting )
Step 6. Fit Handle and allow to soak in a bath of Linseed oil and mineral turps, should soak into the timber and expand a little.
Step 7. Have a beer.
My Brother had a chat also with some of the wiser gents at the event, apparently I have my taper a little to much as well, it appears that if its tapered correctly as you strike the ring on the far side gets pressed on more, its good practice also to alternate each hit of the Maul by flipping the faces around each hit or blow.
I did laugh when I read this, you'll probably like these then, my brother has a set of T wedges, makers marked as well, he says they are great to use. Originally Posted by IanW
Thanks again Ian.
Melbourne Matty.
-
28th January 2016, 09:14 AM #52
Hewer of wood
- Join Date
- Jan 2002
- Location
- Melbourne, Aus.
- Age
- 71
- Posts
- 12,746
Nice work Matty.
I've read of guys dropping the head and handle in a bucket of linseed oil for a few days to get the fibres to swell.Cheers, Ern
-
28th January 2016, 09:37 AM #53
Rusty doesn't mean its dead
- Join Date
- Dec 2010
- Location
- Melbourne, Australia.
- Posts
- 825
Thanks Ern, the Mauls are something I enjoy making, a work in progress I guess you could say. Originally Posted by rsser
I'd be grateful for any other ideas or tips on making these things as well, I'm no expert by any length, always learning....
Melbourne Matty.
-
28th January 2016, 09:42 AM #54
GOLD MEMBER
- Join Date
- Mar 2004
- Location
- Brisbane (western suburbs)
- Age
- 77
- Posts
- 12,127
Hi again, Matty. Yes, there are quite a few stories about earlier times that are rapidly being lost forever. As a kid I knew many hard old blokes who still earned their crust cutting wood for various purposes with nothing but potato power, and heard a few yarns - some no doubt true in every detail, many stretched just a little
 . But the scene changed rapidly in the post-war 50s, with modernity arriving in far Nth Qld as it was everywhere else in the back blocks. By the early 60s there would've been very few folks left who actually earned a living in timber with hand tools only. There were still mill timber cutters working in the rainforest who preferred axes & crosscut saws, they were easier to carry into the rough country where there was still big timber. The monster saws of the time were not very competent at handling the large diameter logs, and the quiet of the crosscut was a big safety plus - you could hear what was happening. My father was nearly killed by a 'widow-maker' when felling scrub in a gang. His ears were ringing so much he didn't hear the bloke with the chainsaw sing out as a large tree started to fall, dragging a dead branch out of an adjacent tree. Speared the old pot on the head & cracked a few cervical vertebrae & put him out of action for close to a year.
I would've been about 14 when the railway decided there were to be no more 'hogback' sleepers (those squared on 3 sides only). That left the field to the Hagan saw blokes, who were pretty well taking over anyway - you could get more sleepers out of a dodgy log with a saw than by splitting, broad-axing & adzing out the flats for the rails. So that skill soon died, but a new skill developed - driving those lethal gimbal-mounted killers. It was a steep learning curve, and they were very unforgiving. My father bought one just as I was leaving home for the wider world, so I got no first-hand experience (mercifully!). He became quite adept with it, and loved the monster. He only gave it up very reluctantly when my brothers insisted an 85 yr. old was a bit long in the tooth for such 'toys' & threatened to chop it up with the oxy torch if he didn't. It's still sitting in an old shed on the farm, and it makes me shudder every time I see it. A local 'sawdoc' modified the blade & added tungsten tips - about 10 teeth on a 3 foot diameter blade - it would scare the daylights out of any reasonable person just seeing it! It takes finesse to drive something like that, but the worst accident he had with it was when it backfired on starting one day and threw the crank-handle at him. That cost him two front teeth, but apart from a few chips & splinters thrown at his shins (mostly stopped by a thick leather 'curtain' that hung between the wheels) he got off lightly. He was either a very lucky or reasonably careful user - many others got more than just a stern warning.....
But I'm digressing - this thread is about hand tools, not their pretender replacements. I was thinking about your problem of retaining maul rings. I had a similar problem with hoops on a set of chisel handles. In my case I made the hoops butt against a shoulder on the top of the handle (should've left a couple of mm of taper for them to keep tightening onto), and didn't leave enough wood proud of the hoop to fur-over & hold them, either (the wood is a hard Acacia, which doesn't mushroom much, anyway). They have been a miserable failure, & I'd like a $ for every time I've had to retrieve one from the floor! ...
Maul hoops are a different matter - given the bulk of those things, you are bound to loosen the 'down' ring at least a smidgin, every time you strike. I can see how flipping the maul on each blow could be a big part of the 'solution'. It would take some getting used to, no doubt, but would eventually become second nature. Ouch! my now-girly hands would be a mess of blisters by the end of day 1 on that routine!
I think the person who suggested you reduce the taper on your maul heads is onto something too. Given that wood is forever expanding & contracting with the weather & seasons, no hoop will stay tight indefinitely, so you do need some way of constantly re-tightening if they are to stay put. Metal tapers hold best when shallow, & I think wood is the same, so my approach would be to apply just a degree or two of taper over the section where the hoop tightens.
Cheers,IW
-
28th January 2016, 09:47 AM #55
Try not to be late, but never be early.

- Join Date
- Apr 2011
- Location
- Bakers Hill WA
- Age
- 75
- Posts
- 1,077
Matty,
I was taught, turn the maul each strike to keep the rings drawn on.
Cheers Geoff.
-
28th January 2016, 10:40 AM #56
Hewer of wood
- Join Date
- Jan 2002
- Location
- Melbourne, Aus.
- Age
- 71
- Posts
- 12,746
FWIW there's a bunch of DIY turning tool handles in my kit, mostly redgum, and a heavy brass ferrule can sit tight for years and then one day just drop off into the shavings. Clearly changing EMC has something to do with but not everything.
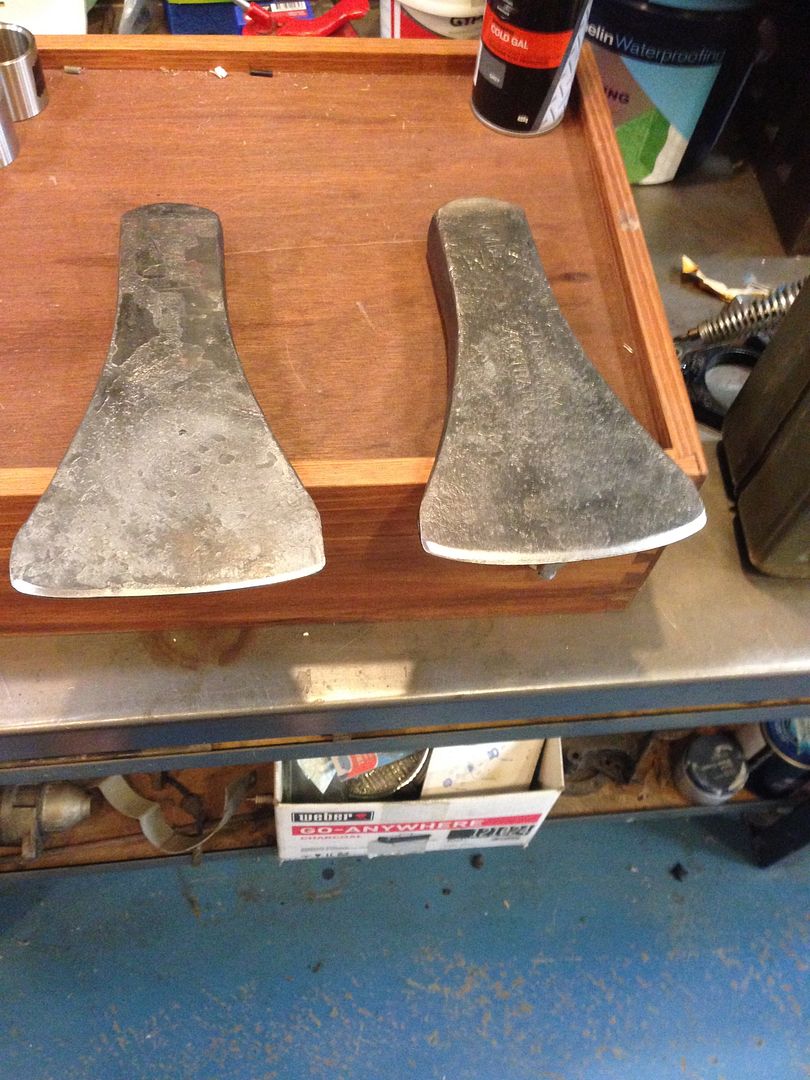
Anyway, here's a couple of new axes from Helko bought from eBay. The hatchet (500 g) is to replace the Plumb and the half axe (1100g) is for light work. Helko is Germany's largest axe maker and has been around for a while.
Specs:
The handles are from Swiss ash (hatchet) or hickory (axe), both FSC certified and lightly lacquered.
German C45 medium carbon steel.
Drop forged and tempered in oil (hrc 53-56).
Comes with a leather sheath (hatchet) or edge protector (axe, pretty useless).
Quality:
Grain alignment on both is good.
They use a thick wood wedge with a cone steel 'wedge' through the middle.
Haft to eye fit is pretty good; bit of a void on the front of the axe. There's a bead of glue or something at the bottom of the hatchet eye.
Very good edge for the money; will just need a quick power hone.
The hatchet cheeks are just on the concave side of straight and the axe's are distinctly concave.
However, the cheeks on the axe are asymmetrical and the edge is noticeably off to the side of the head centre line. Even though it's a mass produced axe there's no need for this and it's going to be returned.Cheers, Ern
-
28th January 2016, 11:28 AM #57
Rusty doesn't mean its dead
- Join Date
- Dec 2010
- Location
- Melbourne, Australia.
- Posts
- 825
Thanks Ian, thats sound advice ! Originally Posted by IanW
Your dad sounds like a salt of the earth hard working man, thanks for the stories I like to hear the history of past things.
My dad is a keen gardener, he has a shovel that he treasures with a solid ash handle, "look at that handle" he says "they don't make them as good as that any more !"
You could imagine his surprise last week when I found a matching pitch fork in an old antique shop, cleaned it up and gave it to the old boy, he was over the moon.
I guess I am part of the crowd that wants to reenact how it was done all those years ago, to learn the skills and have something to pass on.
I Saw some broad axes hang on a pub wall for show a few nights ago out for dinner, it seemed sad to me, I wanted to take them down and hold them may be sharpen them too...
Any way back to talking of Axes, I'm gonna look for my Brades Hatchet....
Thanks Jeff, glad you can confirm as well ! Originally Posted by Boringgeoff
Melbourne Matty.
-
28th January 2016, 12:56 PM #58
Peter McBride
- Join Date
- Nov 2007
- Location
- Melbourne
- Posts
- 1,139
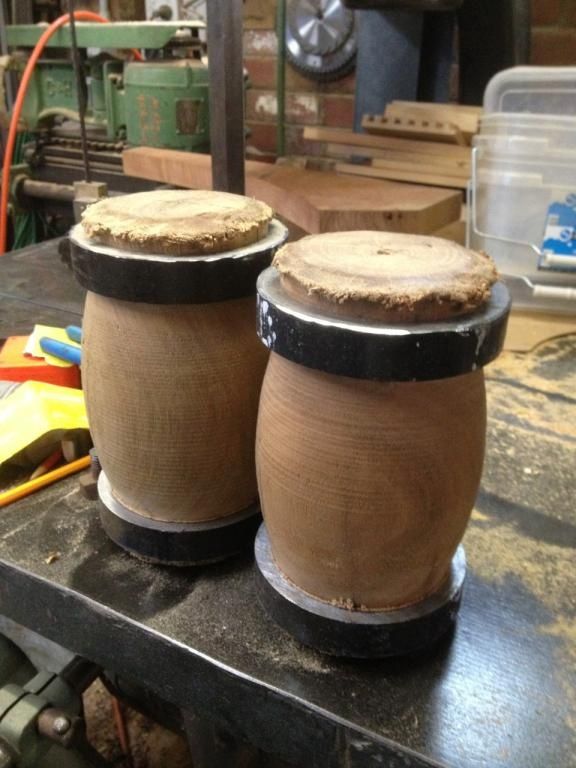
Matty,
here are some pictures of a commercially supplied Maul like yours. seen in a shop mid last year.
Keen students of hardware shops will notice a motorbike in the background and know we were in Invercargill. NZ.
I've no experience using them, but looking at them, there is a definite swelling over the ring.
Cheers,
Peter


 <!--[if gte mso 9]><xml> <w:WordDocument> <w:View>Normal</w:View> <w:Zoom>0</w:Zoom> <w
 oNotOptimizeForBrowser/> </w:WordDocument> </xml><![endif]-->
-
28th January 2016, 03:47 PM #59
GOLD MEMBER
- Join Date
- Aug 2009
- Location
- Armadale Perth WA
- Age
- 55
- Posts
- 4,524
I had to go look to remind myself ... so from this forum ...
Hagen Saw.jpg
-
28th January 2016, 04:23 PM #60
GOLD MEMBER
- Join Date
- Aug 2009
- Location
- Armadale Perth WA
- Age
- 55
- Posts
- 4,524
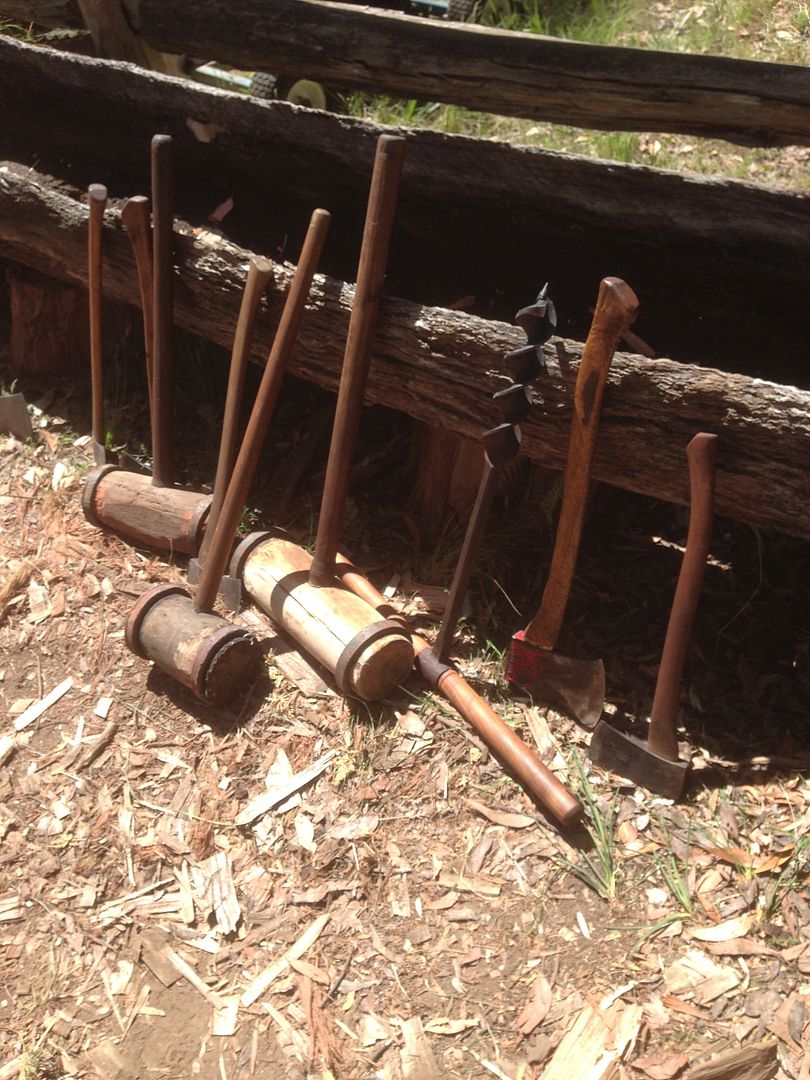
I took these in a bit of a rush ... they all came here in boxes 36" long x 17" x 17", so obviously that sets a max size to what I could buy and ship.
They were pretty cheap pre-shipping ... might reflect the brands ... Mastercraft and Craftsman ... but the other one is a Kelly.
20160127_213712 (Large).jpg 20160127_213727 (Large).jpg and the forum insists the photos turn sideways ... -_-
There's also a differently shaped head-only with no makers marks left ...
20160127_220349 (Large).jpg
"Mastercraft"
20160127_213904 (Large).jpg 20160127_213920 (Large).jpg 20160127_213930 (Large).jpg
20160127_213942 (Large).jpg 20160127_214012 (Large).jpg

 Reply With Quote


Similar Threads
-
The Talk
By Rodgera in forum WOODIES JOKESReplies: 0Last Post: 15th May 2015, 10:53 AM -
Talk to me about oxy LPG.
By soundman in forum WELDINGReplies: 34Last Post: 22nd October 2014, 06:35 PM -
More Saw Talk
By IanW in forum HAND TOOLS - UNPOWEREDReplies: 17Last Post: 26th April 2010, 10:29 PM -
Someone to talk to
By taddy in forum SMALL TIMBER MILLINGReplies: 5Last Post: 5th July 2009, 11:19 PM -
A talk with Grandma
By Allan at Wallan in forum WOODIES JOKESReplies: 5Last Post: 11th January 2008, 12:51 PM
