

 Thanks: 0
 Likes:
  Needs Pictures: 0
 Picture(s) thanks: 0
Results 1 to 15 of 15
Thread: Building a Strike Block Plane
-
1st April 2013, 05:54 PM #1
 Be inspired. Be creative. Be bold.


- Join Date
- Apr 2001
- Location
- Perth
- Posts
- 10,826
 Building a Strike Block Plane
Over the past few weekends I have been busily building planes for the forthcoming Perth LN Tool Event. In past years I have demonstrated joint-making with handtools (OK, in the land of the blind ...). This year I shall be demonstrating plane building.
I thought it pertinent that I take along some new planes (some for demonstration and a few to sell). To this end I have so far completed 11 planes (it sounds grander than it really is - there are 5 router planes, 2 Krenov smoothers, and 3 Krenov block planes). I am just waiting on a few parts, plus have one more to complete (a solid body coffin smoother), and then I shall post pictures.
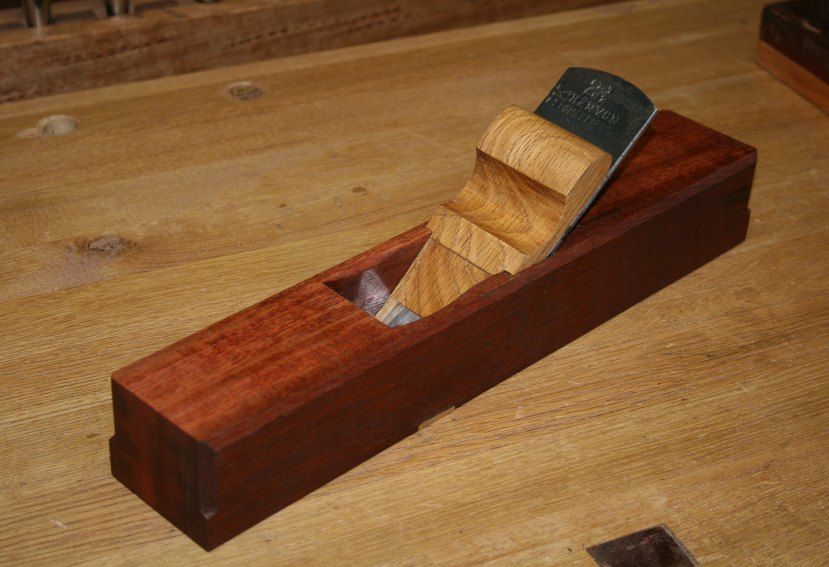
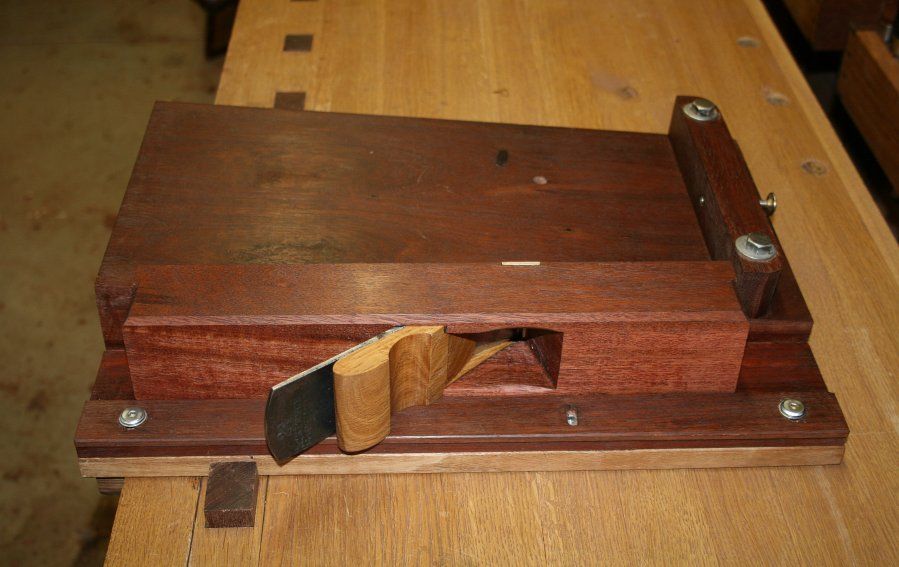
This is a solid body strike block plane. Why did I choose this particular plane to build? It is not as though I am low on planes for shooting. However I wanted one to dedicate to my ramped shooting board. Plus I enjoy using woodies, and my eventual plan is to fill a tool cabinet with planes I have made.
The strike block is a bevel down plane with a low cutting angle designed for shooting end grain. It is an alternative to a mitre plane, which achieves the same cutting angle from a bevel up orientation.
Were we discussing metal planes, there would be no question that the bevel up plane has the advantage of achieving a low cutting angle. Take for example both the Lee Valley and the Lie-Nielsen BU Jack. Built in strong and durable ductile iron, there is no difficulty in building in a 12-degree bed. Add a 25 degree bevel, and the result is a 37 degree cutting angle. This is great for planing end grain.
Wood is not a strong enough medium for low bevel planes. A 12-degree wooden bed is vulnerable. Building a 20 degree bed, while stronger, does not offer any advantage over a common angle (45 degree) bevel down plane. The strike block plane provides the low cutting angle by having a bed between 35 40 degrees.
Larry Williams (Old Street Tools) suggests that strike block planes fell out of favour in the 18th Century owing to the casual sharpening techniques of the day. His view is that it is imperative to maintain a clearance angle of a minimum of 10 degrees. Consequently, unless the bevel is maintained at about 25 degrees, a strike block plane may run out of clearance angle and stop cutting.
The plane build here is based on a bed of 38 degrees. This should provide the same performance as a low angle bevel up plane with a 12 degree bed. The overall dimensions are a 14 length (that comes from the Old Street version), with a 2 ½ wide x 2 1/8 high body. The blade is 2 1/8 wide, tapered and laminated high carbon steel.
I have used Jarrah for the strike block plane, mainly as it is a dense and heavy wood, and I have a good supply of dry, salvaged roofing trusses. The wedge is White Oak.

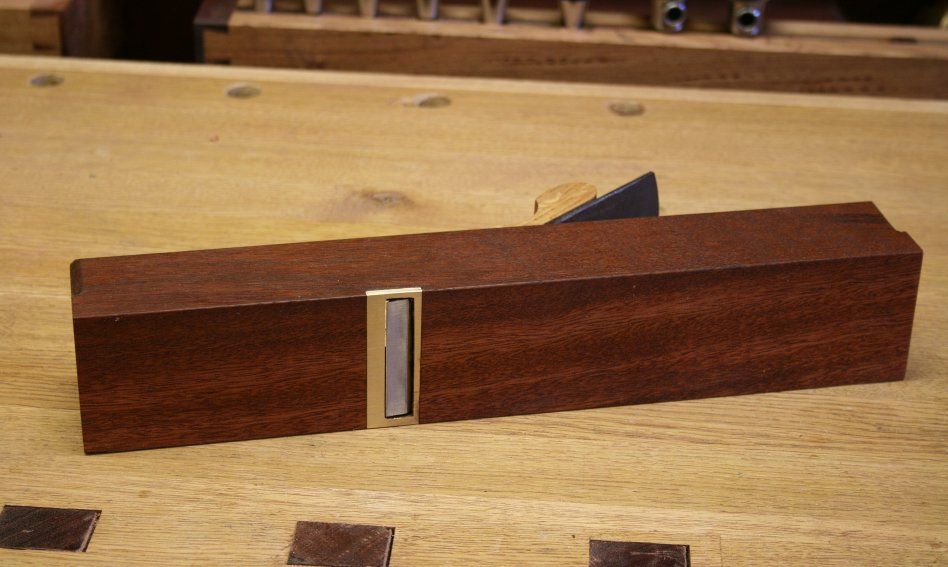
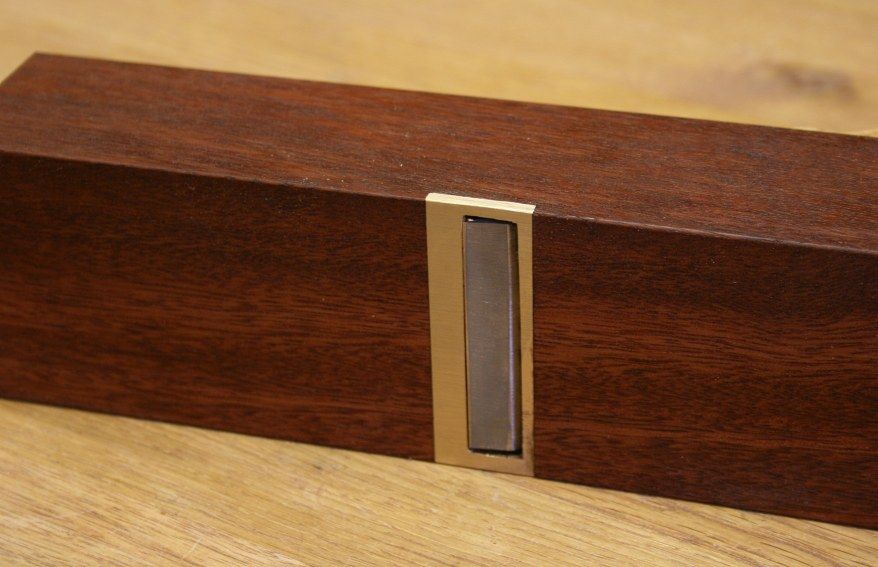
There is a steel strike button (more durable than wood) ...
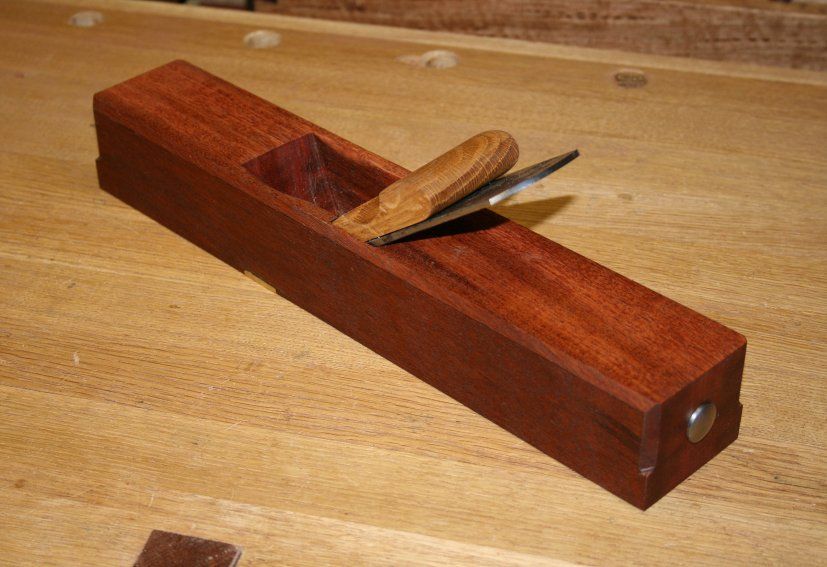
The underside shows the brass mouth ...
A close up (because someone will ask anyway ) ...
) ...
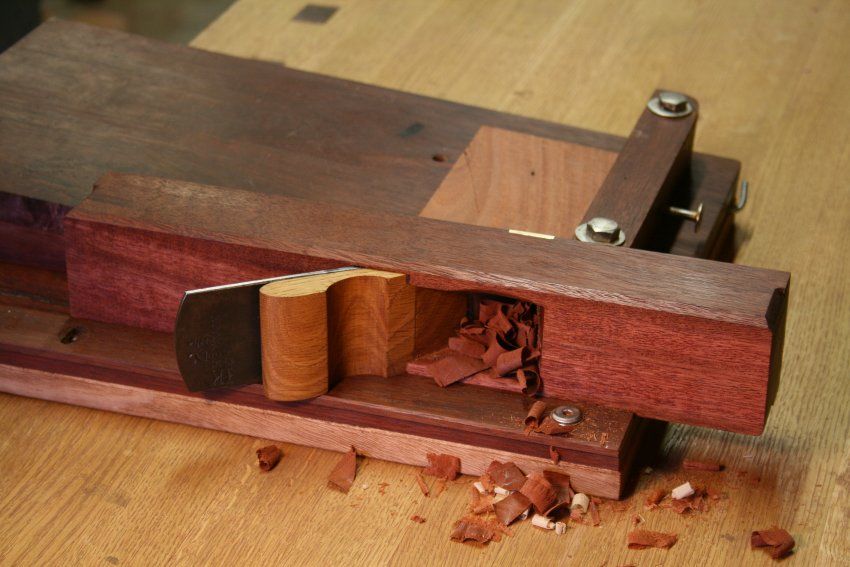
This is where it will work (although it will also be useful for cross flattening panels) ...
And .. yes .. it works very nicely. Easy shavings in 1/2" Jarrah endgrain ...
There is a step-by-step record of the build on my website: http://www.inthewoodshop.com/ShopMad...lockPlane.html
Regards from Perth
DerekVisit www.inthewoodshop.com for tutorials on constructing handtools, handtool reviews, and my trials and tribulations with furniture builds.
-
1st April 2013 05:54 PM # ADSGoogle Adsense Advertisement
- Join Date
- Always
- Location
- Advertising world
- Posts
- Many
-
1st April 2013, 11:06 PM #2
Luddite Lite
- Join Date
- Jan 2009
- Location
- Brisbane
- Posts
- 800
Building a Strike Block Plane
Great looking plane Derek
I just happened to have read the post on your site and instantly added it to my to-do list. It looks fantastic with the shooting board too.
The only thing I would say is that I wouldn't be so unequivocal about low angle beds in wooden planes. I have been using mine for a while now and haven't molly coddled it and it's still trucking along happily. Granted it's not 12 degrees but it is less than 15.
I think perhaps low angled woodies just had to wait for antipodean building material.
ImageUploadedByTapatalk1364817978.602972.jpg
Cheers
Matt...I'll just make the other bits smaller.
-
1st April 2013, 11:19 PM #3
The prize lies beneath - hidden in full view
- Join Date
- Oct 2010
- Location
- 1017m up in Katoomba, NSW
- Posts
- 10,662
Lovely work Derek!. You haven't told us about the strike button though....what's it for?
-
1st April 2013, 11:24 PM #4
Skwair2rownd
- Join Date
- Nov 2007
- Location
- Dundowran Beach
- Age
- 76
- Posts
- 19,922

Nice looking and effective tools DereK!!!

-
1st April 2013, 11:31 PM #5
Be inspired. Be creative. Be bold.
- Join Date
- Apr 2001
- Location
- Perth
- Posts
- 10,826
Hi Brett Originally Posted by FenceFurniture

Thanks.
The strike button is for adjusting the blade. I installed a microswitch under it, but it is sticking a bit, and so I am forced to use a hammer.
When you strike the button, the wedge loosens and the blade retracts. Really!
When you want the blade to project a little more, I say "Lynndy, strike the blade a smidgeon for me". She usually does this a little too much (she is heavy handed, like her mother), and so I have to use the strike button again.
Got to fix the microswitch.
Regards from Perth
Derek
Visit www.inthewoodshop.com for tutorials on constructing handtools, handtool reviews, and my trials and tribulations with furniture builds.
-
2nd April 2013, 09:33 AM #6
Member
- Join Date
- Aug 2012
- Location
- Auckland, New Zealand
- Posts
- 80
Thanks Derek,
Your timing is impeccable - just this weekend I decided I need to make a wooden plane. After some more pondering it had to be a dedicated plane for a shooting board - with some UHMW plastic tape on one side to help with wear and tear.
Now at least I have a set of plans to clone ) Though I may stick with a krenov style build to simplify things.
cheers
Robin
-
2nd April 2013, 10:11 PM #7
 GOLD MEMBER
- Join Date
- Mar 2004
- Location
- Brisbane (western suburbs)
- Age
- 77
- Posts
- 12,134
A nice neat little unit, Derek, & obviously does the job well, too!
Those wedge abutments look perfect, but you glossed over their construction - any new 'secrets' learned in the making of this one, or was it just careful layout and execution (& sweat!)?
And tsk, tsk, why didn't you dovetail that bit of brass into the sole?
Finally, (a serious question) - how deep is the strike-button embedded in the body? I left this feature off the few woodies I've made, and so far they are ok as long as I hit them with a wooden mallet, but I've been thinking I really should include them.
Cheers,IW
-
2nd April 2013, 10:28 PM #8
GOLD MEMBER
- Join Date
- Jun 2008
- Location
- Victoria, Australia
- Age
- 74
- Posts
- 6,132
Originally Posted by Derek
Flat battery perhaps...
Nice work Derek, your usual high standard is an inspiration, I see a perfect opportunity to put one or two of the forum M2 plane blades into service.
Regards
Ray
-
2nd April 2013, 10:29 PM #9
Lignum Vexator
- Join Date
- May 2007
- Location
- North of the coathanger, Sydney
- Age
- 68
- Posts
- 9,417
Very elegant plane!
and it was a pleasure to meet you over in Perth the other night
regards
Nick
veni, vidi, tornavi
Without wood it's just ...
-
2nd April 2013, 10:40 PM #10
The Laird
- Join Date
- Jan 2007
- Location
- Katoomba NSW
- Posts
- 4,774
My thoughts exactly Ray. That is the main reason I purchased some of the last batch of blades. Just need a suitable piece of timber now. Would love to find a bit of gidgee the right size. Originally Posted by RayG
Great job Derek, and, as usual, a great write up as well. You have inspired me
-
3rd April 2013, 06:48 AM #11
Banned
- Join Date
- Apr 2005
- Location
- kyogle N.S.W
- Age
- 50
- Posts
- 4,844
very nice, and like the adjustment options you've got going in the shooting board.
-
3rd April 2013, 11:51 PM #12
Be inspired. Be creative. Be bold.
- Join Date
- Apr 2001
- Location
- Perth
- Posts
- 10,826
Hi Ian Originally Posted by IanW
The abutments needed a little tuning, but setting up the saw cut with the guide (mini "blade/wedge") made the task easier. I've been building a coffin smoother. This uses a 1 3/4" blade, and there is too little space for the flush cut saw. I have had to use a coping saw via the mouth.
I did not dovetail the brass because ..... well because ...
The strike button! This steel button works better than any wooden one I have used. Wood tends to absorb the blow and delay the reaction. The steel seems to transmit the force rapidly, and less impact is needed. I used a bolt - polished up the end to look pretty - and cut it off about 1 1/4" from the rear. This is a tight slip fit and remains attached without epoxy.
Regards from Perth
DerekVisit www.inthewoodshop.com for tutorials on constructing handtools, handtool reviews, and my trials and tribulations with furniture builds.
-
3rd April 2013, 11:53 PM #13
Be inspired. Be creative. Be bold.
- Join Date
- Apr 2001
- Location
- Perth
- Posts
- 10,826
Matt, I think that you had better post some more pictures of that plane. It looks really interesting. Originally Posted by Berlin
Go on now!
Regards from Perth
DerekVisit www.inthewoodshop.com for tutorials on constructing handtools, handtool reviews, and my trials and tribulations with furniture builds.
-
3rd April 2013, 11:54 PM #14
Be inspired. Be creative. Be bold.
- Join Date
- Apr 2001
- Location
- Perth
- Posts
- 10,826
Thanks Nick. Originally Posted by Sawdust Maker
Regards fro Perth
DerekVisit www.inthewoodshop.com for tutorials on constructing handtools, handtool reviews, and my trials and tribulations with furniture builds.
-
4th April 2013, 12:35 AM #15
GOLD MEMBER
- Join Date
- Aug 2009
- Location
- Armadale Perth WA
- Age
- 55
- Posts
- 4,524


 Reply With Quote


Similar Threads
-
New Block Plane
By chook in forum WOODWORK - GENERALReplies: 11Last Post: 30th January 2012, 08:34 PM -
A Compendium of Block Planes: The HNT Gordon Block Plane
By derekcohen in forum HAND TOOLS - UNPOWEREDReplies: 8Last Post: 16th August 2008, 09:54 PM -
Building my own Butchers Block
By CKJ_1980 in forum WOODWORK - GENERALReplies: 1Last Post: 8th May 2008, 12:50 PM -
LN Skew Block Plane or LV Shoulder Plane
By mat in forum HAND TOOLS - UNPOWEREDReplies: 3Last Post: 25th October 2006, 06:46 PM -
Block Plane
By Dan in forum WOODWORK PICSReplies: 7Last Post: 4th April 2004, 08:28 PM
