

 Thanks: 0
 Likes:
  Needs Pictures: 0
 Picture(s) thanks: 0
Results 16 to 29 of 29
Thread: Building a Wooden Router Plane
-
16th April 2013, 12:28 AM #16
 Be inspired. Be creative. Be bold.


- Join Date
- Apr 2001
- Location
- Perth
- Posts
- 10,830

Hi TT
That is excellent thinking, and worth trying out.
It is not necessary to drill both holes for the legs of the U bolt completely through wood. You only need to drill one. Cut the other short and let it ride (be guided within) a shorter hole. Then there is only one screw to adjust, as per the current model.
The need now is to find a suitable U bolt. It must be a snug fit for the blade otherwise it will look and feel poorly made.
Regards from Perth
DerekVisit www.inthewoodshop.com for tutorials on constructing handtools, handtool reviews, and my trials and tribulations with furniture builds.
-
16th April 2013 12:28 AM # ADSGoogle Adsense Advertisement
- Join Date
- Always
- Location
- Advertising world
- Posts
- Many
-
16th April 2013, 12:37 AM #17
GOLD MEMBER
- Join Date
- Dec 2007
- Location
- Melbourne
- Posts
- 3,277
It would be simple enough to make your own U bolt out of brass rod. One leg could be shorter ( the captive side and the other longer (adjustment wing nut).
-
16th April 2013, 12:43 AM #18
Bloke
- Join Date
- Jan 2008
- Location
- Central Coast NSW Australia
- Posts
- 1,136
That's even better. Ive seen some of the gizmos and widgets you make for your tools Originally Posted by derekcohen


Would it be too difficult to take a piece of brass rod and cut a thread onto one end and bend the other to what ever size you need?
TTLearning to make big bits of wood smaller......
-
29th April 2013, 12:26 AM #19
Junior Senior Member
- Join Date
- Dec 2008
- Location
- Adelaide, SA
- Posts
- 962
Building a Wooden Router Plane
What did u end up doing Derek?
-
29th April 2013, 12:31 AM #20
Be inspired. Be creative. Be bold.
- Join Date
- Apr 2001
- Location
- Perth
- Posts
- 10,830
I have ordered some brass. Not yet delivered.
Regards from Perth
DerekVisit www.inthewoodshop.com for tutorials on constructing handtools, handtool reviews, and my trials and tribulations with furniture builds.
-
29th April 2013, 10:28 AM #21
GOLD MEMBER
- Join Date
- Mar 2004
- Location
- Brisbane (western suburbs)
- Age
- 77
- Posts
- 12,142
Just a note of caution, most of the brass you are likely to buy is machinable brass, which is at least semi-hard if not hard, so you will need heating to make an acute bend. Threading should be no challenge - brass of any kind threads beautifully unless your dies & taps are badly worn.....
Cheers,IW
-
29th April 2013, 01:30 PM #22
 .
.
- Join Date
- Feb 2006
- Location
- Perth
- Posts
- 27,800
Ideally the brass should be annealed, bent and threaded and then re-hardened otherwise it may not hold with only one side threaded. Originally Posted by IanW
Here is how I would do it (my addenda are obviously not too scale). I'd use a short length of 25? mm siam brass rod and drill/file a square hole in it for the blade and hex bolt it to the router frame. The rod would be long enough for a blade depth locking bolt. The size of brass rod would need to be selected so it did not affect the weight too significantly
.
-
29th April 2013, 02:11 PM #23
GOLD MEMBER
- Join Date
- Mar 2004
- Location
- Brisbane (western suburbs)
- Age
- 77
- Posts
- 12,142
I like your idea Bob, and was thinking along similar lines myself, though I was thinking of ways to fabricate the blade-holder because accurately broaching that square hole through 30-35mm of brass will be a challenge for me. I think it would need to be done well, or you'd end up with a wobbly blade that won't do the job at all.
I'm conscious that Derek's original basic design is elegantly simple, and works. Most people will have enough gear to make it & should end up with a pretty functional tool. Folks like us, with access to a bit of gear tend to get carried away, because we can. I'm not ag'in that, of course, you all know I can't resist a bit of fiddling; just thinking of the folks who are considering this project as their first foray into plane making...
Cheers,IW
-
29th April 2013, 02:54 PM #24
GOLD MEMBER
- Join Date
- Aug 2009
- Location
- Armadale Perth WA
- Age
- 55
- Posts
- 4,524
While also recognizing Derek's elegant design ...
Maybe cut the brass through a convenient diameter or chord ... then reassemble into a (no longer perfectly circular) whole?
I was thinking it (making the brass receiver) could be a little like making a Krenov-style plane, but in metal.
Paul
-
29th April 2013, 02:55 PM #25
.
- Join Date
- Feb 2006
- Location
- Perth
- Posts
- 27,800
Yep Originally Posted by IanW
Yep - I agree with thisI'm conscious that Derek's original basic design is elegantly simple, and works.
Yep I agree. Looking at the blade shank it looks to have rounded corners so drilling the corners of the square hole with a small (eg 3 mm) bit and then hogging out the middle with a larger drill bit before filing out the corners would probably work. If the locking bolt was moved to a front corner only one back corner would have to be cut squarely. An appropriately sized square piece of steel wrapped in wet and dry can be used as a fair lap to assist with the squareness.Most people will have enough gear to make it & should end up with a pretty functional tool. Folks like us, with access to a bit of gear tend to get carried away, because we can. I'm not ag'in that, of course, you all know I can't resist a bit of fiddling; just thinking of the folks who are considering this project as their first foray into plane making...
Cheers,
-
5th May 2013, 11:17 PM #26
Be inspired. Be creative. Be bold.
- Join Date
- Apr 2001
- Location
- Perth
- Posts
- 10,830
All far too complicated for me!
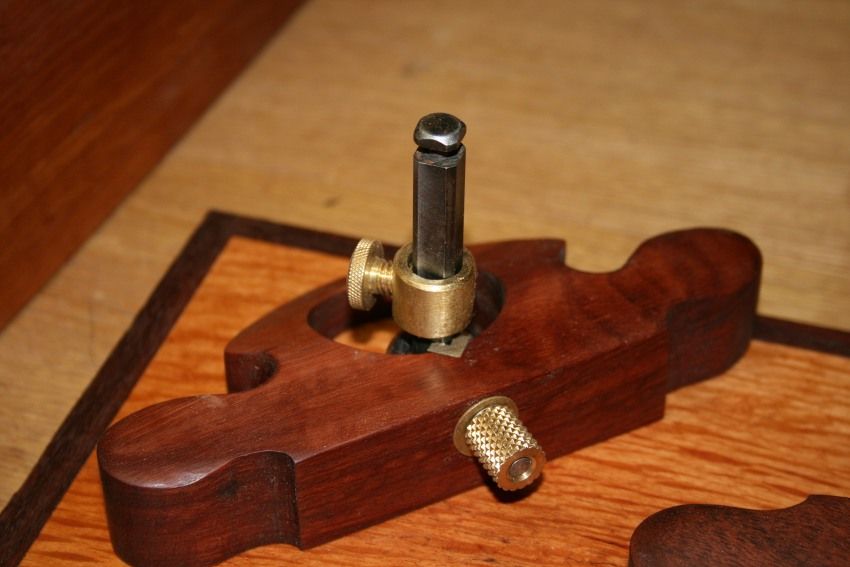
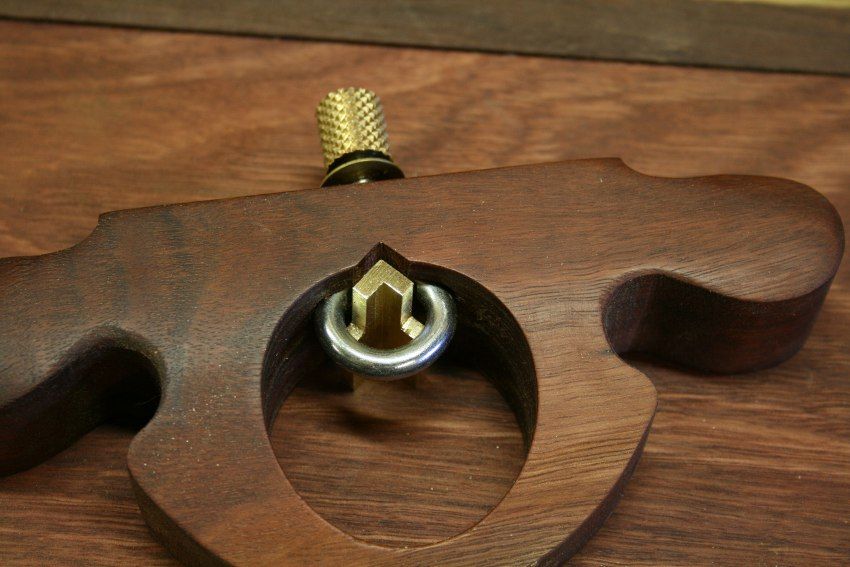
OK, here is the finished router plane ...
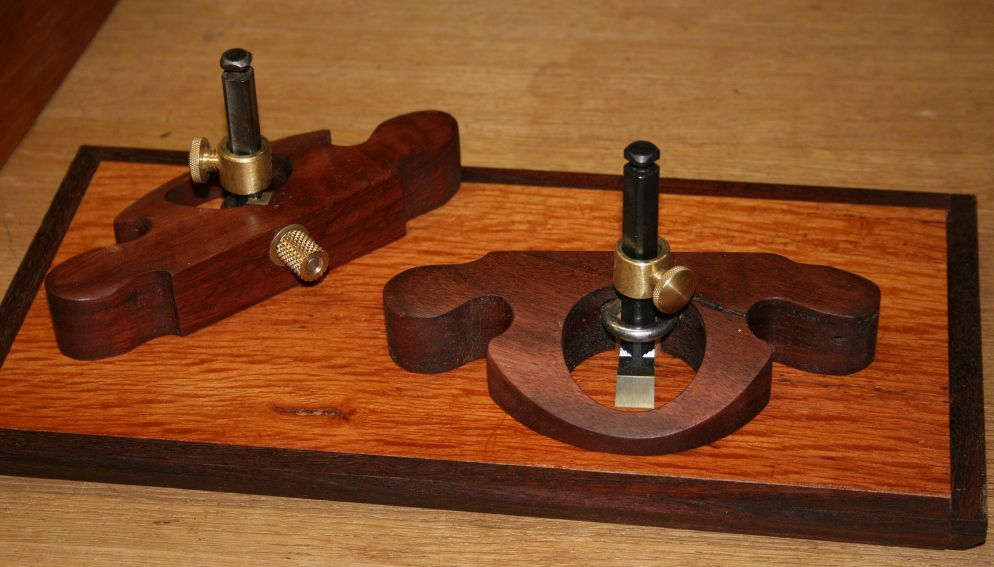
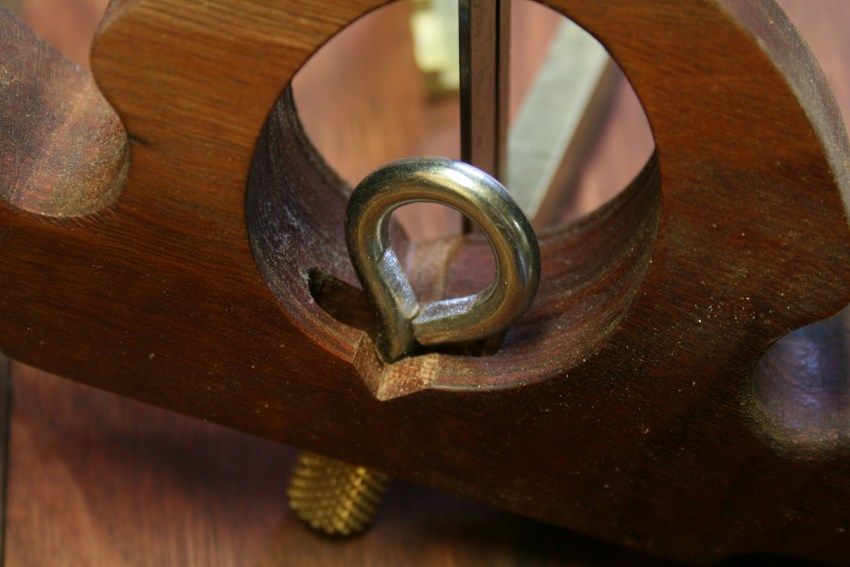
Doesn't look any different to before? Look carefully at the brass "v" at the rear ...
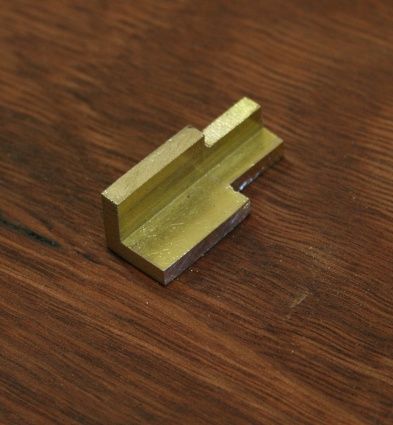
Under the plane the brass channel is more easily seen ...
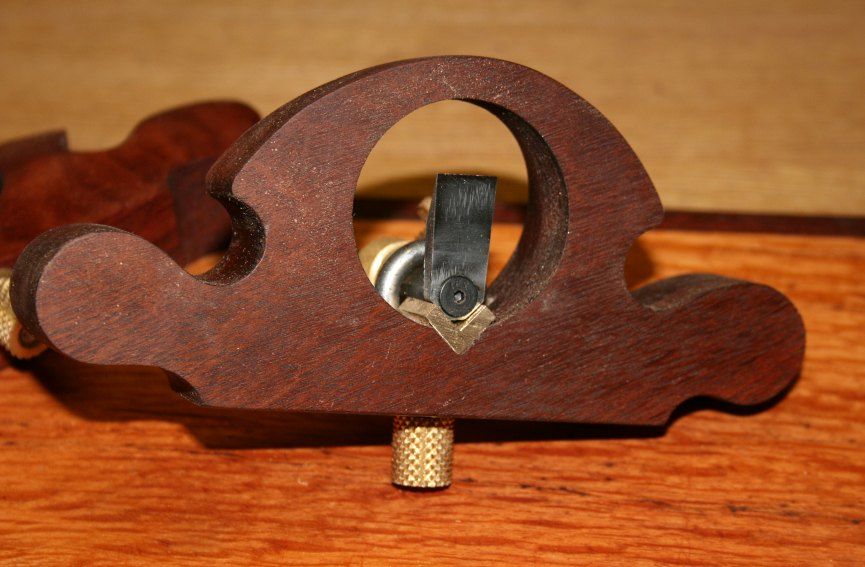
... and without the blade ...
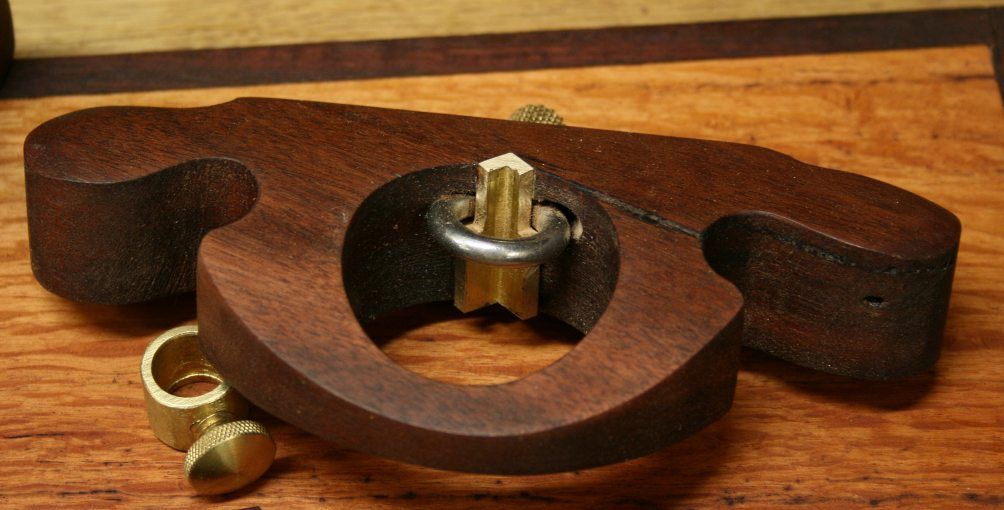
Loose and prior epoxying together ...
Here in the insert ...
A larger eye bolt was required. I could only get a 1/4" diameter and had to convert this to M6 (to match the brass nut).
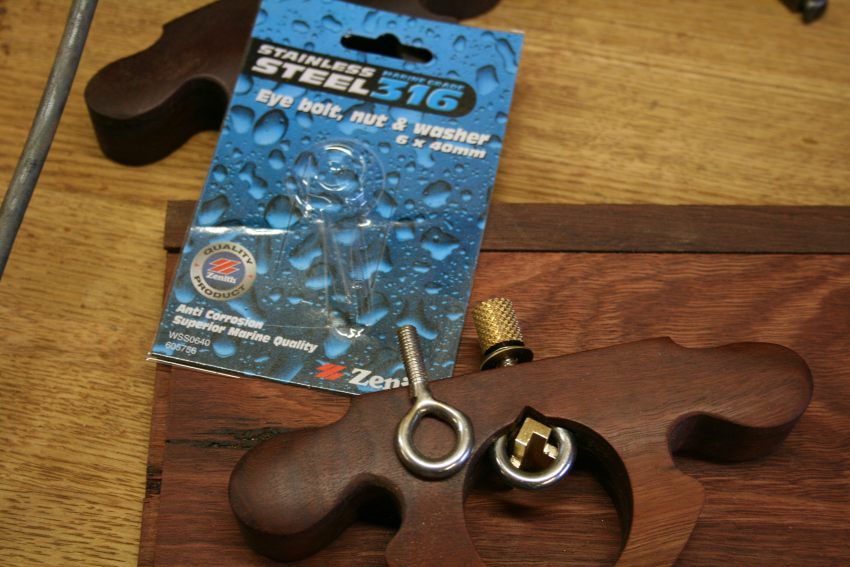
The inside of the eye bolt must be filed so that the brass channel fits snugly ..
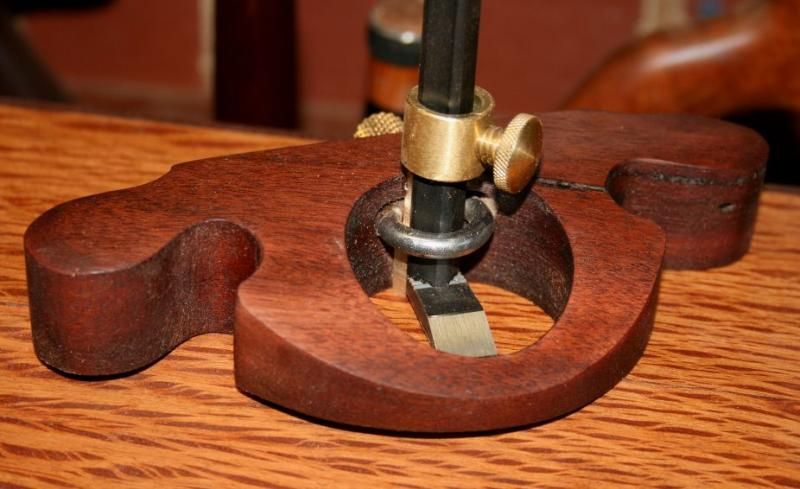
I am very happy with the way this has turned out. Thanks for the challenge to make it happen.
Now, I am do not plan to make these planes for sale - it is simply too time consuming. I do have one spare for sale (the one on the right and immediately above). It comes with two new blades, 1/2" and 1/4", both prepared and ready to go (flattened backs, hollow ground faces, and honed to 13000). There is a brass depth stop and brass knurled blade adjuster with wavy washer (which acts as a spring to retain some tension as you adjust the blade height). Life time warrantee The price is $135. Postage not included.
Otherwise check my website for instructions on making your own. Expect to spend about $60-70 on parts.
Regards from Perth
DerekVisit www.inthewoodshop.com for tutorials on constructing handtools, handtool reviews, and my trials and tribulations with furniture builds.
-
6th May 2013, 07:16 PM #27
Bloke
- Join Date
- Jan 2008
- Location
- Central Coast NSW Australia
- Posts
- 1,136
Derek
That's an elegant solution to a simple problem
one minor point for me is that I would like the tightening nut to be a wing nut 'cause I have old arthritic hands
TTLearning to make big bits of wood smaller......
-
6th May 2013, 09:54 PM #28
Be inspired. Be creative. Be bold.
- Join Date
- Apr 2001
- Location
- Perth
- Posts
- 10,830
Thanks TT
About the knurled nut. It replaced a brass wing nut. While I think the knurled nuts are just so ... right ... I would not have used them if they did not work as easily as the wing nuts. The knurling stands proud that it creates a strong grip. In one respect it works easier - you do not need to turn your hand to find the wing of the wing nut.
Regards from Perth
DerekVisit www.inthewoodshop.com for tutorials on constructing handtools, handtool reviews, and my trials and tribulations with furniture builds.
-
7th May 2013, 10:51 AM #29
GOLD MEMBER
- Join Date
- Mar 2004
- Location
- Brisbane (western suburbs)
- Age
- 77
- Posts
- 12,142
I agree with Derek, wing nuts look so ... agricultural! However, I can sympathise very much with TT. As my hands get a little arthritic & weaker, it's often surprising to me what can be difficult. Fortunately, I have the luxury of being able to make my own brass bits with my little metal lathe, so I can make sure such parts are finger-friendly.
The simplest way to improve ease of locking screws that I've found is to use as fine a thread as the job will allow (or as fine as you can readily get taps & dies for). I discovered when making thumb-screws for my marking gauges that an M6 thread (25 tpi) locks more easily & more securely than 1/4" Whitworth (20 tpi). I wouldn't have thought the difference was so great until I compared them directly. The other help is to make the knurled knob a reasonable diameter, to assist stiff fingers to hold it, & to add a little more mechanical advantage so it takes even less effort to lock or undo.
I find knobs of about 16mm (5/8") to be a very comfy size, and in good proportion to something like these marking gauges, for locking the beam. The screw for holding the pencil in place is a bit wincey, but to make it any bigger would have looked a bit lumpy, as well as adding more weight than desirable to the tip. Fortunately, it has a very fine thread (M5) which is easy to move. (Wood is Hairy Oak.)
Hs set.jpg
Cheers,
Edit: Speaking of suiting different hands, the marking knife was made for someone with large hands, which is why it is a much more generous chunk of wood than the standard 'D.C. design'...
IW


 Reply With Quote


Similar Threads
-
BETH -Skippy- Building a wooden sailing canoe in Tasmania
By tortured_ply in forum Michael Storer Wooden Boat PlansReplies: 26Last Post: 7th April 2024, 04:00 PM -
Duckflat Autumn Wooden Boat Building School 2010
By Boatmik in forum Michael Storer Wooden Boat PlansReplies: 0Last Post: 29th April 2010, 03:33 PM -
my wooden ski boat i am building
By ibeanonchippy in forum BOAT BUILDING / REPAIRINGReplies: 0Last Post: 28th January 2009, 05:34 PM -
Building an Infill Plane
By sam63 in forum HAND TOOLS - UNPOWEREDReplies: 23Last Post: 18th January 2006, 02:31 PM
