

 Thanks: 0
 Likes:
  Needs Pictures: 0
 Picture(s) thanks: 0
Results 1 to 15 of 29
Thread: Building a Wooden Router Plane
-
12th April 2013, 09:05 PM #1
 Be inspired. Be creative. Be bold.


- Join Date
- Apr 2001
- Location
- Perth
- Posts
- 10,826
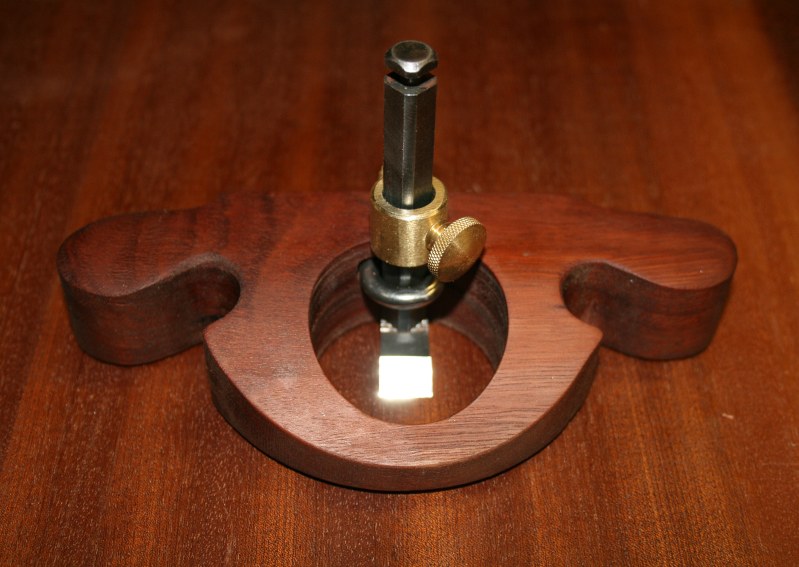
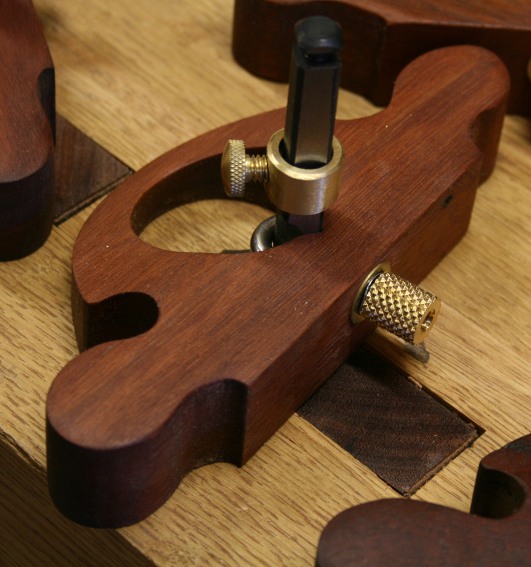
 Building a Wooden Router Plane
Below is a link to a pictorial on and plans for building the wooden router plane I have posted recently:
http://www.inthewoodshop.com/ShopMad...uterPlane.html
Please post any ideas for improvement.
Regards from Perth
DerekVisit www.inthewoodshop.com for tutorials on constructing handtools, handtool reviews, and my trials and tribulations with furniture builds.
-
12th April 2013 09:05 PM # ADSGoogle Adsense Advertisement
- Join Date
- Always
- Location
- Advertising world
- Posts
- Many
-
12th April 2013, 10:08 PM #2
Junior Senior Member
- Join Date
- Dec 2008
- Location
- Adelaide, SA
- Posts
- 962
Building a Wooden Router Plane
The only improvement I can think of is that it'd look better on my workbench! Seriously tho, no, I can't think of anything. Great job, u've inspired me to make one also.
-
12th April 2013, 10:59 PM #3
GOLD MEMBER
- Join Date
- Aug 2009
- Location
- Armadale Perth WA
- Age
- 55
- Posts
- 4,524
Derek, do you tend to use it pushing or pulling?
Cheers,
Paul
-
12th April 2013, 11:25 PM #4
Be inspired. Be creative. Be bold.
- Join Date
- Apr 2001
- Location
- Perth
- Posts
- 10,826
I use it pushing, Paul, but I cannot see why it cannot be pulled.
Regards from Perth
DerekVisit www.inthewoodshop.com for tutorials on constructing handtools, handtool reviews, and my trials and tribulations with furniture builds.
-
13th April 2013, 04:48 PM #5
Bloke
- Join Date
- Jan 2008
- Location
- Central Coast NSW Australia
- Posts
- 1,136
Hi Derek
I wonder if you could put a piece of 90� angle at the back of the router iron.
It seems to me that is where the most wear will come from.
TTLearning to make big bits of wood smaller......
-
13th April 2013, 07:23 PM #6
GOLD MEMBER
- Join Date
- Jun 2007
- Location
- North Of The Boarder
- Age
- 68
- Posts
- 16,794
Derek thats real nice little router plane is this what they used to call an "Old Woman's Tooth"?
-
14th April 2013, 01:32 AM #7
Be inspired. Be creative. Be bold.
- Join Date
- Apr 2001
- Location
- Perth
- Posts
- 10,826
Hi TT Originally Posted by Twisted Tenon

I have been thinking along these lines, not because of wear, but because it may be easier to seat the blade this way. I did something similar with the plough plane I built. However this is not straight forward with the router plane because there is a mortice for the eye bolt that would pass through the angle backing. That would effectively slice the angle in half. Now you have the problem of aligning the two parts in a deep groove.
I am working on it.
Regards from Perth
DerekVisit www.inthewoodshop.com for tutorials on constructing handtools, handtool reviews, and my trials and tribulations with furniture builds.
-
14th April 2013, 01:35 AM #8
Be inspired. Be creative. Be bold.
- Join Date
- Apr 2001
- Location
- Perth
- Posts
- 10,826
This is more technically a router plane. A OWT is traditionally made using a plough plane blade ... Originally Posted by wheelinround

Regards from Perth
DerekVisit www.inthewoodshop.com for tutorials on constructing handtools, handtool reviews, and my trials and tribulations with furniture builds.
-
14th April 2013, 01:08 PM #9
Bloke
- Join Date
- Jan 2008
- Location
- Central Coast NSW Australia
- Posts
- 1,136
I see what you mean. Maybe the only way around that is the have the angle and the clamp made as one unit and installed together. Originally Posted by derekcohen
This would probably require some sort of tig work and then it defeats the principles of your simple (uncomplicated) piece
Still, this type of problem solving is interesting. I'm looking forward to what you do next
TTLearning to make big bits of wood smaller......
-
14th April 2013, 01:55 PM #10
GOLD MEMBER
- Join Date
- Aug 2009
- Location
- Armadale Perth WA
- Age
- 55
- Posts
- 4,524
Derek, BobL and I think IanW have all made things/parts from hardware store brass bits and pieces before ...
I wonder if there wouldn't be some common piece ... like a kitchen sink plug, or the section it plugs into ... that might give you a circle of brass (eg) to inlay around the inside of the throat at the base? (... a bit like Derek did with some of his wooden planes)
Paul
-
14th April 2013, 08:17 PM #11
GOLD MEMBER
- Join Date
- Dec 2007
- Location
- Melbourne
- Posts
- 3,277
Use a piece of brass angle and run it vertically then it goes inside the wood and the eye bolt passes through it?
-
14th April 2013, 09:51 PM #12
Be inspired. Be creative. Be bold.
- Join Date
- Apr 2001
- Location
- Perth
- Posts
- 10,826
Using brass angle was what I had in mind - I like the extra bling
- however, there is still the issue of the mortice.
At this stage the only way I can see that the angle brass is retained in one piece is to make it wide (to retain some section at the outside of the mortice). This will require that the rear section of the router is made deeper (to accommodate the extra depth of the angle brass). This, in turn, impacts on the lightness of the design and its feel. As you can see, it is not straight forward. Happy to hear your ideas.
Regards from Perth
DerekVisit www.inthewoodshop.com for tutorials on constructing handtools, handtool reviews, and my trials and tribulations with furniture builds.
-
14th April 2013, 10:09 PM #13
Bloke
- Join Date
- Jan 2008
- Location
- Central Coast NSW Australia
- Posts
- 1,136
How about using a U bolt instead of an eyelet? That way you could spread where the holes enter the rear of the plane.
The type of U. Bolts I'm thinking of can be sourced from a marine supply sore.
TTLast edited by Twisted Tenon; 14th April 2013 at 10:14 PM. Reason: 'Nother thought
Learning to make big bits of wood smaller......
-
14th April 2013, 10:27 PM #14
Be inspired. Be creative. Be bold.
- Join Date
- Apr 2001
- Location
- Perth
- Posts
- 10,826
Hi TT
How would you envisage that working?
Regards from Perth
DerekVisit www.inthewoodshop.com for tutorials on constructing handtools, handtool reviews, and my trials and tribulations with furniture builds.
-
15th April 2013, 12:37 AM #15
Bloke
- Join Date
- Jan 2008
- Location
- Central Coast NSW Australia
- Posts
- 1,136
Hi Derek
I see that the U bolt would take out the necessity of making a mortice for the eye bolt. The brass angle would have notches either side to accommodate the U bolt and just require 2 holes to be made in the frame. So in my diagram one of the nuts would be fixed and the other a wing nut would do the tensioning. I don't know for sure but I'm thinking that that arrangement would operate much the same as a Moxon Vice where only one of the wheels does the adjustment once the piece has been properly balanced in the vice. The notches should prevent the U bolt from pulling through the timber of the frame and hold in securely in place against the router blade. That way you would have more depth on the angle to play with. Do they make brass U bolts? If not stainless angle with a stainless U bolt would look good against the type of timber you are using.
Apologies for the rough drawings. As you can see I used one of yours which is much better than I could do.
Regards
TT
img026.jpg img024.jpgLearning to make big bits of wood smaller......


 Reply With Quote


Similar Threads
-
BETH -Skippy- Building a wooden sailing canoe in Tasmania
By tortured_ply in forum Michael Storer Wooden Boat PlansReplies: 26Last Post: 7th April 2024, 04:00 PM -
Duckflat Autumn Wooden Boat Building School 2010
By Boatmik in forum Michael Storer Wooden Boat PlansReplies: 0Last Post: 29th April 2010, 03:33 PM -
my wooden ski boat i am building
By ibeanonchippy in forum BOAT BUILDING / REPAIRINGReplies: 0Last Post: 28th January 2009, 05:34 PM -
Building an Infill Plane
By sam63 in forum HAND TOOLS - UNPOWEREDReplies: 23Last Post: 18th January 2006, 02:31 PM
