

 Thanks: 0
 Likes: 0
 Needs Pictures: 0
 Picture(s) thanks: 0
Results 1 to 15 of 140
-
26th May 2012, 07:37 PM #1
 Be inspired. Be creative. Be bold.


- Join Date
- Apr 2001
- Location
- Perth
- Posts
- 10,855
 Chip breakers ... not cap irons .. and what they really do!
On a few woodworking forums - in the USA and UK - there has been ongoing discussion that has certainly changed my awareness about tuning BD double-ironed planes.
It started with Bill Tindall, a member of WoodCentral, re-discovering a video by Professor Yasunori Kawai and Honorary Professor Chutaro Kato at Yamagata University, as part of their research in the role of cap irons in planing. I recall viewing this some years ago, but the true significance was lost on me as it was all in Japanese. I include a link to the video (on the blog of Wilbur Pan, has added English subtitles added (it runs for 17 minutes)):
giant Cypress: Japanese woodworking tool punk • This is the full version of the video created by...
Further details were supplied by Bill, who had the original notes sent to him by Kawai and Kato, and these were translated for our benefit. I have these but shall not overload you with the information!
I do not recall exactly when the video was made, or whether it was the source of data that "confirmed" existing beliefs. However for many years my view has been that the chip breaker (I will now no longer use the term "cap iron") had to be extremely close to the edge of the blade - within .1 or .2mm - or otherwise it was ineffective. With this in mind it has always appeared too difficult or too much trouble to go to. Consequently, it was ignored. The chip breaker was just seen as a cap iron, that is, something to stiffen a blade.
The discussions we have had here over a period of months mark an evolution in the way we think about the chip breaker. We are no where close to the end of the journey.
As I mentioned, there has been considerable discussion. You many or may not wish to plough through threads such as these:
Study on Effect of Cap Irons on Blade Wear *LINK*
Reach and impact of Kawai-Kato video
I completed three sets of experiments before this one I include below. The abbreviated initail two plus detailed third is here:
Experimenting with chip breakers
Now you do not need to plough through this either. The executive summary is that I struggled .. failed .. to see a positive result on a really testing piece of Jarrah using both a Stanley #3 and a #604. Having said this, I believe that others are getting good results on less difficult wood, and so I was determined to try again. The experiment below is the follow up.
Rationale
The conclusion after Session Three was (1) I had either not found the sweet spot for the very hard Jarrah I was planing, or (2) the effect of a chip breaker deflecting shavings is wood dependent.
Session Four
The plane is an unmodified Stanley #604 with LN chipbreaker (given a 70 micro bevel and slightly cambered) and a custom M4 blade.
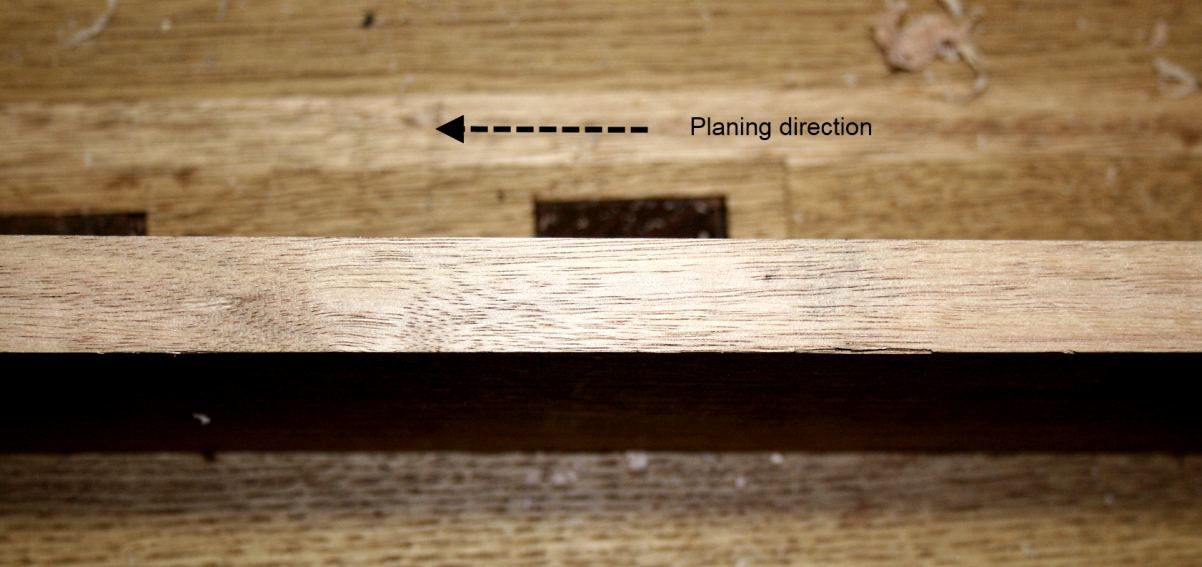
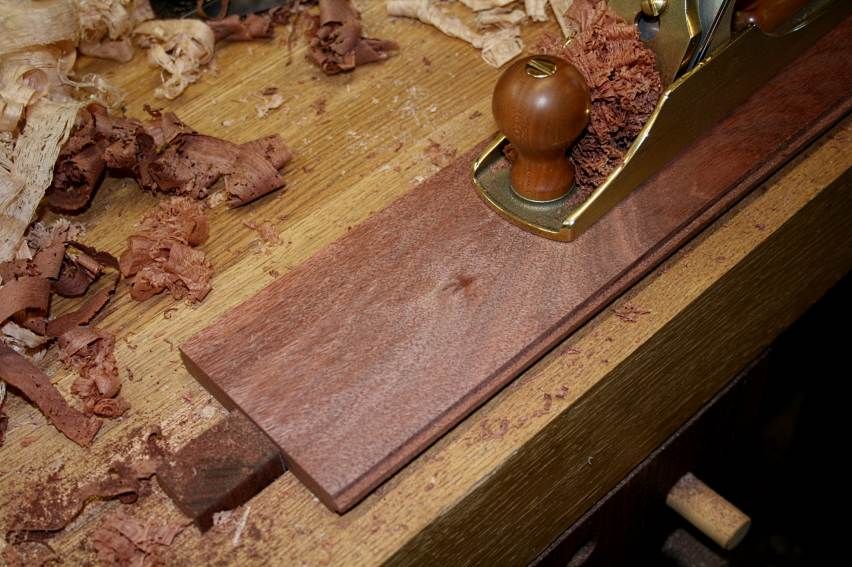
This time around I chose a piece of Tasmanian Oak. For non-Aussies, this is (in my experience) similar in density to USA White Oak and also to European Oak. Tassie Oak is not an oak, however, it is a eucalypt. As such, it tends to be a little more interlocked. This piece was fairly typical.
How would I know if I was in the "sweet spot"? Well the video shows the shavings coming off the chip breaker vertically. This is why I have begun to think of the chip breaker (never again a "cap iron"!) as a "chip bender".
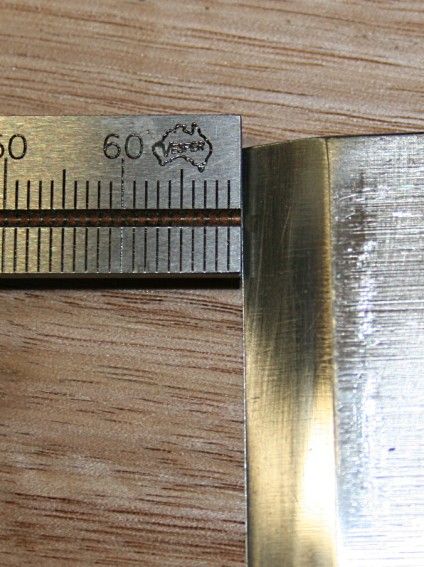
I set the chip breaker at a modest 0.3 (keep in mind that the chip breaker readings are slightly larger at the edge of the blade compared to the centre of the blade) ...
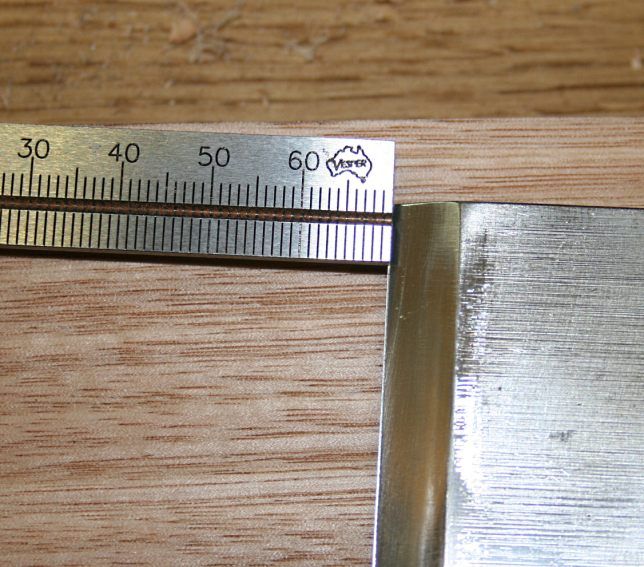
The mouth was "wide" at about 1mm. No effort was made to close it down as I normally would do for a smoother.
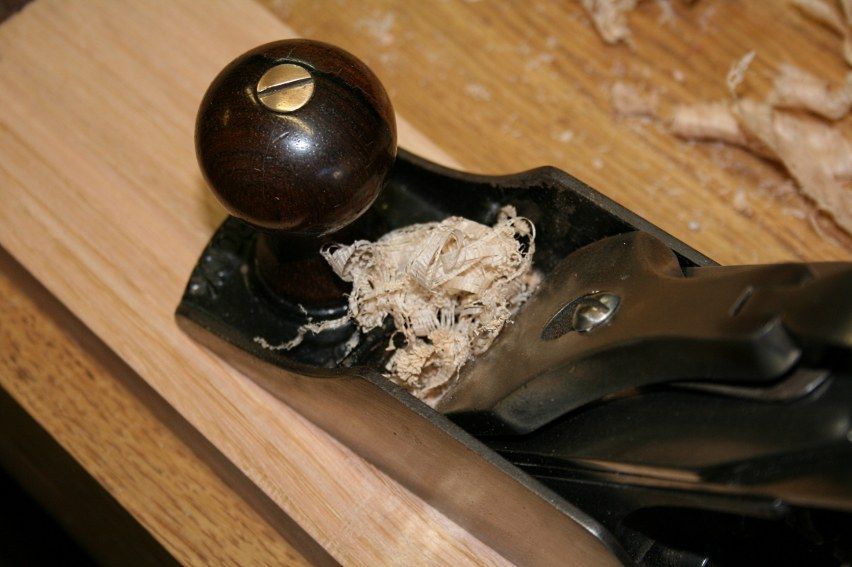
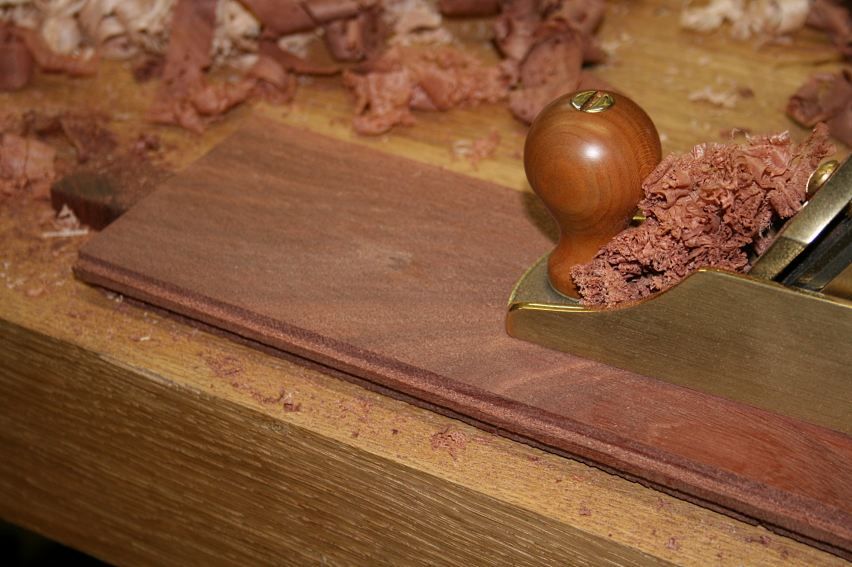
Here is the result ..
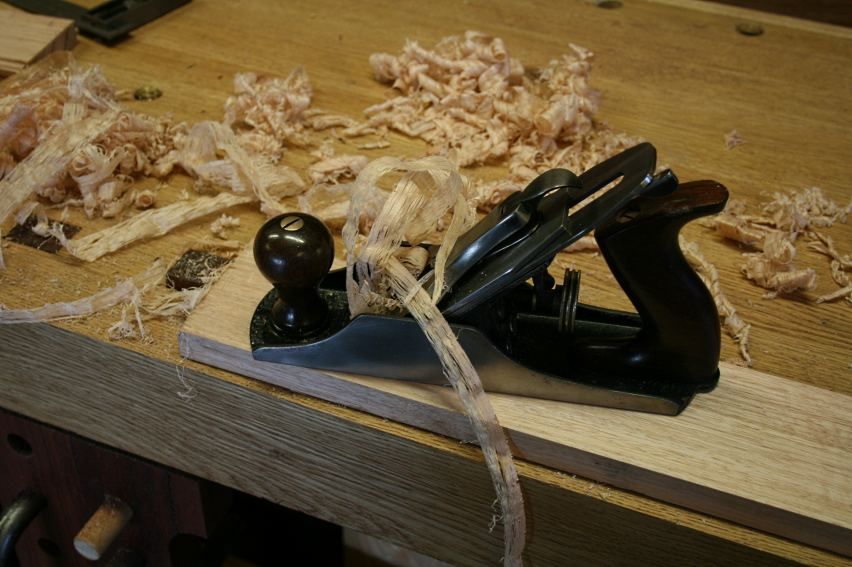
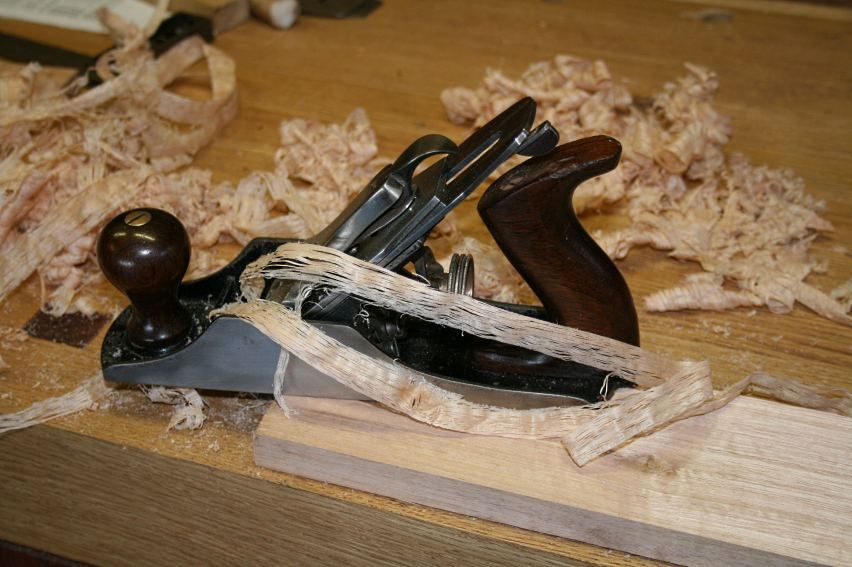
This was a good result. In the background you can see shavings from a chip breaker set back about 3mm. Those shavings are curled.
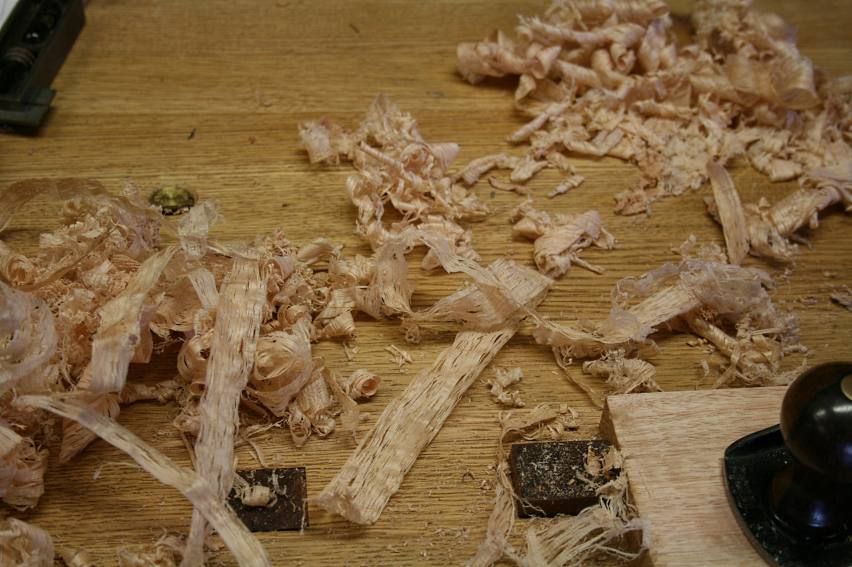
Of particular relevance here is that the planing took place into the grain.
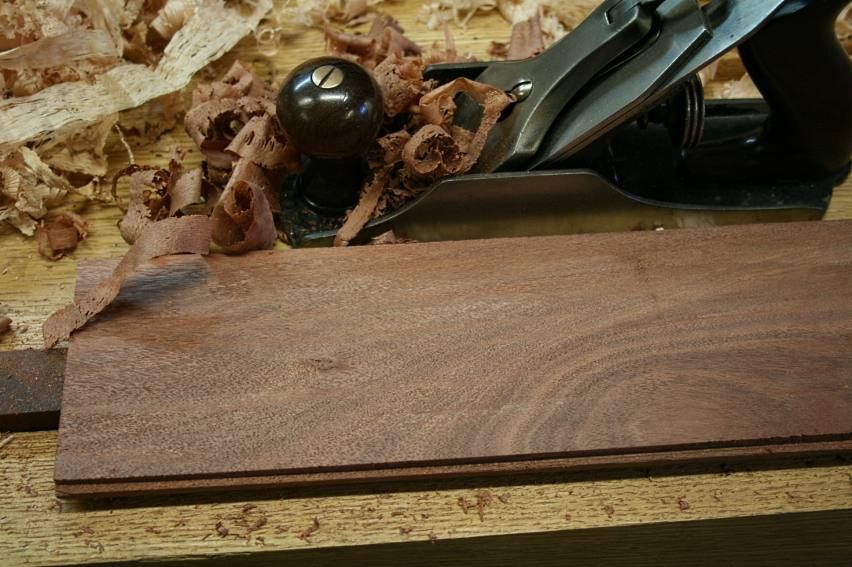
The surface result was also superior - a shiny, clear and tear-out free finish ...
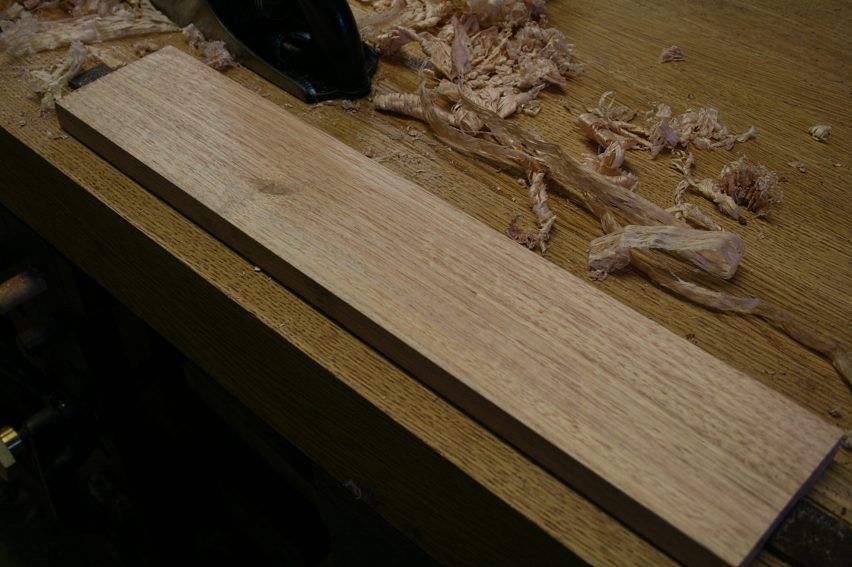
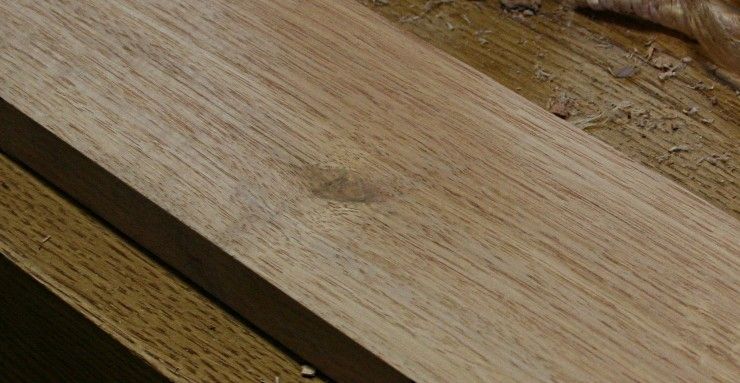
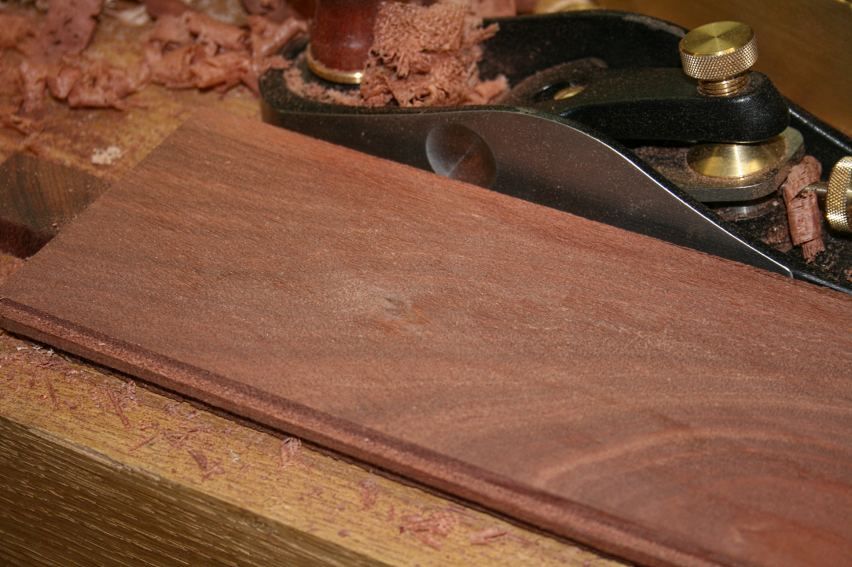
A close up around the knot reveals the absence of tear out ...
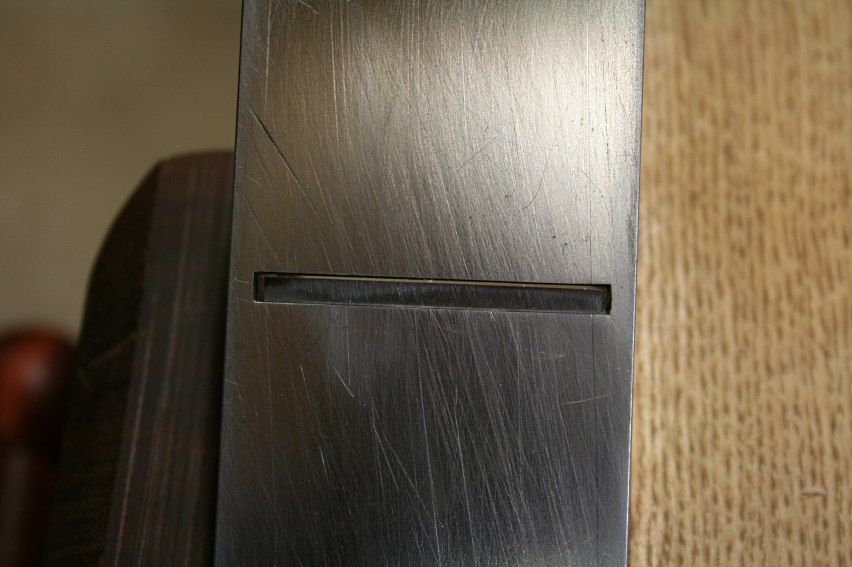
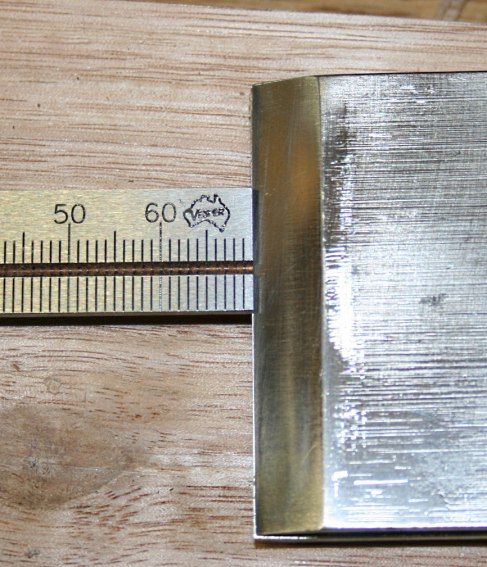
The second part of this session now moved to closing up the chip breaker to about 0.1 - 0.2mm ..
The result of this was very similar to Session 3, where the plane struggled to cut.
Clearly the chip breaker is now too close. However this is further evidence that it has a significant effect on the way the plane cuts.
For Part 3 the chip breaker was returned to the position of Part 1 ..
 Visit www.inthewoodshop.com for tutorials on constructing handtools, handtool reviews, and my trials and tribulations with furniture builds.
-
26th May 2012 07:37 PM # ADSGoogle Adsense Advertisement
- Join Date
- Always
- Location
- Advertising world
- Posts
- Many
-
26th May 2012, 07:39 PM #2
Be inspired. Be creative. Be bold.
- Join Date
- Apr 2001
- Location
- Perth
- Posts
- 10,855
That particularly nasty piece of Jarrah (which is almost like end grain in the one section) was brought back. The #604 proceeded to plane this. The result was a little better than on the previous occasion, but not really that noticeably so. The board had some straight grained sections that were softer, and where the plane met this area, the shavings where long and straight. The surface quality was poor.
The LN #3 (with 55 degree frog, chip breaker set back 3mm) had its turn. The result was the same as before: decent surface to the touch, a noticeable improvement over the common angle #604 ...
The chip breaker in the LN was now adjusted to 0.3mm and the board planed again. The result was a significant improvement in the quality of the surface ..
This was repeated with the Veritas Small BU Smoother (with a 62 degree cutting angle). In the previous experiment the SBUS left a clearly better surface than the 55 degree LN #3. This time the SBUS was shaded ...
Neither LN nor SBUS produced shavings that were vertical. THis must be due to the high cutting angle.
Conclusions
There does appear to be a performance difference in the woods used thus far, indicating that the technique is likely to be wood dependent. The chip breaker does, nevertheless, appear to be capable of improving the performance regardless of the wood type. However cutting angle does play a significant part as well, with a higher cutting angle still seen to be important for hard woods with interlocked grain.
Regards from Perth
DerekVisit www.inthewoodshop.com for tutorials on constructing handtools, handtool reviews, and my trials and tribulations with furniture builds.
-
27th May 2012, 09:43 AM #3
The prize lies beneath - hidden in full view
- Join Date
- Oct 2010
- Location
- 1017m up in Katoomba, NSW
- Posts
- 10,674
Very interesting read Derek, thanks for posting.
-
27th May 2012, 11:28 AM #4
Luddite Lite
- Join Date
- Jan 2009
- Location
- Brisbane
- Posts
- 800
Ditto.
I'm always impressed by the thoroughness of your testing. When i get a cance I will use your test parameters to perform a peer (I flatter myself) review with my woodies.
May be a few others could do the same and we can evaluate the 'chip bender hypothesis' across a variety of plane types, brands, bed angles...?
All the Aussies should be able to get hold of a stick of Tassie Oak.
Cheers
Matt...I'll just make the other bits smaller.
-
27th May 2012, 05:13 PM #5
GOLD MEMBER
- Join Date
- Aug 2009
- Location
- Armadale Perth WA
- Age
- 55
- Posts
- 4,524
Hi Derek - third last photo - is 3mm correct? Just seems large compared to the others tested. Originally Posted by derekcohen

Thanks,
Paul.
-
27th May 2012, 07:03 PM #6
Be inspired. Be creative. Be bold.
- Join Date
- Apr 2001
- Location
- Perth
- Posts
- 10,855
Hi Paul
That's no mistake. For many the chip breaker is considered a cap iron, that is, only a stabilising force for the blade. It was either 3mm or "as close as you can get". And the latter was ignored as it was difficult to do and, after all, what was the point - it did not do anything productive closer up ...
At this stage of the experiment I returned to this set up to obtain a baseline, that is, an example of the performance with the chip breaker set 3mm behind the edge. I must point out that the leading edge of this chip breaker was also left at the factory angle.
What we see is that moving the chip breaker forward to 0.3mm after the baseline effort results in an improved performance.
What I take from this experience is that I may be able to hot rod the performance of my double iron planes, particularly the couple of LN smoothers whose cutting angles (at 55 degrees) were not keeping up with the 62 degree BU designs.
Regards from Perth
DerekVisit www.inthewoodshop.com for tutorials on constructing handtools, handtool reviews, and my trials and tribulations with furniture builds.
-
27th May 2012, 09:08 PM #7
Jim
- Join Date
- Feb 2008
- Location
- Victoria
- Posts
- 3,191
Derek, so the conventional wisdom about chipbreakers being important has turned out to be exactly that, wisdom.
The following would appear not to be true if you were noting an effect at 0.3mm :
"For the cap iron/chip breaker to influence the formation of the chip, it effectively must become a part of the blade. Research in Japan revealed that the chip breaker must be within 0.1mm from the knife edge to effect any change. Beyond this distance and there is no effect."
Cheers,
Jim
-
27th May 2012, 10:26 PM #8
Be inspired. Be creative. Be bold.
- Join Date
- Apr 2001
- Location
- Perth
- Posts
- 10,855
Hi Jim
It is interesting that the use of a chip breaker, as discussed here, has been recorded for 250 years. It is not new. Nevertheless, the prevailing view in recent decades has been that the chip breaker served only to stiffen thin irons. Blame it on Stanley? No, I think not. There are many cabinetmakers who were taught correctly. But carpenters probably were not. And the literature in recent times generally neglected, or ignored, this procedure.
I was looking through old FWW mags. There is an article in the October 2000 edition. I shall not say who wrote it, but it is a frequent contributor, who has a very good reputation, The article is "Planing Difficult Grain". The author goes to pains to describe the tuning required: flat sole, sharp cambered blade, small mouth, etc. But of the chip breaker he says: "The chip breaker stiffens the blade, reducing vibration and chatter. For the chipbreaker to function, shavings coming off the board must travel smoothly along the back of the blade, over the chipbreaker, and up through the throat .... Or if the chipbreaker's edge is blunted, the shaving won't travel up through the throat... The first step is to feather the leading edge with a flat file ... once the chipbreaker is in good shape, set it 1/16" from the edge of the blade". (1/16" is approximately 1.6mm, which takes it completely out of the picture).
None of this changes the need, especially in Oz, for high cutting angles. However, those double bevel BD now may be tuned to perform at their potential. In a way I see the chip breaker effect as if one was adding 10 degrees to the cutting angle of these planes.
Regards from Perth
DerekVisit www.inthewoodshop.com for tutorials on constructing handtools, handtool reviews, and my trials and tribulations with furniture builds.
-
27th May 2012, 10:56 PM #9
Jim
- Join Date
- Feb 2008
- Location
- Victoria
- Posts
- 3,191
1/16" was often used as a rule of thumb as the outside limit to setting when using a fairly coarsely set jack plane to remove material quickly. The finer the work the closer the back-iron was set.
Cheers,
Jim
-
27th May 2012, 11:02 PM #10
Be inspired. Be creative. Be bold.
- Join Date
- Apr 2001
- Location
- Perth
- Posts
- 10,855
Now that you point this out Jim, I would agree and say that is closer to the setting I have used for years as well. The greater camber of a jack would necessitate a 1/8" (3mm) setting.
Edit: I meant to say that setting the chip breaker at 1/16" is as ineffectual for a smoother as setting it at 3mm.
Regards from Perth
DerekVisit www.inthewoodshop.com for tutorials on constructing handtools, handtool reviews, and my trials and tribulations with furniture builds.
-
28th May 2012, 12:40 AM #11
GOLD MEMBER
- Join Date
- Feb 2003
- Location
- back in Alberta for a while
- Age
- 68
- Posts
- 12,006
Hi Derek
thank you for these experiements
one thing though -- Tassie Oak is always (at least these days) supplied quarter sawn while the Jarrah you are using appears to be back sawn.
this will likely have a significant effect on your results.
it may also affect the comparison we in Australia are always trying to draw with European and Nth American timbers. Our northern friends rarely if ever work with Eucalyptus concretus
I don't know, but think most Northern hemisphere oaks are supplied back sawn, so while Tassie Oak might behave (for us) like a true oak, the QS vs BS difference might be material.
Can you comment?regards from Alberta, Canada
ian
-
28th May 2012, 12:56 AM #12
Senior Member
- Join Date
- Feb 2012
- Location
- Adelaide
- Posts
- 451
nice write up and i applaud your documenting and sharing your discovery about the chipbreaker or cap or back iron as it is often referred to, i am sure you will learn more as you go along and i think it is helpful to others. Originally Posted by derekcohen
however i have to ask what qualifications do you have to state in relation to basic (let alone more advanced) use of a plane that tradsesmen have or have not been taught whist completing their indentures and attending trade school, that "many cabinet makers were taught correctly" what not all? and that "carpenters probably were not"...seriously i have never heard anything so ridiculous in my life...it appears you are only just discovering fully what the cap iron does, how would you know what tradesmen have been taught? are you a carpenter? a cabinet maker or any other trade? sheeze! frankly i dont think you have to be a carpenter to know, i am sure in high school they taught us the fundamentals about the plane and cap iron and out of curiosity, because i was sure it was well known, i dug out my old copy of Walton that was often used as a text in aust for high school woodwork class..it indeed lists the primary function as breaking the shavings, preventing tearing up and enabling a smooth surface, it secondary function also provides tension to the cutting edge preventing chattering. i would have to disagree wholeheartedly that the prevailing view in the past few decades has evey been only to stiffen the blade, it may have been in your eyes but i dont see how you can speak for others..certainly any texts i have read distinguish the purpose of the back iron correctly, i'd say that either you misread, misquoted or the fellow that wrote the article was somewhat slack with his wording, although it made sense to me but perhaps i read between the lines
Sir, you do all carpenters and cabinet makers in Australia and probably the world a great disservice and are insulting them by suggesting they dont know about basic functions of using a plane. i guess that might mean that you feel you know more than them? i wonder what poor impressions you must have towards carpenters and how they fill their time over 4-5 years (if not their lives) on the job and in trade school, oafs that just swing a hammer or nail gun perhaps, good gawd you do need to learn more!
cheers
chippy
-
28th May 2012, 12:59 AM #13
Be inspired. Be creative. Be bold.
- Join Date
- Apr 2001
- Location
- Perth
- Posts
- 10,855
Hi Ian
The Japanese research used a wood that looked very similar to the quarter sawn Tassie Oak in this experiment (I included a photo in the experiment of the gran direction). In their experiments they planed into the grain. The aim was to see if the chip breaker could counter the expected tear out.
Tassie Oak was planed here in the same manner (into the grain). Consequently I do not see this as back sawn versus quater sawn, only how reversing grain is controlled by the chip breaker.
Do you see it differently? Do you see an issue that might contaminate the results?
Regards from Perth
DerekVisit www.inthewoodshop.com for tutorials on constructing handtools, handtool reviews, and my trials and tribulations with furniture builds.
-
28th May 2012, 02:17 AM #14
Senior Member
- Join Date
- Nov 2008
- Location
- Melbourne, Australia
- Posts
- 275
Great Post as usual Derek, very thought provoking.
I'd seen that video earlier elsewhere and the thing that bothered me a little was that the researchers isolated the chip breaker and blade from a plane mouth. I can understand why they've done this from one perspective, eliminating a variable. However, the mouth and its openings interact with the chip-breaker/blade assembly to control/regulate tearout and shaving behaviour. So to look at the chip breaker in isolation, whilst interesting, only gives part of the picture.
I spent the day making a new window for our laundry which gave me the chance to follow your lead and do a little experimenting. I had to make a sill for the window and elected to do so out of Tas Oak. I usually do sills and steps in grey ironbark but this sill isn't exposed and I didn't see the need.
I didn't bother fiddling with the #5 that I used to knock off the high spots after my initial shaping but when I started with the #7 I initially set the chip breaker very fine.
What I found with this was that there was really only one setting that "worked" in terms of depth of cut. I had to be taking extremely fine shavings or the plane wouldn't clear the chips and would just gum up in the mouth making it very hard to push. The finish off the plane was pretty good though. Just for the sake of reporting, I also planed against the grain. There was really only one blade depth setting that worked here and as is predictable, there was a bit of tear out in some areas.
Next I pulled the chip breaker back to a thumb nail width from the edge of the blade. This gave me a lot better chip ejection and a broader working range in terms of depth setting. The shavings cascaded out of the plane rather than curling up in it. The surface was quite attractive and lustrous, and this was off a jointer.
Pulling the chip-breaker back to 3mm was a bit of a disaster, fine cuts were ok but patchy but deeper cuts were pretty much impossible.
I'm going to paint this sill so using a smoother was just playing about, however, I repeated the above with a Stanley #4 fitted with an Academy blade as I was on a roll.
With the finest chip breaker setting the plane was quite temperamental, there was a very limited range through which it would work and it was only effective on the most shallow of cuts.
Moving to the "thumbnail" thickness achieved several things. The shavings ejected from the plane rather than curled in the mouth, a broader range of depth settings could be achieved whilst the plane remained workable and the quality of the finish appeared better. This final assessment is clearly subjective but I thought the surface was more uniform and lustrous with the slightly wider chip breaker setting even when the shavings taken were almost twice the thickness of the finest chip breaker setting.
3 mm was clearly too far back on the smoother and I quickly lost patience with it as it gummed up the mouth of the plane and made a mess of my sill.
I guess this would pretty much confirm your results, thanks for the impetus!
Horaldic
-
28th May 2012, 02:23 AM #15
Be inspired. Be creative. Be bold.
- Join Date
- Apr 2001
- Location
- Perth
- Posts
- 10,855
What a wonderfully detailed and helpful post, H! Many thanks for this follow up report.
Edit: I was just re-reading an article I wrote some years ago about Jim Krenov (Paul posted a link to a video about him on YouTube), and I was replying. I had details of the smoother he built, that I have, and that he used before sending it to me. I recorded that the chip breaker had been set 1/16" back! So it seems that JK also did not use the chip breaker to fine tune the performance of his planes! I wonder how this (common angle) smoother will go on interlocked wood with a finely set chip breaker!!
Regards from Perth
DerekVisit www.inthewoodshop.com for tutorials on constructing handtools, handtool reviews, and my trials and tribulations with furniture builds.


 Reply With Quote


Similar Threads
-
Do chip breakers break chips?
By tonyw in forum HAND TOOLS - UNPOWEREDReplies: 5Last Post: 16th December 2011, 10:49 AM -
Tripping circuit breakers
By Andy Mac in forum BANDSAWSReplies: 2Last Post: 14th November 2008, 02:26 AM -
Stalk Breakers
By Gingermick in forum NOTHING AT ALL TO DO WITH WOODWORKReplies: 22Last Post: 4th August 2007, 11:54 PM
