

 Thanks:
  Likes:
  Needs Pictures:
  Picture(s) thanks:
Results 1 to 15 of 22
Thread: Chisel & Rasps rests for storage
-
20th September 2012, 12:12 PM #1
 The prize lies beneath - hidden in full view


- Join Date
- Oct 2010
- Location
- 1017m up in Katoomba, NSW
- Posts
- 10,662
 Chisel & Rasps rests for storage
G'day
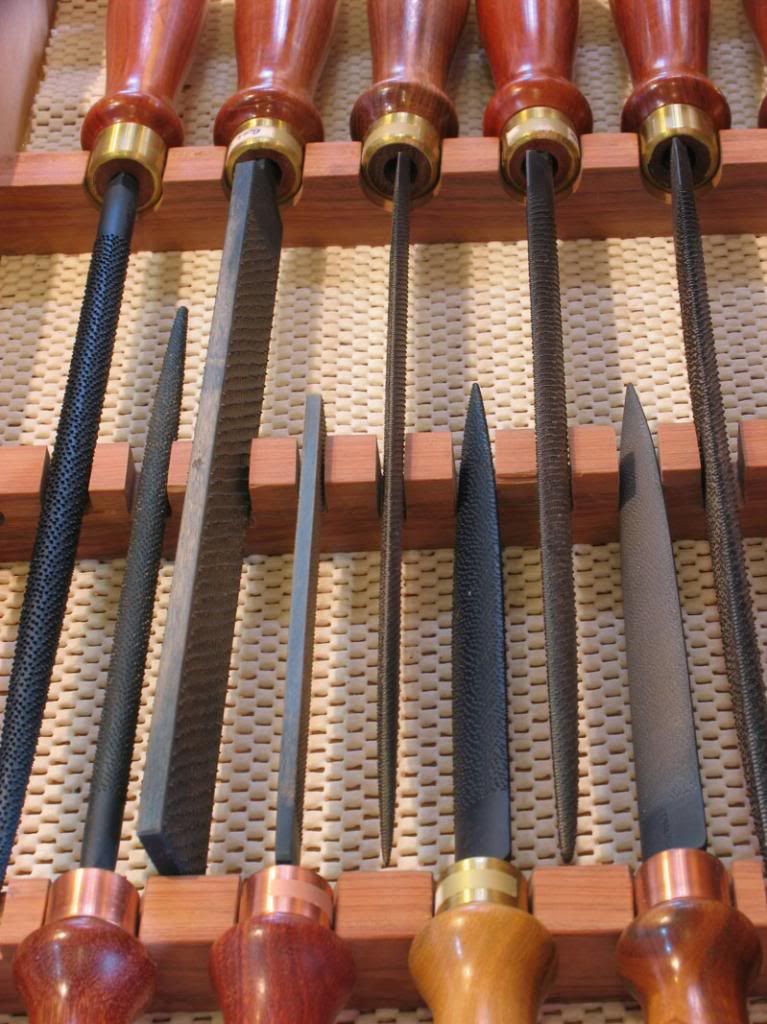
Finally got sick enough of my rasps being too dangerously close to each other in the drawer, requiring far too much care to get them out. The solution was very simple - just a few strips of timber with slots in them (round for ferrules/handles, square for longer rasps, keyholes or circular holes for handle heavy rasps). The half holes for the ferrules were done with a forstner bit (have to watch for breakout on the right hand side where the bit exits the semi circle).
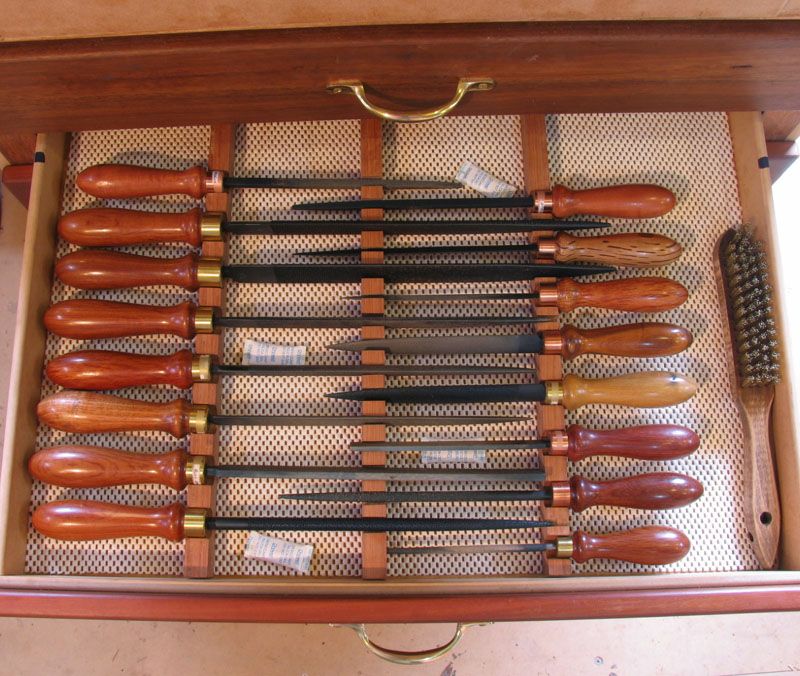
Gorgeous handles courtesy of IanW
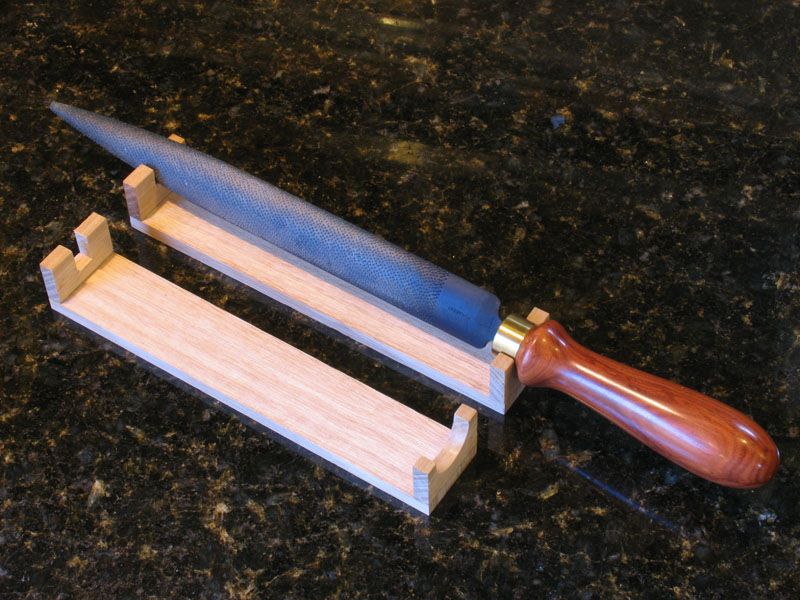
At first I thought that individual rests was the way to go but the current method is much more space efficient. However, the prototypes are great for having a rest to use on the workbench during use:
I did a similar thing for my chisels. The design had to be different so that the cutting edges are protected.

You can see the appalling grind quality of the Irwin chisels. On the 2" jobbie the grinding marks are over 0.5mm deep
Cheers
FF
-
20th September 2012 12:12 PM # ADSGoogle Adsense Advertisement
- Join Date
- Always
- Location
- Advertising world
- Posts
- Many
-
20th September 2012, 12:56 PM #2
 GOLD MEMBER
- Join Date
- Mar 2004
- Location
- Brisbane (western suburbs)
- Age
- 77
- Posts
- 12,133
Brett - if making a batch of supports, I would drill full holes in wood strips, then rip them to make two sets with semi-circular holes. It halves the work, as long as you require more than one with the same spacings. Originally Posted by FenceFurniture

I'm all in favour of modular & removeable tool holders along the lines of yours - you will almost certainly want to change things around at some time in the future (more likely several times! ), and it makes the job so much simpler. The first time I kitted out my toolbox drawers, I went to an excessive amount of trouble making up fixed dividers & tool holding devices, almost all of which have since been scrapped during various remodels as I squeezed another tool in here & there, and figured out better & often simpler ways to stop srap edges contacting things they shouldn't. But I think I've reached the limit of development, so atm, am making a new 'auxillary' toolbox to house some strays that just won't fit however hard I squeeze!
Cheers,IW
-
20th September 2012, 01:17 PM #3
The prize lies beneath - hidden in full view
- Join Date
- Oct 2010
- Location
- 1017m up in Katoomba, NSW
- Posts
- 10,662
G'day Ian
Yeah, I did consider doing that, but the problem was that the left and right half holes are offset by 20mm, and the holes were of different diameters for the ferrules. I was actually able to overcome the breakout with the "right" pressure on the drill press: too slow will burn the hole, too fast will cause breakout, but the sweet spot wasn't too hard to find. (EDIT: obviously the offset problem is pretty easily overcome, by docking to length after the drilling. It's the different sizes that kills the idea).
I was giving that little DT saw a workout - I love it! All good learning for gearing up to starting some DTs (although there are those that might say I'm pretty experienced with the DTs).
I had a bit of a thought last night when I was finishing off the sawn slots with a rasp. Bear in mind that I've never cut a Dovetail in my life, but to smooth off the saw cut I used a #12 and a #15 flat rasp (with a safe edge). This led me to wonder how a specific rasp for cleaning up DTs would go. Profile would be a right triangle with the hypotenuse stitch, the two other faces safe. Angle of the face to suit 1:6 or 1:8 DTs, and you'd need a left and a right (unless you want to keep flipping the job around.
I'm expecting that you might say that a chisel is the weapon of choice for cleaning up the cuts, but surely they are pretty hard to get into the female part of the joint (I'm sure it has a proper name)?
Any thoughts, or is this "was a good idea at the time"?
You're right of course about "things change" - you can see at the back I've left space for four more rasps. The files drawer is next!
-
20th September 2012, 05:43 PM #4
Senior Member
- Join Date
- Feb 2012
- Location
- Adelaide
- Posts
- 451
looks all out of whack Brett, the rasps on the left has one odd copper ferrel, and the rasps on the right have two, thats two mind! brass ferrels, i dont know how you live with that type of disorganisation

jk, of course, very nice!
? not sure if i understood you correct, are you (actually!) rasping the cuts you make with a dovetail saw? to make them smoother! cant be surely, how ruff is the saw your using (thats the vertical cut as its sitting in your vice)...the bottoms (as they are sitting in the vice) are often cut with a coping saw or fret saw, sometimes your cut can be satisfactory enough but often is the practise to clean up with a chisel (or remove it all with a chisel from the start) that makes a nice sharp and clean edge, thats square to the other side. using a rasp isnt a good method, and if your using it on the sides cut with a 15ppi or so dovetail saw, then stop it! you'll drive your self nuts anyway but the saw should be leaving a nice surface behind anyway, not that its important cause it gets covered up! and if your using glue gives it something to grip to... if it isnt leaving a satisfactory finish check the teeth, there might be one or two out. if you are adjusting them with a rasp because you didnt cut along your line (if its that far out!) or worse out of square then a chisel would be used, if your saw isnt cutting straight though (causing it to run out of square), over that very small distance then the saws either out of whack... or you are and need a little practice ..doesnt look like it though as i assume you made all those draws and things that are holding your tools, they all look very nicely, neat and squarely done
cheers
chippy
-
20th September 2012, 07:16 PM #5
The prize lies beneath - hidden in full view
- Join Date
- Oct 2010
- Location
- 1017m up in Katoomba, NSW
- Posts
- 10,662
G'day Chippy
Yeah, I'm still getting over the ferrules being out of whack.
Since posting ealier I have read that thread about coping saws, so the point may be moot. Prolly the most significant part of your reply is "...or you are in need of a little practice...". The surface left behind by the saw is pretty good, but because these were exposed I cleaned them up a bit. When turned into a joint it I guess it doesn't matter that much, as you said. Ian made the saw for me, so you can probably imagine that the cut is good (and fast). I knifed the lines, and after cutting one or two previously I gave the lines a chisel and mallet tap to help reduce breakout (the rasp rests are Ironbark). Still got some breakout at the back of the cut (Ironbark loves to) so I imagine the best remedy for this is to cut it supported with a piece of scrap MDF at the back. Luckily I'm not having much trouble cutting to a line, and I've found that the highly polished finish on the saw plate gives a strong reflection, and this is very useful for referencing the horizontal line as I get deeper into the cut.
I'm cutting without referring to the back scribed line, on the assumption that if the horizontal scribe and front vertical scribe are being followed, then the back must be being followed by default. I angle the saw up a little when I approach the bottom of the cut, and then flip it around and finish the depth on the back of the cut (usually2-3 passes of the saw).
There were a couple that were slightly out of square (there's a surprise) and using a chisel to clean up was a bit tricky (in getting the chisel started at the edge for a very fine cut), and therefore prone to error. By using the rasp instead, I was able to get registration and the clean up was pretty easy.
Lemme guess - you'll answer with the same thing that Claw Hama did when I spoke to him this AM - practice, practice, practice! Indeed, I use all these little jobs I've been doing around the Barn as practice, which sometimes means that the job is finished to a level that is not required for the purpose (they are only rasp rests in a drawer).
Ian you mentioned that the set of this DT saw may make it a little hard to start, but i haven't really found that to be the case. As you know, it's a beefy little saw with a fairly hefty brass back, and so I've found that the easiest and smoothest action is to give the saw just a little negative weight during the cut - the teeth going through the timber feel very smooth that way, and I figure that has to leave a better surface. If I don't give it a little -ve weight it fairly rips through the timber a bit too quickly, and therefore a bit too easy to overcut the line.
-
20th September 2012, 09:17 PM #6
Senior Member
- Join Date
- Feb 2012
- Location
- Adelaide
- Posts
- 451
since Ian 'made' the saw and its shiny it must be a new saw obviously (i should have picked up on that to start with), and i am sure Ian gave it some test cuts so no doubt the set on the teeth are fine and all is good.. Originally Posted by FenceFurniture
definitely! practice, practice, practice (thats the single best thing you can do) and using different specie you will get a good impression of how the saw reacts differently to the different specie, i'm sure you will make huge leaps forward in short time, if you work with one specie predominately you can tweak the saw fleam, rake and tpi if you have to, to (hopefully) best suit that timber..I'm loath tto mention it (also not knowing how many tpi you have atm) because i think its best to stick with what you have and learn it back the front first, but you seem such a perfectionist and the work 'sounds' quite small and intricate you may (one day) benefit from more teeth 18-20 or even 22 (to help eliminate breakout), i have even seen people doing very fine detailed work using jewellers saws that are about 32 tpi (me included) but there are other options easy to get hold of nowadays (razor saws and such for hobby box work etc). usually scribing the back will work well enough! i wouldnt use MDF at back of it and run any of my handsaws through it! if you insist on putting something at the back use a natural timber, i cant remotely imagine its ness but i cant say for certain without being there, send me over a block of that timber and let me have a cut and i'l tell ya
yeah, you need to watch the back to not go past the depth, not to watch the vertical line, but with a little practice you get that right too once your warmed up (a canted saw can be helpful in that respect), and really in many cases it doesn't matter of you are out in small way (angle that is), you make the other side to match when you transfer the marks. Somehow i think (i know really, just being diplomatic about is all) its a bad habit to get into to flip the work around and cut again to ensure accuracy, unless you are working with the last piece of timber on earth or someone has a gun to your head and will use it, if you go over the line! Originally Posted by FenceFurniture
..i had to laugh gives me a mental picture of it, i can just imagine some bad movie with Christopher Eccleston holding a gun to Nicholas Cage's head telling him to do a perfect dovetail or 'ill squash your brother in a car compactor. i realise your just trying to get it right but doing that flipping over and re-sawing hinders 'your' development (why practise bad habits), so your making something perfect, and only an unimportant piece at that, instead of putting your development first you are putting that bit of wood ahead of you! .....do it from the front, stick your head over to look once in a while but one day you will find you dont have too (well much anyway, a bit at the end perhaps) it will just be correct
but hey, there are a few different technics for doing dovetails, i'm sure you will try a few over time and find one thats suits you.
yeah, ok, but this isnt metal work, dont get into the habit is all Originally Posted by FenceFurniture
darn nice rasps rest though, heck sometimes with things like all i do is run two cuts and knock out the middle with a hammer Originally Posted by FenceFurniture
did he say 'set', or did he say 'rake' , set doesn't make it particularly harder to start, changing rake will, it sounds like he made it a fast efficient saw (he can say for himself of course), i'm sure he didnt go over the top, i doubt it, but probably more a case that you need to catch up with the saw (with practice) , too quickly is something you dont hear to often, its meant to be quick! thats a fast, sharp, effective saw if you want a workout (or fun going backwards and forwards) sawing do some ripping or crosscut several beams Originally Posted by FenceFurniture
 , there is a chance that the rake is tad more than you want (it can cause tearout but increases speed, so do less tpi though but with out seeing an example its only speculation, less tpi might just be what you want though)
cheers
chippy
p.s. sorry about the font, pressed a dam button and could not get it to be same again for love or money
-
20th September 2012, 09:39 PM #7
The prize lies beneath - hidden in full view
- Join Date
- Oct 2010
- Location
- 1017m up in Katoomba, NSW
- Posts
- 10,662
Good thoughts Chippy, thanks for all that.
"did he say 'set', or did he say 'rake'" Yes. (aka "I don't really remember"). AFAIR it's 16 tpi, but I'll do a count. I'd not considered the abrasiveness of MDF.
Breakout is one of my pet hates - it really aggravates me. I just put an 80 tooth 10" blade on my Kapex and it made a significant improvement with most timbers I have used it on. I even used the Kapex on those tiny little 15mm long 8x8 blocks of Tas Oak in the chisel rest (either side of the bevel edge) - because of the smoothness of the cut and guarantee of squareness. One has to take certain precautions when cutting pieces this small on a drop saw though! Many is the time I have searched high and low for the piece!
-
20th September 2012, 09:50 PM #8
The prize lies beneath - hidden in full view
- Join Date
- Oct 2010
- Location
- 1017m up in Katoomba, NSW
- Posts
- 10,662
I also meant to say that in that box of old tools that I scored a few months ago there is indeed a Jewellers Saw ( a Boker as I recall). So I might have to dig it out and see what I can do with it. Prolly needs new blades. That was a bloody good score, that box was - lots of saw stuff - Disston vise & setter, stack of Wiltshire Saw files in very good nick. DT saw in very poor nick
 ( Boker Dividers (used them yesterday and very fit for purpose, but I need to put decent points on them). I've been really enjoying my tools lately as things come together a bit more (H&S plane blades and a Tail Vise were a huge boost). The American Stanley 4.5 is a ridiculously good plane, as is Terry Gordon's A55 Trying plane (it's a cracker in scraping mode with the blade reversed on nastier timbers).
-
20th September 2012, 09:53 PM #9
Junior Senior Member
- Join Date
- Dec 2008
- Location
- Adelaide, SA
- Posts
- 962
Thanks Brett. Nice collection of rasps...been participating in some group buys? How are my chisels coming along?
-
20th September 2012, 10:00 PM #10
The prize lies beneath - hidden in full view
- Join Date
- Oct 2010
- Location
- 1017m up in Katoomba, NSW
- Posts
- 10,662
They're coming along! Will be emailing about that in a week or so.
Having the variety of rasps is fantastic, I have to say. I reckon they are my most frequently used hand tool in the Barn, and I keep on finding new uses for them.
-
21st September 2012, 06:01 AM #11
GOLD MEMBER
- Join Date
- Aug 2009
- Location
- Armadale Perth WA
- Age
- 55
- Posts
- 4,524
And *you* are ribbing *me* about hand-planes?????? Originally Posted by FenceFurniture
BTW - Have you seen something in the forums about that non-slip stuff and rust?
Maybe you already commented in that discussion?
Cheers,
Paul
-
21st September 2012, 10:25 AM #12
The prize lies beneath - hidden in full view
- Join Date
- Oct 2010
- Location
- 1017m up in Katoomba, NSW
- Posts
- 10,662
Hi Paul, yeah I was in that discussion. The rasps are fine because they are coated, and also they are no longer in contact with the mat. When I initially glued down the mat I did something "rather stupid" (see here), but I haven't had any problems since. In some places I've rubbed the mat with camellia oil, and all the tools have been oiled. I've got those little sachets of silica gel scattered evrywhere as well. Originally Posted by pmcgee
Anyway, rasps are ABSOLUTELY essential, but planes are just for collecting.
-
22nd September 2012, 10:41 AM #13
GOLD MEMBER
- Join Date
- Mar 2004
- Location
- Brisbane (western suburbs)
- Age
- 77
- Posts
- 12,133
Hi All - sorry, been pretty much out of action this last week with limited access to a 'puter, so coming in late.
Chippy - 'he' (that's me!) did say "rake", as you correctly surmised. I told Brett it has a fine set and a moderate rake (I didn't go OTT since he is new to small saws), so I think he is mixing the two up. (Brett - it seems you have mastered starting it quickly enough, so you get a few degrees less rake on your next one...) There is almost no fleam, as it doesn't seem to me to do anything worthwhile on very thin saws (it's 0.015" plate). And at the tpi, (~16) it should crosscut most cabinet-grade woods almost as well as a dedicated crosscut of the same tpi. It's my version of an all-rounder, capable of handling thin stock, but still cuts fast enough in thicker stuff (up to 25mm or so, depending on the wood, of course). I'm not a big fan of very fine teeth, now, though I used to be, before I learned to sharpen a saw to better suit what I'm doing. These days I almost never use anything finer than 18tpi. Mind you, I rarely do critical sawing of stock finer than 5mm thick, either, so that may have a bearing.
Actually it doesn't have what I would call a 'hefty' back, either, only 3/16" thick brass, but the handle is She-oak, iirc, so that gives it a bit of heft, but compared to my old 10" Tyzack that I used for D/Ts for years it's quite a bit lighter. The Tyzack has a spine at least twice as heavy, & I got used to it, but once I started making my own, I made a lighter spine just to see, & decided I liked it much better. Just personal preference.
As to quality of any saw cut, Brett, if you want 'show' surfaces, of course any hand saw cut is not going to be good enough as-is, so I can understand your needing to clean them up. However, that saw should be capable of giving you good enough surfaces for joining dovetails off-saw. Claw-hamma is absolutely right, of course, it's all about practice, & learning to saw straight & clean. I think Chippy makes an excellent point, to practise your sawing technique on scrap so you can just concentrate on technique & not worry about messing up something precious. I find that the quickest way for me to screw up is trying to be ultra-careful with something very rare & expensive! Another tip: concentrate on one thing at a time. For example, mark out the tails for a set of dovetails and when sawing, concentrate on starting the saw square. Don't worry if you are following the marked angle of the tail exactly, at first, just keep the saw square, and keep your strokes even. I also advocate putting the tail board straight in the vise, & learning to saw both left & right angles accurately - it takes a bit of practise because on one cut (depending on whether you're left or right handed), you are sawing to a line you can't easily see. But I think you'll be surprised how quickly it will come together, & by the time you can keep the cut square & straight every time, you'll find you are are are also starting the cut at the right angles to follow the line very closely - muscle memory takes over.
The plan is to end up with a clean, straight kerf, with no jags where you tried to straighten a cut going off the line (this is why you need a saw that cuts true & doesn't curve left or right). As long as your cut isn't more than a pencil-width or so off the angle, there is no way your eye will pick up that the angles of the tail aren't micrometer perfect. Marking the pins from them will ensure they still fit well, but, the next step, sawing thee pins, is the critical part - if you want to fit convincing D/Ts off-saw, they have to be bang-on. So you may need to use chisels (not rasps, please!) for a while, because if you can't reliably saw exactly on the (waste) side of the scribe lines, it's safer to saw a fraction wider, & clean up to the line with chisels. See the latest issue of AWR for Rob Howard's 'how to' - he shows it well, I think, and makes a good point that it's better for an amateur to go this way and get reliable results than try to fit off-saw and become frustrated.
Some people can make it look easy, but as far as I know, there is only one way they got to be able to do that........lots of repetition!
Cheers,IW
-
22nd September 2012, 12:25 PM #14
The prize lies beneath - hidden in full view
- Join Date
- Oct 2010
- Location
- 1017m up in Katoomba, NSW
- Posts
- 10,662
Good man Ian, a lot of really good info there. I'm doing the Files racks today, and will be trying a few different things. Chippy - one of the things I'll be trying is a backing to restrict breakout (for the hell of it). In deference to your concern about MDF on "his" saw I'm just going to use 3mm. This will be a trial cut to see what gives (these are from Blue Gum and it breaks out even more than Ironbark). There will, of course, be an unconventional technique or two, and my money is on one of these to take the cake actually (not talking dovetails here, just trenches)
-
22nd September 2012, 10:14 PM #15
The prize lies beneath - hidden in full view
- Join Date
- Oct 2010
- Location
- 1017m up in Katoomba, NSW
- Posts
- 10,662
Fishing
OK, I've done the files now. To get them all in they had to be "fit to shape" to acount for the end of one touching the handle or blade of another. This also meant that I had to shape the forster holes to suit the waisted handles, and also the angled positions of some. Interestingly, the Sage Leaf Rasps really came into their own, as they have two half-round sides, but with different radii. I used a #12 and #15, and learnt a thing or two as well, such as using the taper of the rasp to avoid breakout on the back.
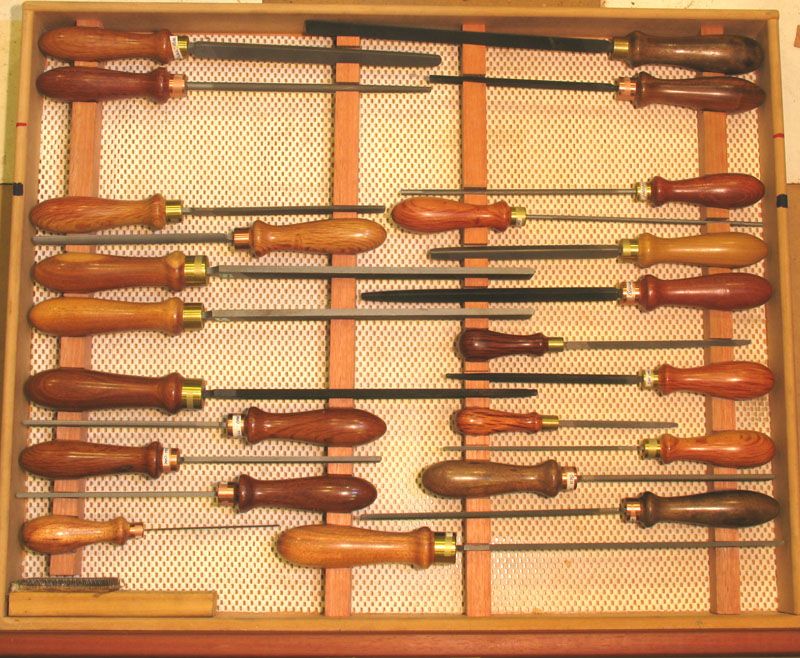
I changed a couple of things and was pretty happy with the result straight off the saw (the bottoms have been chiseled though)
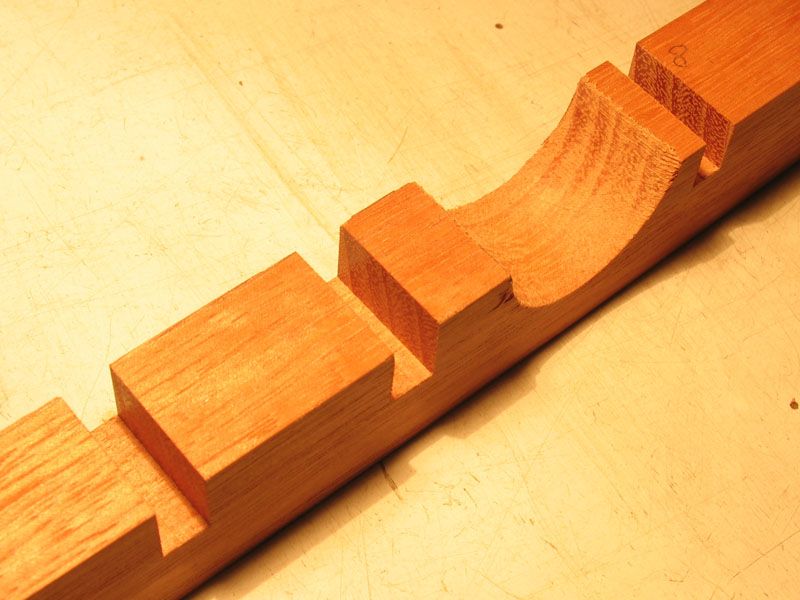
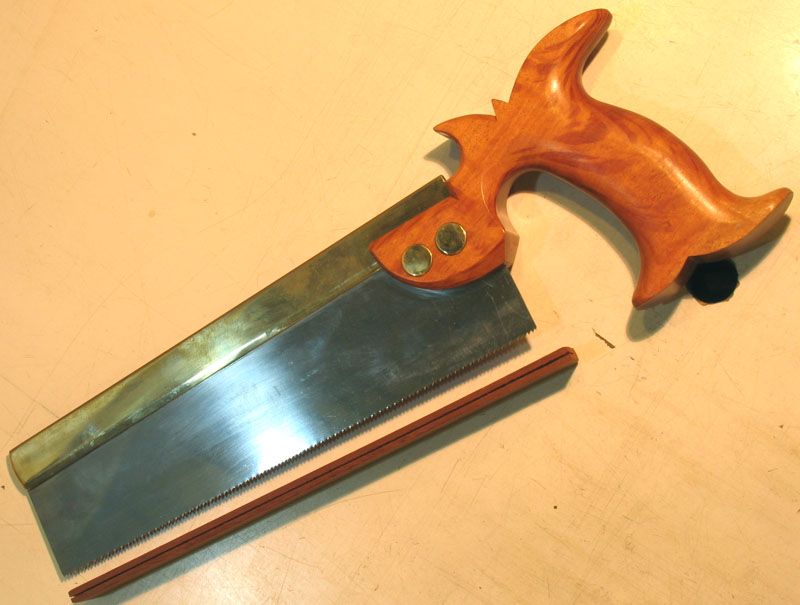
This is the DT saw the Ian made. Apparently he doesn't just make a damned fine saw, he can kinda use it as well. The kerf in the saw cover (Cedar I'd say) has been cut by Ian, and no doubt with this saw. Just imagine how that thin Cedar wants to snap.
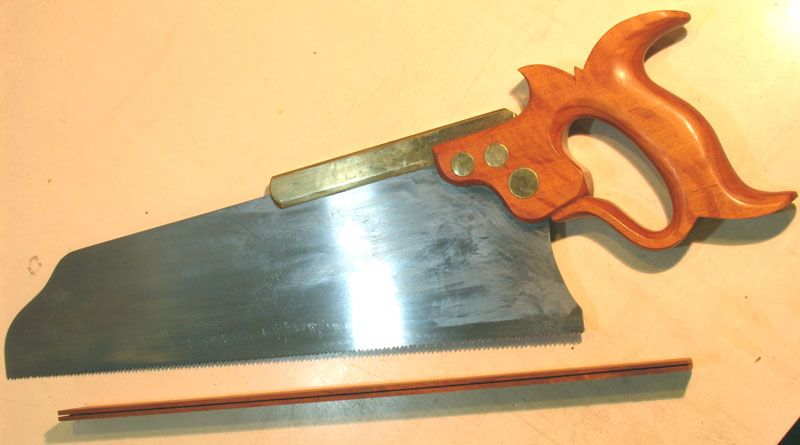
And while I'm about it, this is the Half Back:
Ian, I solved the breakout problem drilling the half holes by supporting the right hand side of face with a piece of MDF (i.e. the MDF covers where the forstner exits the job). Once again in this case ripping down a holed stick wasn't an option because thery were all different sizes and pozzies.


 Reply With Quote

Similar Threads
-
Wet & Dry Grinder, Jigs, Tool Rests?
By gaia in forum HOMEMADE TOOLS AND JIGS ETC.Replies: 4Last Post: 6th October 2011, 07:34 PM -
Tool rests for lathes
By BobL in forum HOMEMADE TOOLS AND JIGS ETC.Replies: 34Last Post: 27th April 2008, 12:29 PM -
Made up some new tool rests
By Stu in Tokyo in forum WOODTURNING - GENERALReplies: 15Last Post: 10th April 2008, 01:25 AM -
Tool Rests
By WillyInBris in forum WOODTURNING - GENERALReplies: 22Last Post: 10th April 2007, 07:12 PM -
Tool rests for grinders
By antman in forum HAND TOOLS - POWEREDReplies: 17Last Post: 8th February 2004, 01:50 AM
