

 Thanks: 0
 Likes: 0
 Needs Pictures: 0
 Picture(s) thanks: 0
Results 16 to 30 of 30
Thread: Christmas came early!
-
5th December 2009, 11:58 PM #16
 Be inspired. Be creative. Be bold.


- Join Date
- Apr 2001
- Location
- Perth
- Posts
- 10,826
 Review time!!
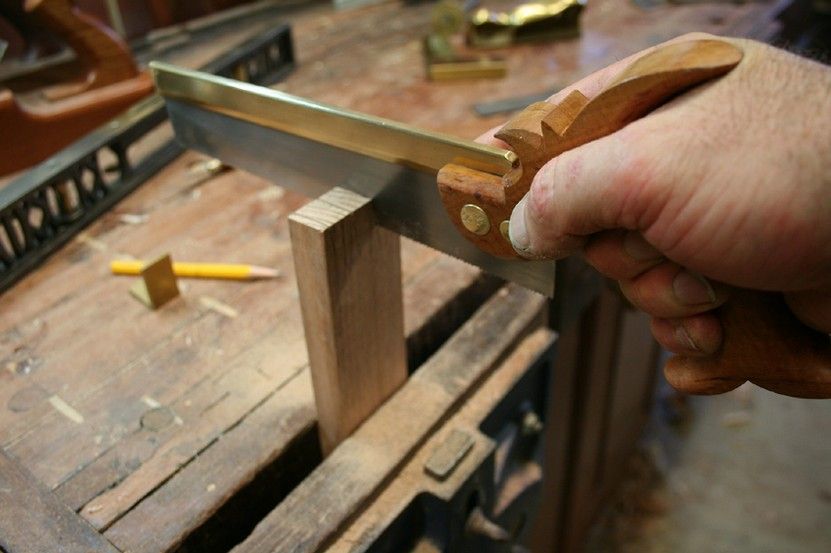
Well I started to put together a few pictures of Ian's saw at work, but I ran into a PROBLEM!

No, not with the saw. This dovetail saw is just fantastic! It is one of the very best I have used (and I have used a few
  ). It cuts straight, cleanly and easily. In fact it cuts faster than my IT, which has been my go-to dovetail saw for some years. This may be down to the teeth being newly sharpened, but the fact remained that it powered past the IT and also left a cleaner kerf in its wake.
So where was the problem?
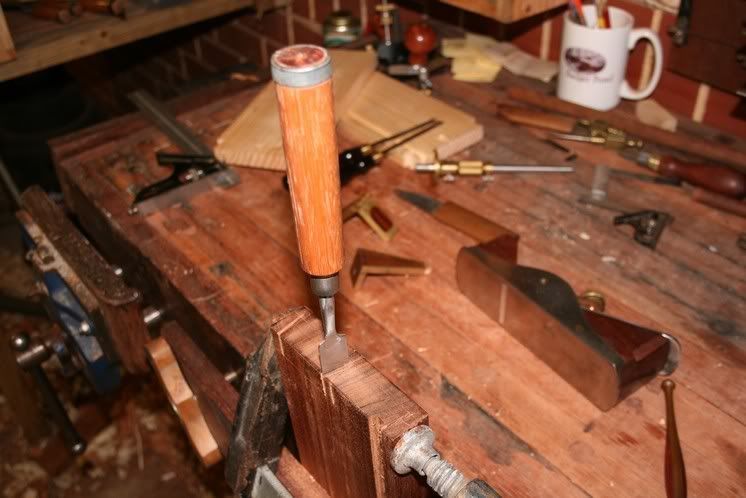
I had marked and sawn very skinny dovetails ... and when it came to transfering the tails to the pin board, my marking knife (made especially for skinny dovetails), could not fit in the kerf!
I checked the saw plate and the set of the teeth. The blade is the same thickness as a LN, Wenzloff, and Veritas at 0.020", but it has a touch less set - 0.025" on each side (the others use 0.003"). This difference does not sound like much, but in practice it is.
Generally less set promotes straight sawing as the blade has no room to wiggle about. But less set can also lead to binding. It is a fine line.
Ian has done some very fancy filing here. He told me that he has come up with something new. I'd like to know what. All I can say is that this is a fantastic dovetail saw and it is going to get a lot of use in the future. Well done Ian!
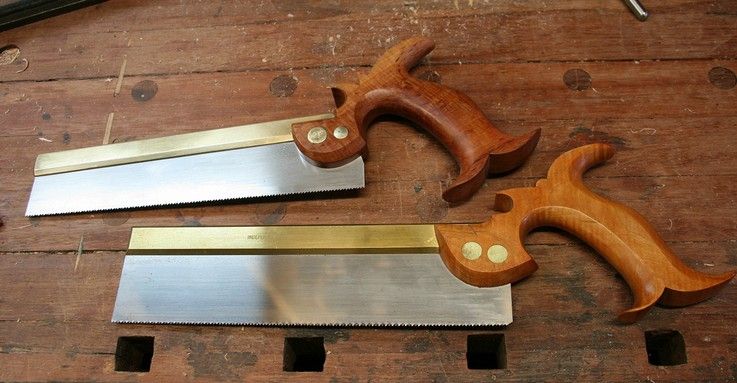
Last picture .. together with my IT .. the Kenyon style is clear to see. Love it!
Regards from Perth
DerekVisit www.inthewoodshop.com for tutorials on constructing handtools, handtool reviews, and my trials and tribulations with furniture builds.
-
5th December 2009 11:58 PM # ADSGoogle Adsense Advertisement
- Join Date
- Always
- Location
- Advertising world
- Posts
- Many
-
6th December 2009, 03:11 PM #17
GOLD MEMBER
- Join Date
- Jun 2008
- Location
- Victoria, Australia
- Age
- 74
- Posts
- 6,132
Apologies for being late to this thread, I missed it earlier....
IanW, you have done it again, beautiful looking saw. That she-oak is magnificient, I like the almost iridescent look that you get. (Is it chatoyance? or something like that)..
Derek, Ian has a write-up on his approach to saw design, which I put on my website here...
Thoughts on Saw Design
IanW will step in and correct me here, but I think you might find it's 5 degree rake and a little bit of fleam. Very lightly set. Check his comments in the above link.
One point of correction, the "Kenyon Style" I would more generally associate with a rounded boss on the handle. But, I like the canted blade.
What a great way to start Christmas.
Regards
Ray
-
6th December 2009, 03:24 PM #18
Hewer of wood
- Join Date
- Jan 2002
- Location
- Melbourne, Aus.
- Age
- 71
- Posts
- 12,746
Yes, chatoyance is the tech term. From the French referring to cat's eye'ness - a quality of reflectiveness of the grain. You get it with lace she-oak and some Tassie blackwood too.
FC, you win this one.
Sorry, that's a bit of a distraction.
Sounds like a helluva hand-tool.Cheers, Ern
-
6th December 2009, 03:27 PM #19
GOLD MEMBER
- Join Date
- Mar 2004
- Location
- Brisbane (western suburbs)
- Age
- 77
- Posts
- 12,132
Hi Ray - yes, 5 degrees of rake, which is supposed to be a rip profile, but it works really well on these small saws for both cross & rip cuts. The fleam has snuck up a bit from what we originally talked about. Initially I tried about 6 degrees or less, but then I tried a bit more, & that didn't seem to reduce its ripping ability, but improved crosscutting noticeably. So for now, I have settled on closer to 10 degrees fleam (I measured it yesterday). It works really well, as Derek has confirmed, so I'll stick with that for a while. if I were to go for sharper points, it would mean more frequent sharpening, I reckon, & possibly less efficient rips. Originally Posted by RayG

I think Derek is right that my saw is showing up the LN because it''s mint - time to get the DEST file out, D.?
Your right, of course - "Kenyon" refers more to the handle shape - there were lots of other breeds of small saws with canted blades. So in future I will use the 'right' terminology - "a small dovetail with canted blade" it is! Originally Posted by RayG
Cheers,IW
-
6th December 2009, 03:39 PM #20
.
- Join Date
- Jul 2005
- Location
- Victoria
- Posts
- 5,215
Originally Posted by derekcohen
Derek try this solution. I have been using it I use it for that exact reason. Its an old gents saw with the teeth filed off, and straightened on a diamond stone. The right side of the blade is flat and the bevel is on the left. The blade thickness is 0.020" and you just insert and gently strike the back to leave a perfect line and just flip it end on end for the apposing mark.
-
6th December 2009, 03:55 PM #21
Be inspired. Be creative. Be bold.
- Join Date
- Apr 2001
- Location
- Perth
- Posts
- 10,826
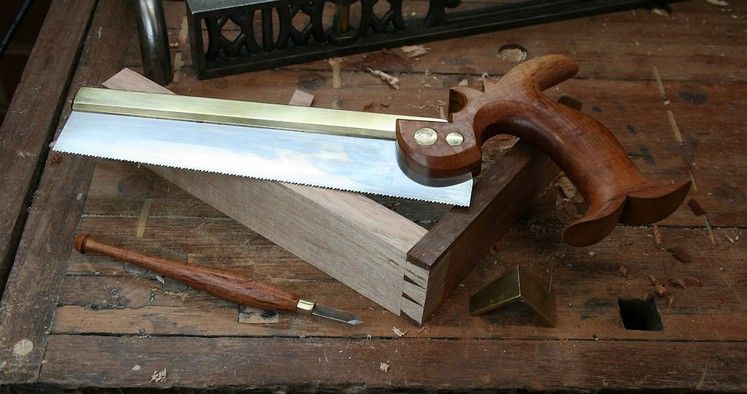
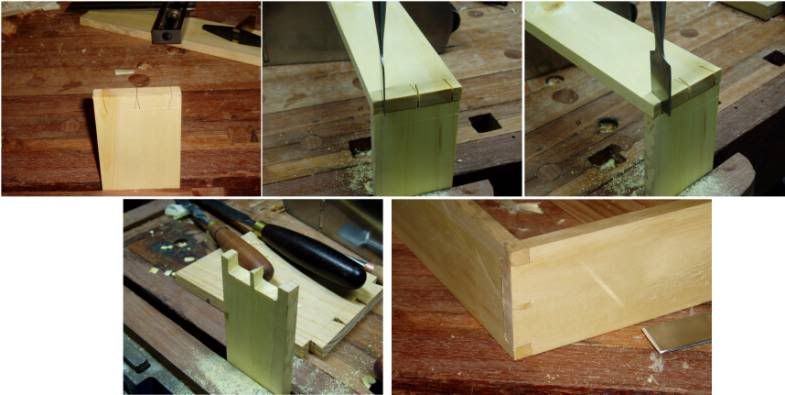
Review time!! PART II
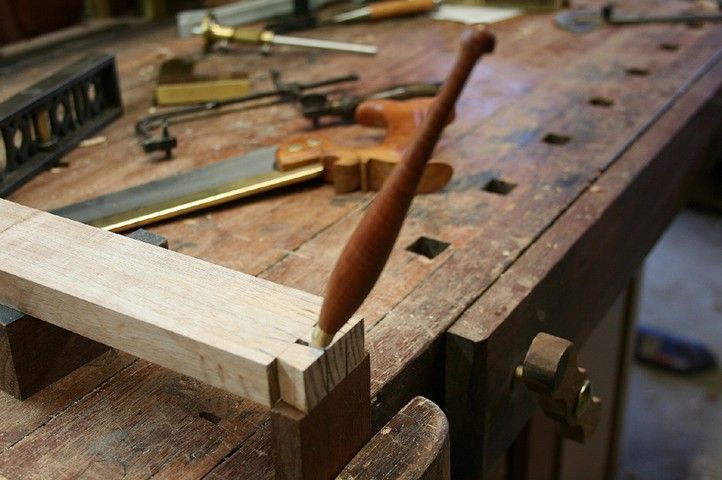
Now you did not expect me to be stumped by a silly marking knife, did you?
Here is an alternative method.
Use the saw to cut the lines. The best way to do this is before you remove the waste (of course I didn't expect this situation, did I) ..

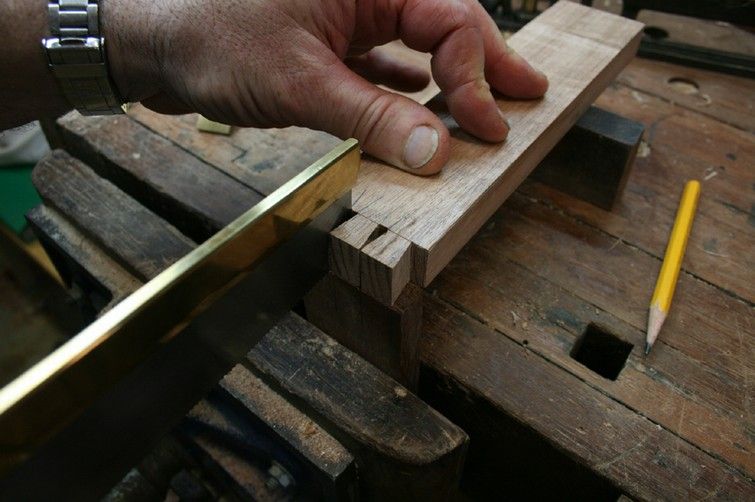
Now use your marking knife to make the lines deeper ..
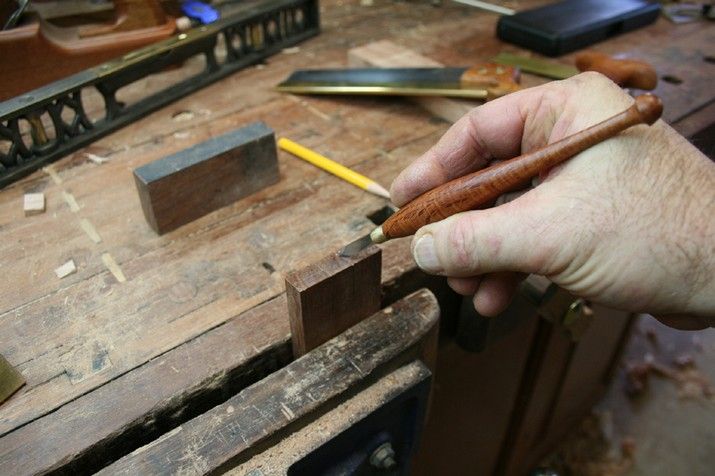
Mark the waste ..
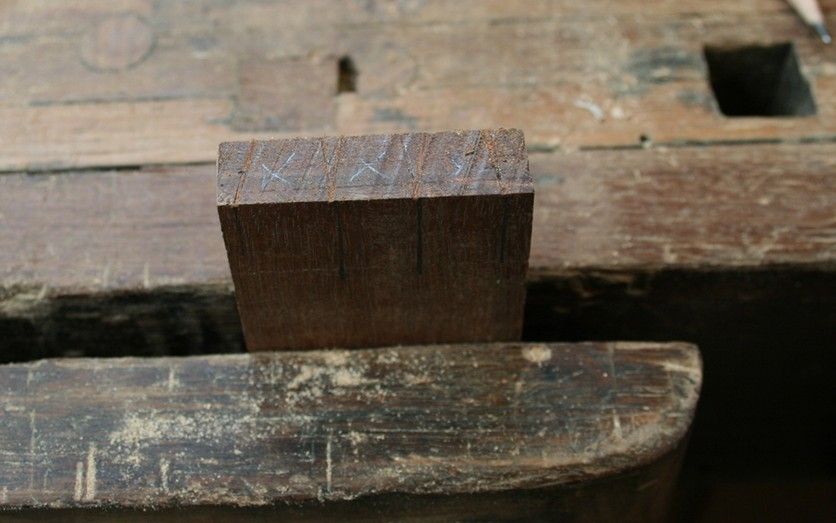
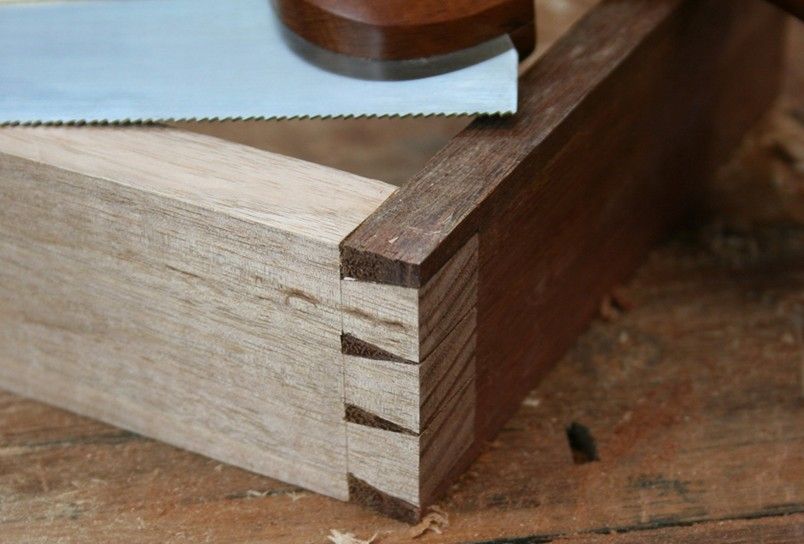
I saw to the edge of the knife line (which is very thin but easily seen with good light - I have a round magnifying fluoro type) .. The saw cuts like a hot knife through butter. Really, as clean as a Japanese saw.
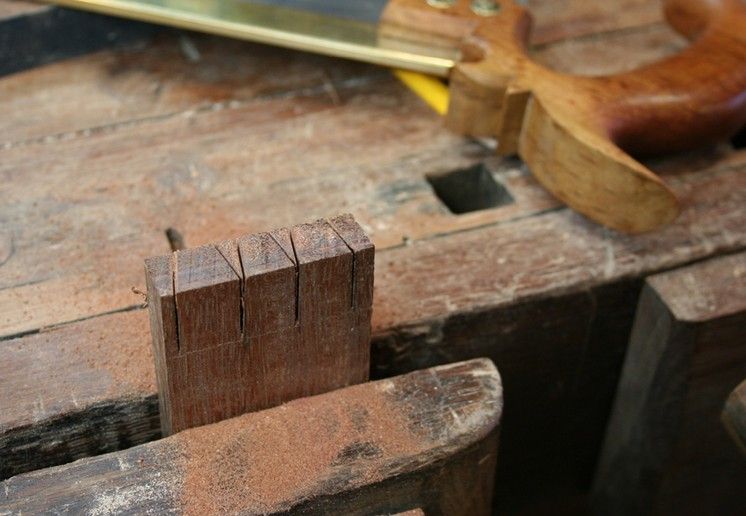
Now remove the waste with a fret saw ..
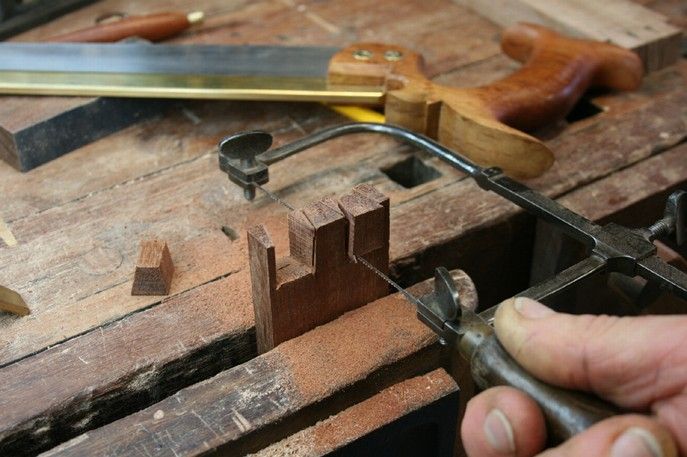
Because this is brittle Jarrah, I clamp the sides before hammering in the tail board. This is saw to saw ...
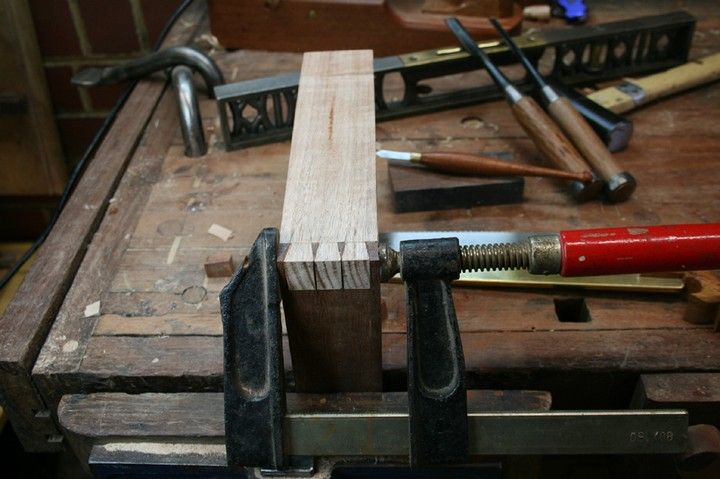
A result!
Thanks again Ian for an absolutely fantastic saw!
Regards from Perth
DerekVisit www.inthewoodshop.com for tutorials on constructing handtools, handtool reviews, and my trials and tribulations with furniture builds.
-
6th December 2009, 03:56 PM #22
GOLD MEMBER
- Join Date
- Mar 2004
- Location
- Brisbane (western suburbs)
- Age
- 77
- Posts
- 12,132
Well, after such a favourable 'review', I summoned the courage to offer some 'spare' saws for sale. I assume (hope) most people reading this post are more likely to be wanting to make their own, but if you know anyone in the market.......
https://www.woodworkforums.com/f221/b...2/#post1075431
Cheers,IW
-
6th December 2009, 08:16 PM #23
GOLD MEMBER
- Join Date
- Jun 2008
- Location
- Victoria, Australia
- Age
- 74
- Posts
- 6,132
Ummm.... Ian, are you sure you know what you are doing?....
Doesn't this mean you'll have to make a whole new set?
I think I see through your cunning plan to spend more time making saws!
Some lucky folks are going to get a real bargain.
Regards
Ray
-
6th December 2009, 08:26 PM #24
Be inspired. Be creative. Be bold.
- Join Date
- Apr 2001
- Location
- Perth
- Posts
- 10,826
Hi Lignum Originally Posted by Lignum
Great idea!
I did something similar some years ago after watching a video of Tage Frid. He used an old piece of bandsaw blade to hammer in the ends of half blind dovetails - to deepen the saw cut in preparation for chiseling out the waste. So I thought why not make a dedicated tool, which I did out of an old steel trowel ...
I first sharpened it like a chisel - don't do this .. I would split the end grain! Now it is flat/square.
Here it is being used on half-blind dovetails ..
And marking through dovetails (note that the waste has not been removed) .. same idea as yours (great minds and all that ...)
Regards from Perth
DerekVisit www.inthewoodshop.com for tutorials on constructing handtools, handtool reviews, and my trials and tribulations with furniture builds.
-
7th December 2009, 08:01 AM #25
GOLD MEMBER
- Join Date
- Mar 2004
- Location
- Brisbane (western suburbs)
- Age
- 77
- Posts
- 12,132
No Ray - I'm a reformed sawaholic & I haven't made a new saw for more than a week! Originally Posted by RayG

I'm definitely hanging up the saw chops for a while. I satisfied any lingering cravings by revisiting the first saw I made, yesterday, and fixing up its saw bolts, which were pretty crude, then refiling it to my now preferred tooth pattern. It was not a bad performer from the start, but it's better now....
It has been a great learning experience, and lots of fun. I now know enough about small saws now to realise there is much more I could learn, but I really have to get back to the business of making 'useful' things, or LOML will be dropping more than hints on me, I expect.
Cheers,IW
-
7th December 2009, 10:08 AM #26
Moderate Moderater
- Join Date
- Feb 2006
- Location
- Lindfield N.S.W.
- Age
- 62
- Posts
- 5,643
Another way is to use a card scraper - I find the corner scrapes a nice line but you can also just give the top a gentle whack with a hammer. Originally Posted by derekcohen
Cheers
Jeremy
If it were done when 'tis done, then 'twere well it were done quickly
-
10th December 2009, 09:59 PM #27
GOLD MEMBER
- Join Date
- Mar 2004
- Location
- Brisbane (western suburbs)
- Age
- 77
- Posts
- 12,132
The last word from me....
I thought I might close the loop for this thread, by showing what will definitely be the last saw I work on for some time. You will see that I have been fiddling with making & modifying tools for a few years.....
I bought this small backsaw at Sears in Saskatoon some time in 1979. I’m pretty sure it cost me something like $6 – it had a knife handle, 18 tpi and worked pretty well on the material I used for building kids' toys & furniture, which was mostly softwood scraps scavenged from the skips on the many bulding sites around our house. I don’t have any pictures of the saw in mint condition, unfortunately.
Some time in the 1980’s I saw a picture of Duncan Phyfe’s toolbox in FWW, with the ‘pistol-grip’ handles of a couple of small saws peeking out amongst the other goodies. Can’t explain why, but these really tickled my fancy, & I decided I had to have one like that. I had a growing family & a small income, so the only way I was going to get what I wanted was to convert the little Sears saw. I had some scraps of figured Walnut, & with the small images in the picture to go by, I sketched out a handle & went at it. Of course, I needed some holes in the saw blade to attach the handle. There was one already – a hanging hole at the toe end. My gung-ho solution to that was to file the teeth down a bit & reverse them, then use that hole plus another for the handle bolts. A slight problem was that the hanging hole wasn’t really in the ideal spot, so my handle ended up rather low on the blade. The only suitable brass bolts I could find at the time were cuttlery bolts (from LV, where else?) but they looked the part, & after much rasping, sanding & fussing, I had a saw with a pistol-grip handle (pic 1).
This little saw served me well for many a year, but my sharpening skills were never that great on small teeth, and it became a bit ragged over time. About 2 years ago, I decided the saw needed a brass back to make it a ‘real’ backsaw. So a friend who had access to a whopping great milling machine slit a coule of lengths of brass bar for me, & a conversion was made.
Unfortunately, we cut the slit in one pass using a dodgy jig, and the slit was anything but straight. I didn’t really notice this until I had mounted it on the blade, which took on a peculiar twist. Needless to say, the saw’s performance went further down hill & it ended up lurking in the back of the toolbox & being ignored!
So that brings me up to last weekend. As my last hurrah in sawmaking for the moment, I decided to fix the little Sears properly.
The first thing to address was the back. A 19 x 6.3mm(3/4 x ¼”) bar was really too heavy for such a small saw, so I made a new back from some 19 x 4.75mm. Cutting the slot carefully on my home-made jig resulted in a nice, straight back. I then made some saw bolts, & cut out a handle from the end of the piece Derek’s handle came from. Here are the bits ready to clean up & assemble (pic 2).
I am pleased to report, it is now a very nice little saw, better than ever, & ready for another 30 years heavy use (pic 3). My handle isn’t quite as figured as Derek's, but still nice enough for a working tool, and a lot more refined than my very first effort, with a much better angle on the grip (pic 4). I jointed the manky old teeth heavily & applied my now practised tooth-forming & sharpening skills and it cuts beautifully. I compared it with a small saw with the same pitch (~15 tpi) as the one I made for Derek. On thin stock, it cuts with the exact same kerf width (0.52mm measured with a feeler gauge) and at the same rate. I didn’t try it on thicker material, but I suspect it would cut more slowly, & be harder to keep straight because the small gullets would choke up more.
Cheers from a happy (retired) sawmaker.IW
-
11th December 2009, 08:46 AM #28
GOLD MEMBER
- Join Date
- Feb 2008
- Location
- Northern Sydney
- Age
- 49
- Posts
- 2,764
All you need to do now is to update the blade plate, and you've got a perfect 1979 sears saw Originally Posted by IanW
Nice build and a pretty little saw. I am sorry to hear you are stopping making them - as said, I'd be first in line (after some fierce jostling from fellow forumites!) to snap new ones up if the bug ever strikes again
I'm more of a turner these days, but seeing these beautiful hand made tools makes me want to turn the power off in the shed and see what I can still do!!! Mind you, reading Dereks website and hit plane reviews hasn't helped much either
Cheers,
Dave...but together with the coffee civility flowed back into him
Patrick O'Brian, Treason's Harbour
-
15th December 2009, 10:00 PM #29
GOLD MEMBER
- Join Date
- Mar 2004
- Location
- Brisbane (western suburbs)
- Age
- 77
- Posts
- 12,132
Santa came East, too!
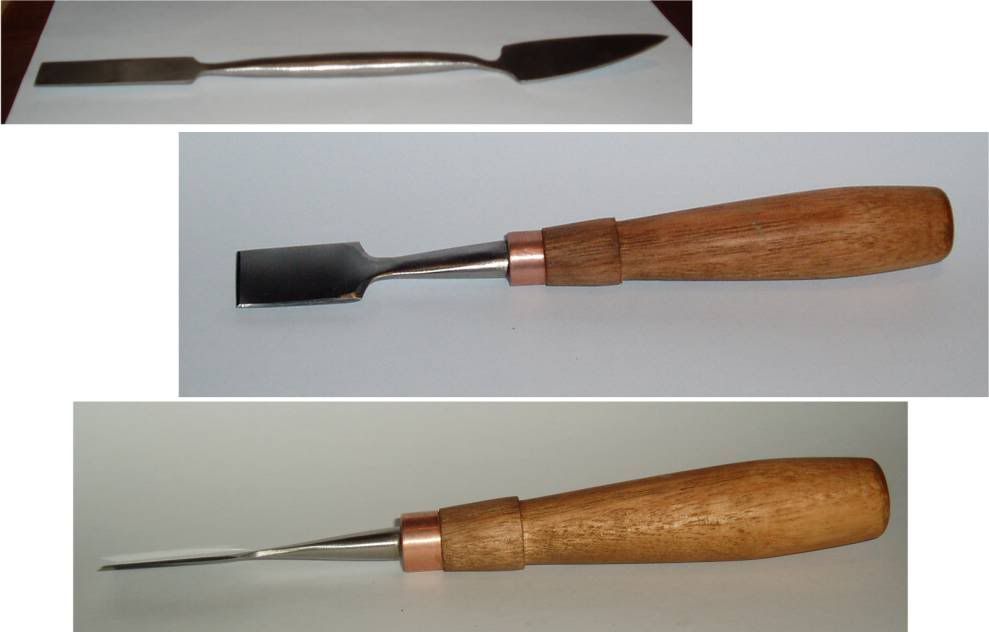
Well, this saga has come to a nice close. The postman left a small parcel for me today. In it were the chisels I had wanted from Derek, but there was more! A nice little bonus - one of his neat little marking knives, and handled with the same 'Rock oak' as used for his saw handle.
So it has found a place in my toolbox, and will get plenty of use - starting today, in fact. I have just commenced a couple of projects I hope to have completed by Christmas, so more shed time & less Forum time coming up......
Cheers,IW
-
16th December 2009, 11:11 AM #30
Senior Member
- Join Date
- Oct 2006
- Location
- Brisbane
- Posts
- 133
What a beautiful saw. I'm hoping to make a small dovetail saw sometime soon and Ian has given some inspiration but set the bar much higher than I hope to achieve on my first attempt at sawmaking! Oh for a Brisbane workshop like the recent one in Melbourne. Originally Posted by derekcohen


 Reply With Quote


Similar Threads
-
Christmas comes early.
By goodwoody in forum HAND TOOLS - UNPOWEREDReplies: 5Last Post: 13th December 2006, 12:00 AM -
Early Christmas Presents
By journeyman Mick in forum Hatches, Matches & Dispatches. Birthday greetings and other Touchie-feelie stuff.Replies: 6Last Post: 25th December 2005, 05:59 PM -
Christmas comes early this year
By al2 in forum TRITON / GMCReplies: 7Last Post: 7th September 2005, 01:34 PM -
Father Christmas is real early this year
By ubeaut in forum WOODTURNING - GENERALReplies: 6Last Post: 13th March 2003, 09:29 PM
