

 Thanks: 0
 Likes: 0
 Needs Pictures: 0
 Picture(s) thanks: 0
Results 1 to 4 of 4
Thread: DC style marking knives
-
12th May 2011, 07:39 PM #1
 GOLD MEMBER


- Join Date
- Mar 2004
- Location
- Brisbane (western suburbs)
- Age
- 78
- Posts
- 12,171
 DC style marking knives
A couple of years ago, Derek Cohen gave me one of his splendid little marking knives as a token of friendship. He didn't know it at the time, but I had seen & liked his design, & already made a similar one (imitation & flattery & all that). However, it was quickly moved aside in the tool chest for Derek's, which was turned from a lovely bit of finely fiddlebacked Rock oak from another mutual friend.
Yesterday, I discovered a 'fault' with Derek's knife - it won't fit through the kerf left by my ultra-thin dovetail saws! That's ok, Derek - an excuse to make another, using a scrap of the same saw plate the saw came from. Here it is beside it's stable mate. The handle of this one is She-oak. I don't try to copy Derek's exactly - just the general idea.
I've made several of this style of knife over the last couple of years - they make very good gifts, and I've evolved a simple & quick method for making them. Derek epoxies his blades in, which I don't like to do. You will probably never need to change the blade in a normal lifetime, but I'm always keeping an eye on posterity.. So my first knives were assembled with a split boss of brass, slightly tapered so that when pushed into a hole, they tighten up & hold the blade firmly. It looks interesting, but it's a fair bit of mucking about turning the boss & slitting it in halves, & getting it all right, so I tried a much simpler technique, which goes like this:
Assemble the raw material - in this case, a scrap of Mulga (I think!), a bit of a broken stainless-steel kitchen knife, and a ferrule cut from a dag-end of heavy gauge copper pipe the air-con installers chucked at the skip from up on the roof, & missed (I picked it up as I walked into the buiolding next morning.). Cut your blade so that it is a snug fit in the ferrule as shown.
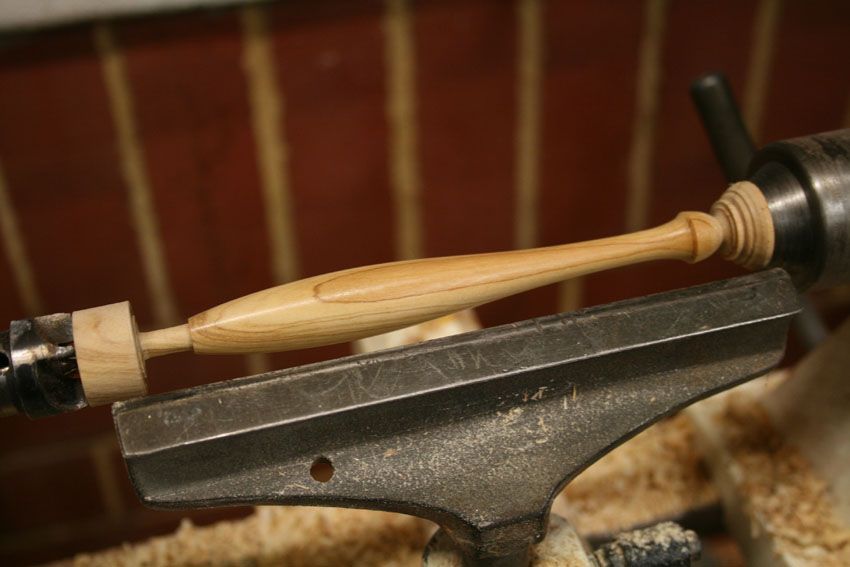
Before fitting the ferrule, drill a hole in the end with a drill just a tad thicker than the thickness of your blade material, then turn down a spigot for the ferrule. Make it a very tight fit, and before you bang the ferrule on, cut a saw slot right down the middle of the spigot (I forgot to take a pic of thhis !)Use a saw which makes a kerf that is the same thickness as your blade material or a bit less. OK, now drive the ferrule on - it should be a firm fit, but when you fit the knife, it will tighten up more, anyway.
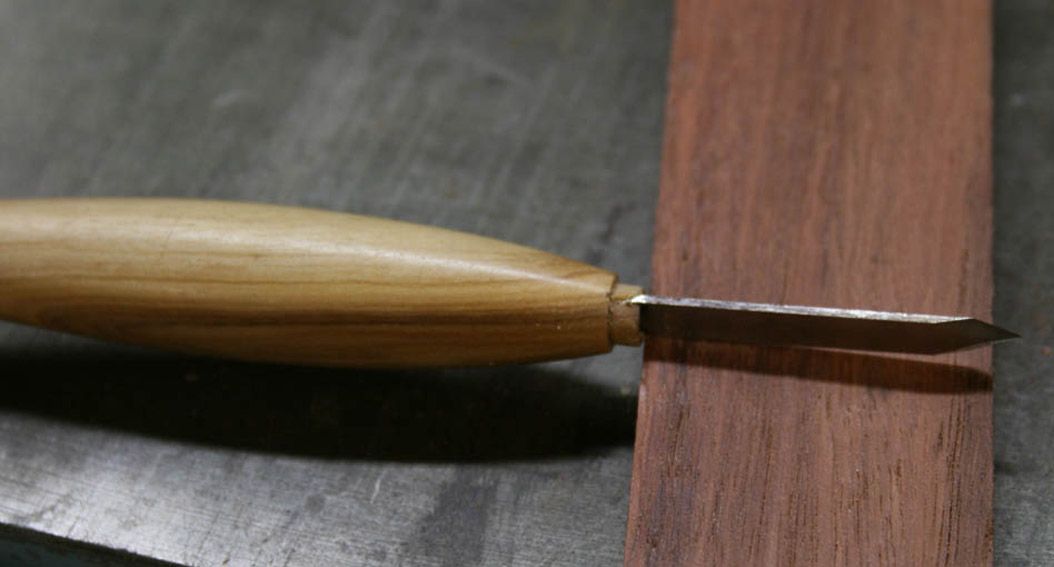
OK - finish knocking off all the bits that don't look like a marking knife, & pretty it up how you like. Now, shape your blade as shown, with a tang that will be a firm fit in teh drilled hole. Grip the blade in a vise, line it up with the slot in the spigot and gently drive it in until the shoulders have seated at the bottom of the spigot. If you calculated it all correctly, it should be rock-solid and need no glue. You can now shape the exposed blade on the grinder, and sharpen it how you desire. I've tried a few fancy shapes, but have decided either straight sides or a slight taper looks & works best for me.
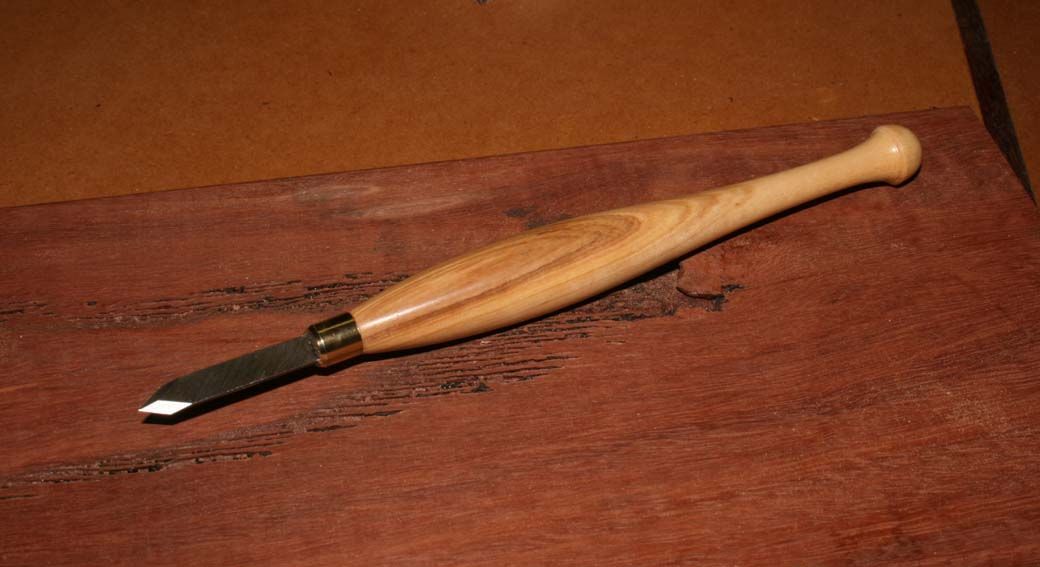
Here's the finished article alongside an old version with the brass boss - a half hour's work vs an hour plus for my old style, and just as solid...
Someone on the forum took Derek to task for these knives, saying they were a bit too dainty for everyday use, but I have found them quite rugged - you can press as hard as you like & cut much deeper than necessary on a single pass on any of the woods I work with. P'raps that person only works with Iron Bark & Lignum vitae..

Cheers,IW
-
12th May 2011 07:39 PM # ADSGoogle Adsense Advertisement
- Join Date
- Always
- Location
- Advertising world
- Age
- 2010
- Posts
- Many
-
12th May 2011, 07:48 PM #2
 Good Wood Ruined!
- Join Date
- Jan 2004
- Location
- Towradgi
- Posts
- 4,837
Good looking knife. Tell you what, how about you send me one of yours and I can run a comparison between the 2 of Derek's that I have and yours. It should take me a good 40 years to do it
 Pat
Pat
Work is a necessary evil to be avoided. Mark Twain
-
12th May 2011, 08:34 PM #3
Be inspired. Be creative. Be bold.
- Join Date
- Apr 2001
- Location
- Perth
- Posts
- 10,860
Thanks for the compliments, Ian and Pat. They made my day.
Ian, those are fine looking knives. Very fine.
A few points on my construction, for those interested in making their own (look on my website for instructions) ..
The first thing is that I have gone through several versions, these including different tang shapes and epoxy, as well as silver soldering to a steel rod. In the end I come back to the epoxy as it is more practical and stronger. Details in a moment.
The second point is that I have avoided adding brass side reinforments, ala Blue Spruce, because it reduces the blade length. The blades I build are about 1 1/4" long. The HSS blades (I use Bosch HSS jigsaw blades) are stiff enough - one wants a little flex so that the blade can be held against the sidewall of a dovetail from high up.
Design: currently I use a tapered tang (with slits for extra grab). This permits the maximum amount of steel that can be driven into a hole drilled into the body and through a tenon. In the drawing below you will see the tang and a see-through brass ferrule.
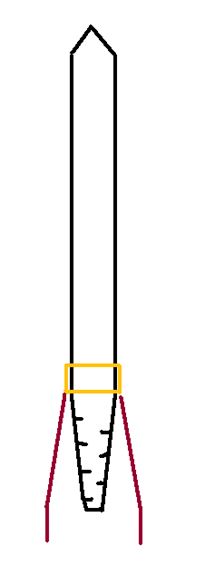
Basically what I have done is to turn the body with a stub tenon, but this tenon is very thin as the body is drilled out to take the 1/4" width of the blade. The tenon is then slit so that the blade can be pushed as deeply into the body as possible ...
The hole is filled with epoxy and the blade slid in. The slits serve to hold the blade square. Note that the ferrule is not added just yet.
Once the epoxy dries, the ferrule can be added. This is essential a faux tenon and ferrule since the tenon is short and very thin, and the ferrule extends beyond it. The tenon would snap off if not for the epoxy inside the hole (and if a bit snaps off in construction, well it is not an issue). The stub tenon is really only to centre the ferrule. So now epoxy the ferrule onto the tenon.
You end up with this ...
Hope this was clear enough.
Edit: I should add that Chris Vesper will be making these knives in future, and will almost certainly do a better job than I. His method may differ as well.
Regards from Perth
DerekVisit www.inthewoodshop.com for tutorials on constructing handtools, handtool reviews, and my trials and tribulations with furniture builds.
-
12th May 2011, 09:13 PM #4
GOLD MEMBER
- Join Date
- Mar 2004
- Location
- Brisbane (western suburbs)
- Age
- 78
- Posts
- 12,171
Thanks for your response, Derek - I think it's good to see that there is always more than one way to skin the proverbial cat.
Nah, it's not flatterry - these are great little tools that are just good to use, and I thank you for introducing me to them. The poor old thing I made from a dead hacksaw blade a very long while back, has sat forlorn & neglected in a drawer ever since. It does just as good a job of marking a line, of course, but your style handle is just nicer to hold in my hand with the pencil-grip I like to use.
Of course, my way of making them is better for production runs, so Chris, you better be prepared to pay split royalties.......
Cheers,IW


 Reply With Quote

Similar Threads
-
Marking knives
By derekcohen in forum HAND TOOLS - UNPOWEREDReplies: 3Last Post: 21st November 2006, 09:39 PM -
Marking knives
By derekcohen in forum HAND TOOLS - POWEREDReplies: 43Last Post: 9th July 2006, 08:33 AM
