

 Thanks: 0
 Likes: 0
 Needs Pictures: 0
 Picture(s) thanks: 0
Results 1 to 15 of 22
Thread: Drawer design and drawer bottoms
-
16th January 2010, 01:08 PM #1
 Be inspired. Be creative. Be bold.


- Join Date
- Apr 2001
- Location
- Perth
- Posts
- 10,826
 Drawer design and drawer bottoms
I am including this in the Handtool forum as previous posts on this piece have been included here.
The armoire project has proved to be a wonderful opportunity to create discussions and glean information in a number of areas - construction, design, technique ...
I have begun to write these up and will post them on my website as they are completed.
Well my wife's brother and family left for home (in New Zealand) yesterday and I managed some hours in the shop today. I have the weekend and then back to work on Monday.
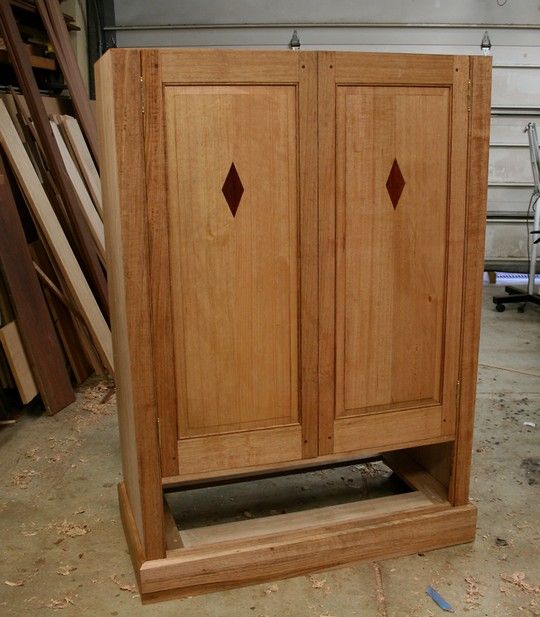
The focus is the large drawer in the lower section of the armoire. This is approximately 30" wide by 7 1/2" high by 17" deep.
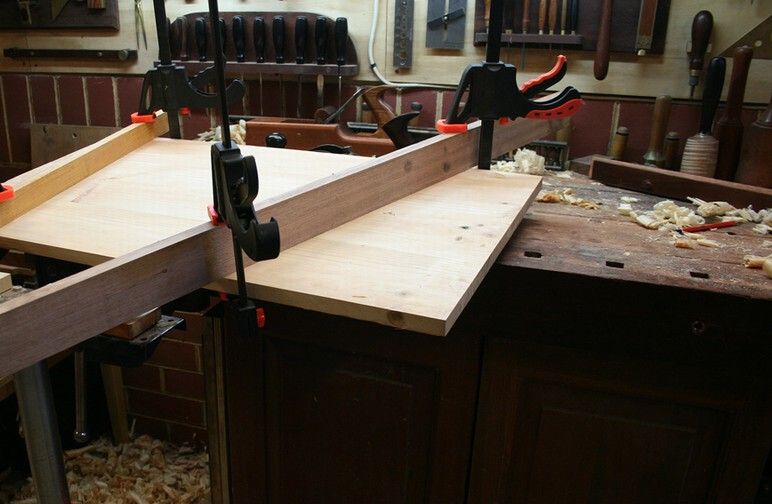
My time today was in preparing the boards - with the exception of a tablesaw for ripping and a bandsaw for resawing, everything has been done with handtools. A few pictures of the dimensioning ...
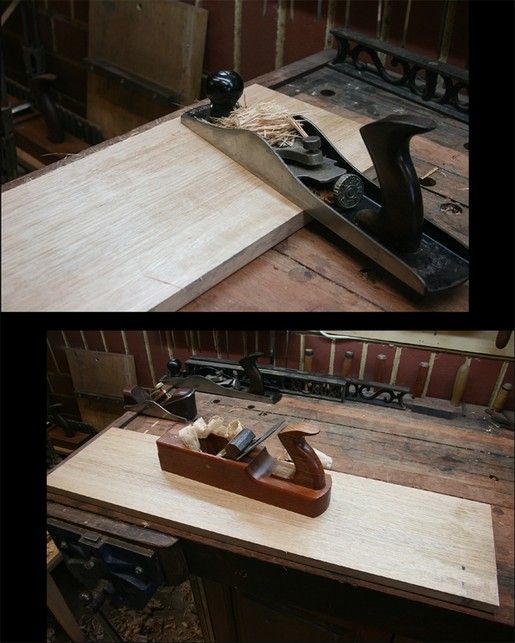
I loved this one of the beads scraped onto the drawer front ...
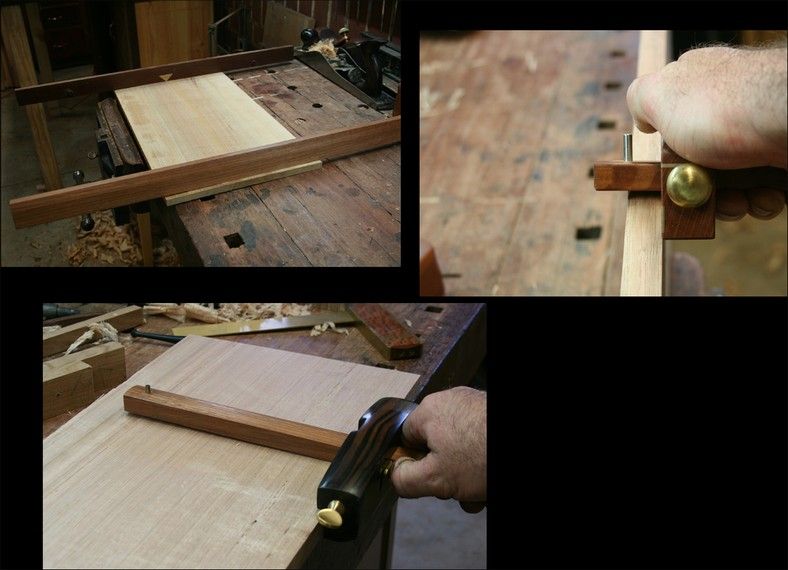
Here are the sides ..
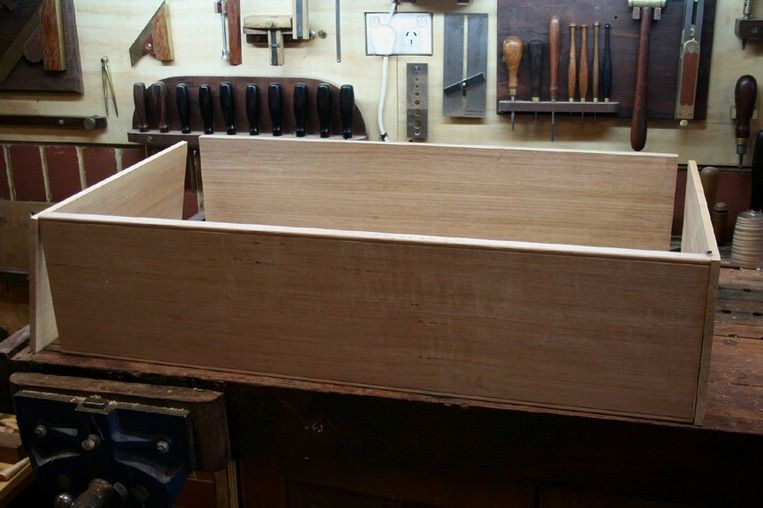
.. and the drawer bottom (clamped with cawls as do with all boards that are left overnight) ..
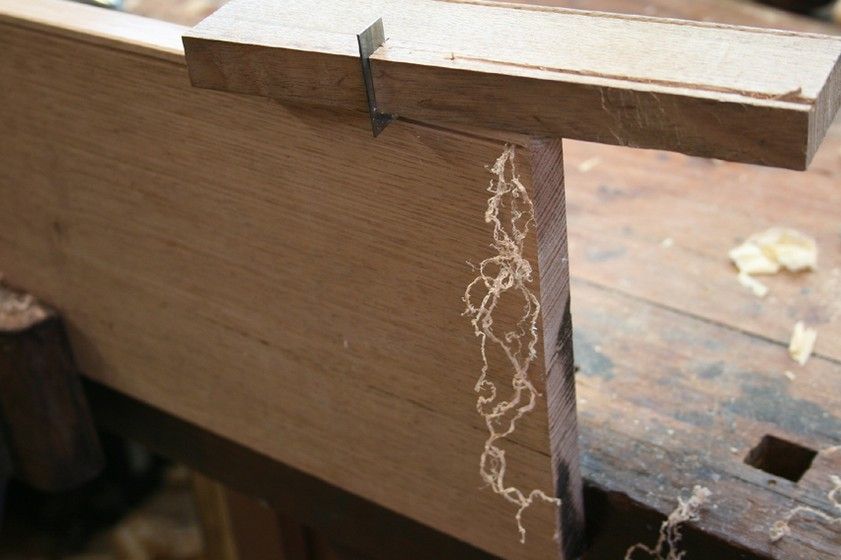
Now the focus of my enquiry is actually the drawer bottom. The dovetails are straight forward - half blind on the front and through at the rear.
I am curious to know what you do when attaching their drawer bottoms, both generally and in a situation such as mine.
Essentially there are two methods I would consider. The third - nailing and glueing to the underside of the drawer - is not up for consideration.
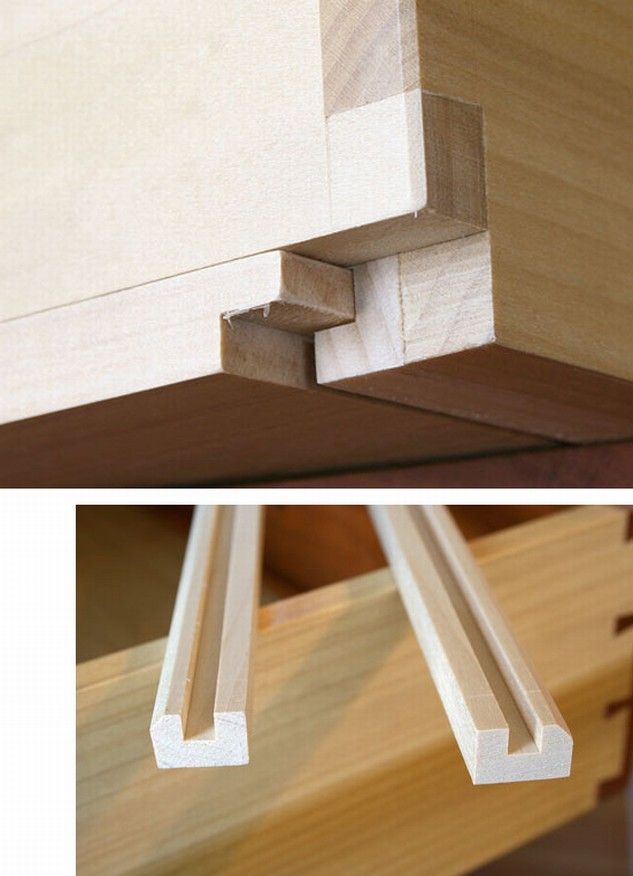
The two other methods are sliding a panel into a groove in the side boards, or sliding a panel into a slip.
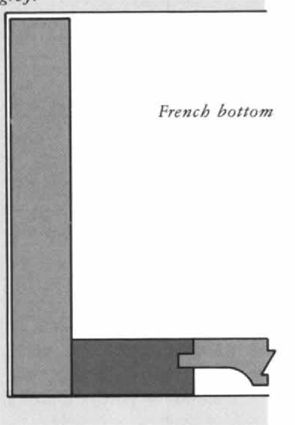
It is interesting that in an article in <i>FWW</i> "Drawer Bottoms" by Alan Marks, he refers to slips as the "French Method", so named as it appears to have originated in France.
Christopher Schwarz described using slips several months ago on his blog ...
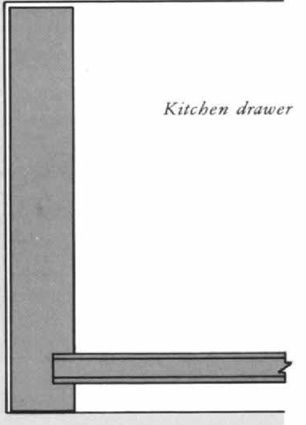
Marks refers to the panel-into-a-groove as the "Kitchen drawer", so called as it was "the cheapening of quality construction to the extreme".
I have used both methods in the past, and my choice is to go down the slip route. These will be constructed from Jarrah top add reduce wear on the bottom of the Pine sides. The use of slips is a decision that is essentially made for me as the side panels are 3/8" thick (the front and rear panels are 3/4") and a groove will weaken the structure.
I am also interested in what thickness others would use for the drawer bottom, keeping in mind the dimensions (noted above). I am using pine here and my plan is to dimension the bottom to around 5/8" (it is presently a nominal 3/4").
Regards from Perth
DerekVisit www.inthewoodshop.com for tutorials on constructing handtools, handtool reviews, and my trials and tribulations with furniture builds.
-
16th January 2010 01:08 PM # ADSGoogle Adsense Advertisement
- Join Date
- Always
- Location
- Advertising world
- Posts
- Many
-
16th January 2010, 03:32 PM #2
SENIOR MEMBER
- Join Date
- Jan 2004
- Posts
- 686
Hi Derek, Originally Posted by derekcohen

I use 10mm drawer sides and slips, usually, on solid timber work.
Regarding the thickness, I'd use 5 - 6mm solid timber with a BIG rider - I'd be putting a drawer muntin into the drawer as well. If you want to go thicker, just create a raised panel sort-of base, with the raised section pointing down, leaving 5-6mm to run into the slot in the slip.
Cheers,
eddie
-
16th January 2010, 03:48 PM #3
SENIOR MEMBER
- Join Date
- Jan 2008
- Location
- NSW southern Highlands
- Posts
- 548
Drawer Derriere
Derek
The method described by Alan Marks is that taught at Sturt, but I have not heard or read it described as a ' French Bottom ' before.
Advantages of the method are that the sides can be kept nice & thin and the interior clean and without dust traps. I would aim to keep the bottom as thin as possible, as along with the thin sides, this will reduce the weight of the drawer and maximise the available space in the drawer. I assume this drawer will only contain very light items such as clothing or shoes, and since the bottom will be supported on three sides in a rebate, and at the back with screws, I would suggest maybe 5/16" or 1/4" thick, if you are concerned about the strength put in a central muntin to provide greater support.
You did not specify which type of pine, I have used Kauri ( agathis mantara ) which planes to a silky finish & looks & feels really nice with a very thin coat of shellac, BUT it can be a real cod, buckling like a demented banana, after machining.
Alan Peters says his book was not intended to be one on furniture making techniques, but he makes an exception on drawer construction & it would be worth reading before you commit.
Regards
-
16th January 2010, 04:07 PM #4
Be inspired. Be creative. Be bold.
- Join Date
- Apr 2001
- Location
- Perth
- Posts
- 10,826
Thanks Eddie.
Basil, the drawer front and back is Tassie Oak (as per the carcase), the sides are Kauri Pine (so nice to work after Jarrah and Tassie Oak!), and the drawer bottom is Radiata Pine.
I have planed down the bottom (since the picture above) to a smidgeon under 5/8" with the slips to be 5/8". I did experiment with a 1/4" Kauri Pine bottom, but it flexed too much for my liking. In the grand scheme of things, I'd rather lose about 1/8" headroom to increase ridgity. The drawer is for guests to store flat items such as shirts and perhaps a jumper. An internal height of about 7" should be fine. Your comments?
Regards from Perth
DerekVisit www.inthewoodshop.com for tutorials on constructing handtools, handtool reviews, and my trials and tribulations with furniture builds.
-
16th January 2010, 04:14 PM #5
Class Clown
- Join Date
- Nov 2005
- Location
- Darkest NSW
- Posts
- 3,207
Basilg - gosh, a fellow Bundanonian. I'm at the Exeter end of Bundanoon myself

Know what you mean about Kauri. I'm not sure if its internal stresses in the timber, but I've had perfectly stable machined pieces go completely wonky when put through the tablesaw.
Poplar is good for this application if you can get it. Easy to work, light but hard, and fairly stable.
Regarding thickness, I favour at least 10mm stock, but (as eddie says) tapered down to about 5-6mm at the edges to fit the slot.
-
16th January 2010, 05:02 PM #6
SENIOR MEMBER
- Join Date
- Jan 2008
- Location
- NSW southern Highlands
- Posts
- 548
Drawer Derriere
Originally Posted by derekcohen
Derek
I must confess that I think Radiata was placed on this earth to be used for house frames and such.
You have already spent a fair amount of time on your project, which is looking very smart, & think it would look much nicer with a Kauri bottom or ( Tas Oak ) in the drawer. I can't really make a judgement on the flex in the panel you have made up, without it in my hand. If it were me I would make up a muntin & put in two half size panels. I agree that the space is not the real issue, but the aesthetic of the Radiata I would not find pleasing.
Aesthetics is very much and individual thing though, and one mans etc. etc.
I think it is nice to have a bit of Wow in a drawer, I recently finished off a kitchen cabinet with Tas Oak drawers and Blackwood top , the carcass is the usual melamined weetbix, but I spent time in lining & partitioning the top drawer with Tas Oak and one section has a knife block in red Cedar, now each time I open the drawer I have a little smile.
regards & have fun Derek
-
16th January 2010, 05:08 PM #7
SENIOR MEMBER
- Join Date
- Jan 2008
- Location
- NSW southern Highlands
- Posts
- 548
Basil & Brush
That has a familiar ring.
Did I hear you saying bad things about misbehaving Kauri at Sturt ?
-
16th January 2010, 05:42 PM #8
What... you mean it's not 1792?
- Join Date
- Oct 2006
- Location
- Melbourne
- Posts
- 5,271
I can only comment from a pre-Victorian perspective. I do know the Victorians came up with muntins and slips (quadrant showing in the drawer) because their new-found machines could produce drawers more efficiently that way. Slips always look to me like somebody stuffed up and made the bottom too short and then installed slips to support it rather than make a new bottom.
Anyway, Georgian dimensions:
Drawer sides: - Run-of-the-mill stuff was 3/8" thick. Some quality stuff was 5/16" or even 9/32" thick (though not for something the size of your drawer Derek).
Drawer bottoms: - Country furniture could have 3/8" or even 1/2" bottoms à la "kitchen"(?) style illustrated at the bottom of the first post, but quality stuff usually had 1/4" or 5/16" bottoms. Where thicker bottoms were required, they were fielded on the underside to fit in standard 1/4" grooves in the drawer sides - where grooves were used that is...
Some drawer sides were rebated at the bottom, sometimes leaving only a 1/16" 'veneer' on the outside. The drawers were assembled and runners glued into the remaining rebate and to the underside of the bottom. When done, the runners and (proud) sides were planed to a snug fit in the drawer openings.
I prefer the latter. If the runners are selected from slightly softer material than the guides in the carcass, and animal glue is used to attach them, then in one to two hundred years, somebody can easily remove the worn runners and replace them.
Unrelated, Derek, but I fear when finally installed in the opening, your drawer will look like it's been cut down in size to fit the opening. Run-out beading always draws the eye to the side without beading which looks unfinished (or cut off).
Beading around drawers is normally applied (cockbeading). Perhaps you could cockbead the drawer ends to balance the visual effect? Or not, it's your cupboard!.
I know you believe you understand what you think I wrote, but I'm not sure you realize that what you just read is not what I meant.
Regards, Woodwould.
-
16th January 2010, 06:02 PM #9
Class Clown
- Join Date
- Nov 2005
- Location
- Darkest NSW
- Posts
- 3,207
Basilg - no, the Kauri I'm talking about was from The Woodage. I've done a few evening courses etc at Sturt, but none of the extended courses.
Can I ask where you procure your timber from in this area? I haven't had much luck with The Woodage, as they don't seem very well set up for smaller (!) buyers. A lot of their timber seems to have been stored for extended periods too, so it can be hard to find reasonably straight boards without too many defects. I've had better luck with Southern Trade Supplies in Moss Vale, and have even resorted to trundling up the freeway to Yates in Campbelltown.
I was reading a book by Robert Ingham a while ago, and apparently he often incorporates a runner into the central muntin in the bottom of the drawer. He reckons it makes the drawer action more stable than just having runners on the sides. Obviously the corresponding part of the runner is a piece inserted from the front of the frame to the back, with a raised ridge to form the runner itself.
-
16th January 2010, 07:05 PM #10
Be inspired. Be creative. Be bold.
- Join Date
- Apr 2001
- Location
- Perth
- Posts
- 10,826
Basil, what can I say ... you have convinced me! I found another Kauri rough sawn board, planed it down, and resawed it ... just enough for the drawer bottom.Derek
I must confess that I think Radiata was placed on this earth to be used for house frames and such.
You have already spent a fair amount of time on your project, which is looking very smart, & think it would look much nicer with a Kauri bottom or ( Tas Oak ) in the drawer.
WW, thanks for the comments. I appreciate your expeience here.Run-out beading always draws the eye to the side without beading which looks unfinished (or cut off).
I am aiming for a 3/8" thick bottom panel. I will use slips here (I have done so before and it will look like a molding, not an add-on).
With regard the beading/cock beading - I think that you are right here, but the drawer beads are in response to my wife (I did a set of drawers several years ago this way in her favourite desk, and she's been at me to do it again). There is no answer to that logic ... however I shall cockbead them if they end up looking strange.
Regards from Perth
DerekVisit www.inthewoodshop.com for tutorials on constructing handtools, handtool reviews, and my trials and tribulations with furniture builds.
-
17th January 2010, 08:16 AM #11
SENIOR MEMBER
- Join Date
- Jan 2008
- Location
- NSW southern Highlands
- Posts
- 548
Mr Brush
Regrettably there is a bit of a dearth of wood suppliers in our area & I don't think there is anyone that stocks a large range of species. Have you tried Allwood in Nowra?
Otherwise there is Anagote, Trend & Matthews up in Sydney.
Regards
-
17th January 2010, 08:20 AM #12
Intermediate Member
- Join Date
- Dec 2008
- Location
- Sydney
- Posts
- 40
Hi Derek,
As a newbie I cannot really add much of a comment other than I think the armoire is looking great.
I take it from your comment that the Kaurie Pine is much softer than Jarrah etc to work hand tools with? What does it look like when finished, would you consider using it as the main timber for a project or only for drawer sides etc?
Thanks
Mark
-
17th January 2010, 08:21 AM #13
SENIOR MEMBER
- Join Date
- Jan 2008
- Location
- NSW southern Highlands
- Posts
- 548
Derek
Good plan, it will also give you the option of planing down the thickness if you find the panel is as substantial as I suspect it will be. Alternatively try that 1/4" Tas Oak and you will then have this info for future reference.
Regards
-
17th January 2010, 10:43 AM #14
Head Moderator
Sister of the DarkSide
- Join Date
- Dec 2004
- Location
- Toowoomba Q 4350
- Posts
- 9,217
What a brilliant thread!! I am so appreciating this discussion and Derek's WIP photos!
How are slips normally attached to the drawer side? Just glue? is there enough strength in that join to house the bottom and hold the contents of the drawer as well?
This is an area of doubt for me, how can a 10 mm drawer side be strong enough with a slip, where it seems to be that the slip is the point where all the pressure lands from the drawer contents?
Cheers
Wendy Box Challenge 2011 - Check out the amazing Boxes!
Twist One - Wooden Hinge/Latch/Catch/Handle
Twist Two - Found Object
Twist Three - Anything Goes
-
17th January 2010, 10:45 AM #15
SENIOR MEMBER
- Join Date
- Jan 2010
- Location
- Range View, Australia
- Posts
- 656
Originally Posted by eddie the eagle
Sound advice from Eddie. I would add thinner drawer sides conserve timber and make precision joinery much easier. Also, drawer bottom repair is going to be paying work for someone 100 years down the track.
Cheers, Bill


 Reply With Quote


Similar Threads
-
Drawer Help
By boxers in forum WOODWORK - GENERALReplies: 5Last Post: 26th May 2008, 10:10 AM -
Drawer bottoms - inset or under
By mcarthur in forum WOODWORK - GENERALReplies: 13Last Post: 19th February 2008, 06:16 PM -
Help with drawer design please
By Carry Pine in forum WOODWORK - GENERALReplies: 2Last Post: 11th June 2007, 09:56 PM -
Five drawer Tee box
By Sculptured Box in forum BANDSAWN BOXESReplies: 10Last Post: 27th February 2006, 08:52 PM -
Three Drawer Box With Lid
By DPB in forum BOX MAKINGReplies: 10Last Post: 12th February 2006, 11:17 PM
