

 Thanks:
  Likes:
  Needs Pictures: 0
 Picture(s) thanks:
Results 1 to 15 of 59
-
25th March 2023, 09:41 PM #1
 GOLD MEMBER


- Join Date
- May 2007
- Location
- Sth Gippsland Vic
- Posts
- 4,396
 Making A Fishtail Chisel from an Old Worn faithfull friend.
I'm doing a bit of tool making this week . And dovetailing.
I thought Id have a quick look at converting a spare chisel into a Fishtail chisel for My half blind dovetails.
I usually use a standard chisel to take out the corner waste. Or if I feel the need I have a few small left and right skew chisels that work like a one sided fishtail. The angles on them are not perfect for half blind dovetails though. So I had a look through my stash of chisels and couldn't decide what to re shape.
I didn't want to ruin a Titan or a Eskiltuna . And I didn't want to spend the time on one of my chisels from my extremely cheap sets of imports I paid nothing ( $10 a set of 4) for and use for all sorts of rough modifications like knocking out upholstery tacks when stripping chairs of fabric. Or levering anything that needs that and a special shape ground on the end.
Then I had a thought about one of My old chisels I started My apprenticeship with and wore out over the years to the point of not being able to re grind it easily. I picked the large one here. Sitting lower near the dovetails. Its an old Yellow and black plastic Stanley. Made in Tasmania at the Old Titan Factory.
IMG_1778.jpg
It started with me on day one from leaving school and starting work in 1979. I keep them ( 3 left) just for the nice working memory's and never thought they would have a use again. This one is the largest. It last was used for scraping paint off something years ago while paint stripping . Blunt and covered in hardened paint.
My thought was it can be revived and live again because its length is fine for an occasionally used Fishtail for half blind dovetails. And Id really love to hang it amongst the working chisels again.
So I drew out some lines with a black marker and got stuck into it with the angle grinder. Then the CBN wheels , 80 and 240 grit. Then the small linisher. And then I took it to the diamond plate and the water stones I'm now using with thin oil.
The longest part was getting the bottom fully flat, as you all know if you have tried that. I had to take it back to the CBN twice then the linisher before it was flat after the diamond plate. The symmetry from left to right is still a little out.
But what a difference!!
I was quite surprised what I ended up with! It looks longer now than the stumpy worn out workhorse that is was! Almost Unbelievably so. And Pretty.
IMG_1790.jpg
Next step after sharpening it up was a test on some end grain White Oak. The edge didn't last two passes. So maybe it was my sharpening? I gave it a second go on the stones and the result was the same. A damaged edge reflecting the light at me that I could see and feel.
IMG_1792.jpg IMG_1804.jpg
I pulled out the LP Oxy and had a go at re hardening then tempering it . I haven't tried that on this type of Stanley chisel before . Sometimes on unknown steels it works and sometimes it just doesn't.
The sunlight in the workshop was a bit bright to easily see the amount heat I was getting into the end when it started glowing red so I kept it a low dull glow that was probably a cherry red. Backed it off so it cooled then brought it up again not quite so hot , still glowing though. Then quenched into some water . Then I took it over to the stone to polish the flat side and kept one eye on the torch that was still running and that white dog that was staring at it and then me like I was a wizard. First time she has seen a flame.
Back to the torch and I heated the top side a long way from the hot part of the flame until the oxidized colours started to slowly show . I was just going off memory and didn't go looking up colour charts. Straw / bronze is what I thought was right. I quickly quenched when I saw those corners turning blue and did some muttering of words. Its so tricky to get it perfect.
IMG_1794.jpg IMG_1793.jpg
But to my delight it seems to have worked pretty well. I re sharpened and had a go a couple of times on this end grain Oak and some other timber and the edge stayed sharp and so did the corners. A run of the finger nail along the edge after that and it was still hard and sharp.
IMG_1795.jpg
Ill have to see what its like after going through a few sets of the drawer fronts . Ill fix the shape when it needs a re grind and sharpen. And I may re handle it ? Or just clean up what is there and leave it original. Or do nothing to it.
Ill let that sit a while.
Rob
-
25th March 2023 09:41 PM # ADSGoogle Adsense Advertisement
- Join Date
- Always
- Location
- Advertising world
- Posts
- Many
-
25th March 2023, 11:31 PM #2
GOLD MEMBER
- Join Date
- Mar 2010
- Location
- US
- Posts
- 3,124
That era of chisels is a pretty good candidate for rehardening because there's something in them that aids rehardening. Probably chromium and manganese in a greater quantity than something like turn of the century steel, and carbon in an amount such that a quick heat yields as good of a result as a more complicated process (nothing excess creating big carbides that hold elements in suspense).
As far as the color tempering, it can be hard to get right if you want to be really precise, but if it's quick, anything from straw to light blue seems to be OK as long as the edge is quenched quickly when darker colors suddenly show up.
So you did well. Slower heat at a "cooler" color (more time spent) may yield the same result.
I've seen old pocket knife clip blade makers (who were of note, so their results must've been good) heating a piece of steel and holding a freshly quenched blade against them until the whole clip blade turned blue. I think Hawley's videos (I that's his name) shows a guy doing the same thing.
it's a different art, but a good one to know if you don't want to remove a handle and rig up some kind of hot pot of oil or hot sand to temper a tool.
the concession is accuracy, but you can heat a chisel like that over and over if needed and reharden with only warp as a consequence (that can be honed out) - the heat level needed to quench isn't a level associated with grain growth or decarburizing.
-
26th March 2023, 10:52 AM #3
Butcher of wood
- Join Date
- Jun 2010
- Location
- Bundaberg
- Age
- 54
- Posts
- 3,428
Ken Hawley? THIS video shows knife maker Tom Merrill making a pocket knife blade back in 1966. At the 3:26 mark he quenches the blade end in oil then lets the residual heat flow back before placing the blade against a piece of hot bar (looks like a repurposed file?) Originally Posted by D.W.
 Nothing succeeds like a budgie without a beak.
-
26th March 2023, 11:02 AM #4
GOLD MEMBER
- Join Date
- Mar 2010
- Location
- US
- Posts
- 3,124
this is the video I was thinking of - I knew there were a couple cutler videos but didn't see the one you mentioned before.
https://www.youtube.com/watch?t=520&v=UeWH7xEOv_E&feature=youtu.be
This probably results in a blade in the low to mid 50s, but in a pocket knife, a super hard blade wasn't appreciated.
it's still kind of rare in traditional knives - case's chrome vanadium steel blades in the US are almost soft enough to file.
If possible, I'd stick to straw, and even then you can get weird stuff - I rarely do it because of what we're really looking for in a chisel - an edge that doesn't deform.
In knives, rule number 1 is the blade can't break. Everything else is secondary.
-
26th March 2023, 11:26 AM #5
GOLD MEMBER
- Join Date
- May 2007
- Location
- Sth Gippsland Vic
- Posts
- 4,396
Both amazing videos.
Hows the second guy Albert Craven! His Canadian Knife at 12.06!! Folds out from standard skinning use for protection. From bears
That'd be a Paul Hogan moment on the street. "That's not a knife . This is a knife "
If you don't have handy pricey gas and bottles and just a coke forge that's the way it was done I suppose. And more control as well.
Got to give it a try next time.
-
26th March 2023, 06:36 PM #6
Senior Member
- Join Date
- Jun 2014
- Location
- Foot of the Dandenong Ranges
- Posts
- 270
Your fishtail chisel is a great end for a tired old bench chisel. Nice work.

-
26th March 2023, 11:37 PM #7
GOLD MEMBER
- Join Date
- Mar 2010
- Location
- US
- Posts
- 3,124
Those videos are a treat. Originally Posted by auscab
(just as a side comment, though, I flame tempered a marples chisel yesterday that was 65 hardness out of the quench and it only got to medium straw at the tip and it tests on both sides around 50.
I've redone it in the past due to soft tools, but never had a hardness tester at the time. A chisel that I rehardened the other day (giant chisel I made - kind of like that knife!) has areas 58-60, which I guess is a good result. I was hoping to sneak up on low 60s but went past it.
If you have a toaster oven and a few spare junk plane irons or bar stock steel to stabilize temperature (what I use day today) and the ability to temper a tool without a handle, you can get very stable temperatures. I have a thermocouple now and aluminum plates, but the toaster oven air temperature varies wildly. the thermocouple close to the very inside of the aluminum plates varies about 1 degree.
I'll bet you'll find you'll never wear the chisel out and will be glad you didn't spend a lot on it.
-
26th March 2023, 11:55 PM #8
Be inspired. Be creative. Be bold.
- Join Date
- Apr 2001
- Location
- Perth
- Posts
- 10,824
Rob, I will say this for the benefit of others wanting to make a fishtail chisel: I have successfully made a few without needing to heat treat the steel after grinding the shape. Just work carefully and cool frequently. I used a small angle grinder in all cases, working freehand.
The first one I ever made was this. The blade came from an old Wetherby.
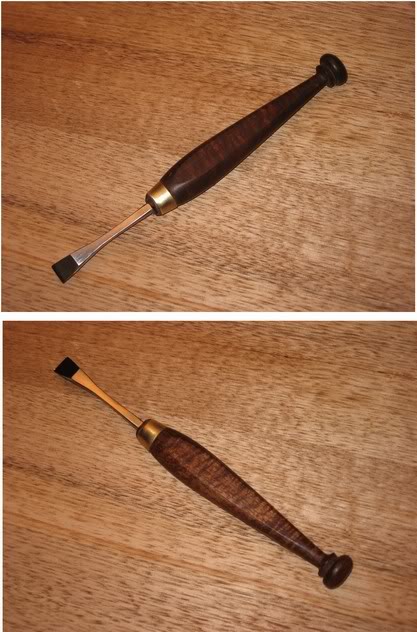
I still have it - need to give it away to an aspiring dovetailer. Do you want it?
Here is another. It started out as a 3/8" Veritas O1 bench chisel, part of a pre-production bunch I road tested for Lee Valley (Veritas does not have one as yet - I do not know what their's will look like).
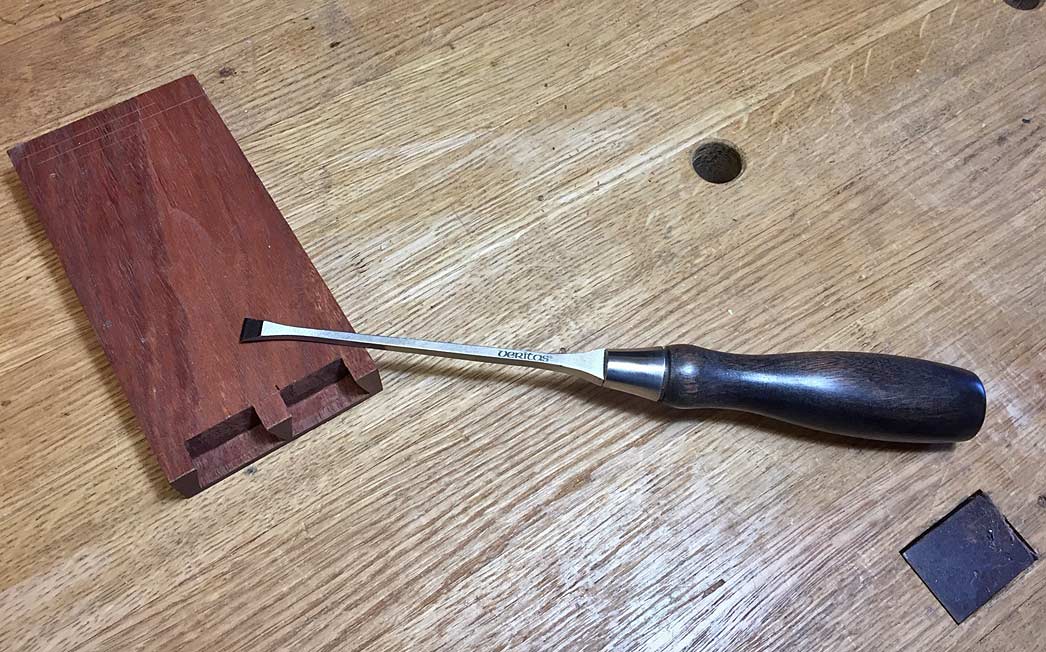
Note: all ground cold. No heat treating. The steel has not been affected by the grinding.
Regards from Perth
DerekVisit www.inthewoodshop.com for tutorials on constructing handtools, handtool reviews, and my trials and tribulations with furniture builds.
-
27th March 2023, 12:54 AM #9
GOLD MEMBER
- Join Date
- May 2007
- Location
- Sth Gippsland Vic
- Posts
- 4,396
Whats your hardness tester look like David. Is it one of those ones that puts a small pinpoint dent on the surface ? I don't know how many types of hardeners exist. Ive just seen one of them at an engineers workshop some time back. It sounds very interesting. Not that I'm thinking of going that deep into it. Originally Posted by D.W.
Ive always made springs and hardened things the Gas or coke in forge way. A dark workshop helps. Trial and error and reading about it . I made springs for a secret drawer once . A matched pair to throw a drawer forward when the catch with another spring was pressed. I first got them to bright on the first quench then tempered blue and fitted them . Half an hour under pressure I heard one or both, I forget, snap at the same time I think. The next two I did a lower quench temp colour then same temper and they have been going perfect for 20 years. That metal was old band saw blade I'm pretty sure. 1.25 or 1.5 deep and decent thickness.
I'm interested in what you said about heat cycling in your thread on making those Seaton chisels. Would doing that cycling be a benefit in re forging old chisels Or is it just with new steel ? Did you get it brighter first heat and the later cycles it was reduced a step each time before first quench. Or where would I read about it ? Knife makers forum I guess? Ive mainly just bought things up to colour , held them there a while then quenched.
Yes. Your right there. Originally Posted by D.W.
I was a bit shocked seeing the price of this. Looks like a nice chisel though.
asa.png
-
27th March 2023, 01:17 AM #10
GOLD MEMBER
- Join Date
- Mar 2010
- Location
- US
- Posts
- 3,124
One of the first things I considered making aside from a few cut and filed irons was a fishtail chisel. George Wilson at one point said "they are the easiest chisels to smith - get square stock, hammer the tip, shape the sides and quench it - you have a fishtail chisel". Originally Posted by auscab
Never did it though.
but each time I've seen suggestions for people to buy really expensive fishtail chisels, I wince, as I've always cut half blinds without them first with a pair of skews, but more recently with one wide chisel and one very narrow for the back corners. they make me wince, though, because they're often sold as a "need" to do joinery, but we rarely see them on the old tool market, which should be a clue.
When you make your own, then the cost justification for something that probably was uncommon goes away. And to be honest, I don't know how someone would've cut half blinds 200 years ago, and at the same time, use the toolmaking excuse myself to make things I wouldn't buy in the first place.
On to the thermal cycling - I think forging is often not given the press it should have in terms of introducing defects. it takes a fair bit of experience to get something old and forge it, and if what you have is cracked and not seen (often the case), it's very very low chance that the bit will be forged back to sound. Bar stock sheets usually give a forging range, and one has to really kind of visually learn those color ranges and not go outside of them. And using fresh bar stock is probably a must if the item will have some value. The hobbyist blacksmith forums are populated by new folks, but a lot of older guys who are turned off by bar stock costs and want to buy everything salvage (especially truck springs here in the US, which would make a just passable woodworking tool at best).
But if forging isn't done, or bar stock is purchased - addressing your actual question - thermal cycling is repeated heats that will remove original grain boundaries with iterations and the result will be a new set of grains that would not quench to full hardness, but that isn't the point. The quench follows. the heat is just high enough to establish grains at the smallest possible size. 3-5 iterations will make a big difference in tool grain size, depending on where the grain is at the start. Quality bar stock is rolled and even that will show visible (under magnification) improvement, and get you results in line with the best commercial offerings in woodworking stuff.
I think the only real key thing is to lose some mangnetism, but don't push past that any further than you have to and then let steel cool until it's black and let it cool just a little more - it doesn't have to cool any further than that, and then reintroduce heat. After that, if you have an electric furnace, it could be soaked to quench temp and then quenched. if you have a torch or forge, steel won't soak, so it has to be heated a step past that as quickly as possible and then quenched.
If you accidentally overheat something or heat it pretty hard and quench and it warps, you can reheat it, let it air cool, give it three to five of these cycles, and then have another go at it and you'll see smaller grain than you would've from the outset. So it's a two part thing - it improves the toughness at high hardness of good stock, but it also allows you to get away from the old adage that you can't reheat steel more than once because the grain will grow.
I have an induction forge and could show the process if it's helpful - the induction forge makes it quick and it wouldn't be a long video. It's very unspectacular looking, but critical and the benefits show up when you snap sample sand magnify the break to see the grain size. it would also show up in a sample that was etched to show grain boundaries, but I don't do that because it involves nitric acid, which isn't really something I want to keep around. Larrin Thomas advised when I asked him about this that if you're willing to sacrifice samples by snapping them, then there's no reason to etch them also because you're looking at the same thing - just on a non-destructive basis if etching.
------------
the hardness tester is a chinese copy of the Ames portable tester, but it does what you mention - it takes a diamond cone and precisely measures how deep the cone goes and then the scale on it reads the hardness based on that depth. If it's run with care the same way every time, the variance is about 0.5 points in reading. the stationary bench top types are more accurate and especially more resistant to tester error, but I don't want to give up yet another table of space in my shop even though I guess it wouldn't be that big of a deal. The chinese copies of the stationary testers are good quality, too, and much more than the portable versions if bought from china and shipped freight.
There are two types - superficial (lower weight) and regular. I have the regular one - it puts 150kg of force on the diamond cone and isn't as easily thrown off by surface variation. It still doesn't indent deep enough to damage anything. the stationary bench versions are about 200 pounds in weight, I guess due to the weights in them and cast table, and they impart the same force and same cone geometry.
For hand tool users, I have to admit, there's some attraction to the portable design, too, because you can be consistent and have a small error or be willy nilly and introduce about 1 additional point of error by being sloppy. And it's very quick - about a minute to get two readings and confirm they're similar.
The tester model that I got is called "PHR-1". it's wonderfully made in contrast to a lot of stuff made in china and sold at the US buyers. I'd love to have a real ames, but they're $3500 or so and when they're sold used, it's a risk that they will be incomplete or have a broken diamond cone ($700 to replace).
-
27th March 2023, 01:21 AM #11
GOLD MEMBER
- Join Date
- May 2007
- Location
- Sth Gippsland Vic
- Posts
- 4,396
Thank you Derek , Yes Id like to try that out very much. I need a smaller one and will make more possibly later. A gift is a very nice thing though. Can I send you something in return? Ill pay postage of course and PM you. Originally Posted by derekcohen
That looks nice. Fine as well. My first FT is wide but its just the outer ends doing the work so should work fine as long as there is room to put pressure in small bites. Narrow and fine would ensure that . Originally Posted by derekcohen
I agree with what your saying about grinding .
My FT didn't get over heated with my grinding. The bulk of the grinding was done with the angle grinder further back up away from the cutting edge and didn't even change colour. It was either all the years of abuse that left it soft at its edge. Or it was never heat treated that far back from its original cutting edge. When I was cleaning the cutting end up on the 80 grit CBN I was water cooling as well, more so for holding it and putting even finger pressure very close to the wheel than any colour change.
That would be something a hardness tester like Davids would be very interesting to check out. How hard are commercial chisels 2/3 back closer to the handle? I don't think they are very hard up the back are they? Or does commercial production just do the whole thing in one go and the whole thing is as hard as the cutting end?
Rob
-
27th March 2023, 04:06 AM #12
GOLD MEMBER
- Join Date
- Mar 2010
- Location
- US
- Posts
- 3,124
How they're hardened depends on the method. Probably four common commercial types:That would be something a hardness tester like Davids would be very interesting to check out. How hard are commercial chisels 2/3 back closer to the handle? I don't think they are very hard up the back are they? Or does commercial production just do the whole thing in one go and the whole thing is as hard as the cutting end?
Rob
* molten salt bath
* induction production line
* gas furnace (Ashley Iles still uses this method, it just takes a furnace and skilled worker)
* inert gas computerized furnace working at multiple atmospheres of pressure
The first three can easily be used for part or all of a tool. Not sure about the last.
I'll dent a few tools along the length to see what the results show.
-
27th March 2023, 06:14 AM #13
GOLD MEMBER
- Join Date
- Mar 2010
- Location
- US
- Posts
- 3,124
Ward paring chisel: 63 at bevel end, 63 at center, 53 at logo just below the tang.
Stanley sheffied fatmax- 57.5 at bevel, 53 center, 43 just below tang.
I no longer have any modern boutique chisels to test.
-
27th March 2023, 10:59 AM #14
GOLD MEMBER
- Join Date
- Mar 2010
- Location
- US
- Posts
- 3,124
Stanley 750 - 60 at the bevel end, 60 in the center, and 60 2/3rds of the way to the socket.
I can't measure up to the bottom of the socket due to corrosion.
if I had anything boutiquey to check, I'd check it, but would guess a lot of that stuff is done in computerized oven and hard from end to end.
Hock's plane iron is 63/64 from end to end. I'm curious as to how those blades are done in the factory as it's not something I'd mess with due to potential warp issues. It's nice for a blade to be partially hard above the keyhole so you can really make the slot tight and if someone had a wheel 5 thousandths too big, they could still file it.
However, whatever it is the french producer is doing, it's still impressive to get even hardness end to end like that on an oil hardening steel (and at a pittance wholesale price even after hock distributes them). On air hardening (A2, V11), you'd kind of expect it even heaeting because the quench can be slow and distortion very little, and then cleaning up the tail end in liquid nitrogen is common.
-
27th March 2023, 01:39 PM #15
 GOLD MEMBER
- Join Date
- Nov 2004
- Location
- Millmerran,QLD
- Age
- 73
- Posts
- 11,135
David Originally Posted by D.W.
I think the fishtail chisels are deemed easy to make as they don't have a lot of mass. That means a fairly rudimentary heating arrangement can be used. As the size of the work increases, more and more heat is required to achieve the hardening temperature. That becomes a limiting factor for most of us. We go from a modest propane flame perhaps to a heating head and then finally to a forge. Forging itself requires a good deal of heat.
Regards
PaulBushmiller;
"Power tends to corrupt. Absolute power corrupts, absolutely!"


 Reply With Quote


Similar Threads
-
The making of a Japanese Chisel
By woodPixel in forum JAPANESE HAND TOOLSReplies: 6Last Post: 14th March 2021, 06:10 AM -
A fishtail chisel in an hour
By LanceC in forum HAND TOOLS - UNPOWEREDReplies: 25Last Post: 21st December 2019, 01:27 PM -
Faithfull woodturning chisels
By comgreserv in forum WOODTURNING - GENERALReplies: 11Last Post: 14th May 2013, 09:20 AM -
Faithfull planes?
By mhewitt in forum HAND TOOLS - UNPOWEREDReplies: 28Last Post: 15th September 2012, 01:29 AM -
Opinions please: Skew chisel v fishtail
By Virgil in forum HAND TOOLS - UNPOWEREDReplies: 2Last Post: 16th September 2009, 10:07 AM
