

 Thanks:
  Likes:
  Needs Pictures: 0
 Picture(s) thanks:
Results 1 to 4 of 4
-
8th January 2023, 02:49 AM #1
 Be inspired. Be creative. Be bold.


- Join Date
- Apr 2001
- Location
- Perth
- Posts
- 10,820
 A fixture for mitred through dovetails (with a story).
When my son Jamie was 10 years old, I build him a chest of drawers, somewhat Shaker-esque. This was an all-hand tools build, made easier as the wood used was Pine, with just Jarrah trim.

Jamie is now 29, married, and lives on the other side of Oz. He still has the chest of drawers, which is gratifying since he clearly treasures it (having said this, he asks me to build for him all the time - which I do - so perhaps he is just short of furniture).
In his last move, from Sydney to Canberra, the chest was dropped and the Jarrah base broke. It is not repairable, at least not by him. My wife and I are due to visit in February, and I said I would bring along a new base for the chest.
Now the issue is, how does one get it to him? It would be too expensive to ship. And the last time I carried (packaged) furniture on the plane to him (as hand luggage!), I was strip searched and treated like a possible terrorist. See: http://www.inthewoodshop.com/Furnitu...eForJamie.html
I decided that the best way to do this would be to construct the base in knock-down format, and assemble it in Canberra. I also decided that the best joinery would be mitred through dovetails at the front corners, since these are mechanical joints, and would just require a little glue once there. The parts could either be rolled up and carried as hand luggage, or perhaps it might fit inside a suitcase. The base is 30" wide.
A while back I decided that I needed a better way to pare the mitre in mitred dovetails. Up until now, I used a mitred guide on top of the mitre to guide a chisel ...

I have made a number of cases this way, and have not been happy with the method, the results of which can be unpredictable. The danger is that the chisel causes breakout at the edge of the mitre. Watching Japanese woodworkers, who use this joint quite frequently, more often as part of a blind dovetail (or secret mitred dovetail), they will pare the mitre from the side.
This is the fixture I built ...

It is made with more of the Merbau panels (used for the MFT bench) as it is cheaper than plywood. The clamps used are by Veritas: Wonder Dog clamp and Surface clamp. The fixture rests against two small bench dogs at the rear.


The method is to pare the mitre from the side ...


The fence/guide is only on one side as this makes it possible to use it on boards wider than the fixture itself.
The fixture is also reversible, for mitres on the other end of a board ..


Pushing the joint together for the first time ..
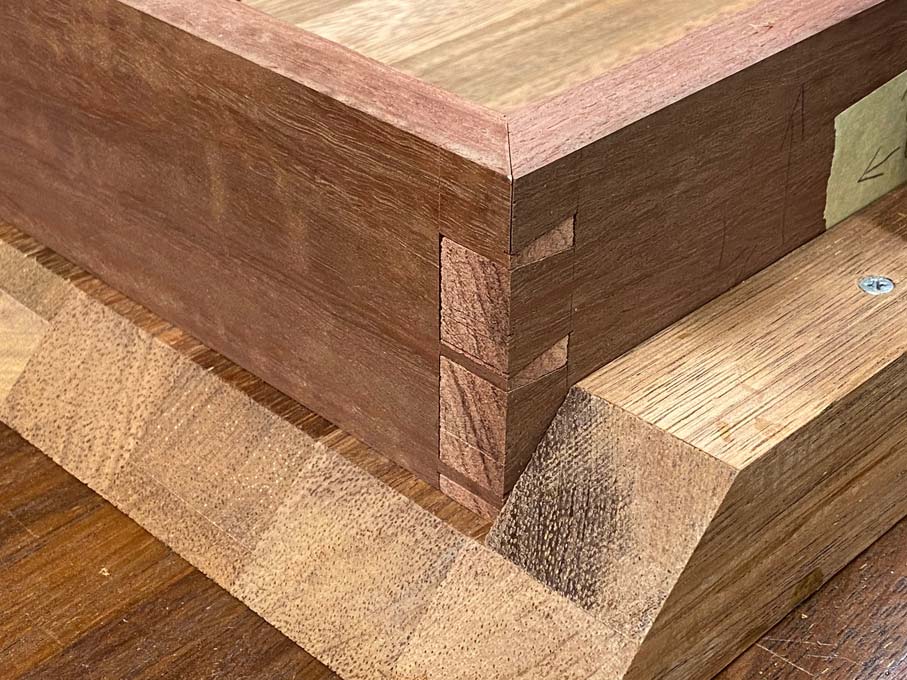
And a dry fit (prior to chamfers and internals being added) ..

Regards from Perth
DerekVisit www.inthewoodshop.com for tutorials on constructing handtools, handtool reviews, and my trials and tribulations with furniture builds.
-
8th January 2023 02:49 AM # ADSGoogle Adsense Advertisement
- Join Date
- Always
- Location
- Advertising world
- Posts
- Many
-
8th January 2023, 04:11 PM #2
SENIOR MEMBER
- Join Date
- Mar 2018
- Location
- Sydney
- Posts
- 469
Thanks for posting Derek,
I'm assuming you would use that same jig for full blind dovetails as well.
Can i ask how you elected both the width and length of the jig, and do you find it needs those dimensions as you have holddowns ensuring it registers correctly..
Regards,
Adam
-
8th January 2023, 07:57 PM #3
GOLD MEMBER
- Join Date
- Oct 2007
- Location
- Yarram
- Age
- 63
- Posts
- 2,207
Lovely story Derek! Thanks it�s good to know such things are going on.
-
9th January 2023, 03:14 AM #4
Be inspired. Be creative. Be bold.
- Join Date
- Apr 2001
- Location
- Perth
- Posts
- 10,820
 Originally Posted by taz01

Hi Adam
The size was simply to make the table large enough to use with typical cases I have made. The one side is open for panels that are larger.
The hold down holes are for smaller panels, such as boxes.
I built this about a month ago, before the MFT. If I had planned it better, the MFT dog holes could be linked in, especially for larger panels.
Regards from Perth
DerekVisit www.inthewoodshop.com for tutorials on constructing handtools, handtool reviews, and my trials and tribulations with furniture builds.


 Reply With Quote
Similar Threads
-
WIP - Small mitred box
By AlexS in forum BOX MAKINGReplies: 35Last Post: 10th September 2012, 06:21 PM -
Mitred edges box
By Tiger in forum BOX MAKINGReplies: 18Last Post: 21st July 2012, 08:15 PM -
Mitred box
By Woodlee in forum BOX MAKINGReplies: 16Last Post: 24th January 2011, 06:50 AM -
Machine dovetails better than hand-cut dovetails?
By Charleville in forum WOODWORK - GENERALReplies: 23Last Post: 4th February 2010, 11:08 AM -
Small mitred box - picture story
By zenwood in forum WOODWORK PICSReplies: 19Last Post: 17th October 2005, 10:32 AM
