

 Thanks: 0
 Likes:
  Needs Pictures:
  Picture(s) thanks:
Results 1 to 15 of 16
-
17th October 2020, 03:11 PM #1
 SENIOR MEMBER


- Join Date
- Oct 2019
- Location
- Brisbane, Australia
- Age
- 43
- Posts
- 519
 A less fussy plane till (all by hand, if you count pushing a tracksaw as by hand)
Just sharing a little build - still on my on-going work of building up the 'shop and learning in the process.
I made a plane till. I have noticed many builds and frankly with all the little cleats find them a little "busy".
The guts of this one is hardwood panels (Karri project panel from Bunnings) with a diagonal groove. I cut the panels with a track saw and the sloping panel with a 30 degrees/60 degrees bevel (flipping the panel over). The dadoes made with a knife wall and then using a hand saw to get down to depth. The Karri was such a **** to work! I sawed an extra kerf down the middle of the dado to help with the waste removal, then cleaned up with a router plane. Some sections were like solid rock!
Plane Till 1.jpg
Plane Till 2.jpg
I quite liked at this stage but one of the objects was to get the planes out of the dust (they previously lived under the bench and collected dust), so I added some horizontal top and bottom and reinforced with dowels (as the contents will be heavy). Then to hide the edges, practised with my shooting board and some tassie oak pieces to make a face frame. And voila!
I will add a door but am thinking about whether to make it a tool-storage door (I am worried it might protrude too much if I do).
Plane Till 3.jpg
Plane Till 4.jpg
I am quite pleased with the result. I think people seem to be - to my tastes - too fussy with the little cleats and divides on a plane till, particularly with lots of visible screws. At the angle these planes are resting on the shelf at (30 degrees), the contact with the wood means they do not move at all. If I add some dividers I will just hot glue in some short ones to about half the height of a No 4.
There is a slight lip to the face frame that was intentional - to ensure planes can't slide off.
I think this is also a good advertisement for a French cleat tool wall - this is right near my elbow at my bench. It could possibly get in the way if I had any really big projects. But if it does I can just remove it or move it quite easily.
I do feel I am coming a little way along. I bought my first hand plane less than a year ago and now am getting a little more confident. Something I learnt from this build was that the hand-cut joinery was very easy to glue-up and assemble - it was a little time-consuming at first, but once the joints are well-made the rest all just works. I am actually finding hand-cut joinery is less stressful and difficult than things like using pocket holes, dominos or dowels - one the joints fit, it's all downhill from there.
I know this is a fairly humble project but I thought I would post for other beginners as a bit of encouragement!
Chris
-
17th October 2020 03:11 PM # ADSGoogle Adsense Advertisement
- Join Date
- Always
- Location
- Advertising world
- Age
- 2010
- Posts
- Many
-
17th October 2020, 09:21 PM #2
GOLD MEMBER
- Join Date
- Mar 2004
- Location
- Brisbane (western suburbs)
- Age
- 77
- Posts
- 12,146
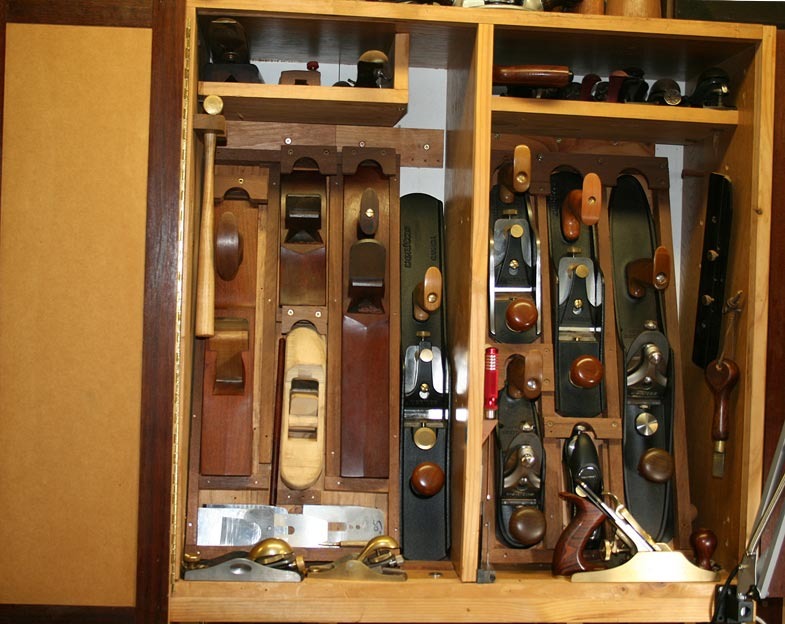
Chris, if you can fit narrow separators between the planes it does make it easier to avoid clanging metal on metal when you are putting back/taking out planes. However, even very narrow boards take up room. I started out with partitions between each plane when I first made my tool cupboard, but a few more planes followed me home & space began to get rather tight. I've re-arranged this section 3 or 4 times over the last 20-odd years & removed most partitions in order to squeeze more planes in, but I think I've just about reached the limit (there's another couple hiding behind the lift-up ramp the #7 is sitting on, so every available space is filled). Plane storage b.jpg
It's not ideal having them cheek by jowl like this, I have to be careful taking out & putting back. But if one more plane decides it wants to live with me, someone will have to give up their place!Last edited by IanW; 19th October 2020 at 02:03 PM. Reason: fix photo
IW
-
17th October 2020, 10:12 PM #3
SENIOR MEMBER
- Join Date
- Oct 2019
- Location
- Brisbane, Australia
- Age
- 43
- Posts
- 519
Wow Ian - what a setup!
The whole arrangement with the angled board was intended to make it easy to lift planes in and set them back. If you're setting the whole sole down at a high angle you have a lot of control. I also (forlornly?) hope I will not overcrowd it!
It seems if they're going in flat and closely packed that is when the jostling is likely.
What a great arrangement you have. One of the reasons I have for not wanting to make my storage too prescriptive is I feel I am still finding my legs for my regular users, and ones that can be kept in another room and bought out rarely. I simply do not know what I really will want handy in the medium-long term to think about such a well-organised affair as yours is.
-
18th October 2020, 01:03 AM #4
Senior Member
- Join Date
- Oct 2019
- Location
- Brisbane
- Posts
- 141
Hi Chris,
I like the idea of placing the till on the cleat wall for easy removal.
On the last photo, it appears that there are three planes sitting on the till. What type of plane is the one at the back (with the tote against the wall)?
Thanks for the encouragement, I also had my first plane about a year ago but haven't done much joinery yet. Spent most of the time fettling the planes trying to get them to work. Getting there... after some useful pointers from Ian on my #4.
Ian's setup will look even more impressive if the photograph were zoomed out a bit to capture the whole cabinet!
Andy
-
18th October 2020, 04:07 AM #5
Be inspired. Be creative. Be bold.
- Join Date
- Apr 2001
- Location
- Perth
- Posts
- 10,831
Chris, mine is even more basic than yours: angled boards with cleats for the planes.
The angled boards are hinged, so �stuff� can belosthiddenstored behind.
Note that the planes have their handles on top - as the planes angle, the handles are tucked away this way (saving cabinet depth).
These are my more common working planes - I like to keep the most used tools near to hand. Less used planes are in either cabinets alongside, or specialist planes/hand tools are in dedicated cabinets ...
Regards from Perth
DerekVisit www.inthewoodshop.com for tutorials on constructing handtools, handtool reviews, and my trials and tribulations with furniture builds.
-
18th October 2020, 06:33 AM #6
SENIOR MEMBER
- Join Date
- Oct 2019
- Location
- Brisbane, Australia
- Age
- 43
- Posts
- 519
Gday Andy,
It's a Veritas shooting plane. Definitely a luxury item!
(It's quite the looker but a left-hand version and very heavy so I have to face it that way to get at the handle easily)
-
18th October 2020, 08:37 AM #7
GOLD MEMBER
- Join Date
- Mar 2004
- Location
- Brisbane (western suburbs)
- Age
- 77
- Posts
- 12,146
A very wise approach Chris. I'm still "finding my legs" after 40 years of being a reasonably serious woodworker... Originally Posted by Cgcc


The reason my storage is so 'constrained' is because I thought I had my plane preferences (and my other hand tools) well-sorted by the time I made my current tool chest. I'd been using & acquiring tools pretty seriously for at least 30 years at that point, & I told myself I had all the tools I needed or wanted. Yeah, right! Luckily I had a sneaking suspicion I wasn't being entirely honest with myself, there were still one or two items I knew I'd find hard to resist if they popped up at a price I reckoned was sensible,so I did allow some extra space in the cabinet for 'future expansion'. I also started making tools at about that time, so it wasn't long before the tool cabinet that was going to serve me to the end of days started to looka bitvery over stuffed. I've lost track of how many times I've re-arranged it to make better use of all available space.
In Vers1.0, I had the planes stored on ramps (more like yours than Derek's), but my chest is quite deep because I wanted deep drawers for things like chisels (down under the plane section), and having the planes on ramps although neat & convenient, just used up too much vertical real-estate. First I tried having some individual hinged ramps so I only had to remove one plane to get at what was behind it, but no matter how I arranged them, the plane I wanted always seemed to be at he back of the queue & I had to dig it out. In the end, I opted for the straight shelf arrangement, simply because I can stack more in that way. The only plane on a ramp now is the #7 because it's too long to sit flat.
I suppose there are a few strong-willed folks who get all the tools they need and stick with them for life, but I haven't met one yet. Who can resist when an "irresistible" tool presents itself? So my advice is, the earlier in your woodworking career, the more extra space you should allow in your tool chests for future acquisitions you don't yet know you must have.
I'm resigned to the fact that I will probably still acquire a few more I didn't know were vital to my future happiness & comfort, but at least the rate has slowed to maybe one per year or less, now. There are a couple of things that I use very rarely, and don't really earn their place, but have been with me for a very long time & I just can't part with them to make more room. For example, I have a Stanley 110 block plane that I bought new in 1958 when I was 12, my first-ever plane. It's the most basic block plane in the business, and not a terribly good performer at the best of times. I once used it quite a lot, but these days I go for one of my chariot planes whenever a block plane is called for & the 110 come out only very occasionally. But it's been with me for more than 60 years and it did teach me some important basic lessons on planes, so there's no way I could abandon the old thing at this late stage of our lives.....
Cheers,IW
-
18th October 2020, 09:33 AM #8
GOLD MEMBER
- Join Date
- Jul 2011
- Location
- In between houses
- Posts
- 1,784
You need another one for the three sitting on top.
-
18th October 2020, 09:37 AM #9
GOLD MEMBER
- Join Date
- Jul 2011
- Location
- In between houses
- Posts
- 1,784
�I told myself I had all the tools I needed or wanted�. Originally Posted by IanW
No, no you didn�t. 😆😆😆
-
18th October 2020, 10:12 AM #10
GOLD MEMBER

- Join Date
- Oct 2018
- Location
- Dandenong Ranges
- Posts
- 1,903
Hi Chris. My plane till no longer has enough room and I am looking at new designs too. Your post comes at a perfect time. Thanks
-
18th October 2020, 11:17 AM #11
GOLD MEMBER
- Join Date
- Mar 2004
- Location
- Brisbane (western suburbs)
- Age
- 77
- Posts
- 12,146
Yes I did, I swear! Originally Posted by riverbuilder
I TOLD myself that, but I obviously had no intention of taking any notice of myself..... IW
IW
-
18th October 2020, 11:49 AM #12
Senior Member
- Join Date
- Oct 2019
- Location
- Brisbane
- Posts
- 141
Originally Posted by Cgcc
Ah, that make sense. Couldn't wrap my head around it when looking at the shape, didn't think of a left-handed plane! Thanks Chris.
Andy
-
19th March 2021, 04:56 PM #13
 GOLD MEMBER
- Join Date
- Apr 2006
- Location
- Hobart
- Posts
- 5,140
Originally Posted by IanW
Just tripped over a blog by Paul Sellers where he shares your opinion of the Stanley #110, but not your sentimental attachment to it, Ian.
Originally Posted by Paul Sellers says
-
19th March 2021, 07:13 PM #14
GOLD MEMBER
- Join Date
- Mar 2004
- Location
- Brisbane (western suburbs)
- Age
- 77
- Posts
- 12,146
Wow!!
 I get the impression Mr. Sellers doesn't like the very basic block planes much, Graeme?
I guess I better not repeat that tirade to my dear old 110, it would send it into irrecoverable depression. It already has bruised feelings from being passed over so often these days in favour of a couple of fancy-pancy brass-sided, rosewood-infilled pretenders.
Although I agree the 110 is not a fine bit of toolery, it's a bit of an overstatement that it "won't work". Mine has made shavings ever since I got it (once I figured out the blade bevel went UP ). It's definitely capable of acceptable, if not brilliant work. Much depends on what you ask it to do, of course, and fine-finishing of cranky-grained woods is not something you should ask from it. But it's as useful as any other block plane for the sort of one-handed knocking-off corners & general rough work I use it for. I've got a few other planes that can handle the fine work...
Cheers,IW
-
19th March 2021, 10:32 PM #15
 Butcher of wood
- Join Date
- Jun 2010
- Location
- Bundaberg
- Age
- 54
- Posts
- 3,435
They have their uses...
I have a generic Made-In-China copy of a Stanley 102. I purchased it from the old (pre warehouse) Bunnings in Darwin around 15 years ago when they were consolidating all their stuff ready for the big move to the new premises. I paid I think $4...
Anyhoo; the blade is reasonable quality, the sole flat enough and it doesn�t feel awkward in the hand. It�s a good training aid in that if you can hone the blade and set it to take a fine shaving you shouldn�t have any issues moving on to a quality plane. It�s the one I�m most likely to hand to or loan out to a novice.
But it�s BEST use is in quickly scrubbing down a bit of old, dirty or rough sawn timber to check out the grain. I have no fear of grit or embedded foreign objects; so what if it hits old tacks or staples? It�s not like I paid a fortune for it!
For that reason alone I highly recommend having a junk block plane in your arsenal.Nothing succeeds like a budgie without a beak.

 Reply With Quote


Similar Threads
-
WEST AUST Hand plane
By Gezawa in forum WOODWORK - Tools & MachineryReplies: 0Last Post: 24th May 2017, 02:38 AM -
Can I trim a #6 hand plane & use as a #5 1/2 jack plane? Your opinion needed
By woodhog in forum WOODWORK - GENERALReplies: 9Last Post: 16th May 2017, 12:32 AM -
Hand Scraping a Hand Plane to .0001" Accuracy
By Ulma Doctor in forum METALWORK FORUMReplies: 4Last Post: 28th February 2015, 06:38 PM -
Has anyone ever made a wooden hand plane... by hand?
By snafuspyramid in forum HAND TOOLS - UNPOWEREDReplies: 18Last Post: 11th August 2011, 06:47 AM
