

 Thanks: 0
 Likes:
  Needs Pictures:
  Picture(s) thanks:
Results 16 to 30 of 57
Thread: Hand Saw Roadside selection
-
7th June 2012, 08:57 AM #16
 GOLD MEMBER


- Join Date
- Apr 2011
- Location
- Dandenong, Vic
- Posts
- 2,029
 Thanks Toby,
 Originally Posted by TobyC

Interesting reading. took it all in I think.
I cleaned a plastic handle one last night.
Needs to be sharpened today but it wasn"t that bad except someone has been using to cut the top of silicone tubes. It also has 1 tooth missing.
tooth set still looks ok, so just a sharpen.
Then on to the next one.
Peter
-
7th June 2012 08:57 AM # ADSGoogle Adsense Advertisement
- Join Date
- Always
- Location
- Advertising world
- Posts
- Many
-
7th June 2012, 08:57 AM #17
Mossback
- Join Date
- Apr 2012
- Location
- Cat-Pig Swamp
- Posts
- 705
I've never seen anything like that. Spear & Jackson had there 'unbreakable' handles with a dowel running through it. Originally Posted by pmcgee
I guess this is made the same way. The grain going two directions doesn't seem to be a very good idea.
Toby

-
7th June 2012, 10:48 AM #18
GOLD MEMBER
- Join Date
- Apr 2011
- Location
- Dandenong, Vic
- Posts
- 2,029
I'll check but I think its tape.
I'll see if there is a crack before taking it off.
As someone pointed out its a UK saw.
-
7th June 2012, 06:14 PM #19
SENIOR MEMBER
- Join Date
- Jan 2011
- Location
- Sydney
- Posts
- 613
Hi Peter Originally Posted by _fly_
Very nice find!
The handles just unscrew, and you'll leave a lot of rusted blade underneath them if you don't remove them first. I found the best thing to do is buy a cheap packet of mini ziplock bags to keep each saw's screws and medallion separate, and label it well. Spray the screws with some wd40 and leave them overnight if they aren't shifting rather than using too much force and damaging what will be brass screws on most of those saws.
After experimenting with sanding, scraping, citric acid and just about everything else, I've found that the less done the better - I'd be using one of those scrapers that hold a razor blade to take the worst off and then a brass brush in the drill to clean the majority of the metal, followed with some soft steel wool. You won't get them to new this way but you'll leave them in a clean state that shows their heritage better than some of the more aggressive methods will. You also have less chance of damaging the etch if any remains too.
Give the handles a light sand with 600-1200 grit paper then a couple of coats of boiled linseed oil and they should come up nice.
#7 is a Stanley too unless I miss my guess, look at #1 and see how similar the handle design is, and I haven't seen anyone else use that style.
Cheers
Andrew
-
7th June 2012, 06:31 PM #20
GOLD MEMBER
- Join Date
- Apr 2011
- Location
- Dandenong, Vic
- Posts
- 2,029
Thanks for that info Andew,
I cleaned one last night with 400 and 600 grit paper and a wood block.
It was a plastic handle so was easy to take off.
Today I sharpened it. I have one of those guides that slides down the saw.
The teeth are only out in one spot and do you think I can find the tooth setter I have had for 25 years and never used, Nope. Spent half hour looking so will look harder tomorrow.
Will try another saw tomorrow. Will go with another plastic one thats there.
I don't any similarity between #1 and #7. The horn is cut on one and not on the other, different number of screws in different places ???.
Hey, I know nothing about saws except how to use them.
OK, Whats the trick for getting the screws out when it spins. WD40 and then more WD40?
or do I try and hold what I'll call the nut with pliers or something....
Peter
-
7th June 2012, 11:26 PM #21
GOLD MEMBER
- Join Date
- Apr 2011
- Location
- Dandenong, Vic
- Posts
- 2,029
OK, Cleaned up another one, the one with the wooden handle that I can't get off.
Means I've only cleaned to within an inch of handle.
Got to try and get it off.
Blade is quite pock marked but its clean and smooth.
Will put pictures of the 1 1/2 saws I've done so far.
Catch Peter
-
8th June 2012, 06:49 AM #22
Mossback
- Join Date
- Apr 2012
- Location
- Cat-Pig Swamp
- Posts
- 705
Drill a hole in a wooden clamp like this. (only on one side)

One side of the clamp will hold down on the bolt while you unscrew the nut through the hole.
Toby
-
8th June 2012, 06:54 AM #23
Mossback
- Join Date
- Apr 2012
- Location
- Cat-Pig Swamp
- Posts
- 705
Originally Posted by andrewr79
I've never seen a Stanley without a medallion.
Toby
-
8th June 2012, 09:04 AM #24
GOLD MEMBER
- Join Date
- Apr 2011
- Location
- Dandenong, Vic
- Posts
- 2,029
Thanks toby, Very clever.... Originally Posted by TobyC
Don't have a wood clamp, but i get the idea and will work something out. Got a couple of vices I could use, Or the one on the bench has oversize wooden blocks in it. so could drill the 1/2 inch hole or so and use that.
Thanks again
Peter
-
8th June 2012, 01:32 PM #25
GOLD MEMBER
- Join Date
- Apr 2011
- Location
- Dandenong, Vic
- Posts
- 2,029
OK Here's the first 3 saws I've done.
After the third I'm not happy with the first now.. (may revisit it).
Still can't get the handle off No 2 but I'll keep trying.
Went back to what I think is bakerlite handle for the third one seeing the handles on wood give me trouble.
Do they come up to scratch? They are usable.
Still need to find that tooth setter......
Peter
-
8th June 2012, 03:12 PM #26
Mossback
- Join Date
- Apr 2012
- Location
- Cat-Pig Swamp
- Posts
- 705
Some handles were called Bakelite, some were nylon, sometimes the catalog just says Molded plastic handle. If they are tight and comfortable, and you're ok with them then use them.
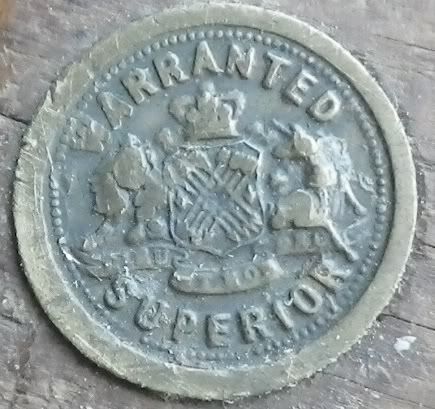
On the warranted superior saw...Outside of England, the WS medallion was used on second line or lesser quality saws, but in England it was used on first quality high end saws, and was a mark of quality. England used them from 1819 to 1878. The banner says Dieu et Mon Droit, the literal translation is "God and my right", referring to the divine right of kings.
Toby
-
8th June 2012, 04:08 PM #27
GOLD MEMBER
- Join Date
- Apr 2011
- Location
- Dandenong, Vic
- Posts
- 2,029
Well thats the tag on it and it does have the English coat of arms. You sure about 1819-1878 and not 1919-1978? May have to clean and hang above my bed if it is that old. Originally Posted by TobyC
Peter
-
8th June 2012, 06:32 PM #28
SENIOR MEMBER
- Join Date
- Jan 2011
- Location
- Sydney
- Posts
- 613
Let the WD40 soak in for a day or so and it should come loose. Originally Posted by _fly_
Nice job so far
-
9th June 2012, 01:03 AM #29
Mossback
- Join Date
- Apr 2012
- Location
- Cat-Pig Swamp
- Posts
- 705
1819-1878, is what I've found in several places, and it was a registered trademark. Originally Posted by _fly_
Toby
-
9th June 2012, 03:19 AM #30
Mossback
- Join Date
- Apr 2012
- Location
- Cat-Pig Swamp
- Posts
- 705
Here is another one. The image is not a true Royal coat of arms, it has elements of the Sheffield Coat of Arms, with 8 crossed arrows in the center.
Toby


 Reply With Quote
Similar Threads
-
Translating a US timber selection list for Aussie timer selection
By Mick@itc in forum BOAT RESOURCES / PRODUCT SEARCHReplies: 9Last Post: 27th December 2011, 05:58 PM -
Roadside chuckout
By Burnsy in forum SMALL TIMBER MILLINGReplies: 21Last Post: 23rd April 2009, 07:48 PM -
Elm on the roadside in Williamstown
By thumbsucker in forum TIMBERReplies: 0Last Post: 11th May 2008, 06:38 PM -
Roadside find
By sundancewfs in forum WOODWORK PICSReplies: 16Last Post: 14th August 2007, 01:07 AM
