

 Thanks:
  Likes:
  Needs Pictures:
  Picture(s) thanks:
Results 1 to 12 of 12
-
10th May 2016, 04:55 PM #1
 GOLD MEMBER


- Join Date
- Nov 2012
- Location
- SE Melb
- Age
- 65
- Posts
- 1,278
 Minimizing tear out during planing
Hi all
I've been having a bit of tear out while hand planing when I get it wrong in reading the grain.
My reading of the grain consists of 3 strategies
1. read the edge while hand planing the face of the board;
2. follow the cathedral if there is one and the surface is on heart side (smiling end grain , or plane into the points of the cathedrals on the bark side (
 )
)
3. check for the direction of splinters.
Any how I get it wrong, and sometimes grains run in 2 directions.
Lately, I saw a youtube about adjusting/fettling with the cap iron. I wasn't sure if it would work, so I tried it out on one of my planes. I ground the lip of the cap iron so that there is a backward bevel and polished the front as well. I offset the cap iron from the tip of the blade by about 0.5mm~1.0mm. Put it together and it seems to work. Before I do that to all my planes, I wonder what the brain trust think of his method.
-
10th May 2016 04:55 PM # ADSGoogle Adsense Advertisement
- Join Date
- Always
- Location
- Advertising world
- Age
- 2010
- Posts
- Many
-
10th May 2016, 06:06 PM #2
GOLD MEMBER

- Join Date
- Jun 2014
- Location
- Seattle, Washington, USA
- Posts
- 1,857
Man, I'm sorry to be the guy to do this. I know that asking this question is like when you call IT and they say "have you turned it off and back on again", but...
Is the iron sharp? Are you 100% confident in your sharpening skills and the fact that there is negligible room for improvement?
Assuming you are...
I use the cap iron as well. Some considerations include:
1: The interface between the two irons must mate perfectly. This means that the back of the blade and the bottom of the curved piece of the cap iron must be polished and dead flat. You don't want to put an edge on the cap iron, but you should still consider polishing it on an 8000+ grit stone of some kind.
2: Consider steepening the angle at which the cap iron meets the back of the iron. Information on this can be found online, but it basically consists of holding the cap iron at a steep angle and honing a little flat onto the front so that the angle at which it contacts the blade is closer to 70deg than the standard ~50. I might wait to do this until after you've tried it without doing it.
3: It has to be close. Really really close.
I've had a lot of success with this, but, at the end of the day, sharp trumps all.
As far as reading the grain, I perform step 1 of your 3 part process. This is the only one I do and it's worked for me.
Best of luck,
Luke
-
10th May 2016, 06:25 PM #3
GOLD MEMBER
- Join Date
- Nov 2012
- Location
- SE Melb
- Age
- 65
- Posts
- 1,278
I'm the "IT" guy...... and the blade is sharp, I can shave the back of my arm, it will cut paper from the edge without effort and it makes nice shavings.
I don't know if I understand you 100% re (2) of your 3 points. But it seems to be in line with what is being said on one of his videos ( I could only post one youtube video, he made a series of vidoes)
Is that what you mean?
-
10th May 2016, 07:35 PM #4
GOLD MEMBER
- Join Date
- Jun 2014
- Location
- Seattle, Washington, USA
- Posts
- 1,857
Unfortunately I tether to a mobile data source and can't watch a video that long of that quality.
Could you tell me the times of the critical information in the process and I can skip around to get the gist of it?
-
10th May 2016, 10:10 PM #5
SENIOR MEMBER
- Join Date
- Jan 2001
- Location
- Langwarrin, Victoria, Australia
- Age
- 56
- Posts
- 677
JOT, not quite sure what the significant change is over "normal" methods. I have watched both videos and haven't seen anything revolutionary.
There was a thread some time back (Luke, Derek and others I can't remember) where setting cap iron close to edge was discussed, along with "blunting" the nose of the newer style cap irons ... Will try to find and drop link into this thread.
Edit: here is the thread:
Shapton pro series or ohishi waterstones?
I think you can start at this post and read forward - but the entire thread is a good read if you havent seen it before.Glenn Visca
-
10th May 2016, 11:09 PM #6
GOLD MEMBER
- Join Date
- Nov 2012
- Location
- SE Melb
- Age
- 65
- Posts
- 1,278
Luke,
If you just watch from 2:50 for about a minute, then you will be able to tell if what you said re point 2 is what he is also talking about.
GV
Thanks for the link, I'll take a look.
It's probably nothing revolutionary. Just that the way he hones his cap iron is different than most of the others (on youtube at least). Most will advocate holding the cap iron flat and hone it on a stone. What he does (2:50) is to hone the cap iron at an angle. The idea is to make the leading edge of the cap iron press down on the iron.
-
10th May 2016, 11:15 PM #7
SENIOR MEMBER
- Join Date
- Jan 2001
- Location
- Langwarrin, Victoria, Australia
- Age
- 56
- Posts
- 677
Ahh ok. I ordered an IBC blade from Jim Davey for my #8 along with a 2nd hand cap iron which he kindly set up for me. I noticed his angle on the cap iron appeared steep too. I wouldn't think it matters much. If you can get it well seated at a lesser angle ... I wouldn't think there is anything wrong with that. Perhaps one arrives at the desired state a little quicker with steeper angles
Glenn Visca
-
11th May 2016, 01:15 AM #8
Be inspired. Be creative. Be bold.
- Join Date
- Apr 2001
- Location
- Perth
- Posts
- 10,855
The shape of the shavings can tell you when you have set the chipbreaker at the ideal distance from the edge of the blade. They should straighten up, rather than remain curly (as when there is no chipbreaker effect). Here is an example ...
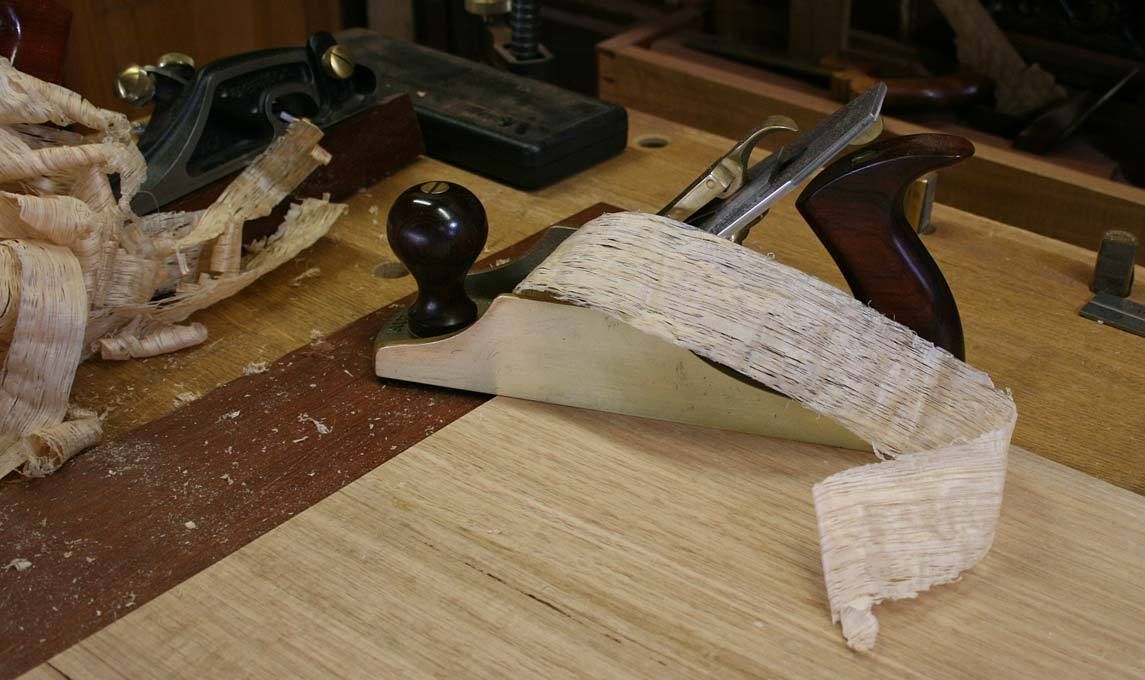
I wrote a quick tutorial some time back which can help get one started: http://www.inthewoodshop.com/Woodwor...ipbreaker.html
I would change a few things. Firstly, the leading edge of the chipbreaker was honed at 45 degrees in the tutorial. This is the lower limit for planes with beds of 45 degrees. In the tutorial I was using a plane with a 50 degree frog. Generally, I would recommend 50 degrees and up. Some even use up to 80 degrees. Secondly, the distance to the leading edge is variable, not a specific number. When experimenting and demonstrating, it is easier to get someone started by offering up a number. In the tutorial I mentioned 0.4mm. In reality, this can be 0.3 - 0.5. You will know when the chipbreaker is closed up too much as the shavings concertina. Too far away, and the shavings become curly. A little curl is OK - some woods do not need a tight setting.
Regards from Perth
DerekVisit www.inthewoodshop.com for tutorials on constructing handtools, handtool reviews, and my trials and tribulations with furniture builds.
-
11th May 2016, 01:56 AM #9
GOLD MEMBER
- Join Date
- Feb 2016
- Location
- Canberra
- Posts
- 5,122
An easy way to find the grain direction is to wipe a regular tissue on the wood. If it's against the grain it catches very easily. It does not the right way.
i.e. "Pat the cat"
-
11th May 2016, 08:22 AM #10
GOLD MEMBER
- Join Date
- Jun 2014
- Location
- Seattle, Washington, USA
- Posts
- 1,857
I just used some data at work to watch the whole thing and yep, that's pretty much exactly what I do to prep a cap iron.
This is the first time I've seen a photo of it resulting in a flat shaving, however. I will try to adjust mine accordingly.
-
13th May 2016, 12:12 AM #11
GOLD MEMBER
- Join Date
- Nov 2012
- Location
- SE Melb
- Age
- 65
- Posts
- 1,278
thank you all
-
14th May 2016, 02:35 AM #12
 GOLD MEMBER
- Join Date
- Mar 2010
- Location
- US
- Posts
- 3,150
Side comment about sharp. functional sharpness is required for everything, but if you're using it to solve tearout problems instead of a cap iron, it's always going to lag behind by a factor of 10.
With the cap iron set properly, the plane will cut tearout free with anything marginally sharp (it's more important to have adequate clearance so that you don't have to push the plane down in the cut to make the shaving stay continuous).
One of the benefits of using the cap iron probably is that it opens you up to being able to plane with reasonably sharp irons, but relieves you from the chase of believing that you need sub-micron media to prevent tearout or do day to day work. Doing that instead of relying on the cap is counterproductive - it is the shaving thickness that prevents tearout more so than the sharpness. That is, if you are one of the few cave men left behind who doesn't believe the cap iron is worth learning, you can avoid tearout by keeping the shavings very thin - even a washita stone can do this, though - making shavings that are less than a thousandth of an inch thick.

 Reply With Quote

Similar Threads
-
small contact areas, minimizing mess
By PaulWG in forum GLUEReplies: 1Last Post: 23rd July 2013, 08:14 PM -
Taming tear out?
By Tools4Me in forum WOODWORK - GENERALReplies: 16Last Post: 3rd May 2013, 08:34 PM -
scraping / tear out
By gnu52 in forum WOODWORK - GENERALReplies: 4Last Post: 19th June 2006, 06:53 PM -
How do I deal with tear out?
By BrettC in forum WOODWORK - GENERALReplies: 13Last Post: 13th November 2005, 03:01 PM -
preventing tear-out
By KristianH in forum WOODWORK - GENERALReplies: 5Last Post: 10th January 2005, 11:37 PM
