

 Thanks: 0
 Likes: 0
 Needs Pictures: 0
 Picture(s) thanks: 0
Results 1 to 14 of 14
Thread: The ideal plough plane ...
-
24th January 2007, 04:39 PM #1
 Banned


- Join Date
- Apr 2005
- Location
- kyogle N.S.W
- Age
- 50
- Posts
- 4,844
 The ideal plough plane ...
I know the following plane doesn't 'look' ideal, but its the concepts behind it that are, I feel.
Because the ideal plough is yet to be made in my opinion, I've modified an old 45 in an attempt to own one. And its turned out to be the most reliable plough I've ever used....ie. no annoying surprises. Consistantly works how I want it to. No stuffing about.
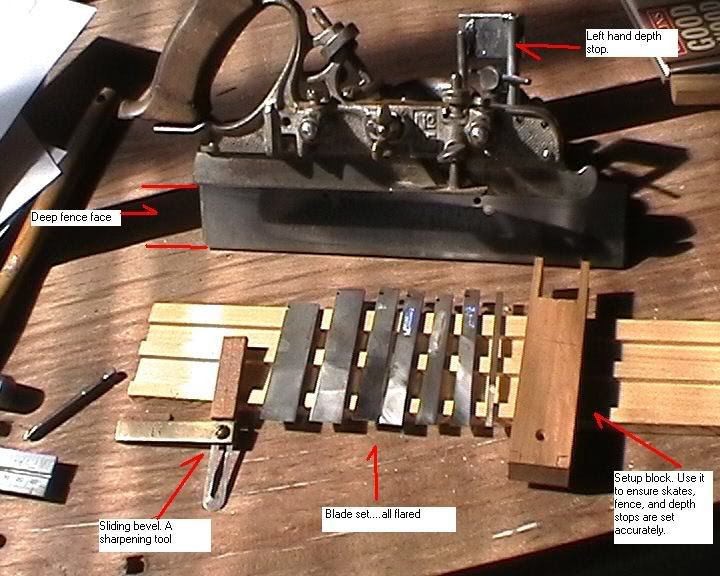
Here it is, along with its modified blades, and setup tools. I've labelled the mods.
Its all about obtaining an accurate plough cut. A common cut, but yet still quite tricky to get them spot on with a regular plough plane. Which tends to make the powered router attractive eh.
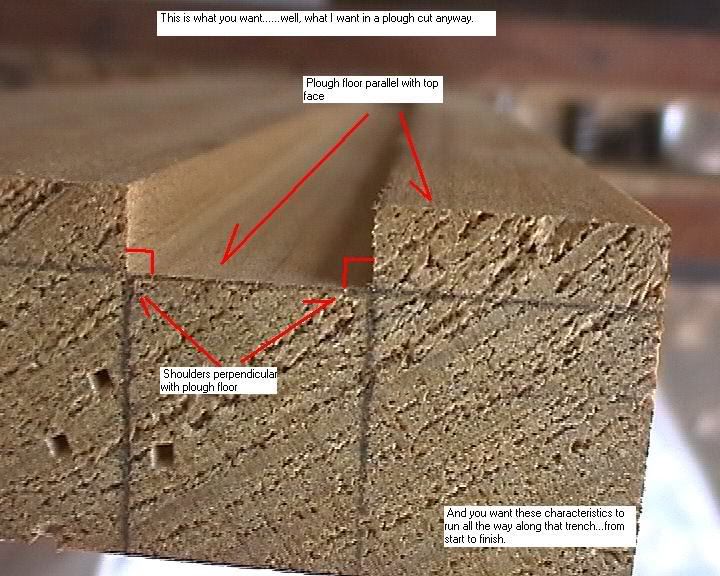
More often than not my results are substandard with a regular plough....ie. those shoulders arn't crisply cut at 90 and the plough floor isn't square. and its not entirely my fault ! .....the plough plane designs are to blame as well.
Seems the best way to try and describe what I think is the 'ideal' plane, is to run through how I tuned this old 45 ..... Hopefully, I'll be clearer that way.
First, I'll introduce this setup block I recommend you make. Or something like it..... It allows you to easily check your planes settings.
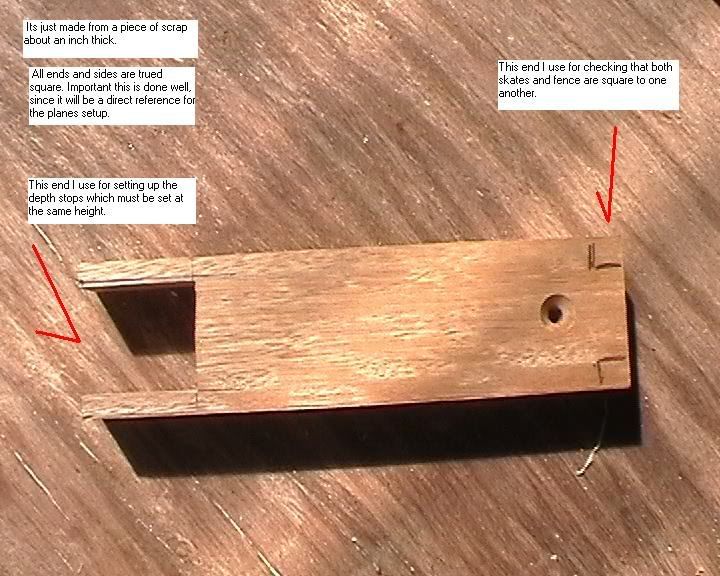
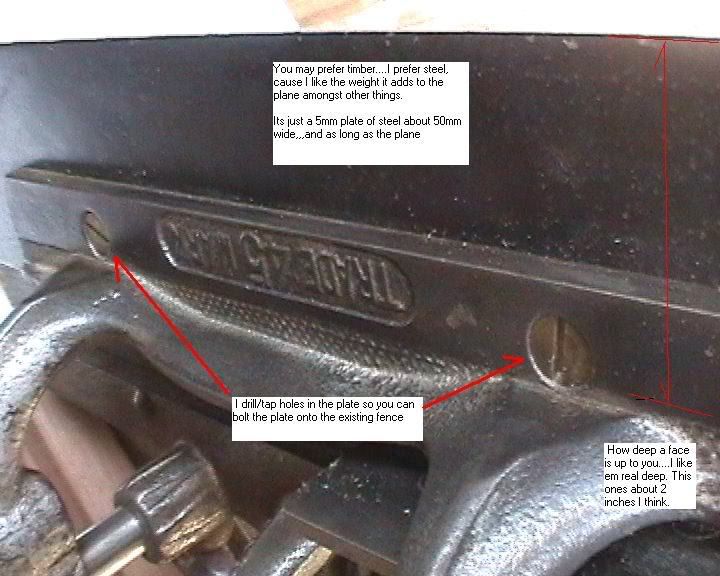
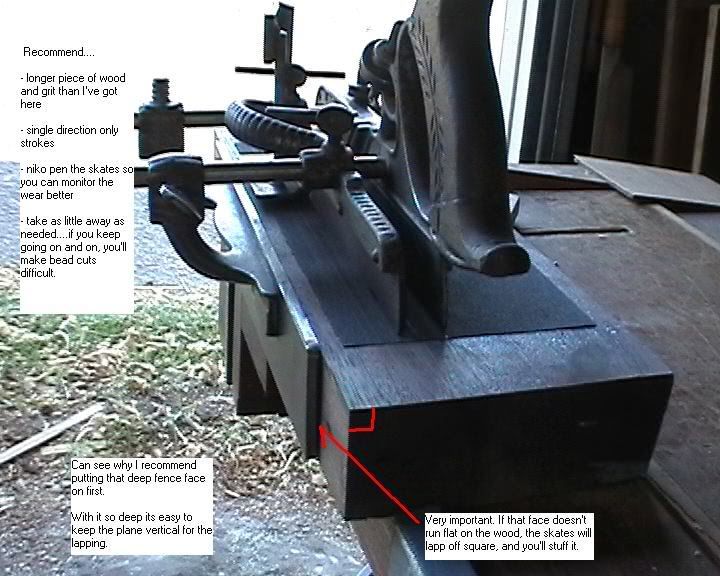
Add a deep fence face first....A deep fence face I've found when rubbing off a deep timber face will provide excellent stability.
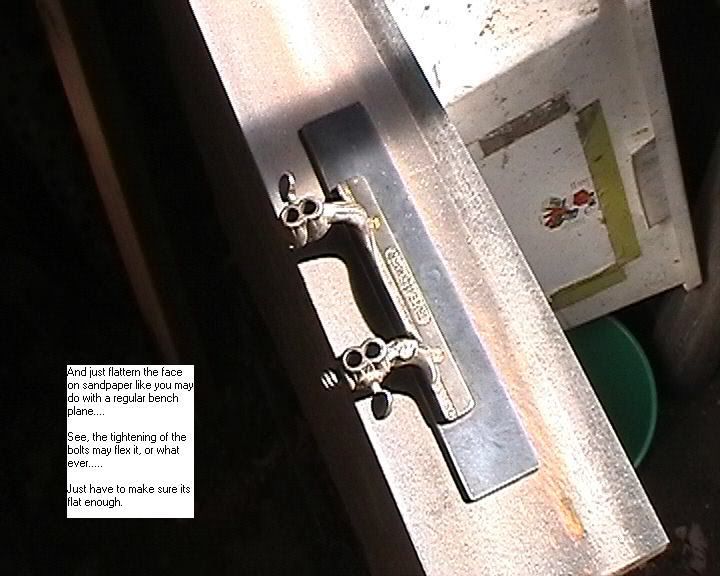
Fence setup now......Now have to make sure the skates both run perpendicular to your new fence. Often there a little off, which will only affect accuracy.
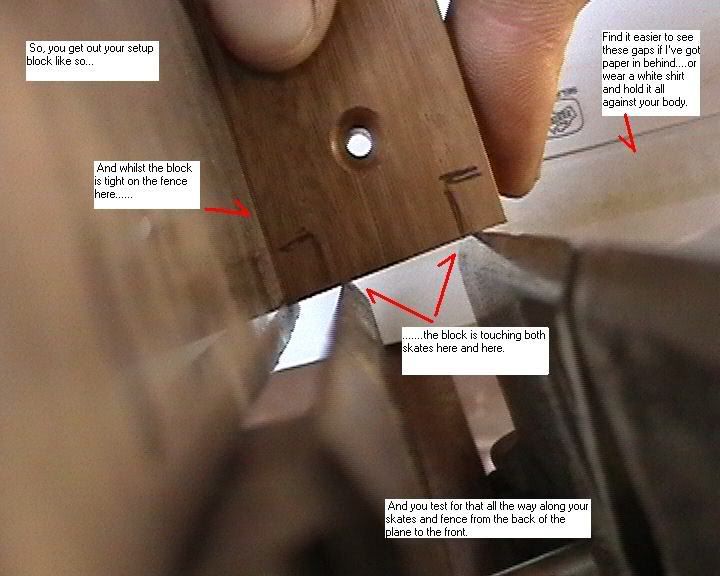
If theres a gap anywhere between the skates and block, you've got a problem... I think you should really lap your planes skates square, until its all gapless.
The technique I use is with a squared block of thick timber......spray adhere the sandpaper down.....and whilst running that fence tight against the wood(always), the skates run on the grit,,,,taking the high spots off, just like lapping a bench plane..
Fence and skates ok........now the blades.
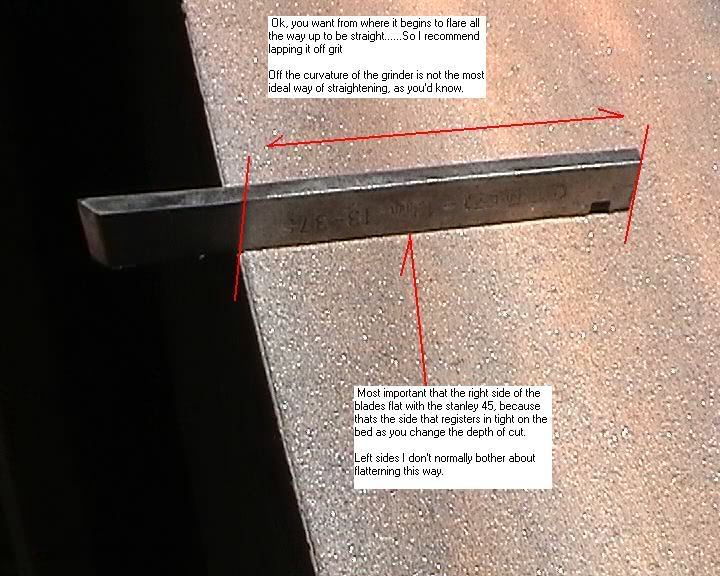
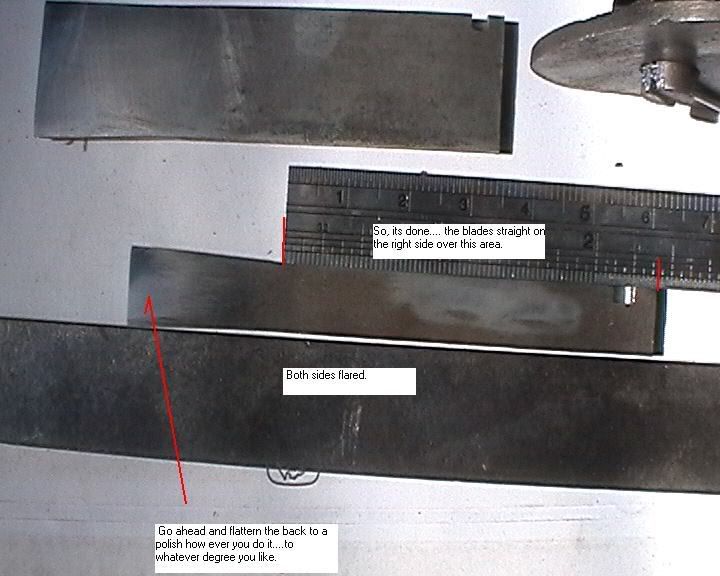
Flaring the blades
IMO all plough blades should flare. Meaning, the width of the blades edge should be wider than the rest of the body further up.... Really makes all the difference I've found.
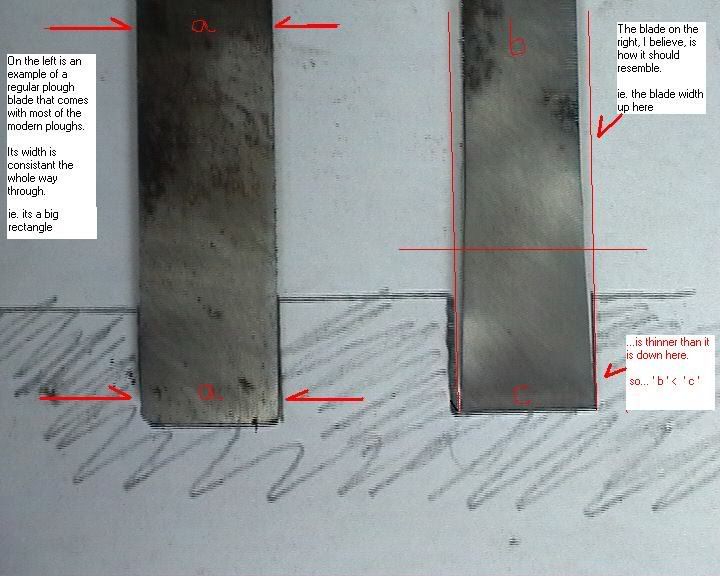
Old wooden plough plane blades seemed to have it....but modern ploughs like my 45 seemed to skip the concept unfortunetly.
Without it, you've got a caustrophobic environment for your plane.
I feel you can understand the problem better by relating it to what it feels like using a hand saw without enough set. There prone to bind up in there own kerf. To fix the problem you put more set on the teeth and the saw will work better because the width of the cut (kerf) is wider than width of the saw body above it.
Well, I see a plough cut as being similar to a saw cut in that respect. A plough blade that doesn't flare; thats just a rectangular blank, is like trying to handsaw without enough set.
Flared blades wouldn't improve things I'd imagine, if we all moved like robots. But we don't. And particularily when we are pushing the plane with the fence rubbing a thin edge(or using a very wide blade), we're prone to wobble the plane off vertical a little. Like this sort of thing.
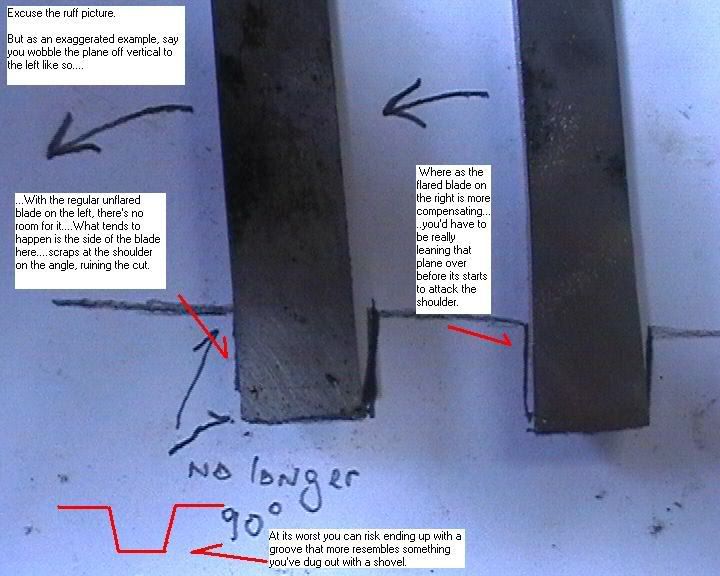
For combination planes, with multiple skates like the stanley 45, 50..etc flared blades I've found are a godsend....because the skates grip the blade closer together. This tends to solve a lot of those fiddly alignment problems of fence and skates. The plane just has more freedom to move.
If you decide not to to use flared blades you must be extra careful to ensure skates and fence are all in parallel with one another. Even say 1mm askew and you risk a jam up...so use callipers.
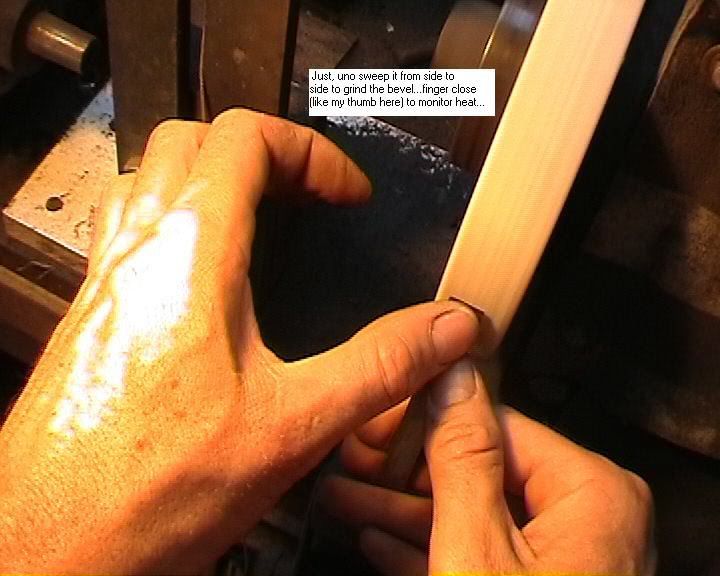
Anyway, this is how I ground my plough blades flared.
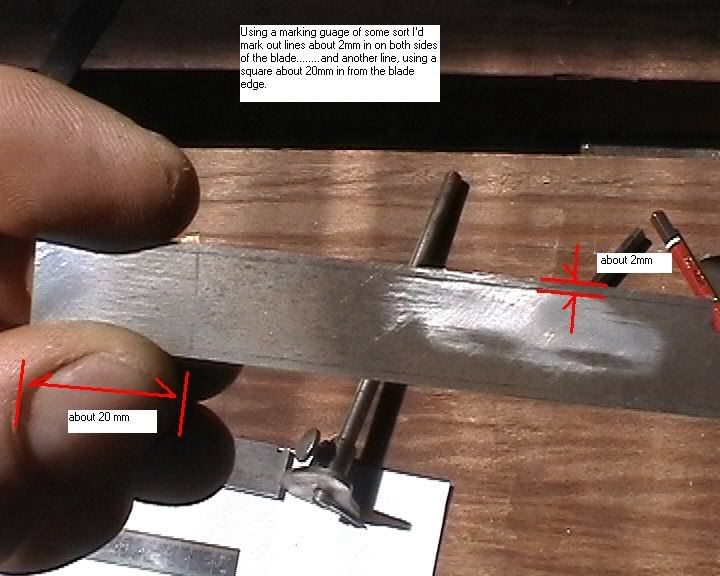

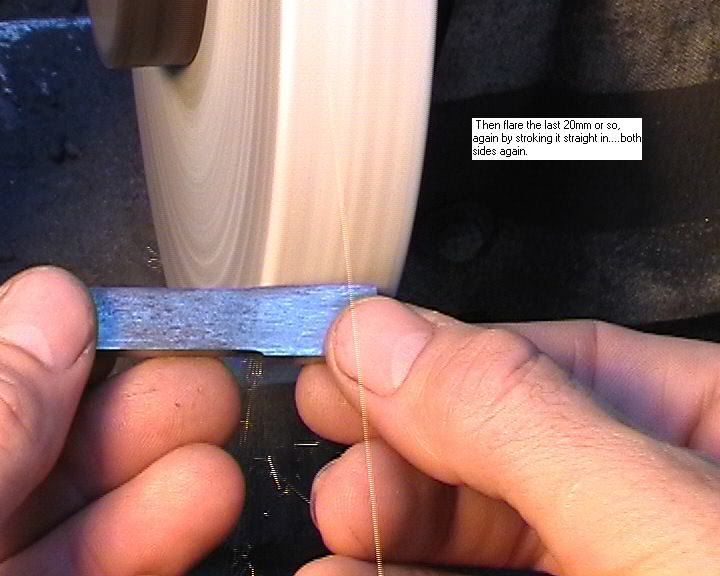
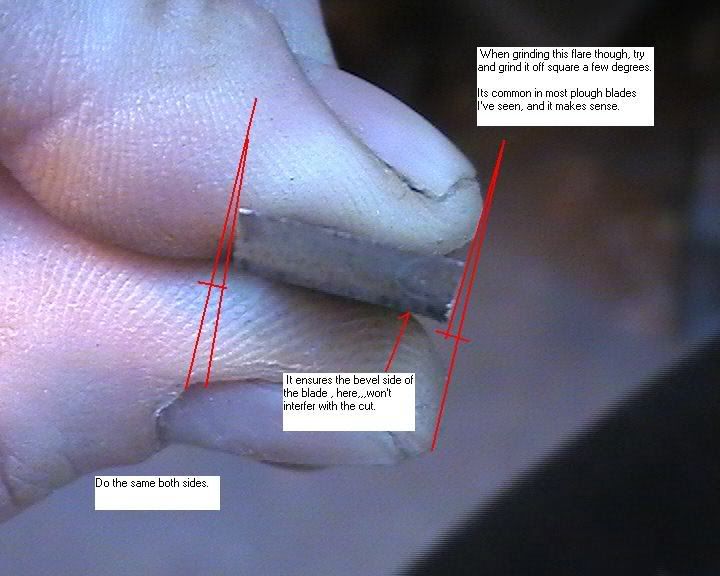
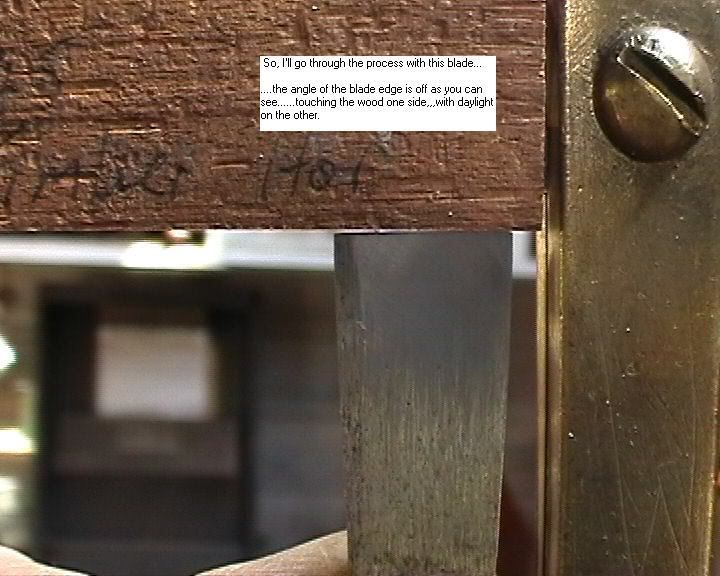
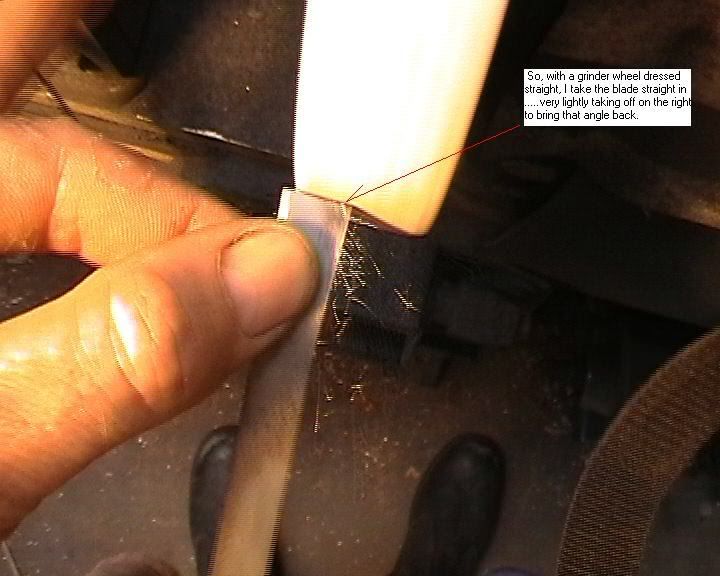
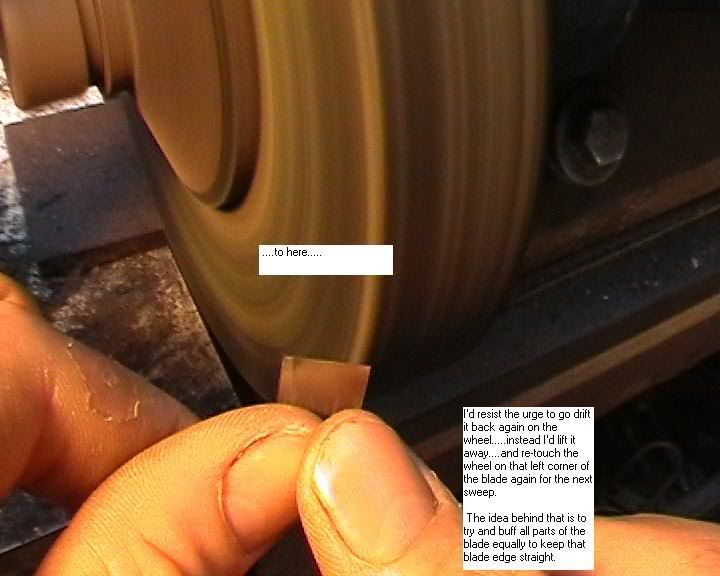
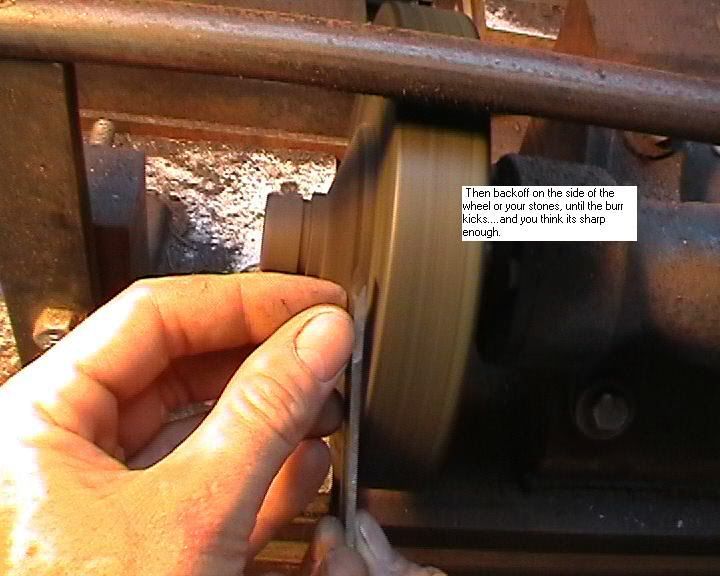
Sharpening the blades
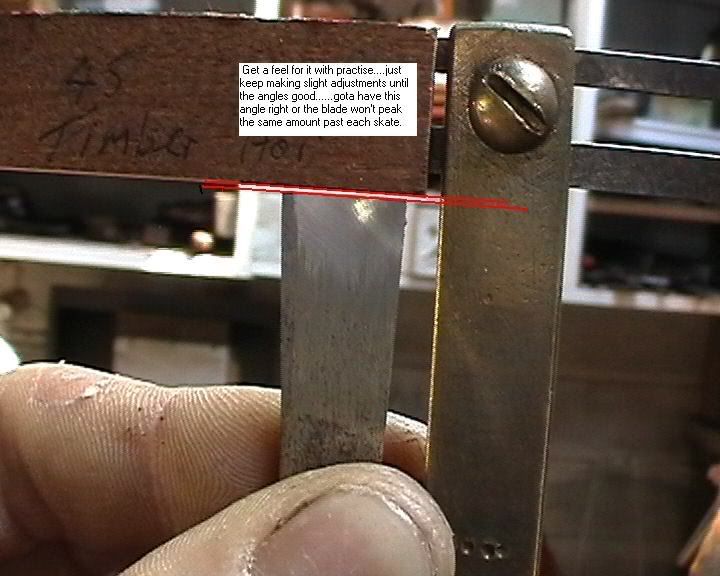
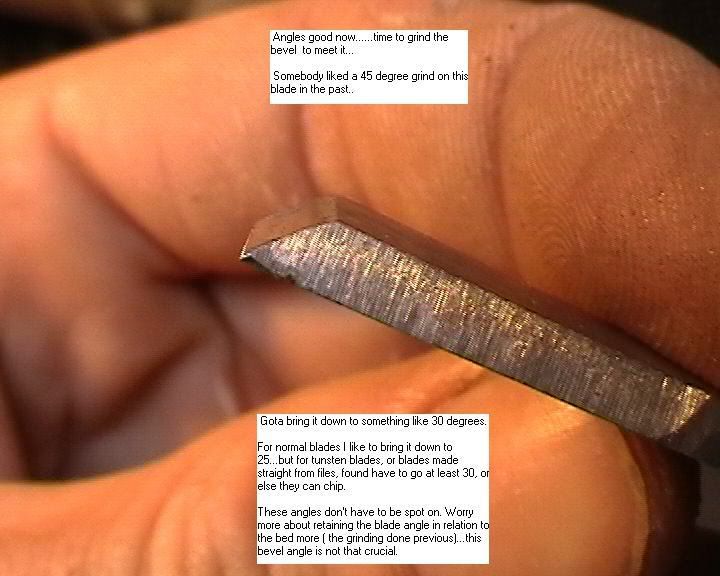
Now that the blades are flaring at the sides, have to think about sharpening the business end of the blade right. Which will no doubt take some practise. But its worth learning.
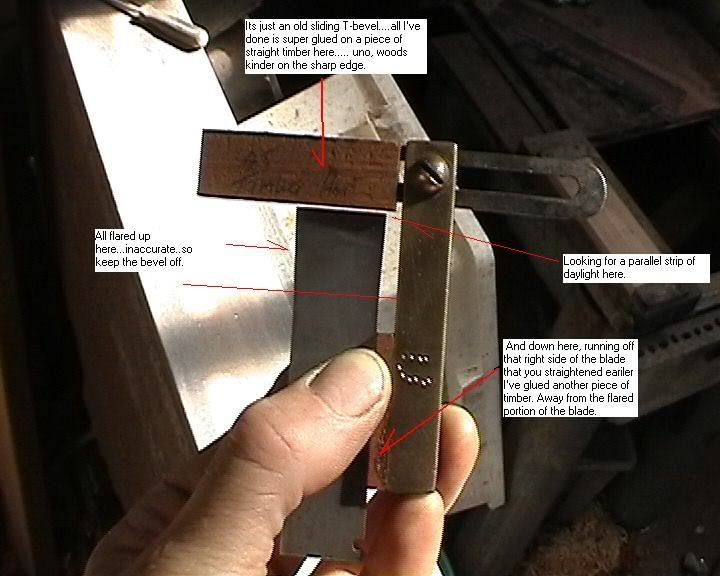
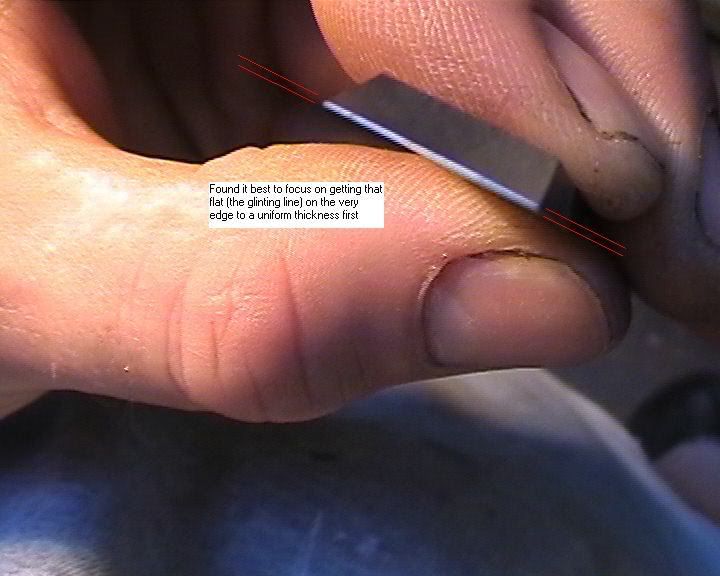
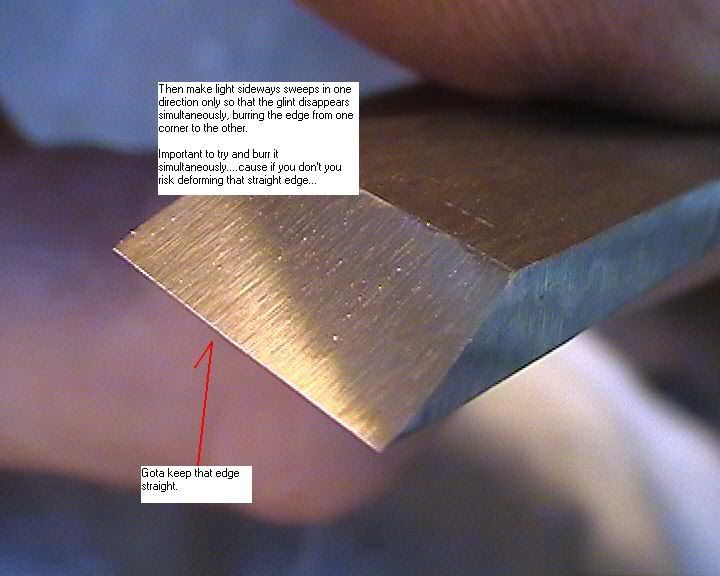
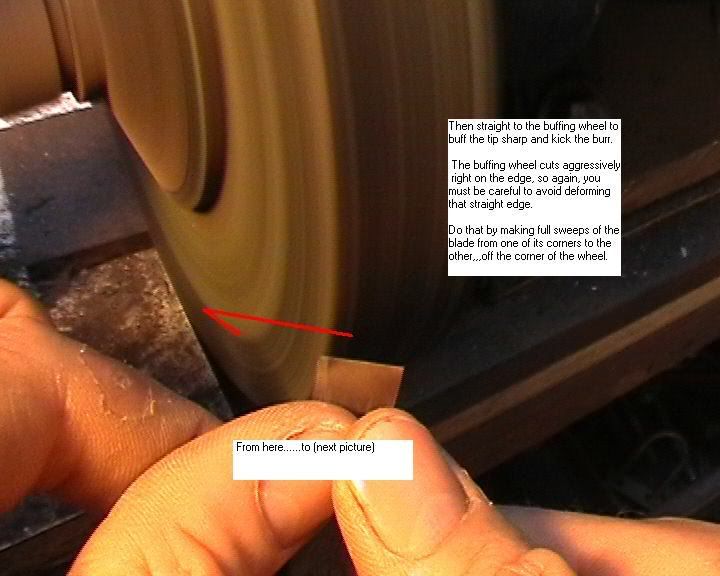
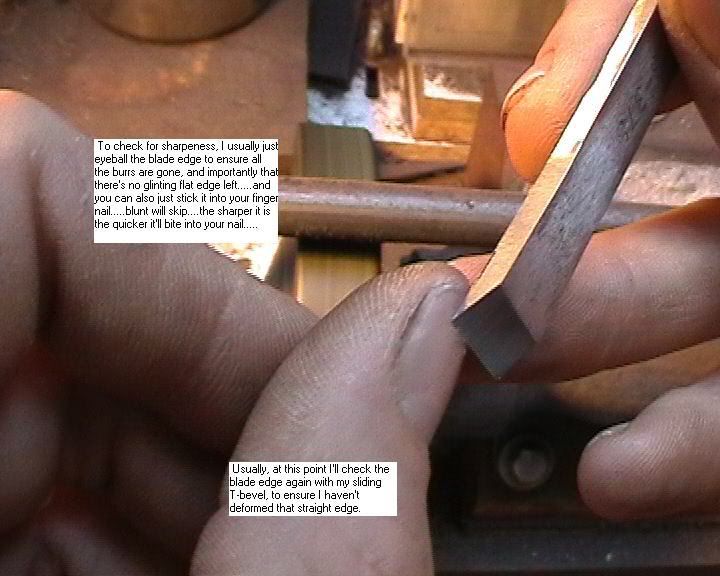
I grind my blades freehand. Its just an uncomplicated method I find appealing. But I suppose you could do it with some clever honing guide.
Ultimately in a nut shell, this is how the blade edge should present to the wood in order for it to cut well with accuracy.
I feel the need to have a tool to make frequent checks while sharpening to ensure alls well..... This is what I use.
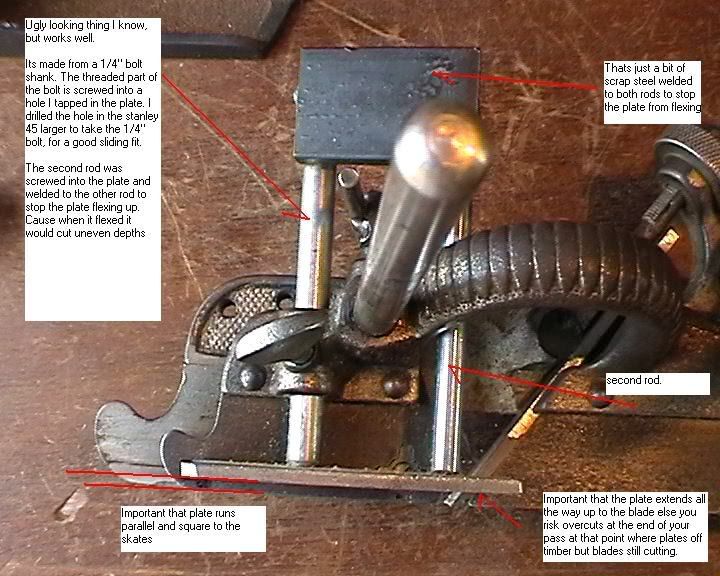
Depth stops
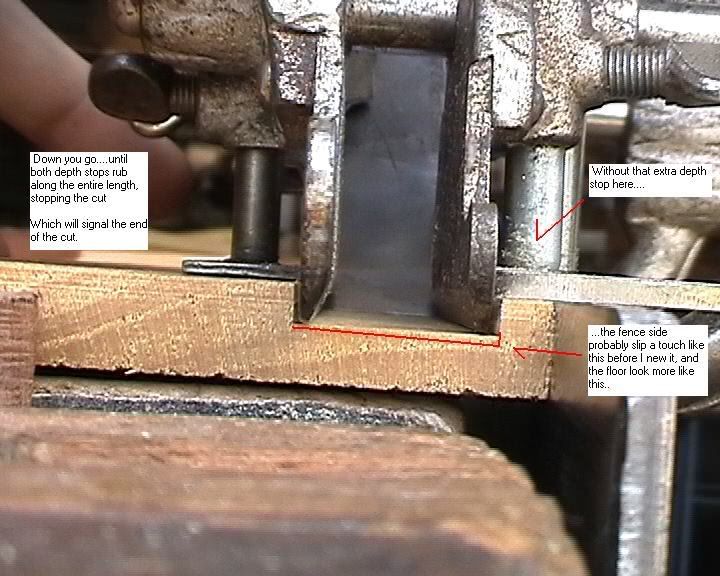
Ideally I think you should use 2 depth stops. Can get away with only using one for the smaller blades, but I'd say you'd have to be pretty talented to get consistantly good results using just one depth stop with the wider ones.
The presence of a second depth stop will ensure the floor of your plough cut runs parallel to the face. See, if you've only got one depth stop, when it rubs the timber, the planes encouraged to rock over, overcutting the floor...ie. its being held up on one side. Can be hard to avoid, especially with a wide blade.
The problem though is that most ploughs don't have a good second depth stop design (IMO)...
So I made a second depth stop especially for my stanley 45. Here it is....
And this is how I setup my depth stops.
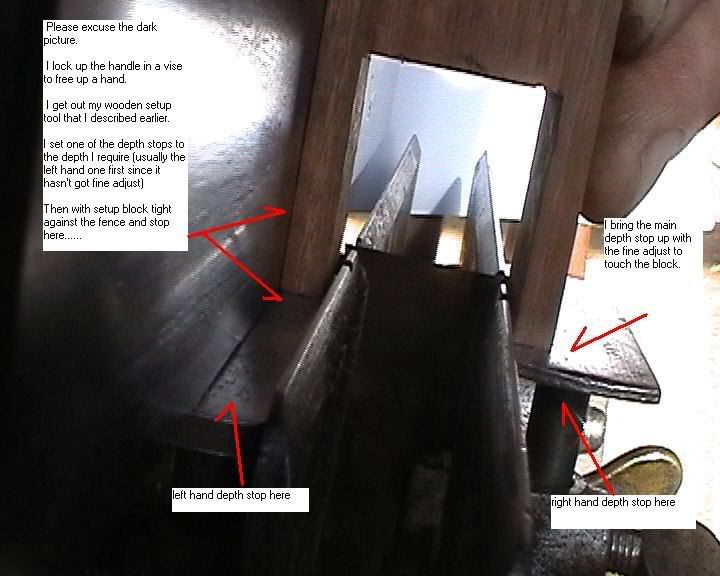
Set your fence distance.
Now everythings set......... there shouldn't be any need for test cuts.
- fence running perpendicular to skates and depth stops
- depths stops at the same height
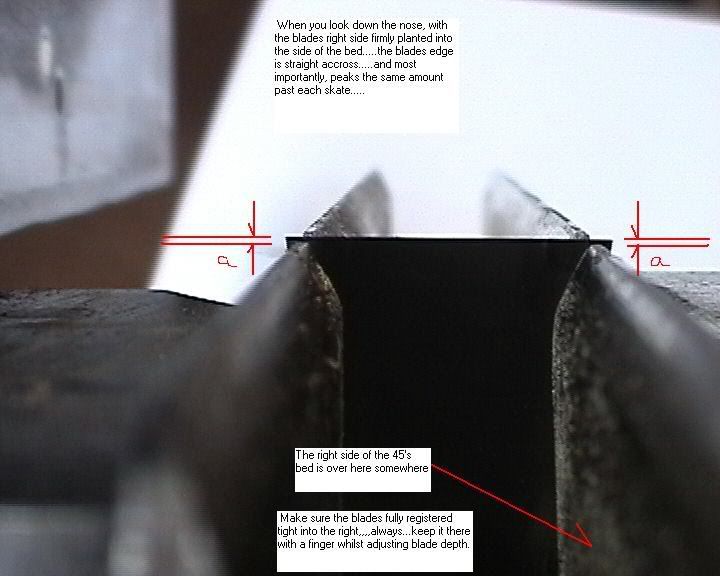
- blades peaking the same amount past each skate
- blades flared for good clearence
- blades edge straight and sharp
Make your cut
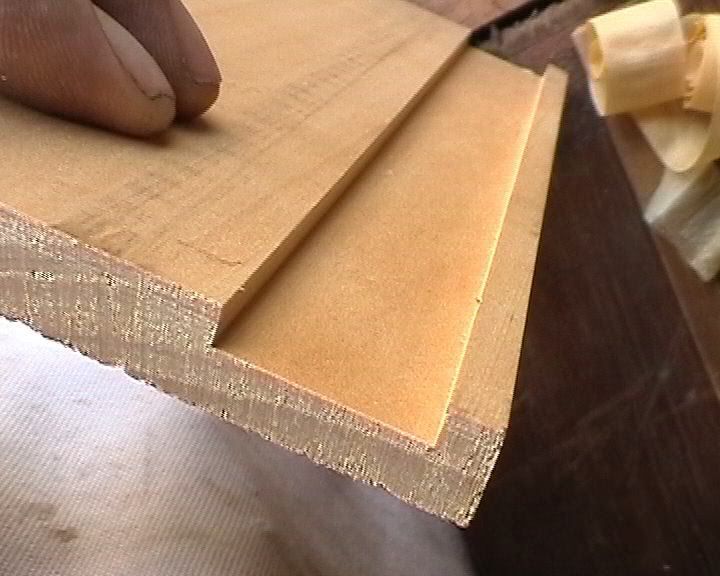
So, probably best to start with a fine shaving to get a crisp looking shoulder.
Then to speed up, coarsen the shaving maybe...fine up again as you near depth....or just stick with one blade setting all the way through....up to you. Spose that depends on how polite the wood is.
Have to keep the plane as verical as possible.....
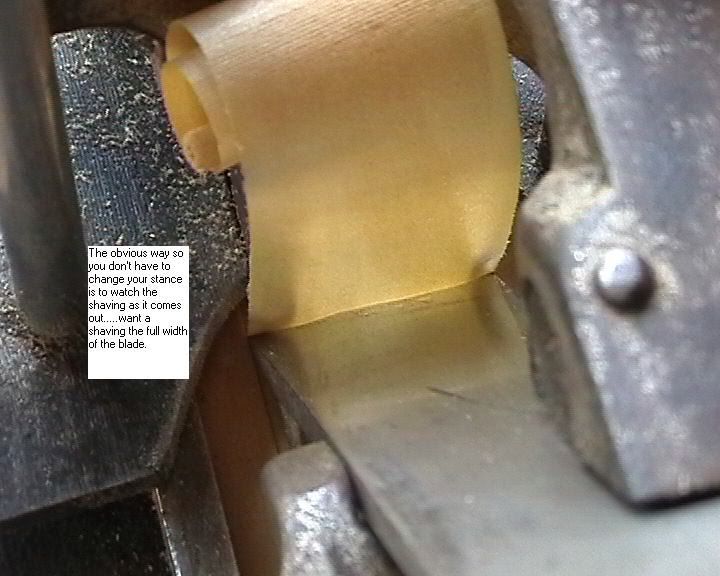
Despite that, you may be leaning over slightly every pass such that you end up overcutting one side too much after a few passes. ....so ever now and again I'd get my eye down close and inspect it so I know how to correct my style....
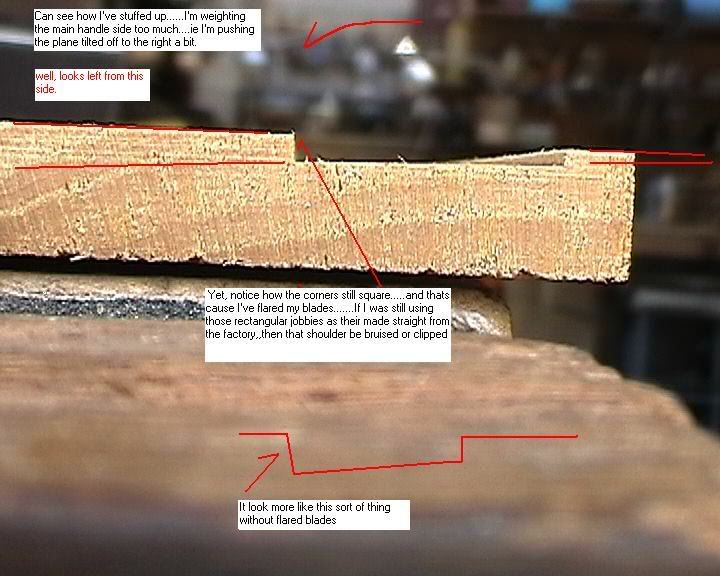 See,
See,
so the flared blade saved me.
So, there you go. No reason I think why one can't get consistant result like these everytime with a good plough plane.
-
24th January 2007 04:39 PM # ADSGoogle Adsense Advertisement
- Join Date
- Always
- Location
- Advertising world
- Age
- 2010
- Posts
- Many
-
24th January 2007, 05:02 PM #2
Bricoleur
- Join Date
- Jul 2005
- Location
- Toowoomba Qld.
- Age
- 65
- Posts
- 2,792
Thanks for that Jake, excellent post as usual! I was lucky enough on the weekend to see the modified plane in action, and it really does work a treat. Quick and accurate, without the noise and dust of a corded version.

My only comment would be the squaring of the cutter on the grinder when you've lost the 90* reference by taking off the sides. I'd be lost there, and would probably make a jig or something to hold it.
I think I'll drag out my Record and have a look at a couple of things, like the second support for the depth stop, and an extended side plate. It might even get used again, seriously!
Only scoring a supporting role here, Jake's grinder setup is really something to behold in the flesh!!
Cheers,Andy Mac
Change is inevitable, growth is optional.
-
24th January 2007, 05:43 PM #3
GOLD MEMBER
- Join Date
- Aug 2004
- Location
- Lost in Space
- Age
- 53
- Posts
- 2,406
Inspiring stuff JAke Thx
Absolutely awesome post Jake.
I'm often in owe of your ideas n the way you weild various archaine Handtools with finesse n style. Its great to have our own version of Bob Smalser right here on the Aussie Woodwork forums.
....................Fantastic Stuff n thanks ssssooooo much for passing on your skill n ideas
Dam you tripper now I want to get a No 45 n Copy your mods................The Darkside calls
This is "Best of the Best" Material....................Green on the way!
Regards Lou
.....................Now where can i pick up a No 45? ANy ideas? Just Do The Best You Can With What You HAve At The Time
-
24th January 2007, 06:20 PM #4
Senior Member
- Join Date
- Sep 2006
- Location
- Bookham, Surrey, UK
- Age
- 79
- Posts
- 137
Hi Jake,
That is absolutely brilliant Your ability to analyse problems and come up with solutions that work never ceases to amaze me. Thanks for sharing that
Cheers
Paul
-
24th January 2007, 06:40 PM #5
GOLD MEMBER
- Join Date
- Mar 2005
- Location
- In the shed, Melbourne
- Age
- 52
- Posts
- 6,883
G'day Jake,
Again you continue to take the time and care to both photograph the WIP of how you adjust your planes your way with great notes to accompany them by way of not only getting things set up the way you want them, but also helping us poor sods to try and get the same results.
I think I should just have a post written and saved for your threads so I can just copy and paste.
Brilliant stuff. Fanbluddytastic.

-
24th January 2007, 07:26 PM #6
Neander Normite
- Join Date
- Jan 2005
- Location
- Melbourne
- Age
- 65
- Posts
- 11,997
-
24th January 2007, 07:33 PM #7
Banned
- Join Date
- Apr 2005
- Location
- kyogle N.S.W
- Age
- 50
- Posts
- 4,844
Ta everyone..... thrilled I made sense for a change.
yeh, see what you mean.....there probably is a better way like you say. Originally Posted by Andy Mac

Maybe scribe a line off on the blade with pencil and grind to that line ?? ...I do that sometimes.
That veritas jig maybe ? ...I've never used one though. I don't know.
-
24th January 2007, 07:48 PM #8
Novice
- Join Date
- Feb 2004
- Location
- adelaide sa
- Posts
- 23
fabulous stuff. when I have some time Im off to the 45.
Im not sure about the veritas jig--usually you have the side as a reference and then it all sets up nicely. Here if youve ground the edge skew you would have trouble ensuring it will sit in straight. You do have the back of the blade though...will have to have a look at the jig when home and have a think"In the field of observation chance favours the prepared mind"
-
24th January 2007, 11:35 PM #9

Super Moderator
Dodgy brother
- Join Date
- May 2004
- Location
- Pakenham, outer Melb SE suburb, Vic
- Age
- 54
- Posts
- 4,158
Fascinating stuff as usual, Jake, & good pics, esp. the sharpening & "money" shots at the end
Cheers..................Sean
The beatings will continue until morale improves.
-
25th January 2007, 08:48 AM #10
Ageing, balding,teenager
- Join Date
- Nov 2004
- Location
- Belfast, NI, UK
- Posts
- 40

Jasus, Murphy and Joseph, that's one FINE bit of work....Jake, "Thank you", yet again for the analysis of the problem, the synthesis of a solution and the elegance of its execution.
Yes, I did say "ELEGANCE" - my scientific training defines that word as 'the most solution with the least complexity' and by The Late J.C. himself, this is one ELEGANT bit of work.
If I'm ever blessed to win a ton of spondulicks, that'll be me knocking your front door with some 25 year-old Black Bush as a token of appreciation.
Cheers Mate, from one Chicken Shack Engineer to another - and yes, yours IS a fine emporium of first class woodworking.
-
25th January 2007, 11:58 AM #11
GOLD MEMBER
- Join Date
- Aug 2002
- Location
- Perth, WA
- Age
- 76
- Posts
- 2,078
Jake
That's one of the best illustrated tutorials I've seen anywhere, on the web or in a text book. Greenie launched!
ColDriver of the Forums
Lord of the Manor of Upper Legover
-
25th January 2007, 06:01 PM #12
Banned
- Join Date
- Apr 2005
- Location
- kyogle N.S.W
- Age
- 50
- Posts
- 4,844
Ta guys....
-
27th January 2007, 06:25 AM #13
Moderate Moderater
- Join Date
- Feb 2006
- Location
- Lindfield N.S.W.
- Age
- 62
- Posts
- 5,643
Jake
This is brilliant! I just got back from a short break with the family and found this!!! I read it quickly last night and again this morning - the family think I'm nuts
A great photo tute and a wonderful explanation.
One thought. As I understand your setup, the flare goes right to the cutting edge. This means that as you sharpen the edge in the future, its width will reduce as you grind down the flare. So the cutter will cease to be the right width. I know we are only talking microns here, but do you think that ending the flare a mm from the edge would lose the benefits of having it?
I suppose that if you have to keep the flare right up to the edge, when you have sharpened a cutter so often that it isn't the width that you want, you use that cutter as a blank for the next width down (ie 3/4" cutter will become the blank for a 23/32", then 11/16", then 21/32", then 5/8" and so on..)
Virtual greenie sent (I need to spread the lerv more before you can get another!!!). Thanks again for sharing your ideas and results with us.
Cheers
JeremyCheers
Jeremy
If it were done when 'tis done, then 'twere well it were done quickly
-
27th January 2007, 07:33 AM #14
Banned
- Join Date
- Apr 2005
- Location
- kyogle N.S.W
- Age
- 50
- Posts
- 4,844
Thanks Jeremy.....quite relieved it was understood. Always a gig fear of mine for some reason. Originally Posted by jmk89
yep, I think your right.....the width of the cut will gradually reduce with sharpenings... but even if its used regularily we're probably talking years......tell you the truth, seeing people wear out there plough blades would be great.
So, when your looking for a plough cut have to choose the blade from the set that closest resembles the width you want, and work it. Just have to accept those dimentions as fixed.
..shouldn't matter though. Its a priority for me that I get good cuts first, else, concede to using that noisy router.


 Reply With Quote


Similar Threads
-
The Orange Block Plane a review
By derekcohen in forum HAND TOOLS - UNPOWEREDReplies: 18Last Post: 13th July 2006, 08:35 PM -
Modifying a record 43 as a dovetail plane
By JDarvall in forum HAND TOOLS - POWEREDReplies: 27Last Post: 28th June 2006, 07:43 PM -
What do you use as Winding Sticks?
By derekcohen in forum HOMEMADE TOOLS AND JIGS ETC.Replies: 17Last Post: 6th June 2006, 03:41 AM -
Lie-Nielsen and the National debt.
By monoman in forum HAND TOOLS - UNPOWEREDReplies: 55Last Post: 31st August 2005, 07:43 PM -
Holtey Classic Hand Planes
By steve54123alt in forum HAND TOOLS - UNPOWEREDReplies: 13Last Post: 27th April 2005, 05:25 PM
