

 Thanks:
  Likes:
  Needs Pictures: 0
 Picture(s) thanks:
Results 1 to 15 of 33
Thread: Laminated Mallet
-
3rd September 2020, 11:53 PM #1
 Senior Member


- Join Date
- Oct 2019
- Location
- Brisbane
- Posts
- 141
 Laminated Mallet
After a few painful miss-hits while working with chisels & a steel hammer combo, I decided to make a mallet out of scrap spotted gum. The inspiration was from Paul Sellers' YT video, but the prospect of cutting a mortice for the handle insert was a bit daunting. So I cheated and ended up making a laminated version instead. The stock was cut to size on a table saw and the handle recesses were done using a combination of hand saw, chisels, and a 71 router.
Rudimentary skill and limited shed time meant that the recess took a whiiiiiiile to complete and the two halves were only glued together a few weeks later. That was when I noticed that the two faying surfaces no longer matched (shrink / tension release after cutting / wet wood?). Tried to level the two surfaces the best I could with a plane. It's nowhere near perfect, but a couple of clamps did the trick while gluing up using titebond red. I left the clamps in place for a week before shaping the head & handle with a rasp, block plane and spokeshave. Even though there were countless tear and chipped marks (couldn't get the irons sharp enough for the life of me), it's finally finished and I was as happy as Larry.....
IMG_20200830_162226145.jpg
....... until a week later when this gap appeared!
IMG_20200830_162301236.jpg
I did expect the mallet to fall apart soon-ish, but after one mere week?!
It has almost been a month since the second photo was taken and the gap has not grown any wider. No doubt it's due to the lack of finesse in the built, but I wonder if the type / moisture content of the wood or the time delay before gluing would have contributed to this? Might have to bite the bullet and make a new one with a solid head... one day.
Andy
-
3rd September 2020 11:53 PM # ADSGoogle Adsense Advertisement
- Join Date
- Always
- Location
- Advertising world
- Posts
- Many
-
4th September 2020, 06:26 PM #2
Senior Member
- Join Date
- May 2018
- Location
- South Australia
- Age
- 54
- Posts
- 271
That looks to have failed on the glue joint, in my limited experience, spotted gum isn�t the easiest wood to glue. I have had success using titebond 3 after cleaning the surfaces with acetone.
Cheers Andrew
-
4th September 2020, 10:44 PM #3
GOLD MEMBER
- Join Date
- Nov 2004
- Location
- Millmerran,QLD
- Age
- 73
- Posts
- 11,135
Andy
As AJ said, Spotted gum is a difficult timber to glue. It requires very high clamping pressure, it seems that most people prepare the two surfaces (either by planing or sanding) and glue up as soon as possible immediately after preparation and wiping down with acetone is also recommended.
However, bearing in mind the above comments, it may be a big ask to expect this style of mallet to hold together under extreme provocation, which of course is the intended use. A couple of mechanical devices might be advisable too. These could be either timber or brass dowels. The brass dowels would look good and can be cut a little longer than necessary by about 2mm each side and peened over into a ready formed countersunk hole.
Regards
PaulBushmiller;
"Power tends to corrupt. Absolute power corrupts, absolutely!"
-
4th September 2020, 11:11 PM #4
GOLD MEMBER
- Join Date
- Mar 2018
- Location
- Sydney
- Posts
- 1,166
I'm interested to know how much side-to-side taper is on the handle? In this case that too is working to apply pressure against your lamination joint, so it could have applied more force than you needed if the handle was a touch wider than the mortice...
-
5th September 2020, 01:04 AM #5
Dances with splinters
- Join Date
- Jul 2005
- Location
- Oberon, NSW
- Age
- 63
- Posts
- 13,360
It's all been pretty well covered above, but movement may also have been an issue.
You say you noticed it had warped so you flattened it again... it would probably have been in your best interest to put it aside for another couple of weeks to see if it kept moving.
Personally, for whacking chisels and stubborn pieces of wood I tend to go for the round "carver's" type of mallet.
I have an old Merbau handle I turned up years ago, leaving half it's length square. I glue WRC onto this and then give it a quick spin in the lathe to true it up. Falls to pieces fairly quickly but it's very easy to rebuild and, being sacrificial, doesn't mark whatever I'm whaling on.
- Andy Mc
-
5th September 2020, 08:05 AM #6
Senior Member
- Join Date
- Oct 2019
- Location
- Brisbane
- Posts
- 141
Thanks Andrew, Paul, poundy and Andy Mc for the feedback.
Good to know the acetone tip. Following your comments I did a quick search on "gluing spotted gum" and realised that the wood is 'oily'. Lesson learnt.
Dowel is a good idea, will give it a go.
The taper on the handle is 1/28 (approx. 2 deg). Though I tried to cut the mortice accurately to the line, it is very possible that the taper on the mortice is a hair narrower (if not more!).
I still have some scrap spotty left, will try making some test cuts and see how long it takes before the warp settles.
Andy
-
6th September 2020, 09:39 AM #7
GOLD MEMBER
- Join Date
- Mar 2004
- Location
- Brisbane (western suburbs)
- Age
- 77
- Posts
- 12,126
PVA type glues like Titebond are subject to 'creep', i.e., they remain partly plastic for a long time, and will give under constant loading, such as would happen if your S.G. head wanted to shrink but the handle wood was drier and didn't want to shrink with it.
I've always been suspicious of laminated mallets, but then I don't treat mallets very kindly, like Skew, I regard them as sacrificial tools. But I've had my favourite mallet for 25 years - it's only had a couple of new handles & 6 new heads
I tend to get a bit carried away making worked-oval handles on the lathe for mine, but you can make a perfectly comfy handle from a square section with a few minutes of rasping or spokeshaving & some sandpaper. Ironbark mallets.jpg
Round "carvers' " mallets take but a few minutes to cobble up if you have a lathe. Carvers mallets.jpg
It's a bit more work to make one by hand, but quite do-able. They are good for beginners because the short handle & balanced head makes it easier to learn to strike accurately without watching the head of the chisel & you can watch what's happening at the pointy end. And if you do mis-hit and contact flesh, it's usually just a glancing blow that doesn't do the sort of damage a steel hammer can do!
Not to sound too much like grandpa, but it really isn't all that difficult to chop a mortise through a block of spotted gum to make a solid head. Drill a couple of holes through the block using the largest bit that will fit comfortably within the layout lines and then work away steadily from each side with a sharp chisel until you get a reasonably straight mortise. The mortise doesn't have to look pretty inside, & if the hole tapers a bit from each side to the middle, so much the better, you can drive the handle in so it's tight at one end, then wedge the other, and it should stay tight forever.
Cheers,IW
-
7th September 2020, 10:43 PM #8
Senior Member
- Join Date
- Oct 2019
- Location
- Brisbane
- Posts
- 141
Thanks for your extensive explanation, IanW. Appreciate it!
The carvers' mallets look really comfy to hold, will be one for the future to do by hand (I don't have a lathe).
I think you've convinced me to make a solid head spotty! Another one to add on the ever increasing to-do list.
Andy
-
7th September 2020, 11:13 PM #9
.
- Join Date
- Feb 2006
- Location
- Perth
- Posts
- 27,791
I only recent made an all wooden carvers mallet, tis indeed the ducks nuts Originally Posted by Andy_B

MAllet3.jpg
12 years ago I made this one - have hardly used it.
IMG_8178.jpg
A few others
mal2.jpg LCMallet.jpg BobsTools2.jpg IMG_4844p.jpg Frethammer.jpg Lgemalletsp.jpg SmallMallet.jpg
-
8th September 2020, 08:39 AM #10
GOLD MEMBER
- Join Date
- Mar 2004
- Location
- Brisbane (western suburbs)
- Age
- 77
- Posts
- 12,126
 There's summat about mallets, isn't there, Bob? I used to bring home likely-looking wood from MIL's firewood pile. I reckoned if the splitting maul was still bouncing off a block leaving a bare indentation on the 4th strike, it was meant for a mallet head, not the fire. A firewood billet is long enough for two heads after trimming any end-checks, so I generally made them in pairs. MIL stopped using the fire a couple of years ago, & even though I frequently give/trade them away, I've still got a carton full of the darn things........
Pr.jpg
Cheers,IW
-
8th September 2020, 09:19 AM #11
GOLD MEMBER
- Join Date
- Mar 2008
- Location
- Hobart, Tas
- Posts
- 1,211
I don't think laminations are inherently a bad idea, just not ideal.
When I wanted to make my first mallet I didn't have a large piece of timber for the head, so laminated four square sections together with normal white PVA. It's significantly battered and bruised and has withstood some serious walloping.
20200908_080451.jpg 20200908_080501.jpg 20200908_080542.jpg
Sadly it sees less and less action since buying my Thor earlier this year (or was it late last year?). It has none of the romance of a wooden mallet and is a bit of an ugly duckling in comparison, but boy is it a pleasure to use.
20200908_080630.jpg
Perhaps I should make another one for fun, and use Ian's idea of firewood for the blank. A nice wooden mallet does look lovely.
-
8th September 2020, 09:25 AM #12
GOLD MEMBER

- Join Date
- Oct 2018
- Location
- Dandenong Ranges
- Posts
- 1,892
Hi Bob. I love this one. What species is the wood? Originally Posted by BobL
-
8th September 2020, 10:23 AM #13
.
- Join Date
- Feb 2006
- Location
- Perth
- Posts
- 27,791
Olive. Originally Posted by Mountain Ash
It has the most marvellous tactile natural to it making it suitane not only for mallets and tool handles but also kitchen utensils.
I've made quiet a few kitchen things with olive. This big spoon was made for a family member who works in a service kitchen.
BigSpoon.jpg
-
8th September 2020, 10:57 AM #14
Be inspired. Be creative. Be bold.
- Join Date
- Apr 2001
- Location
- Perth
- Posts
- 10,821
Mallets are such a personal thing.
There are three main factors that influence my choice in mallet design: the first is the shape - a flat over a round face. I have made round, carver�s mallets in the past. I have a beautiful Blue Spruce version. However, they are vulnerable to glancing strikes.
The second factor is the weight. For Australian hardwoods, I find around 18oz is about right.
Thirdly, the handle design can be crucial. It needs to not be a �stick� and, rather, offer both a secure grip as well as one that is not fatiguing (which occurs when having to hold it too tightly.
For most chisel work I use a modified Veritas Cabinetmaker�s mallet. This weighs around 18oz. The wooden infill is faced with UHMW. This provides a great balance between hardness and cushioning. There is no lack of feedback, an insignificant reduction of energy, and no jarring. The handle has the ergonomics I like ...
This mallet is good for both bench- and mortice chisels. I try not to wack chisels too hard - which is difficult in my local woods - and the trick is to take fine slices to preserve the edge.
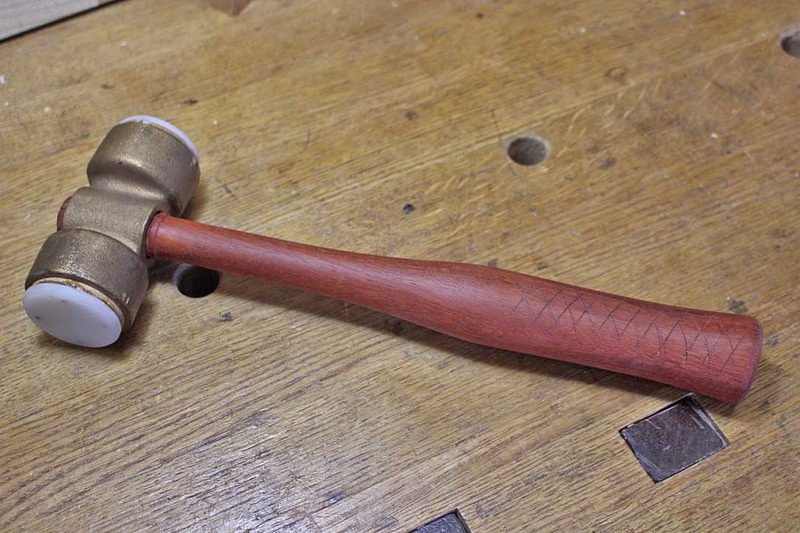
Occasionally used is this 36oz persuader I built ...

Regards from Perth
DerekVisit www.inthewoodshop.com for tutorials on constructing handtools, handtool reviews, and my trials and tribulations with furniture builds.
-
8th September 2020, 10:21 PM #15
Senior Member
- Join Date
- Jun 2014
- Location
- Foot of the Dandenong Ranges
- Posts
- 270
Hi Derek,
I love your "persuader" mallet. What "ingredients" did you use to construct it?
Lyndon

 Reply With Quote


Similar Threads
-
Mallet - what was it used for
By Therapy in forum HAND TOOLS - UNPOWEREDReplies: 4Last Post: 20th October 2018, 08:44 AM -
Mallet
By qwertyu in forum WOODWORK - GENERALReplies: 18Last Post: 29th September 2018, 10:42 PM -
That's not a mallet!
By IanW in forum HAND TOOLS - UNPOWEREDReplies: 14Last Post: 1st August 2015, 07:27 PM -
Another Mallet
By niki in forum HOMEMADE TOOLS AND JIGS ETC.Replies: 6Last Post: 6th May 2007, 02:53 PM
