

 Thanks:
  Likes:
  Needs Pictures: 0
 Picture(s) thanks:
Results 16 to 30 of 34
Thread: Making a mallet or hammer handle
-
18th January 2015, 03:16 PM #16
 GOLD MEMBER


- Join Date
- Jun 2008
- Location
- Victoria, Australia
- Age
- 74
- Posts
- 6,132

Talking about making handles, making axe handles with an axe... https://www.youtube.com/watch?v=s-dEJdyXj34
He demonstrates the crook knife for shaping at around 7:10 .. having watched him use it, tempts me to make one.
Ray
-
18th January 2015 03:16 PM # ADSGoogle Adsense Advertisement
- Join Date
- Always
- Location
- Advertising world
- Age
- 2010
- Posts
- Many
-
18th January 2015, 05:32 PM #17
GOLD MEMBER
- Join Date
- Mar 2004
- Location
- Brisbane (western suburbs)
- Age
- 78
- Posts
- 12,186
 Making a handle using off-centre turning...
Wheelin' got me thinking, perhaps I should make a handle or two using the off-centre method, if only to see if I could remember how!

So here we go, I roughed out a blank about 42mm square (a bit smaller than ideal, as I soon discovered). To figure out my dimensions, I first drew a 37mm circle on one end, to mark the major diameter I wanted the handle to be: 01.jpg
OK, that sets one parameter. Now, I want to establish the 'off' centres to turn the sides. I want the handle to be about 25mm or a little more thick, so I marked off 12.5mm from the centre, then made a couple of marks on the major diameter where I thought the arc of the sides should meet it: 02.jpg
A bit of trial & error with the compasses and I determined that a radius of 30mm would give me the curve I wanted, which is I when I realised I should have made the blank bigger!: 03.jpg
Well, can't be helped - I'll just have to turn very lightly to avoid the drive spur shearing out (wished I had one of them fancy Steb drives like in the video I linked to above). To ease matters a little, I first did as much of the centre turning as I could, which almost sunk me, as I took a bit more off than I planned, and reduced the margin of the off-centre holes a fraction more! 03a.jpg
Then I got carried away, concentrating on what I was doing, & forgot to take pics of the next couple of steps. But there's nothing much to show anyway. Don't forget to reposition the tool support (I managed to remember), and you have to cut obliquely from drive end (off-centre) to the front, to compensate for the reduction in 'off-centeredness'. In retrospect, It's probably easier to turn the sides with both ends off-centre, I thought I was saving myself a step, but I wasn't. It was after I'd put the handle back on centres to blend in the neck & sand it that I had one of my rare Eureka moments. Since I had the darn thing in the lathe, why not turn the end tenon and simply drill a single hole in the head, & make the job as simple as possible? The only reasons I can think of for using a squared tenon is that it helps align the handle (more on which, shortly). So I done it, & turned a 7/8" tenon instead of the 25 x 22mm end I'd prepared. Here's the handle, ready to fit: 04.jpg
I drilled the prepared head, & flared the hole a bit at the exit side with a modellers' rasp: 05.jpg
Then sawed a slot for a wedge and banged it all together. I over-flared the top of the hole a bit, and wasn't careful about sawing the wedge slot straight across, so it's not exhibition perfect, but my handle is locked on very solidly: 06.jpg
All fairly easy & straightforward, however, just for comparison, I made a second mallet, using my one-centre method. It took a little more rasping to form the oval than the bit of hand work needed to complete the off-centre turned handle, but overall, it was much faster for me to do it the lazy way. You'll notice I didn't make the oval as flat as the off-centre turned handle, which was deliberate, as I prefer the handle to be a little fuller: 07.jpg
You may ask, why has it taken me 35 years to realise I could simplify attaching handles by using a round tenon (I've had a lathe of some sort for that long)? I dunno . I was blinkered by the way my father did it, I suppose (he never had a lathe until he was 80, so always made handles with hatchet, spokeshave & bits of bottle glass) & it just didn't cross my mind until today.....
 ")
Cheers,IW
-
18th January 2015, 07:45 PM #18
GOLD MEMBER
- Join Date
- Jun 2007
- Location
- North Of The Boarder
- Age
- 68
- Posts
- 16,794
Ian thanks for the additional comments and links I am surprised with Sordby's turning I thought it a little thin on the edge.
Your WiP showing setting out the narrow blank wasn't narrow at all I have done the same thing lucky I figured if I used the blank looking at it as diamond shape and set up across diagonal corner to corner gave me the width and thickness required. Hope that helps.
-
18th January 2015, 07:45 PM #19
GOLD MEMBER
- Join Date
- Jun 2008
- Location
- Victoria, Australia
- Age
- 74
- Posts
- 6,132
Looks good Ian, I'm not so sure about the round tenon, wouldn't that have a tendency for the head to rotate when belting away at something?
Ray
PS
Clever... also less timber to remove... Originally Posted by wheelinaround
-
18th January 2015, 07:53 PM #20
Be inspired. Be creative. Be bold.
- Join Date
- Apr 2001
- Location
- Perth
- Posts
- 10,872
Ray, as long as the round is elongated into a tapered ellipse, as Ian has done, then it should hold fast. Originally Posted by RayG

Here is a recent plane hammer I made - same deal ...
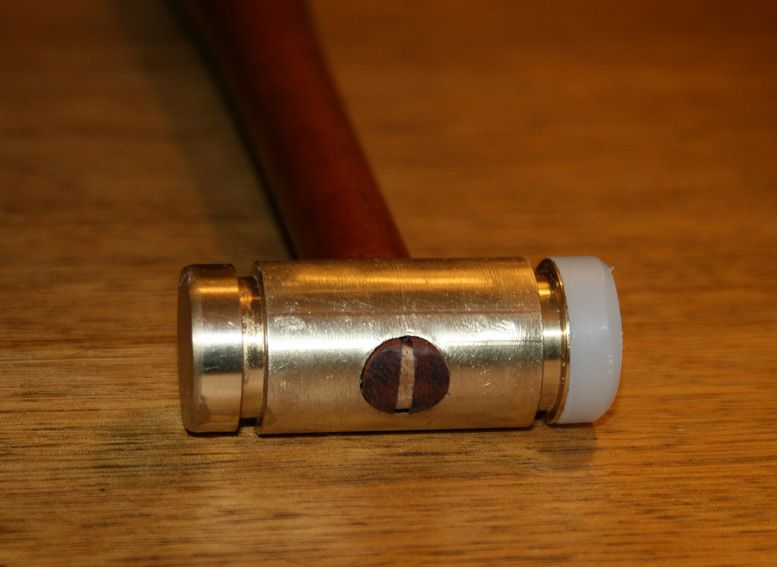
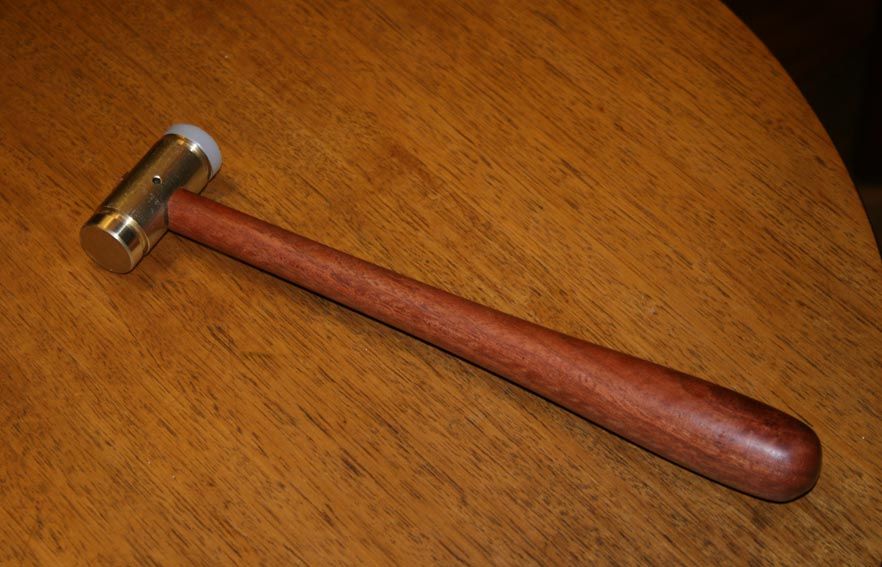
Nice thread, Ian
Regards from Perth
DerekVisit www.inthewoodshop.com for tutorials on constructing handtools, handtool reviews, and my trials and tribulations with furniture builds.
-
18th January 2015, 08:01 PM #21
GOLD MEMBER
- Join Date
- Mar 2004
- Location
- Brisbane (western suburbs)
- Age
- 78
- Posts
- 12,186
Ray, Wheelin' - the reason I didn't put my centres on the diagonal & cadge a bit more room was because I started out with a square tenon, and putting the centres on the diagonals would have skewed the handle 45*. Of course, I subsequently decided to go with the round tenon, so it wouldn't have mattered anyway! Originally Posted by RayG
And as to the head turning, I don't think it's too likely, Ray. I did consider the posibility, so I flared the hole fore & aft, to make it oval. I think it's pretty unlikely to swivel, but if it does, I'll have to figure out a better method. The eyes in the ball peen hammers I've re-wooded were only slightly oval each side & round in the centre, & none have given any trouble (so far.....).
Cheers,IW
-
18th January 2015, 08:15 PM #22
GOLD MEMBER
- Join Date
- Jun 2007
- Location
- North Of The Boarder
- Age
- 68
- Posts
- 16,794
Originally Posted by IanW
 It would only skew the two if you had already cut the rectangular/square tenon, but even looking back at pic it looks like enough meat to achieve it inline.
-
18th January 2015, 09:14 PM #23
Most Valued Member
- Join Date
- Aug 2010
- Location
- Horsham Victoria
- Posts
- 5,713
Nice job Ian
Dave TTC
Turning Wood Into Art
-
19th January 2015, 08:18 AM #24
GOLD MEMBER
- Join Date
- Mar 2004
- Location
- Brisbane (western suburbs)
- Age
- 78
- Posts
- 12,186
I had ! Originally Posted by wheelinround
 I made the four straight cuts on the bandsaw, because they were a bit too long for a tenon saw to reach - much easier to do that when the handle is still square...
Anyway, you're right, Wheelin', there was enough wood, 'cos it didn't fly out of the lathe, even when I had a very small catch. I was reminded how tricky it is to use a skew when it's only contacting the wood for about a third of each revolution - takes a steady hand!
And a final note, I won't be using off-centre turning to make handles as a regular habit. Doing the one above reminded me that it's wasteful. I needed a blank twice as wide as I'd use for my on-centre & rasp method where the blank only needs to be the width & thickness of the major & minor diameter of the oval desired. It offends my Scottish heritage no end to see all that potentially useful wood end up as chips & shavings!
CheersIW
-
19th January 2015, 08:34 AM #25
Most Valued Member
- Join Date
- Aug 2010
- Location
- Horsham Victoria
- Posts
- 5,713
For the sake of your Scottish heritage, not that I am ever known to be tight, I will have to investigate a way that it can be turned from close to your size blank.
Could be an Australia Day challenge. Might be cracking out the lathes
Dave the turning cowboy
turning wood into art
-
19th January 2015, 09:52 AM #26
GOLD MEMBER
- Join Date
- Mar 2004
- Location
- Brisbane (western suburbs)
- Age
- 78
- Posts
- 12,186
Not too big a challenge, Dave, depending on how you decide to meet it. Originally Posted by DaveTTC
The simplest way I can think of, would be to cut the blank to the minimum size that the oval will fit into, then glue a couple of short blocks of scrap on the end to place your centres in.
The most complicated way would be to build yourself an oval-turning chuck, as a friend in Victoria did (I think quite a few people have now made them, but Frank was one of the first, I reckon).
Either way, it's more faffing, & since I don't need to make handles very often (four in 3 days must be a record!), I'll just stick with the 'easy' way, from here on. But I'll be interested in seeing whatever you come up with, nevertheless.......
Cheers,IW
-
19th January 2015, 12:11 PM #27
GOLD MEMBER
- Join Date
- May 2007
- Location
- Sth Gippsland Vic
- Posts
- 4,468
I did a Redgum Handle for a spike I use, similar to a chisel handle , on a tool I call my Redgum spike.
I got a natural unintentional oval by turning it round while wet , straight off the tree wet.
A few months later I had a M N Oval .
A Mother Natures oval . They have slightly different proportions to the made made design .
Perfect
-
19th January 2015, 12:37 PM #28
GOLD MEMBER
- Join Date
- May 2007
- Location
- Sth Gippsland Vic
- Posts
- 4,468
The handle end measures 39mm across the wide part x 34mm across the narrow.
-
19th January 2015, 02:15 PM #29
GOLD MEMBER
- Join Date
- Jun 2007
- Location
- North Of The Boarder
- Age
- 68
- Posts
- 16,794
I wonder if you soaked a bit of timber and clamped it in a vice and at regular intervals tight the vice would it become perm oval Originally Posted by auscab
-
15th January 2016, 06:40 PM #30
 Franklin Ferrier
- Join Date
- May 2007
- Location
- Gold Coast
- Age
- 70
- Posts
- 2,747
I just rehandled an old ball-pein head I picked up. It was very rusty and after scrubbing a lot of rust off with a wire wheel, the only markings I could find were a J and the number 675. So I figure it is a European source 24oz hammer head.
I happened to have a new old stock spotted gum handle lying around that was a good fit. It all went together well with minimal shaping and a wooden wedge down the longitudinal axis nicely filled the eye. Unlike my cobbler's hammer mentioned above, I would describe the eye as being more bowtie shaped with a central straight section, rather than the cobbler's direct transition from wide flare in to wide flare out.
Being a rather heavy head I thought I had better add some metal cross wedges as well for security. So far the only source I can find for metal wedges is Bunnings at $4.50 a pair. This seems a lot for two small bits of steel and more than the head cost. Looking around I found Trade Tools sells handle (unknown species) and wedge sets for the same price, but unfortunately no loose wedges.
While I guess wooden handles are a dying artform, is there a cheap source these days for metal wedges? I'm guessing if Bunnings is the only store carrying a range of replacement handles and wedges, it will only be a few years before they disappear from their shelves as well.


 Reply With Quote

 lucky I figured if I used the blank looking at it as diamond shape and set up across diagonal corner to corner gave me the width and thickness required. Hope that helps.


Similar Threads
-
Plane setting hammer/mallet
By orraloon in forum HOMEMADE TOOLS AND JIGS ETC.Replies: 5Last Post: 31st October 2013, 11:39 AM -
Hammer Handle Lathe
By brendan stemp in forum WOODTURNING - GENERALReplies: 10Last Post: 8th January 2013, 01:54 AM -
Hammer handle wedges
By KevinB in forum WOODWORK - GENERALReplies: 7Last Post: 25th February 2010, 12:45 PM -
Making a mallet
By jmk89 in forum HOMEMADE TOOLS AND JIGS ETC.Replies: 21Last Post: 28th June 2009, 07:20 PM -
Turning a hammer handle?possible?
By glxman in forum WOODTURNING - GENERALReplies: 13Last Post: 25th April 2009, 01:49 AM
