

 Thanks:
  Likes:
  Needs Pictures: 0
 Picture(s) thanks:
Results 1 to 15 of 23
-
24th April 2023, 12:46 PM #1
 Be inspired. Be creative. Be bold.


- Join Date
- Apr 2001
- Location
- Perth
- Posts
- 10,826
 Manual for setting up the Veritas Skew Rabbet Plane
The Veritas Skew Rabbet Plane is one of the most important tools in my workshop. It is used to create fine rebates in drawer bottoms ...
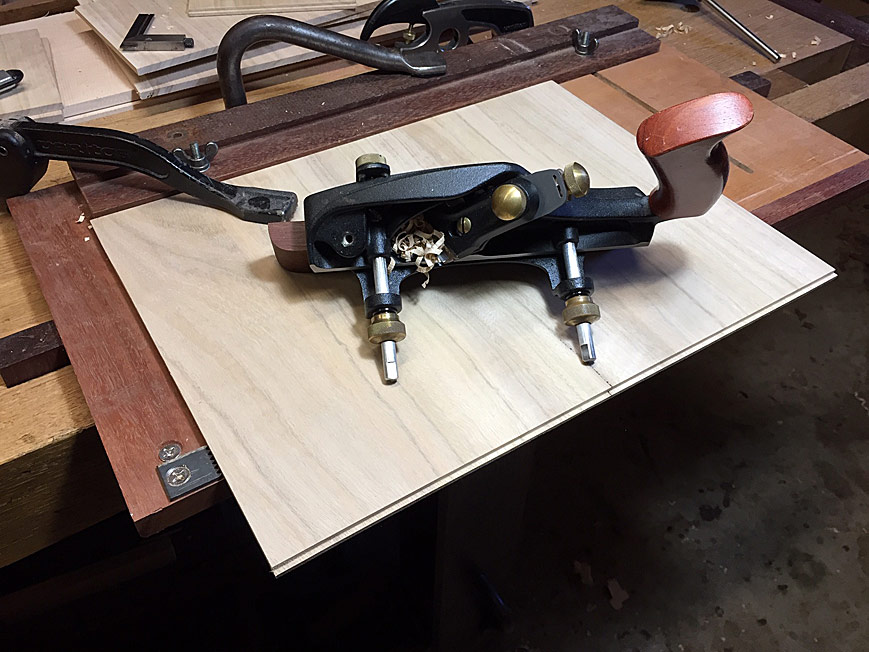
... and planing large rebates for the rear panels in cases ...

There has been some discussion about the difficulty in setting up this plane, in particular, positioning the blade and nicker. This is complicated by the skew blade, which is more tricky to sharpen to the ideal profile than a square blade. There is a significant advantage for a skew blade, which makes this worthwhile, this being that the plane will plane cleanly across the grain.
You will note that the front knob has been removed on my personal plane. I will explain this shortly, and advise that others do the same.

Two items here: the first is the sub-fence. This is 240mm x 40mm. It provides greater registration, while the wood offers less resistance. Secondly, the brass knob for the depth stop has been given a slot for a screw driver. This makes it easier to lock down more securely.
I have two fences, a straight one for rebate work, and an angled one for raised panels ...

There are two areas which are vulnerable to movement, which will be disastrous: the depth stop, above, and the fence, which is locked down by circular brass rings. It pays to tighten these further. I use a pair of plastic-mouthed vise grips (which will not damage the brass) ...

Inside the body is a screw ...

This controls the nicker. Loosen the screw and the nicker will slide in-or-out of the body. The nicker is used when planing across the grain. It sits ahead of the blade and creates a path for the blade to prevent tearout. It is not needed when planing with the grain.
It is the harmony of blade and nicker that determines how well the rebate plane with work:
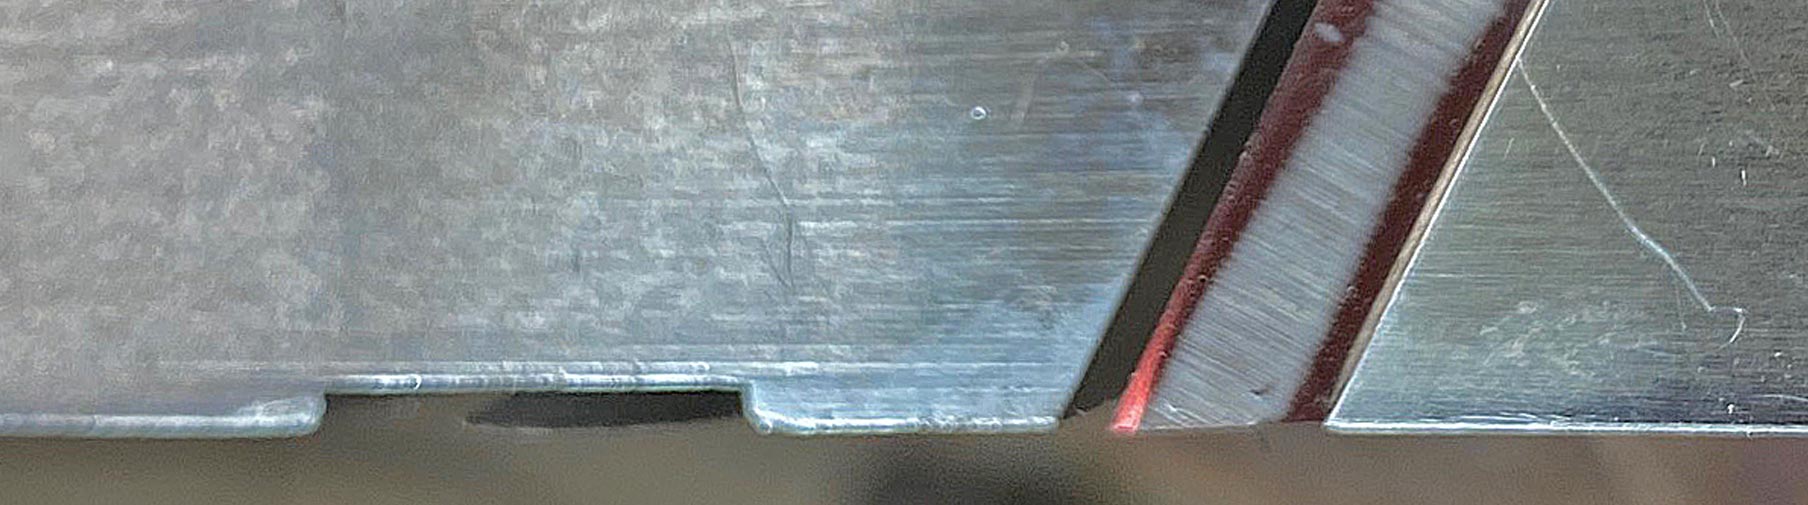
1. The blade must project a smidgeon (technical term for 0.5mm) from the side of the body. This is necessary to cut into the inside corner of the rebate. If it did not, the plane will be forced progressively away from the wall, creating a slope instead of a square face.
2. The nicker needs to be at, or slightly further away from the body than the blade. If the nicker is set too close to the body, it will not pre-cut for the blade, and the result will be tearout along the shoulder of the rebate.
3. The blade projection needs to be set parallel with the sole. If it is canted one way or the other, it will prevent the floor of the rebate being square to the shoulder.
Set the nicker before you set the blade. This is the nicker. It is screwed on at an offset so that it may either project below the sole, or above the sole.

Remove the screw ...

... and sharpen the nicker. Just a few rubs on a fine diamond stone will do this. Mine is a 20 year old 1200 grit ...

Loosen the screw that holds the nicker barrel, and it will come out ...

Setting the nicker with blue tape ... what else did you expect from me! ....
....

Three layers of blue tape will total about 0.5mm. Replace the nicker and barrel. Orientate the screw to the lower end for the nicker to project for a cut ...

Now place a rare earth magnet on top of the tape. This will lift up the nicker to this height ...

Once the nicker is set, install the blade. Set is just a fraction inside the nicker. Once positioned and locked down by the lever cap move the set screws into position (against the blade). This will enable for set up to be done without any fuss.
It is not that easy to see here, but both the blade and nicker project from the body ...
Now set the depth stop, and lock it down. The ruler is measuring from below the depth stop to the tip of the blade (not the edge of the sole) ...

Here is a demonstration board, where we will create a rebate across the grain. This is soft wood, which will penalise any set up errors with tearout along the shoulder line.

To set the fence, what I do is mark the width of the rebate with a cutting gauge, and then place the nicker in the cut line, and push the fence up against the side of the board.

The hand position is thumb where the knob would have been, pushing down, and palm against the fence, pushing against the side of the board ...

Start the first cut at the far end. This creates a down hill slope, which planes more easily (like planing with the grain). Also, deepening the shoulder progressively will minimise tearout.
If you notice a little tearout along the shoulder, loosen the blade screw fractionally, and use a plane hammer to tap the blade in a little. I could see this happening here very faintly, made the correction, and then all was well.
Now move back and plane again ...

This is the result we are after ...

Checking for square ...


All good. Good luck with yours.
Regards from Perth
DerekVisit www.inthewoodshop.com for tutorials on constructing handtools, handtool reviews, and my trials and tribulations with furniture builds.
-
24th April 2023 12:46 PM # ADSGoogle Adsense Advertisement
- Join Date
- Always
- Location
- Advertising world
- Posts
- Many
-
25th April 2023, 01:05 AM #2
Be inspired. Be creative. Be bold.
- Join Date
- Apr 2001
- Location
- Perth
- Posts
- 10,826
Earlier I wrote about setting up the nicker, so now ...
Setting up the blade
Freshly sharpened blade. The bevel has been hollow ground, and then honed on the hollow. This blade will not need to be ground again for a long time.

It is important to get the grind angle to fit square to the mouth (as much as possible, but not critical) but especially be parallel to the sole when inserted into the plane and positioned. Take your time to get this right. Bevel angle of 30 degrees ...

Place the blade in the plane. Note the set screws against the inside of the blade ...

Once the blade is positioned as close as possible - it is not final at this stage - then tighten up the set screws until they touch the blade ...

Once the blade has been fully positioned, it is unlikely that it will need to be set up again.
When making adjustments, such as re-positioning the blade projection, press the blade against the set screws, then loosen the lever cap, and use the adjuster ...

Regards from Perth
DerekVisit www.inthewoodshop.com for tutorials on constructing handtools, handtool reviews, and my trials and tribulations with furniture builds.
-
25th April 2023, 01:02 PM #3
Senior Member
- Join Date
- Aug 2008
- Location
- avoca beach nsw
- Posts
- 411
Thanks for posting this thread Derek. I have owned this Veritas plane for many years , purchased from a previous owner on Market Place. Lack of skills, grinding and honing equipment stood in the way of it performing as in your thread.I didnt realise there was a screw that controlled the nicker barrel movement, or i had forgotten. It is mentioned in the instructions i see , but lacking a diagram i skipped it , That is fixed now. My other error was to try and set the set screws prior to setting the iron in place , measuring the turns exactly and clocking the screw heads , thinking that was the key to the iron being parallel to the bed, i persisted with this wrong thinking and just gave up on it.The iron with and angle of 22 degrees while the mouth opening is 30 degrees also confused.However with grinding and honing purchases and an understanding of their application to produce angled, very sharp iron, i put it all together , following your steps in the post and happily the plane is working like a charm across and with the grain.I also use vice grips to tighten the knurled knobs whatever tool i am using, with a rag as protection as finger tight insufficient.Your step by step instructions with high quality photos have made all the difference , thanks again Ross
-
27th April 2023, 10:46 PM #4
GOLD MEMBER
- Join Date
- Sep 2010
- Location
- Sydney
- Posts
- 1,983
Hi Derek
Any tips for not tilting the plane resulting in a rebate that isnt square?
Also for the depth stop as i get a rubbing mark on my work ( even when square)?
and lastly what screws did you use to attach the fence please?
-
27th April 2023, 11:36 PM #5
 GOLD MEMBER
- Join Date
- Mar 2010
- Location
- US
- Posts
- 3,132
Derek - what is the bed angle on those? I had the pair when veritas released them (they were cut price as an initial promo if I remember if you bought the pair), but later got a pair of very good quality moving fillisters and the metal planes couldn't hang with them in regular work.
it didn't occur to me at the time that I think the bed angle is steeper on the wooden planes - they're a little more tolerant of curly grain, etc and there's much less to screw around with on them. You keep the iron in decent shape to match the sole freehand honing and avoid grinding into the area that's honed, and then set the fence off of the nicker and that's about it.
Also had a stanley 289 that I'll admit I didn't do anything with once using the woodies, and I think I sold it.
moving fillisters with a screw depth stop and in great shape aren't as plentiful in the US as they are in England, but there's plenty from England and it doesn't cost much to get them here.
-
28th April 2023, 02:35 AM #6
Be inspired. Be creative. Be bold.
- Join Date
- Apr 2001
- Location
- Perth
- Posts
- 10,826
PM, firstly, while the fence is the major guide for square planing, you can do a decent job without a fence. For example, I have made many rebates using just a shoulder plane. When you are using one, it is necessary to develop a sense of vertical. It is the same when chopping mortices. It just takes practice. Originally Posted by Pac man

When using the fence, your main strategy involves the palm of your guiding hand. This pushes the fence against the side of the board. This should work well whether you are using the slim main fence or the wide sub-fence.
Thirdly, to correct any out-of-square rebate, whether the vertical shoulder or the horizontal floor, use a shoulder plane. This is where shoulder planes excel. I love the small (1/2") Veritas Small Shoulder Plane ..

Place it in the rebate. Hold a square to the body to obtain vertical, slide the square away, and then plane the rebate. You may need to do this a few times.

Regards from Perth
DerekVisit www.inthewoodshop.com for tutorials on constructing handtools, handtool reviews, and my trials and tribulations with furniture builds.
-
28th April 2023, 02:48 AM #7
Be inspired. Be creative. Be bold.
- Join Date
- Apr 2001
- Location
- Perth
- Posts
- 10,826
Originally Posted by D.W.
David, many of the old woodies have 50 degree beds. Terry Gordon of HNT Gordon (a modern Aussie planemaker) makes his beds 60 degrees. He also makes his shoulder planes 60 degrees. Now logically these should cut poorly, but they work fantastically well.
The bed of the Veritas is (as far as I can recall - I have not checked) 45 degrees. On a skew, it probably cuts lower.
Many, many years ago, when I was still writing plane reviews, I borrowed a Stanley #289, and was going to compare it with the Veritas Skew Rabbet plane and a Record #778 and ECE I owned. The ECE also had a skewed blade ...

This was an excellent performing plane. But I chose to sell it (reducing the herd) and keep the Veritas. I found the #289 a bit clunky, and the ECE had a wide mouth which made it less easy to set up for fine shavings. I also liked the precision of the Veritas, not just how well it cut when set up, but adjustments were the easiest of the three planes (in my experience).
I have both a left-and right Veritas, both pre-production samples which I put through road testing before they were released, which I was doing a lot of a decade ago.
Regards from Perth
DerekVisit www.inthewoodshop.com for tutorials on constructing handtools, handtool reviews, and my trials and tribulations with furniture builds.
-
28th April 2023, 03:20 AM #8
GOLD MEMBER
- Join Date
- Mar 2010
- Location
- US
- Posts
- 3,132
I'll have to check the beds on mine (woodies). I hardness tested them - the irons ranged from 55-59, which is a little unusual considering the double irons from the same span are more commonly 60-63, typically middle up in that range.
..
Ok, just checked, they are all 50. Apparently, I have five moving fillisters at the moment, but only two of them are set up and used on a regular basis - one griffiths, one hields.
I thought they would be steeper. I'm retracing things more or less to try to figure out why both of those planes outclassed the veritas version by such a wide margin in a combination of large and small work (that I just immediately sold the veritas).
With the wooden planes the nature of the nicker to the fence in cross grain work is critical. it may or may not be problematic in long grain work if it's set like cross grain -in my experience, I don't generally have an issue with it and don't always set the nicker off in long grain work.
As soon as set the nicker proud of the iron the first time, any notion of inaccuracy in the older high quality makes (one could perceive that, everything moves freely on them) went away and I was done with the metal ones.
I haven't got any thoughts for people who use power tools a lot, but for someone using hand tools only where sometimes, the moving fillister will have to do a large volume of work, the veritas is out. It's less smooth in the cut and twice the effort to use - my curiosity on the bed has to do with whether the veritas is bedded too aggressively and thus troublesome if grain runs out and back into the blade at all unexpectedly.
I don't recall enough - I just recall the work rate vs. the wooden planes was at best half and setting the fences (which move freely on their own) by eye is critical only at the nicker and blade.
Trying to buy one and being absolutely certain that for the 50-100 pounds that they cost out of england, that they'll be in excellent shape and not have blades or nickers swapped or a depth screw that doesn't bind, is a different matter. I'd say it's a 2 out of 3 or 3 out of 4 thing, but in a market that caters to beginners who really aren't going to use planes much in the first place, instant success and "i have the same thing" forum discussion appeal is more important.
-
28th April 2023, 03:37 AM #9
Be inspired. Be creative. Be bold.
- Join Date
- Apr 2001
- Location
- Perth
- Posts
- 10,826
David, what I liked especially about the ECE (which I believe also had a 50 degree bed) was that it easily took thick shavings. It would work more rapidly than the other moving fillisters. But ... there's a but ...
I understand what you say about workers 100 years ago needing to work quickly and get the product out the door as soon as could be done. Time was (is) money. Today, of course, if this is so important, then you go to machines, not stuff around with fillisters. By-and-large, the same situation rests with amateurs today. There are very, very few who work only with hand tools as in the days of olde. More commonly, like myself, the rebate plane (and plough and smoother and jointer, and ..) is used regularly but briefly. The target (at least for myself) is precision and not speed. I would rather take a few extra, thinner shavings if it adds to accuracy and a tidy finish. I do not have the same deadlines as workers of olde.
Regards from Perth
DerekVisit www.inthewoodshop.com for tutorials on constructing handtools, handtool reviews, and my trials and tribulations with furniture builds.
-
28th April 2023, 04:09 AM #10
GOLD MEMBER
- Join Date
- Mar 2010
- Location
- US
- Posts
- 3,132
the older moving fillisters don't really have any trouble taking thinner shavings, but you would generally set them where they are pleasant planing but not slow and if you needed really fine (like finer than you could plane with the veritas plane as far as consistent depth) you would gauge the bottom of the rebate and take the last few shavings with a skew rabbet plane.
the emmerich plane isn't a match for older planes with the fixturing and the blade turned the wrong way.
For that matter, the veritas isn't a match for them, either, in actual use, close work or not -especially pairing a moving fillister with a rabbet plane - but the market isn't dedicated enough for it to make a difference and the reality is the joinery planes from all of the boutique makers don't get used much.
I hate to say it, but most of stanley's combination and joinery planes were just site planes and not the equal of the wooden planes made before them. I've had a huge number of them and the only plane that I still use on any regular basis is the narrow tongue and groove plane. that could probably be rectified at some point with a wooden plane, but there's no rush.
I found the irons on the veritas plane aggravating - and hardness testing the old wooden planes illuminated why - when cutting rebates, whoever is horsing the plane around is doing it with one corner in the work and sometimes a small cut width. the irons end up chipping if they're full hardness because of a whole combination of factors and then you're stuck grinding that away.
To see one at 55 was a surprise, though - I never noticed any shortcomings in work.
Hollows and rounds so far have also been soft (a chip would be catastrophic) in that same ballpark and complex moulders *fileable*, which was a shock.
At any rate, it goes without saying that I was very disappointed in the veritas planes vs. the two that I use (hields and griffiths, the former only because the latter's fence doesn't allow as much width as I'd like), but I also get the market and the factors that the older planes mastered are only important if a plane is used on a regular basis.
I wouldn't pretend to have any idea what it's like to sell planes to people who don't use them much - the reason steve is making planes and I never did (for pay) has a whole lot to do with avoiding the real market for buying tools (it's not skilled users, though i've found plenty of working professionals who want seaton style chisels).
-
28th April 2023, 09:24 AM #11
SENIOR MEMBER
- Join Date
- Feb 2015
- Location
- Hobart
- Age
- 77
- Posts
- 649
Derek,
Wow, 29 pics = 29,000 words = a most detailed & systematic step-by-step manual indeed !!!
I don't own such a plane. Assuming that the depth of the nicker is set by the barrel into which the blade is screwed, how does the barrel remain in place once the magnet is removed? Is friction sufficient or is the barrel then fixed in place from the other side of the plane?
Thanks for this great pictorial "demo" !
Cheers,
Yvan
-
28th April 2023, 10:59 AM #12
Be inspired. Be creative. Be bold.
- Join Date
- Apr 2001
- Location
- Perth
- Posts
- 10,826
Yvan, thank you.
The barrel is held in position by a screw - see earlier photo. Just tighten it down with the magnet in place. The design here is poor from the point that one needs a magnet to set it accurately. It would have been so much easier to do if there was a way to push the barrel out. For example, combining the barrel with an arm rod. Then you could push the rod in-and-out to do this. The fence is not affected by the rod.
Regards from Perth
DerekVisit www.inthewoodshop.com for tutorials on constructing handtools, handtool reviews, and my trials and tribulations with furniture builds.
-
30th April 2023, 02:57 AM #13
Be inspired. Be creative. Be bold.
- Join Date
- Apr 2001
- Location
- Perth
- Posts
- 10,826
Manual for setting up the Veritas Skew Rabbet Plane - Part Two With the Grain
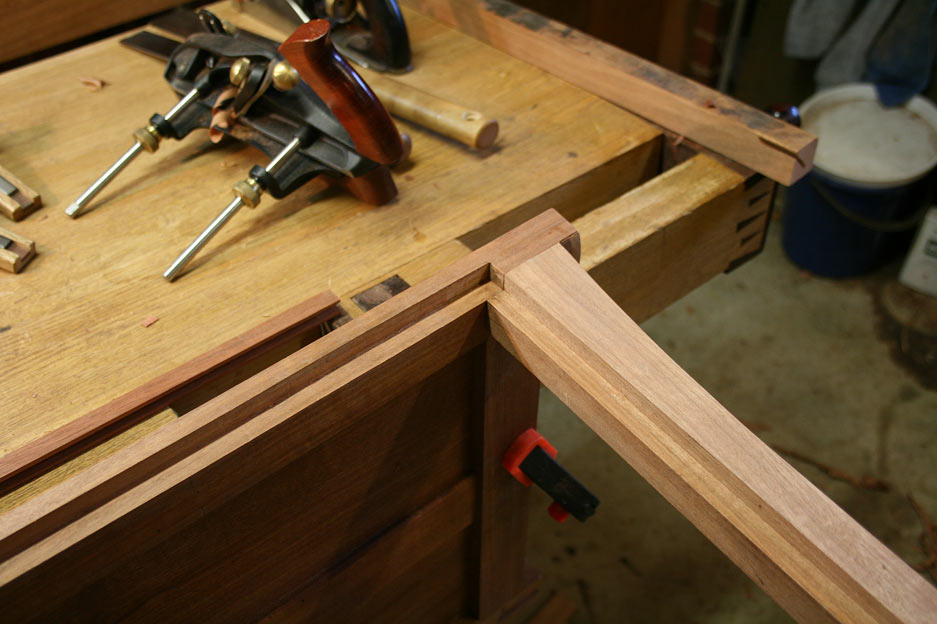
I am presently building two night stands. The drawer case is made of four mitred sides in quartersawn Tasmanian Oak ...

The mitres are connected with packing tape ...

.. and finish as the basic drawer case.

The drawer cases will be bow-fronted. The rear remain straight, and receive a rebate to house the case back.
This is what we are after ...


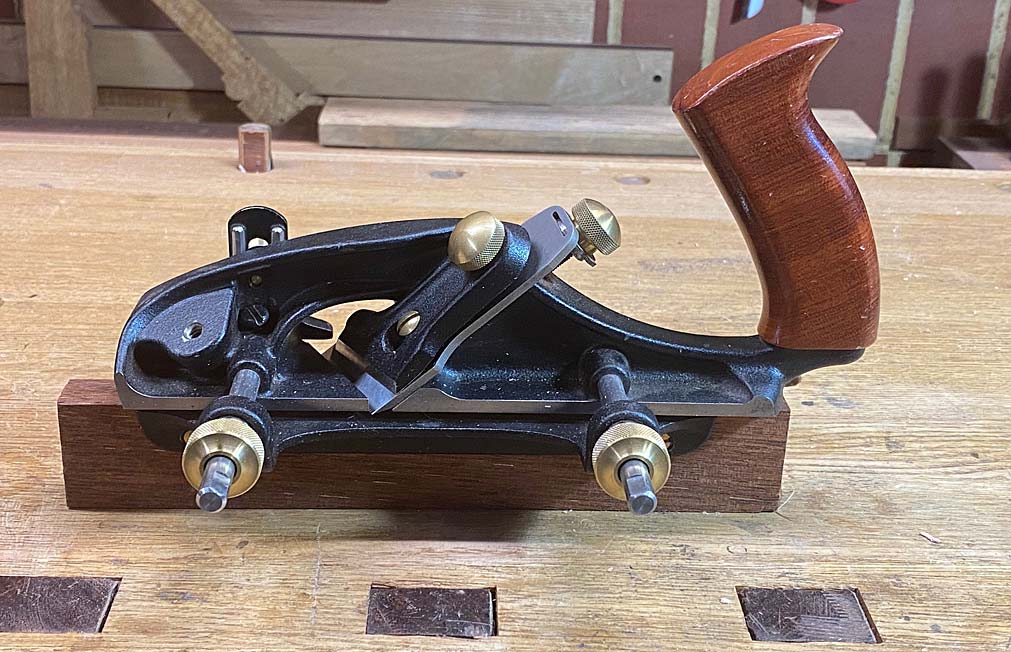
For this set up, the nicker is retracted into the body of the plane. However the blade remains a smidgeon outside the body (0.5mm) ..

I find that the shoulder wall will taper downwards if the blade is left flush with the body. The rebates above were planed this way, and the shoulder are square.
The hand grip is thumb where the front knob would be (it was removed), pushing downward, and the palm pushes the body into the work piece ..

When planing into the grain (this happens), it pays to use a cutting gauge to score the outlines of the rebate ...

It is also important to start planing at the end of the board and create a taper. This "straightens" the grain and reduces the fuzziness of the surface ...

A decent finished rebate which involved planing into the grain ..

Ready for assembly ..

Regards from Perth
DerekVisit www.inthewoodshop.com for tutorials on constructing handtools, handtool reviews, and my trials and tribulations with furniture builds.
-
30th April 2023, 05:02 AM #14
GOLD MEMBER
- Join Date
- Mar 2010
- Location
- US
- Posts
- 3,132
How does the width score line not interfere with the nicker? The nicker on a plane like this needs to be definitive and cut cross grain like a knife. It's shaped like a short radius wing on an auger bit.
With a wooden version, we might mark depth if it's critical, especially at beginning and end of cuts,but not width. It's been too long since I sold my pair to remember.
-
30th April 2023, 11:51 AM #15
GOLD MEMBER
- Join Date
- Mar 2010
- Location
- US
- Posts
- 3,132
I noticed something I didn't notice with the pictures in initially - the nicking iron orientation isn't right - it should be proud of the side of the plane, and somewhat considerably to allow the iron to be set at or proud of the sole, too.
When my wooden fillister plane more or less torched the LV effort by a wide margin (both in productivity using, as well as in ease of setting up - you set either the iron or the nicker to a mark and that's it), it was in long grain - cutting transition mouldings for the house from hardwood to carpet.
Had the work been cross grain, the margin would've been wider.
For what must be a monumental effort to actually create a plane pattern and produce it, it's mind boggling that time and again, LV seems to come up with designs that are overcomplicated but ultimately fall flat on their face, often for simple reasons.
To be fair, the nicking iron stood proud of the casting, most beginners would probably complain - but that's the cost of selling to beginners.
I doubt these planes ever get used much. I'd bet a lot of people, too, get 78s or record's version or whatever and struggle to be able to find a use for them on hardwoods. I went down that road, too.


 Reply With Quote

Similar Threads
-
WEST AUST Veritas Skew Rabbet Plane - Right Hand
By bueller in forum WOODWORK - Tools & MachineryReplies: 2Last Post: 16th April 2021, 12:56 PM -
WANTED:WA Veritas LH Skew Rabbet Plane
By bueller in forum WANTED & WANTED TO BUY - in AustraliaReplies: 4Last Post: 30th December 2020, 07:41 PM -
Midadventures with the Veritas Skew Rabbet plane
By bueller in forum HAND TOOLS - UNPOWEREDReplies: 10Last Post: 26th September 2020, 09:31 PM -
WANTED:VIC Right Hand Veritas Skew Rabbet Plane
By Bernard Zhang in forum WANTED & WANTED TO BUY - in AustraliaReplies: 2Last Post: 21st July 2020, 12:40 PM -
Veritas Skew Rabbet Plane fence moves
By section1 in forum HAND TOOLS - UNPOWEREDReplies: 2Last Post: 10th February 2013, 10:34 PM
