

 Thanks: 0
 Likes: 0
 Needs Pictures: 0
 Picture(s) thanks: 0
Results 1 to 15 of 20
Thread: Norris-esque Blade Adjuster
-
6th March 2012, 11:26 AM #1
 .
.


- Join Date
- Nov 2008
- Location
- Perth WA
- Age
- 71
- Posts
- 5,650
 Norris-esque Blade Adjuster
I've strayed from my usual forum to seek advice regarding the above. I have been making a ersatz version of a Norris 50 and I need to consider an adjuster. Is the original Norris left/right hand thread combination worth pursuing or is a single fine thread preferable?
I'm sure some will say no adjuster is preferable and in some ways I would agree but the little 50 sans adjuster would look like a pair shoes missing their laces.
Any suggestions would be appreciated.
A few photos here illustrating progress so far - https://www.woodworkforums.com/f65/ad...-plane-132894/
BT
-
6th March 2012 11:26 AM # ADSGoogle Adsense Advertisement
- Join Date
- Always
- Location
- Advertising world
- Age
- 2010
- Posts
- Many
-
6th March 2012, 01:03 PM #2
Senior Member
- Join Date
- Feb 2009
- Location
- Esperance,Western Australia
- Posts
- 192
Adjuster
Hello Bon
I have an adjuster that I bought with the plane Kit, if you are interested in looking at the way it was made. I can send it to you if you are interested.
Cheers Gerry
-
6th March 2012, 01:10 PM #3
.
- Join Date
- Nov 2008
- Location
- Perth WA
- Age
- 71
- Posts
- 5,650
Hello Gerry,
What are your close up photo skills like? Be easier than risking things in the mail.
Regards
Bob
-
6th March 2012, 02:46 PM #4
Moderate Moderater
- Join Date
- Feb 2006
- Location
- Lindfield N.S.W.
- Age
- 62
- Posts
- 5,643
This chapter from Jim Kingshott's book on making tools discusses his version of the Norris adjuster. I found it very interesting, although I have not tried to make one
 Cheers
Jeremy
If it were done when 'tis done, then 'twere well it were done quickly
-
6th March 2012, 03:21 PM #5
.
- Join Date
- Nov 2008
- Location
- Perth WA
- Age
- 71
- Posts
- 5,650
Thank you Jeremy.
I gave my copy of Jim Kingshott's book to Ray Gardiner because I wasn't keen on the mother of pearl Jim had a fondness for. And Ray confessed to having a taste for bling. I photographed the pages of interest before I dispatched to book.
The micrometer screw is a simple variation in that it does away with the left hand thread. But it does introduce the complexity of ensuring a play free rotating connection between the "traveller" and the threaded adjuster.
Left hand threading is easy enough and LH fine thread taps are available on Ebay. Backlash could be minimised by careful, painstaking fitting of the male thread to the tapped hole while set up in the lathe.
I will see if the self professed best plane maker in the world, Karl Hotley reveals any secrets.
BT
-
6th March 2012, 09:34 PM #6
Senior Member
- Join Date
- Feb 2009
- Location
- Esperance,Western Australia
- Posts
- 192
Adjuster
Hello Bob,
I am coming to Perth tomorrow for more training, I may not have a lot of time as the courses run all day and night, as well as through the weekend. I am sure I could drop of the adjuster and the blade in my travels that I got with my kit. The blade is not a patch on the one you have but maybe worth a look.
Cheers Gerry
-
8th March 2012, 05:05 PM #7
GOLD MEMBER
- Join Date
- Mar 2004
- Location
- Brisbane (western suburbs)
- Age
- 77
- Posts
- 12,132
Hi Bob,
You are correct that some of us would advise 'forget about the adjuster', but as you say, you want to include it, so that's not the issue. I own a Norris A5, and have to say I'm singularly unimpresssed by its adjuster. Unlike the spring-clamped lever cap of the Bailey mechanism, which puts an adequate, but not excessive amount of force on the cap iron, the screw on the Norris applies a bit too much too easily. You really need to back off the pressure before trying to adjust the blade setting, or it puts undue strain on the adjuster screws. I'd guess this plane has had only a moderate amount of use, judging from the amount of useable blade left, but it's a late model, so possibly not as well made as pre-WW2 examples. The adjuster has a moderate amount of backlash, and the blade movement is a bit jerky, caused (I think) by slightly uneven pressure over the cap-iron. Anyways, as a consequence, I find it very hard to make consistent fine adjustments. Anything you can do to improve that sort of situation would be greatly beneficial to function, I reckon. I have read that the original single thread adjuster actually worked better, & I can see that it would be likely to have less backlash if carefully made. Anyway - food for thought.
I went to a lot of trouble making an adjuster for a shoulder plane I made many years ago (it was trouble because I had very primitive equipment at the time!). Despite much monkeying around, it never worked well, and I have long since given up on it & just set the depth with a brass hammer. Because of that, & the Norris experience, I decided not to bother with an adjuster when I made my own version of a coffin smoother. I also started it before I bought my mini-lathe, so I would have had to buy one & trhen make a suitable cap iron, which would not have been a terribly difficult task, but I already had a nice blade/cap-iron combo I wished to use. It all seemed like too much effort for too little gain, so I went ahead without it. I have to say, not having the screw adjuster hasn't mattered one bit, in use. I already prefer my home-made version over the 'real' thing - partly because I made it, of course ( ) but mostly because the higher blade angle makes it more suitable for planing the cranky-grained woods I like mucking about with. As I get used to it, it gets easier to set, & of course these are planes you rarely need to change between sharpenings, so all in all, I'm quite content with my decision to go without the screw adjuster.
Of course, now I have a lathe capable of cutting a very fine thread, I may be tempted to add one on the next plane I have planned, just for fun.....
Cheers,IW
-
8th March 2012, 05:21 PM #8
.
- Join Date
- Nov 2008
- Location
- Perth WA
- Age
- 71
- Posts
- 5,650
Hello Ian,
Gerry very kindly dropped off at my place his St James Bay adjuster and plane blade for me to "review". The action of the fine single thread adjuster is impressive. I could not detect any backlash. It would warrant posting some photos and comments here.
I purchased a (long gone) post war A5 in London back in '85 and like you was unimpressed with the function of the adjuster. I never warmed to the stained beech infill either which I subsequently removed and replaced with some nasty stuff described as Amazon rosewood. Another story.
The little thumb plane I made and posted photos of on this forum a while back works wonderfully without the complication of an adjuster.
Thank you for your reply.
BT
-
8th March 2012, 11:42 PM #9
Novice
- Join Date
- Jan 2012
- Location
- USA
- Posts
- 24
Adjusters
The problem with adjusters in a plane with this type lever cap is not with the threads or any part of the mechanism. The problem is the combination of the mechanism and the lever cap.
The lever cap has to be well tuned to the back of the iron in order for the plane to work properly and adjust predictably with any means. When you attempt to adjust the plane with a mechanical adjuster you must loosen the hold of the lever cap lest you stretch the threads on the mechanism. When this is done the lateral adjustment is almost always lost due to either the loosening or the re-tightening of the lever cap screw and then there is the issue with the actual depth setting increasing when you re-tighten the lever cap. Most find themselves making the lateral adjustment with a hammer and it is much simpler to tighten the lever cap and then make all the adjustments with a hammer as well as being immensely faster and more precise.....or you can persist with the mechanical adjuster and spend your time trying to effect an action that is most similar to chasing your tail.
Ron
Blog
Brese Plane
-
9th March 2012, 08:13 PM #10
.
- Join Date
- Nov 2008
- Location
- Perth WA
- Age
- 71
- Posts
- 5,650
Gerry's Adjuster
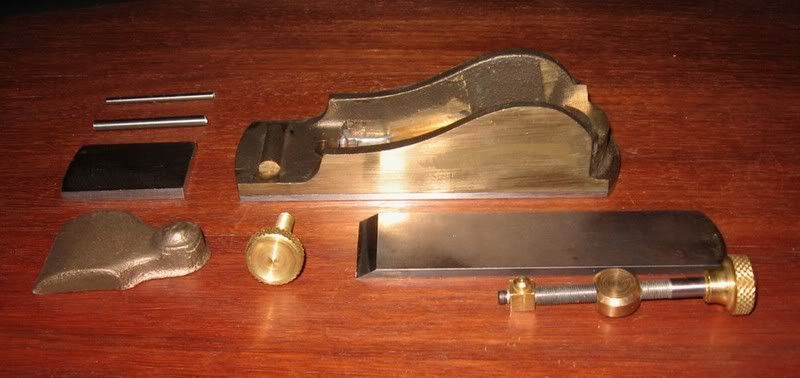
The shaft is 5/16" in diameter and the thread is 40 TPI. The "traveller" is retained by means of a small countersunk socket screw. I was not able to undo the screw which makes me think that it may have had an adhesive such as Loctite applied to the thread. The knurled thumbwheel does not unscrew off the shaft. It could be parallel knurled and pressed on or threaded and adhesive fixed? The "traveller " has some radial play (a lot) but no discernible axial play. A simple adjuster.
The 2 1/2" wide blade is 3/16" thick. The cap iron is 1/16" thick. The cap iron on my post war plane was 4mm thick.
Thank you Gerry
BT
-
9th March 2012, 08:31 PM #11
Be inspired. Be creative. Be bold.
- Join Date
- Apr 2001
- Location
- Perth
- Posts
- 10,826
Hi Bob
I have another of the St James' adjusters to look at, if you wish. Let me know.
It is for a thumb plane (which I really need to get back to and finish) based on a Norris type ...
Regards from Perth
DerekVisit www.inthewoodshop.com for tutorials on constructing handtools, handtool reviews, and my trials and tribulations with furniture builds.
-
9th March 2012, 09:40 PM #12
GOLD MEMBER
- Join Date
- Mar 2004
- Location
- Brisbane (western suburbs)
- Age
- 77
- Posts
- 12,132
Bob - you've shown a pic of the thread gauge on the screw, but don't tell us what pitch it is. Looks pretty fine - ?
Cheers,IW
-
9th March 2012, 10:25 PM #13
.
- Join Date
- Nov 2008
- Location
- Perth WA
- Age
- 71
- Posts
- 5,650
40 threads per inch, 0.025" pitch, 60 degree thread form.

-
10th March 2012, 05:00 AM #14
GOLD MEMBER
- Join Date
- Aug 2009
- Location
- Armadale Perth WA
- Age
- 55
- Posts
- 4,524
I have been wanting to start a thread on the Norris planes since January, but haven't had the time to frame my thoughts/issues into a coherent narrative.
I have had an A5 (well-used, post war) for a bit under 2 years now. I had several well used and very effective infill planes up to that point and had gotten used to the taptap method of adjusting them, but was looking forward to the much lauded norris plane with the adjuster.
It gave me some troubles for some time. One thing i decided early on was that the base was slightly hollow down its length, which wasn't helping. But even after addressing that issue, it wasn't the purely heavenly experience I might have been looking for. It was great - like other infills - when the setting was right and there was no need to alter anything ... just shhhniiiikkk, shhhniiiikkk, etc
Pretty much as Ron said ... I didn't want to hurt the adjuster ... so I would tend to loosen the cap-iron bolt slightly, adjust, and then tighten. And not necessarily end up where I expected.
This January I received a near-new post-war A5 with the little circular mill? marks all down the sides, and a 14" norris panel plane - also post war.
The 'new' A5 was definitely easier to use than my first time-worn one, but still had some similarilities in behaviour that I can now put down to the design in general, or the inexperience of the user
One short lesson I have come out of it with is that I now use the cap-iron bolt *as* a fine adjuster. Often when planing it is enough to just turn it down tighter slightly, or back it off slightly, to adjust the depth of cut. I don't know if that might ring any bells with others ... or just mean my cap-iron or bed or etc has a problem
When I was tappitty-tappying the normal infills, I always found it easier to adjust a bit deeper (by tapping the iron) than to manage to back it off a little (by tapping the rear). I had/have never adjusted the cap-iron bolt on one of those planes.
I read a very interesting thread on a UK forum/discussion site that was fairly critical of the norris and went into detail in text and pictures on addressing the problems he found in his A5. It didn't come up on my browser in a readable arrangement and I had to copy the text out to notepad in order to read what he had to say. I'd thought about duplicating that text over to our forum here ... but I don't know the etiquette on that sort of thing ... and I don't know the link without going digging into my browser history or whatever safe place I put the reference in.
Off to Harvey auction tomorrow morning
That's my 5c for now.
Cheers,
Paul McGee
-
10th March 2012, 08:14 AM #15
GOLD MEMBER
- Join Date
- Mar 2004
- Location
- Brisbane (western suburbs)
- Age
- 77
- Posts
- 12,132
OK - NOW I can see the number on the gauge...... Originally Posted by Anorak Bob

I think my eyes were a bit blurry last night, but I couldn't make out the number in the original pic - now I know what it is, it's easy to readIW

 Reply With Quote


Similar Threads
-
My Norris A5
By andyxbach in forum ANTIQUE AND COLLECTABLE TOOLSReplies: 3Last Post: 14th February 2011, 10:07 PM -
Norris Plane
By kusa in forum HAND TOOLS - UNPOWEREDReplies: 10Last Post: 4th June 2009, 05:21 PM
Tags for this Thread
adjuster,
advice,
agree,
appreciated,
blade,
combination,
ersatz,
fine,
forum,
illustrating,
laces,
missing,
norris,
norris-esque,
norrisesque,
pair,
photos,
preferable,
progress,
pursuing,
sans,
seek,
shoes,
single,
strayed,
suggestions,
thread,
usual,
version,
worth
