

 Thanks: 0
 Likes: 0
 Needs Pictures: 0
 Picture(s) thanks: 0
Results 1 to 15 of 56
Thread: Another plane?
-
2nd February 2010, 10:13 PM #1
 GOLD MEMBER


- Join Date
- Mar 2004
- Location
- Brisbane (western suburbs)
- Age
- 78
- Posts
- 12,148
 Another plane?
There have been some pretty impressive planes made & shown here, so this is a bit old-hat, but maybe I can get a few people who are hovering on the verge of trying to give it a go by presenting my efforts. I have been wanting to have another go at a dovetailed body for years. The last one was solid enough, but not a competition winner - it needed a dollop or two of silver solder in a few of the more severe gaps.
My excuse has been that I couldn't get the softer brass suitable for peining. The only plate you can buy readily here in Brisbane is the 380 machinable alloy which gets a bit brittle when you whack it with a hammer a few times. However, I've been doing a bit of mucking about with metal lately, & peining brass & steel rivets, & the mild steel I've used is quite easy to pein. It dawned on me that you really only have to move a lot of metal on one of the parts, because you cut & fit one set of dovetails, just as you would with wood, so if you make these a nice fit, virtually all of the peining is in closing the other piece over it..
So to cut a long story short, I have successfully completed a metal body for a 200mm (roughly) by 55mm (blade) smoother loosely based on a Spiers picture I trawled from somewhere. The tails were cut in the brass sides, and scribed onto the steel sole. After cutting out & careful fitting, I filed a bevel on each tail, then peined the steel over to lock them in. It worked so well, I just have to show it off.
Now the funny part. I started out doing a square body because it seemed a lot simpler & safer. I got to the stage of makingthe mouth & cutting out the tail gaps along most of one side of the sole before I realised I'd cut them upside down. Since I had already cut out most of the mouth, there was no way I could simply flip it over - by the time I refiled the ramp, the mouth would have been at least 2mm oversize! So what's that old hoary one about the tough getting going when the going's tough? After almost giving up in disgust, I decided to give it another go & this time, try a coffin shape as I originally wanted to do before whimping-out. It ws a bit of fun bending & fitting the sides, but in fact, it turned out much easier than I had anticipated. I've started to fit the wood, but the weekend ended at taht point.
Here are a few shots of progress, but it might be a while before I get back & finish it...
(Edit: Little did I know when I wrote this just how long the project was going to languish!)
1. preparing the sides from 3mm brass: cutting sides.jpg
2. the body assembled & peined & starting cleanup: Peining done starting cleanup.jpg
3. Initial cleanup complete - Just two tiny gaps that I won't bother about as you need to look very closely to find them & I'm confident the rivet shadows on the sole (from the anti-chatter block) will disappear completely when the sole is lapped. A better result so far than I had hoped for! Initial cleanup.jpg
4. The wood being readied (She-oak) Still to be shaped & cheeks glued on. I don't have a piece big enough to carve the rear stuffing from a solid bit, so am laminating it as many (most?) of the oldies are. The handle is based on my favourite old rosewood tote off a very old Baily #5.: Fitting infil.jpg
Will keep this updated as & when I progress.
Cheers,Last edited by IanW; 30th December 2019 at 09:08 AM. Reason: Restore pics
IW
-
2nd February 2010 10:13 PM # ADSGoogle Adsense Advertisement
- Join Date
- Always
- Location
- Advertising world
- Age
- 2010
- Posts
- Many
-
2nd February 2010, 10:34 PM #2

 Fossil Member
- Join Date
- Jan 2005
- Location
- Perth
- Posts
- 1,181
Well done Ian. It is looking fantastic. I would have thought the coffin shape would have been quite difficult too.
Really like the the timber for the handle, looks like it will come up very nicely with that grain. Is it She Oak or something similar?
Do keep us posted. Am always impressed with the tasks you tool maker fellows tackle. I'm still too chicken.
Cheers
Pops
-
2nd February 2010, 10:39 PM #3
Be inspired. Be creative. Be bold.
- Join Date
- Apr 2001
- Location
- Perth
- Posts
- 10,842
Hi Ian
That is looking good!
What is the bed angle and did you add a mouth block?
I wondered if you might use the Rock Oak .. none left? Not to worry, the She-oak is going to be equally stunning.
With regards the mouth, not to panic - the higher the cutting angle, the less important the size of the mouth. 60 degrees and the mouth sizre is irrelevant. Alternatively, what about silver soldering a shim/steel veneer to the front of the block?
Regards from Perth
DerekVisit www.inthewoodshop.com for tutorials on constructing handtools, handtool reviews, and my trials and tribulations with furniture builds.
-
2nd February 2010, 10:40 PM #4
GOLD MEMBER
- Join Date
- Jun 2008
- Location
- Victoria, Australia
- Age
- 74
- Posts
- 6,132
Hi Ian,
Let me be the first to offer congratulations on the stunning progress so far.
I would like to see some more detail of the build, anti-chatter block, lever cap fabrication. Is the lever cap drilled yet, or are you going to do the sides and cap together somehow. Details of the mouth...... ahh... so many questions. Is the infill overstuffed?
Double dovetails look nice. Gotta love that steel and brass together..
If you are interested, I have some she-oak that would be big enough for that.
Regards
Ray
Whoops, wasn't quick enough to be first!
-
2nd February 2010, 10:42 PM #5
GOLD MEMBER
- Join Date
- Mar 2005
- Location
- In the shed, Melbourne
- Age
- 52
- Posts
- 6,883

Pops wrote a bit of what I was going to write before I scrolled down and read his post, but anyway...
I am always impressed by those who have a go and end up making a beaut plane that makes whisper thin curlies and looks just as good as many other planes. (dunno if that last bit came out they way I intended but I mean it with all sincerity, I'm having a brain phart right now)
I'm keen as to follow your progress IanW, maybe one day I'll tackle something myself. In the meantime I'll continue to follow threads like this with great interest.
-
2nd February 2010, 10:43 PM #6
What... you mean it's not 1792?
- Join Date
- Oct 2006
- Location
- Melbourne
- Posts
- 5,271
Brilliant! (As the chap in the Guiness ad used to say.)
.
I know you believe you understand what you think I wrote, but I'm not sure you realize that what you just read is not what I meant.
Regards, Woodwould.
-
2nd February 2010, 11:03 PM #7
Peter McBride
- Join Date
- Nov 2007
- Location
- Melbourne
- Posts
- 1,139
Ian,
you certainly have the piening of the dovetails under control!
That is looking fantastic. Looking forward to seeing it finished.
Just had a thought....
I don't think all is lost with the wide mouth smoother.
What about moving the blade position back some more, and opening up the front some more and making a "T" shaped throat closer with and adjustable screw tightener bearing down and fixed through a nut under the the front infill....bit like an old marking gauge
Regards,
Peter
-
3rd February 2010, 09:40 AM #8
GOLD MEMBER
- Join Date
- Mar 2004
- Location
- Brisbane (western suburbs)
- Age
- 78
- Posts
- 12,148
First, thanks to all for compliments, comments, & advice.
Pops, the main reason I started the thread was to encourage those who have been thinking about it, but making excuses (like I was doing) to plunge in & have a go - you have nothing to lose apart from a few $$ worth of metal, much of which could be recycled for other uses if things go really pear-shaped. I don't think I would recommend tackling a coffin shape on my first go, not because it was all that hard, but it just adds another dimension. I think you would be surprised at how easy it would be to make a small, straight-sided smoother like the one Derek completed from a kit last year.
Peter - I'm really pleased with the peining results myself. Once I realised the trick was to ensure the steel got pushed around more than the brass, it was a comparative doddle. My fears came from that previous attempt where I'd joined brass to brass, & the results were less satisfactory - mostly, I realise now, because I was too timid with the peining. To someone like yourself who has been working metal forever, the way you can make metal move is no surprise, but I would recommend a little practice-run for those who've never tried it before - it will boost your confidence no end when you see how those gaps close up!
And my blurb is a bit misleading - I scrapped the original sole plate & started over. I thought about a few ways of fixing the mouth, along the lines of your various helpful suggestions, but each would have involved compromises I wasn't prepared to make. A half day's work & a few cents worth of steel isn't the end of the earth.
Derek, I take on board what you say about the mouth width being less important as the angle increases - at least I can be more relaxed about the final fit!
The bed angle will end up something less than 55 - that was the angle I started with, but with fitting & filing the chatterblock & the wood, it will sneak back a deg or two, I think. I think anywhere between 50 & 55 will give me what I'm after.
I do have some of that Rock-oak still, possibly enough to stuff the plane, but I really want to use the She-oak, both because of its connections to where I was spawned & because I am more experienced with it & know it to be a reliable & stable material.
Ray - yes I have included an anti-chatter block. I put that in before assembling the sides, because I thought it would be much easier filing it flush with the back of the mouth without the sides getting in the way.
No, the lever cap isn't drilled, yet. That will be done last, when I can clamp it in place & get it spot-on.
Thanks for the offer of some Oak, but in fact I would prefer to laminate the back bits, this time, as it's much easier to get the result I want that way. I have plenty of material big enough for the bun, so that's no problem.
I will have to work on it intermittently for the next little while - the day job & other responsibilities are crowding in, but I would rather take it slowly than have any more stuff-ups (we've had good rain here at last, too, so LOML will have me back on yard-duty this weekend ). Still deciding whether to over-stuff or keep the wood inside the metal & make a nice chamfer on the brass - each has its appeal. For those who want more build info, I'm keeping notes, so when it's done, I will make a PDF for anyone interested.
A couple more pics to help answer some of the questions raised so far:
1. The scrapped & new soles! Starting over.jpg
2. The anti-chatter block riveted in place. Anti-chatter block fixed.jpg
3 & 4. My cap-iron bending jig (any resemblance to a drunken mud-dauber wasp's efforts & my welding are entirely co-incidental. ) It worked beautifully, & I got a perfectly controlled rollover, once I finally got it set up in the vice - having only two hands is a real nuisance, at times! Cap_iron bending jig.jpg Bending cap_iron.jpg
Cheers,Last edited by IanW; 30th December 2019 at 09:13 AM.
IW
-
3rd February 2010, 10:37 AM #9
GOLD MEMBER
- Join Date
- Jun 2008
- Location
- Victoria, Australia
- Age
- 74
- Posts
- 6,132
Hi Ian,
When I made mine, I closed up the mouth by going to a thicker blade...
The coffin shape, is stiffer IMHO, and while a bit more work, most of the extra work is in the inletting of the overstuffing.
Here is a drive-by gloat, .......... sorry I couldn't resist.
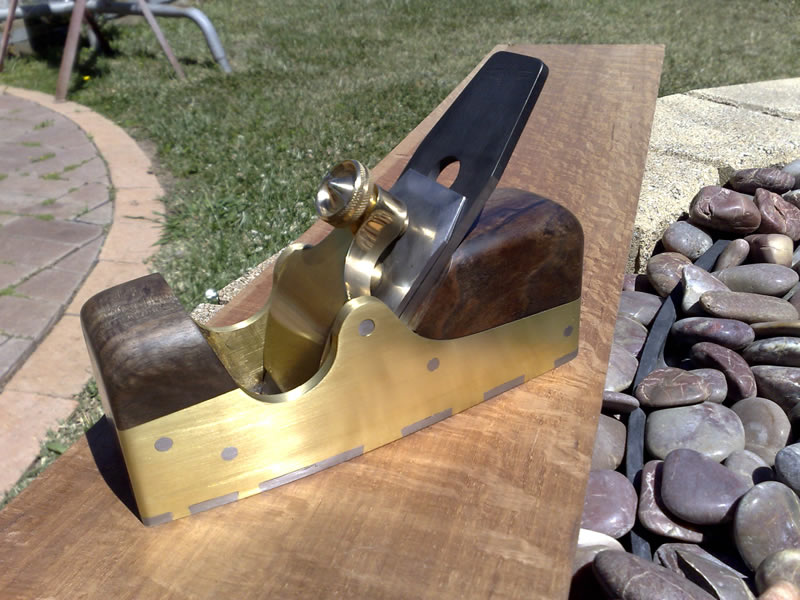
Apologies Ian, I am not normally one for drive-by gloats... but there is something about making planes...
Regards
Ray
-
3rd February 2010, 10:46 AM #10
GOLD MEMBER
- Join Date
- Mar 2005
- Location
- In the shed, Melbourne
- Age
- 52
- Posts
- 6,883
-
3rd February 2010, 11:04 AM #11
Member
- Join Date
- Aug 2009
- Location
- Lara, Vic, Oz
- Posts
- 58
Beaut work Ian, as always
 , will follow progress with great interest. This has motivated me to have a go myself!
Cheers
Si
-
3rd February 2010, 11:06 AM #12
GOLD MEMBER
- Join Date
- Mar 2004
- Location
- Brisbane (western suburbs)
- Age
- 78
- Posts
- 12,148
Ray - the blade I am using is a Paul Williams (long story!) so I am not keen to substitute it. But it WAS one course I considered. Originally Posted by RayG

Yeah - it was precisely because my side material is a bit thinner than I would have liked that I favoured the bend. I think it adds noticeably to stiffness & very happy the stuff-up occurred, now. Yours has much thicker sides - looks like 3/16" - is that so? Bending that thickness would be a challenge!
Still can't decide whether to overstuff or not - I like both ways. The thing that's leaning me to not overstuff is I have made the sides higher than the equivalent Spiers - again looking to increase stiffness - but it gives me less room to play with the stuffing. I'll keep my options open, for a while.
No need to apologise - it's a beauty, & should be shown off at any opportunity. P'raps we should put together a calender set, one of these days? Originally Posted by RayG
Avagooday,IW
-
3rd February 2010, 11:08 AM #13
GOLD MEMBER
- Join Date
- Mar 2004
- Location
- Brisbane (western suburbs)
- Age
- 78
- Posts
- 12,148
Excellent - that was my main agenda! Originally Posted by SiJ
IW
-
4th February 2010, 09:21 AM #14
GOLD MEMBER
- Join Date
- Jun 2008
- Location
- Victoria, Australia
- Age
- 74
- Posts
- 6,132
Hi Ian, Originally Posted by IanW
Not overstuffing gives you the opportunity to do some decorative work on the chamfering.
Looking forward to seeing more progress pictures..
Regards
Ray
-
4th February 2010, 11:41 AM #15
GOLD MEMBER
- Join Date
- Jun 2007
- Location
- North Of The Boarder
- Age
- 68
- Posts
- 16,794
Now thats nice work looking forward to seeing the finished plane


 Reply With Quote


 Very nice.

Similar Threads
-
Record model 735 plane? + a mini plane
By MICKYG in forum WOODWORK PICSReplies: 5Last Post: 28th February 2009, 08:12 AM -
Veritas 5-1/4 Bench Plane Vs Low-Angle Jack Plane
By Wolfs in forum HAND TOOLS - UNPOWEREDReplies: 10Last Post: 30th April 2008, 01:43 PM -
Jack plane converted to scrub plane...???
By Greg_stewy in forum HAND TOOLS - UNPOWEREDReplies: 4Last Post: 7th June 2007, 10:59 AM -
LN Skew Block Plane or LV Shoulder Plane
By mat in forum HAND TOOLS - UNPOWEREDReplies: 3Last Post: 25th October 2006, 06:46 PM -
Kudos to Lee Valley- Scrub Plane; and Shoulder plane question
By lyptus in forum HAND TOOLS - UNPOWEREDReplies: 5Last Post: 12th July 2005, 08:07 PM
