

 Thanks:
  Likes:
  Needs Pictures: 0
 Picture(s) thanks:
Results 1 to 10 of 10
Thread: A plane hammer
-
17th August 2020, 09:14 PM #1
 GOLD MEMBER

- Join Date
- Oct 2018
- Location
- Dandenong Ranges
- Posts
- 1,892
 A plane hammer
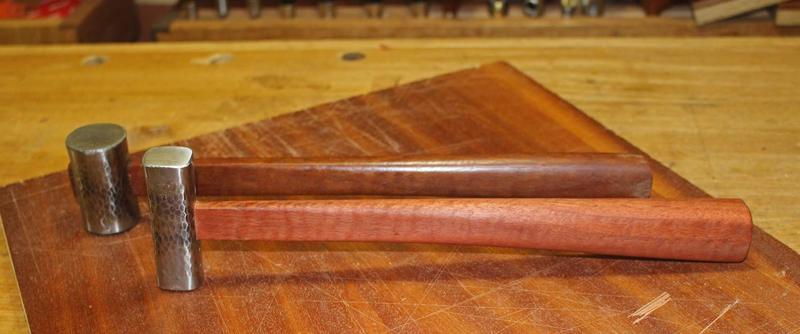
Hi all. Stage 4 restrictions have really given me some extra time to get stuck into some more projects. For some time (as my interest in, and collection of, wooden planes grows) I have felt the need for a double headed hammer - metal one end and timber the other. A posted question in another thread led to an offer of some brass and thanks to Matt, I am able to show you some pictures of my finished plane hammer.
20200817_164558.jpg
The timber is Bloodwood (Corymbia Opaca) and is one the toughest timbers I have tried to turn and/or plane. The grain was all over the place and some tearout is still visible.
20200817_164616.jpg
It took me 2 attempts to get the handle right. First time I drilled a round mortice and turned the tenon but even though I thought I had checked everything the hole in the brass was off centre. And the handle was too short! Round tenons in round mortices are hard to secure and squaring up the hole in the head gave me a chance to re centre and avoid pinning head to handle.
20200817_164551.jpg
The timber striking end is a more successful example of a round tenon and a better attempt at drilling a centred hole. The "plug" is super glued in and the handle wedged both in the "x" and "y" axis (helps fill a slightly over filed hole). The timber has finished nicely and I got to try turning metal on my wood lathe (with HSS chisels). The longish handle seems common with this style, and it does help distribute the weight of the head better than my shorter version.
-
17th August 2020 09:14 PM # ADSGoogle Adsense Advertisement
- Join Date
- Always
- Location
- Advertising world
- Posts
- Many
-
17th August 2020, 09:52 PM #2
GOLD MEMBER
- Join Date
- Nov 2011
- Location
- Melbourne
- Posts
- 7,013
M,A
Well that�s come up a treat,love the little coves on the hammer,
Finding centre on bar stock? a machinist trick is too place a small steel ruler over the stock perpendicular to the axis, then using a point,
Even a pencil will do, hold the ruler on the bar with the pencil till the ruler is horizontal.
I�m now looking forward to using some Bloodwood I just happen to have to hand[emoji6].
Any chance of dimension on the hammer.
Cheers Matt.
-
17th August 2020, 11:22 PM #3
GOLD MEMBER
- Join Date
- Oct 2018
- Location
- Dandenong Ranges
- Posts
- 1,892
Hi Matt. Diameter of brass is 25mm
 . Hee hee! Hammer head is a bit under 100mm long and handle is around 380mm long. Majority of the handle is around 18mm in diameter. I hope you like the look of tbe bloodwood. Dressing it is going to be a challenge. Planing the flats on the handle was a pleasure on one side, not so on the other. Very little warning of change of direction and big chunks came out. Quite brittle I suppose. Intersting spiral effect which doesn't show in the photos. Lots of little "furry" spots too, more grain variation.
-
17th August 2020, 11:59 PM #4
Be inspired. Be creative. Be bold.


- Join Date
- Apr 2001
- Location
- Perth
- Posts
- 10,821
MA, that looks like mine!

I used UHMW on mine. Better wearing, and will not crack, as wood eventually does ...


Regards from Perth
DerekVisit www.inthewoodshop.com for tutorials on constructing handtools, handtool reviews, and my trials and tribulations with furniture builds.
-
18th August 2020, 02:59 PM #5
GOLD MEMBER
- Join Date
- Oct 2018
- Location
- Dandenong Ranges
- Posts
- 1,892
Hi Derek. Great minds think alike? Based on the number of times I have read and re read articles on your site, I'm sure that I have subconsciously absorbed many of your designs
 .
.
Did you have to pin the brass head to the handle to stop it rotating?
-
18th August 2020, 03:33 PM #6
Be inspired. Be creative. Be bold.
- Join Date
- Apr 2001
- Location
- Perth
- Posts
- 10,821
MA, that particular hammer is wedged ...

Another way might be as Japanese gennou are treated ...
This is to compress the wood fibres at the end of the handle shaft with a hammer, insert the head, and allow the compressed wood to uncompress.
Regards from Perth
DerekVisit www.inthewoodshop.com for tutorials on constructing handtools, handtool reviews, and my trials and tribulations with furniture builds.
-
24th August 2020, 09:13 PM #7
Member
- Join Date
- Jul 2017
- Location
- Melbourne
- Age
- 37
- Posts
- 53
Looks great! I�ve been meaning to make one similar for some time now. Thanks for the inspiration!
Sent from my iPhone using Tapatalk
-
26th August 2020, 09:36 AM #8
GOLD MEMBER
- Join Date
- Mar 2004
- Location
- Brisbane (western suburbs)
- Age
- 77
- Posts
- 12,124
The eye of a hammer head should taper from both sides to the middle. The tenon of the handle fits the thinnest part of the hole snugly, but tapers up into the rest of the handle so that when you drive the handle home, it tightens up on that side, & wedging the exit side locks it in from both sides. Some handles inevitably come loose over time, thanks to repeated moisture cycles & crushing of wood fibres beyond their elastic limit.
These are my lot, made from scraps & leftovers: Brass hammers.jpg
I used a coarse round file to elongate both sides of the eye after drilling. Wedged heads.jpg
The hammer made from 3/4" square brass bar (centre), is the handiest shape for plane adjusting, I find. Round heads don't seem to fit as well in the confined space between the top of the blade & the top of the tote. The dinky little thing is what I use on my thumb planes. It's made from a scrap left after cutting out a lever cap - it occurred to me one day that this is about the only use I could make of such an odd bit...
Cheers,IW
-
26th August 2020, 11:07 AM #9
GOLD MEMBER
- Join Date
- Jul 2011
- Location
- In between houses
- Posts
- 1,784
I just fit the handles to a tight fit, put them in the head, and stick the head and the end of the handle in a bucket of water for a couple of days, wood swells up and tightens up
-
26th August 2020, 07:28 PM #10
GOLD MEMBER
- Join Date
- Mar 2004
- Location
- Brisbane (western suburbs)
- Age
- 77
- Posts
- 12,124
Yeah, RB, but what happens after a week or three of dessicating dry weather like we've just experienced? Originally Posted by riverbuilder

None of my hammer handles have come loose, but I've got several fingers with (painful!) deep cracks beside the nails....
IW

 Reply With Quote


Similar Threads
-
Shop Made Plane Adjustment Hammer
By Luke Maddux in forum HOMEMADE TOOLS AND JIGS ETC.Replies: 4Last Post: 15th March 2017, 12:59 PM -
Got a HNT Gordon Radius plane; needed an adjusting hammer!
By DomAU in forum HOMEMADE TOOLS AND JIGS ETC.Replies: 3Last Post: 14th March 2017, 02:21 AM -
Plane setting hammer/mallet
By orraloon in forum HOMEMADE TOOLS AND JIGS ETC.Replies: 5Last Post: 31st October 2013, 11:39 AM -
Plane setting hammer
By AlexS in forum HOMEMADE TOOLS AND JIGS ETC.Replies: 11Last Post: 16th June 2005, 11:10 PM -
Plane Setting Hammer
By DarrylF in forum WOODWORK PICSReplies: 3Last Post: 12th September 2004, 07:43 AM
