

 Thanks: 0
 Likes: 0
 Needs Pictures: 0
 Picture(s) thanks: 0
Results 16 to 29 of 29
-
16th September 2011, 11:20 PM #16
 GOLD MEMBER


- Join Date
- Sep 2010
- Location
- Sydney
- Posts
- 1,984

Derek could you please elaborate on the function of the piece of Jarrah holding the blade or is this already on your website?
-
16th September 2011 11:20 PM # ADSGoogle Adsense Advertisement
- Join Date
- Always
- Location
- Advertising world
- Posts
- Many
-
16th September 2011, 11:51 PM #17
Be inspired. Be creative. Be bold.
- Join Date
- Apr 2001
- Location
- Perth
- Posts
- 10,860
The Jarrah is not significant ...
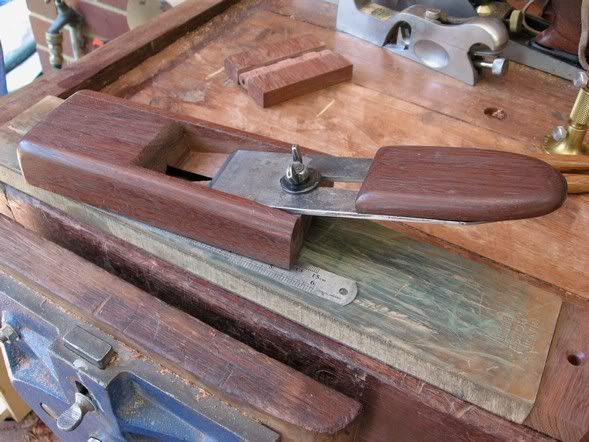
Just the handle on my chamfer plane.
Regards from Perth
DerekVisit www.inthewoodshop.com for tutorials on constructing handtools, handtool reviews, and my trials and tribulations with furniture builds.
-
17th September 2011, 05:51 AM #18
Senior Member
- Join Date
- Nov 2008
- Location
- usa
- Posts
- 161
I know you've already resolved this one, but a trick I have borrowed from Japanese planes is to tap out the blade. that is, using a big hammer with a slightly domed face gently work a slight curve in the blade, giving you more metal at the edge to lap out. you're really creating a back bevel as when you mount the blade in the plane the frog and cap will pull it back to straight. however it makes sharpening a lot more straightforward.
this probably won't work with some of the modern super hardened steels. it does work a treat with really old wrought iron/crucible steel laminated blades.
 Originally Posted by snafuspyramid

-
18th September 2011, 03:30 PM #19
Hewer of wood
- Join Date
- Jan 2002
- Location
- Melbourne, Aus.
- Age
- 71
- Posts
- 12,746
Another after-the-fact comment:
Should be no drama putting a back-bevel on. Will work better on cranky grain. On straight grain just skew the plane to drop the effective cutting angle back.
Can someone with geometry nous work out some compensation angles for skewing? Beyond me.
Otherwise, yes, you can obsess about getting a mirror finish on the back but why not try a pitted blade to see if it really causes serious grief?
I would've gone for an aftermarket blade for the improved steel quality; but even a Hock needs lapping and so you still risk operator frustration not to mention cramped paws!Cheers, Ern
-
22nd September 2011, 12:24 PM #20
GOLD MEMBER
- Join Date
- Aug 2004
- Location
- Brisbane
- Posts
- 5,013
I was going to work it out from first principles but some kind soul has already published it here. I double checked it and it is correct. Perhaps now we can put the myth that a ramped shooting board offers a skew angle to bed forever. Of course skewing is only possible when the edge of the plane is travelling at an angle to the direction of the plane. In a ramped shooting board the edge angle is normal to the direction of motion using a standard (non skew) plane. Which ever way you orient the wood to the plane, doesn't change a thing with regard to skew angle. To contend otherwise you must also contend that when flattening a panel and planing diagonally across the grain, this must be a skew cut! Originally Posted by rsser
memento mori
-
22nd September 2011, 04:51 PM #21
Be inspired. Be creative. Be bold.
- Join Date
- Apr 2001
- Location
- Perth
- Posts
- 10,860
Hi Mic
A ramped shooting board does not create a skew cut, but it does utilise a progressive cut. That is, where a flat board (with a plane that has a square blade) has the blade striking the work piece on the square, a ramped board has the same plane striking the board at an angle. This reduces the impact during planing. A skew-blade plane does the same thing. And this is additive, that is, a skewed blade on a ramped board has the least impact shock.
See: http://www.inthewoodshop.com/Furnitu...sCompared.html
Incidentally, as I understand, the article you cite is not about ramped shooting boards, but about skewing the plane when planing face grain.
Regards from Perth
DerekVisit www.inthewoodshop.com for tutorials on constructing handtools, handtool reviews, and my trials and tribulations with furniture builds.
-
23rd September 2011, 10:56 AM #22
GOLD MEMBER
- Join Date
- Aug 2004
- Location
- Brisbane
- Posts
- 5,013
Glad to see you are on board with that. As recently as this year you were saying that the 5º ramp adds a 5º skew cut. However, you may have made a new, or extra definition (as is the wont of world-leading experts) of a skew cut ( other than lowering the apparent angle), which needed more careful explanation to us poor punters who follow you blindly. Originally Posted by derekcohen
Undoubtedly the ramp reduces the surface area of the initial contact between the blade and wood, reducing the initial force the wood applies to the plane and making a less jolty impact.
That original article is about the mathematical principle that defines the skew cut and clearly shows that the fundamental ability to produce a standard-definition skew cut (a lowering of the apparent angle) is a function solely, only, and exclusively, of angle between the edge of the blade and the vector of motion of the plane. Although I have only low insight, I was able to realise it is a property that resides entirely with the plane and is independent of whether the plane is used on face grain, side grain, end grain, mdf, acrylic, the shape of the material, and is just applicable to whether the plane is upright or lying on its side on a shooting board, ramped or not. A (standard-definition)skew cut (a lowering of the apparent angle) can never come from the orientation of the work.memento mori
-
23rd September 2011, 11:35 AM #23
The Laird
- Join Date
- Jan 2007
- Location
- Katoomba NSW
- Posts
- 4,778
Back on track. We seem to have skewed off at an angle there for a while

Blade arrived today. Will sort it out on the weekend and send it back.
(Hope I remembered to keep the return address ) Snafus you better pm it to me just in case.
-
5th October 2011, 10:00 AM #24
Rank Beginner
- Join Date
- Jun 2011
- Location
- Melbourne
- Posts
- 484
Well I have received the "finished" iron from NCArcher and I have to say, it's a significant improvement on what I could have managed myself, even with a great deal of time at my disposal. I've been rounding off the edges without actually flattening the back too well, probably because I've been using too course a grit. I've done the same to a few chisels which I've sent off in the hope that they too might be saved. I suppose I'm just too impatient.
I think I might stick to the 120 sigma for initial flattening, the sandpaper has been doing more harm than good
Thanks againCheers,
Eddie
-
5th October 2011, 10:17 AM #25
Hewer of wood
- Join Date
- Jan 2002
- Location
- Melbourne, Aus.
- Age
- 71
- Posts
- 12,746
Yes, dubbing over the corners is normal with common coarse sheet abrasive on a flat surface.
Cheers, Ern
-
5th October 2011, 05:32 PM #26
GOLD MEMBER
- Join Date
- Mar 2004
- Location
- Brisbane (western suburbs)
- Age
- 78
- Posts
- 12,171
And also with fine paper! You just don't notice it as much until you apply the blade to a hard surface like a diamond plate. Originally Posted by rsser
 IW
IW
-
5th October 2011, 07:33 PM #27
Hewer of wood
- Join Date
- Jan 2002
- Location
- Melbourne, Aus.
- Age
- 71
- Posts
- 12,746
Yeah. Though the 3M microabrasive sheets perform better here than W&D. Esp. on a really flat surface.
Cheers, Ern
-
5th October 2011, 08:23 PM #28
Rank Beginner
- Join Date
- Jun 2011
- Location
- Melbourne
- Posts
- 484
So using stones is the way to go? As I mentioned, once I realised what I was doing to my chisels (i.e. making them worse) I switched to using the #120 Sigma for flattening.
It stays very very flat.
But boy, is it slow.
From there, it's up to the 1000 and 6000 King stones, then the Veritas green strop on MDF (which is, incidentally, excellent). The 1000 does dish pretty quickly, but it's not an issue provided I get into a rhythm with flattening it.
Stu has a new stone for sale, the King Deluxe #300. I'm not really sure how it compares to the Sigma for cutting speed, but I'm tired of the flattening process for the Sigma (it's awful). I want something I can flatten on WD like my other stones, but don't know whether the King fits the bill. Anyone ever used one?
It's a new, very hard, composition. Not the old traditional clay binder ones.Cheers,
Eddie
-
6th October 2011, 07:53 AM #29
Hewer of wood
- Join Date
- Jan 2002
- Location
- Melbourne, Aus.
- Age
- 71
- Posts
- 12,746
Coarse waterstones are the best value proposition in my book for starting the work. I use a #120 Shapton and a #240 Sigma Power II. Then it's possible to jump to 15 micron 3M microabrasive sheet in the Woodpeckers Honing system followed by 5 and 0.3.
But how slow is slow? I'd expect eg. a 1000 strokes on a bedded-in coarse diamond plate to flatten the back of a quality 1" chisel. (This is flattening to about 30-35mm from the edge).
How many strokes is the #120 Sigma taking you?Last edited by rsser; 6th October 2011 at 10:40 AM. Reason: water added to stones in line 1; length of flat added
Cheers, Ern


 Reply With Quote


Similar Threads
-
Chipped plane Iron
By groeneaj in forum WOODWORK - GENERALReplies: 15Last Post: 2nd November 2010, 03:21 PM -
Help to identify plane iron manufacturer
By sergeydove in forum HAND TOOLS - UNPOWEREDReplies: 0Last Post: 12th July 2009, 07:27 PM -
help identify this plane iron
By sergeydove in forum HAND TOOLS - UNPOWEREDReplies: 0Last Post: 10th July 2009, 08:13 PM -
Plane Iron pitting
By John Saxton in forum HAND TOOLS - UNPOWEREDReplies: 5Last Post: 19th January 2006, 08:51 PM
