

 Thanks: 0
 Likes:
  Needs Pictures: 0
 Picture(s) thanks: 0
Results 1 to 15 of 18
-
8th April 2013, 12:17 AM #1
 Be inspired. Be creative. Be bold.


- Join Date
- Apr 2001
- Location
- Perth
- Posts
- 10,826
 Preparing for the Perth LN Tool Event
Next weekend in Perth is the LN Tool Event. This is the third or fourth year it has been held. Each year I have been invited to provide a weekend of demonstrations. I have tried to vary these. This year I suggested plane making and, before I could change my mind, this appeared on the adverts. It dawned on me shortly after this that I should have suggested something simpler.

In for a penny, in for a pound ... I spend the past three weekends building planes to take with me as examples. I have a number of planes I have built over the years that I could take along as examples - a recent bridle plough and a jointer, two dovetail planes (one male and one female) ... the list is quite long. However I thought I needed something fresh.
I also realised that the type of planes I could build in front of an audience (whom I am sure will get bored and move on) would be limited to those I could chop out in front of them. Some thing like a coffin smoother. So I have planned for this. The problem with these planes is that they are not for absolute beginners. The easiest plane to build is a laminated body, notably the Krenov plane (with a correctly shaped cross piece, which is the most important part of the design). However these are machine-made planes, which I cannot do at the Tool Event. To demonstrate these planes, then, I have made up a model that can be broken down, and several examples of a Krenov.
The third type of plane I have to show is a router plane. These are easy to build with a drill press. I shall give anyone interested a plan to use at home, plus demonstrate its use. I've made up a few for sale as well.
Here is a my bench as I tidied up this evening ...
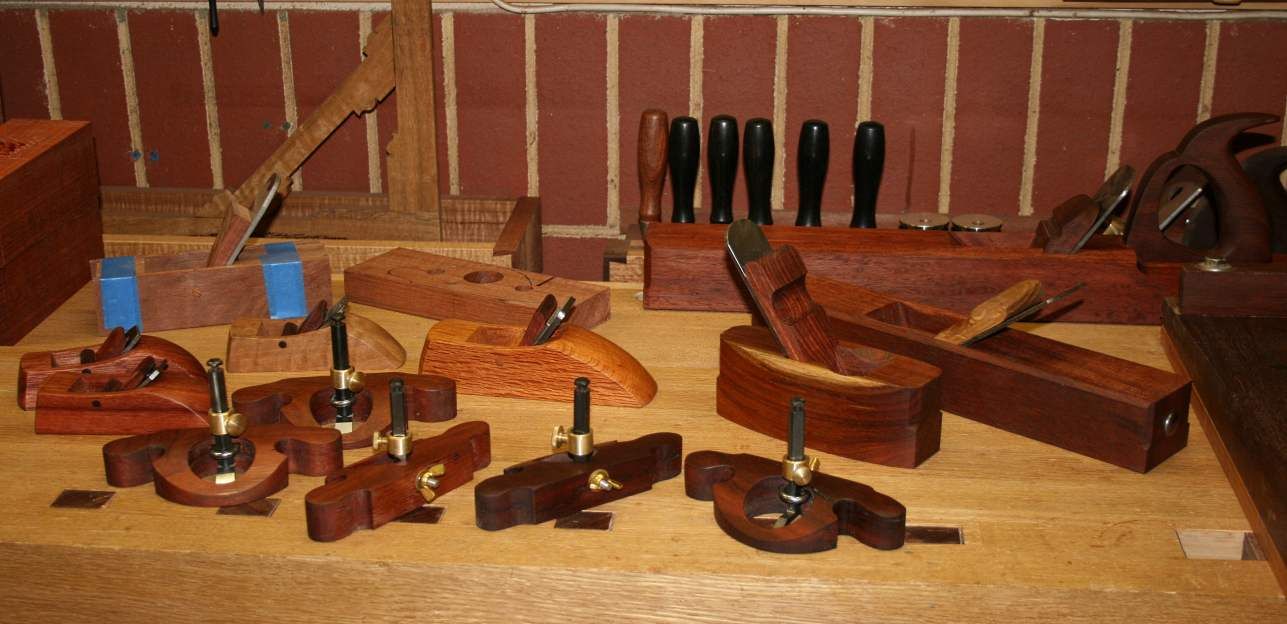
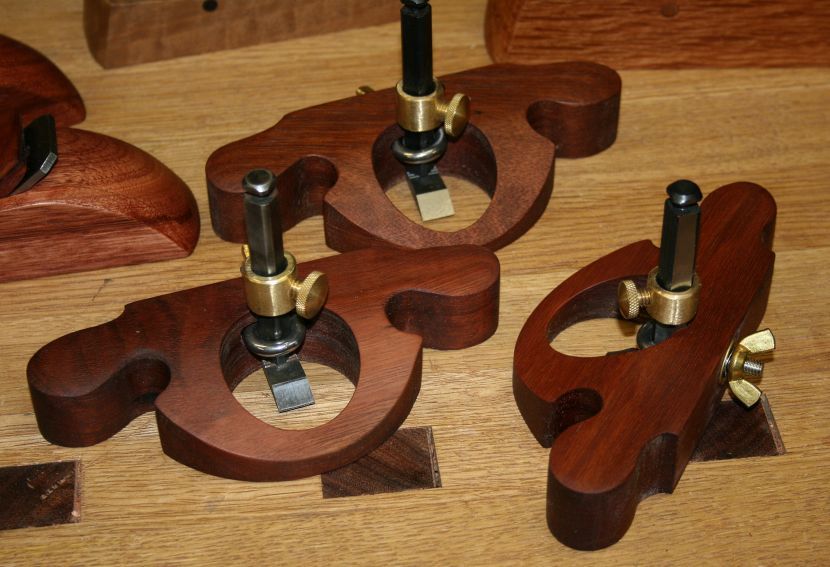
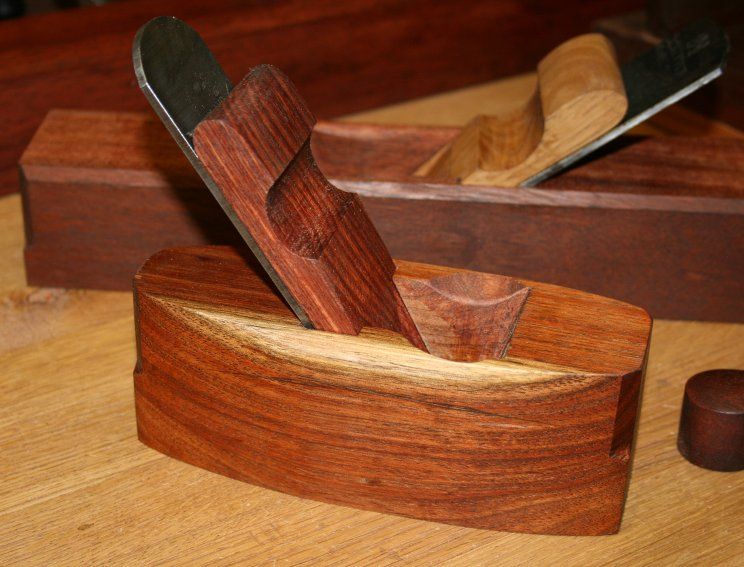
I really like these router planes. They are what I would call a "Medium" - smaller than a large and larger than a small. Really an excellent size, nimble and very precise. Think of them as a woodie - they do not need an fine adjuster as they are adjusted with a light tap from a mallet. The planes use the Veritas irons, so there is a range from 1/8' through to 1/2" available (there's a 1/4" and 1/2" with each one on sale). The blade holder uses a wavy washer (like the Veritas), which means that you can loosen the wing nut and the blade will not drop out. There is a depth stop (which I consider a vital piece of equipment with a router plane).
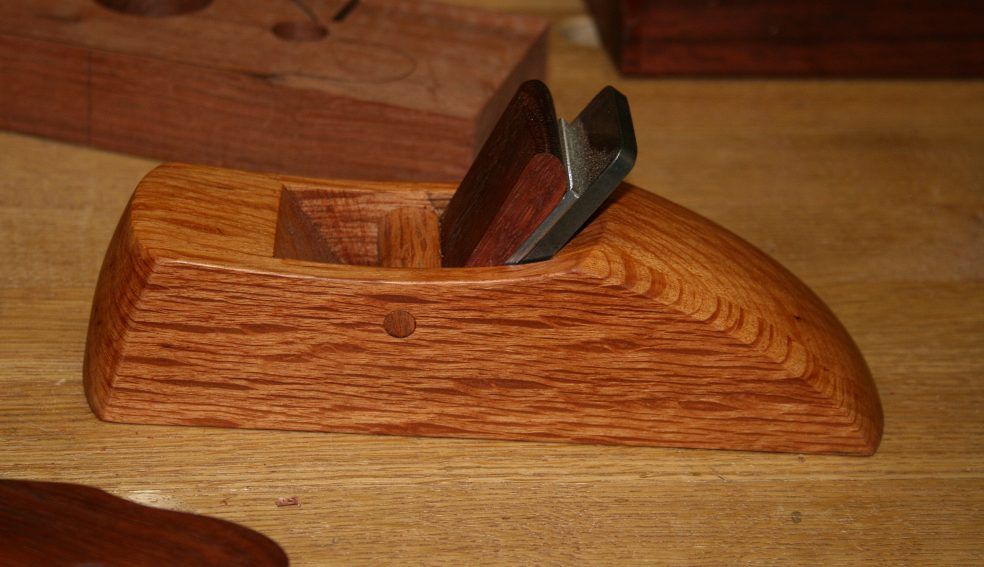
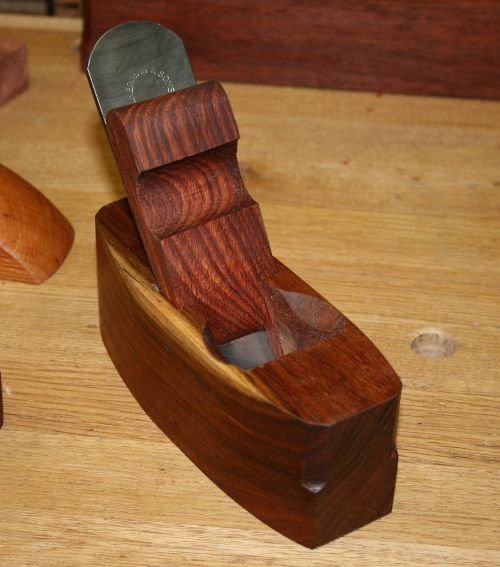
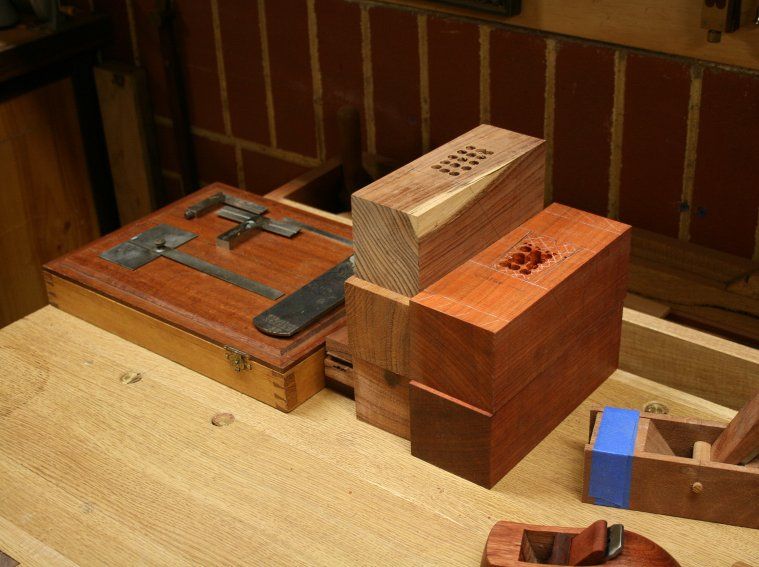
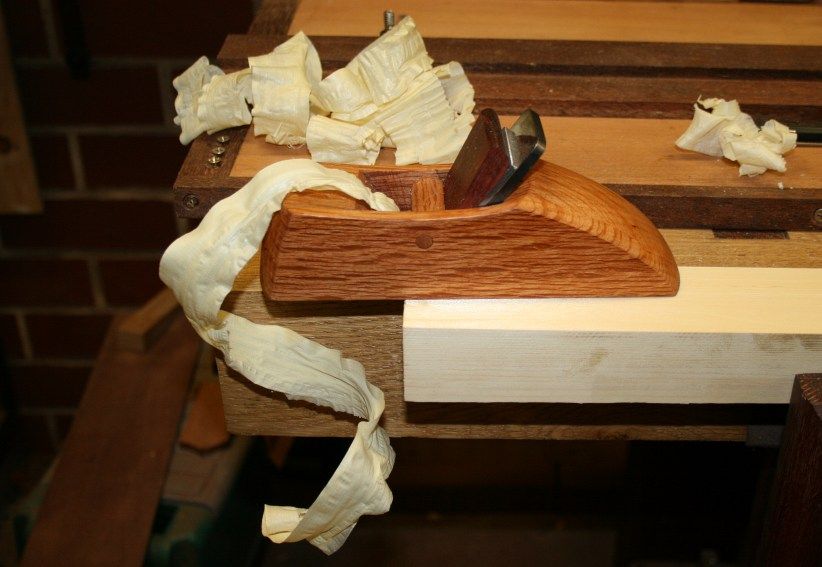
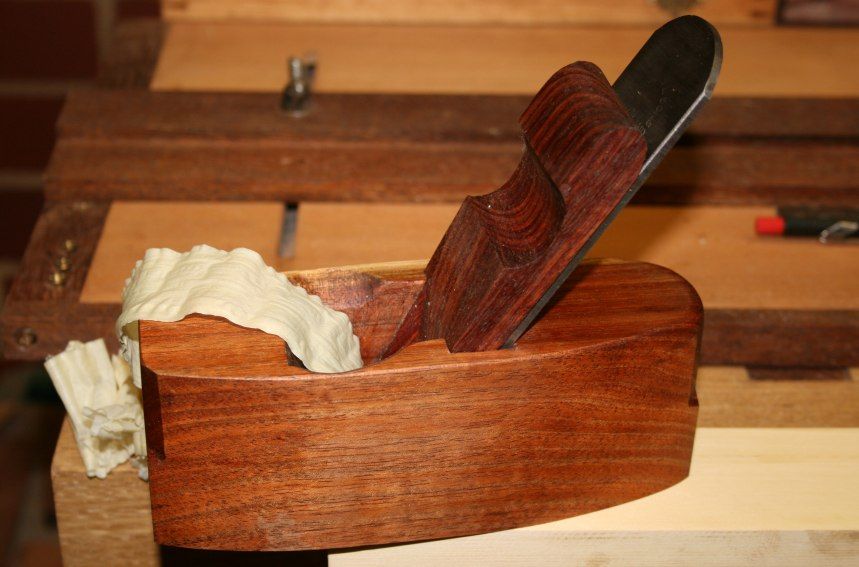
Krenov smoother in West Australian She-oak. This is 7" long, with a 1 1/2" Hock blade/chipbreaker at 55 degrees.
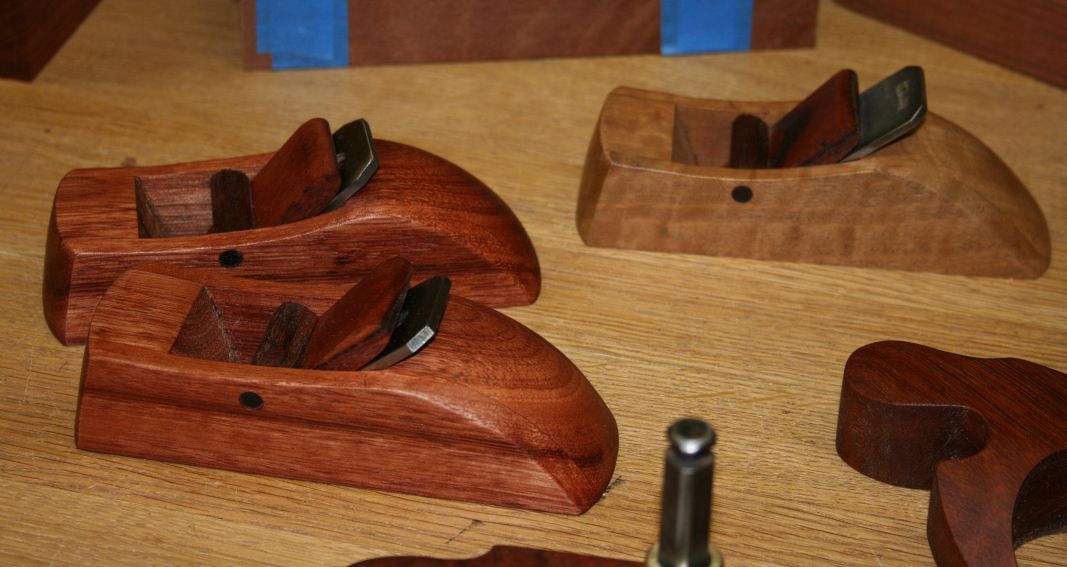
Three Krenov block planes. 5 1/4" long, with two in Jarrah and a third in Tuart. 1 1/4" Mujingfang blades (from Lee Valley), bedded at 40 degrees.
I am so impressed with these Krenov planes. I have an original plane from Jim Krenov, which I use on occasions, but otherwise have never had much interest in building these planes. They are soooo sweet!
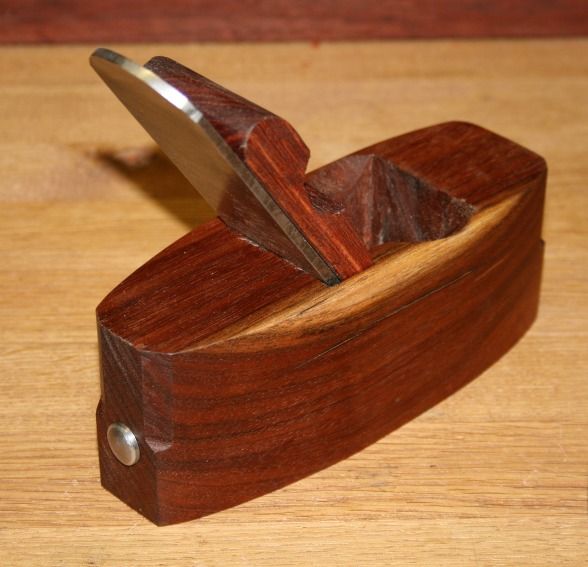
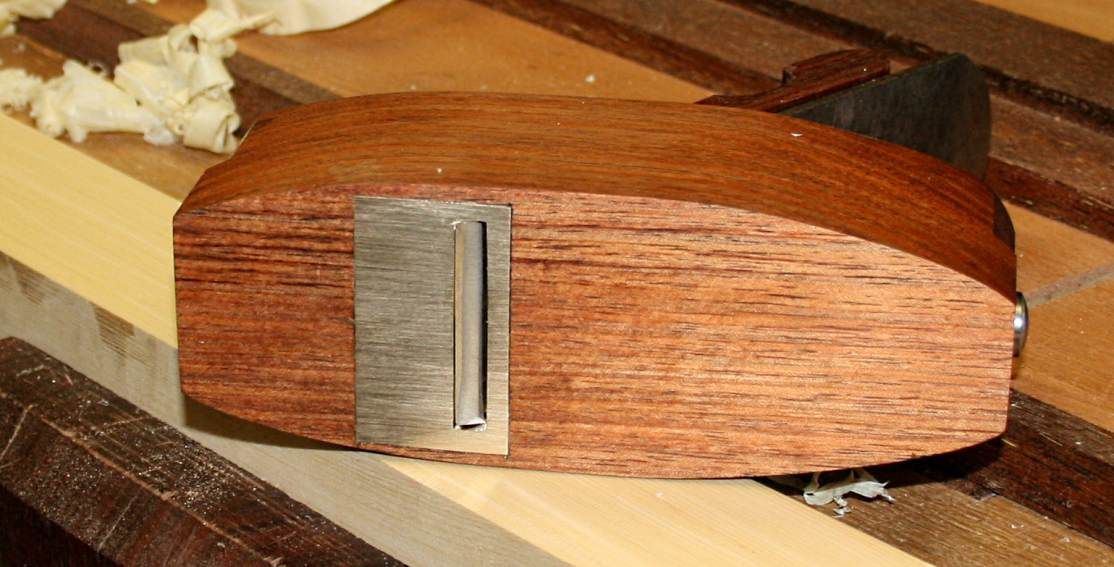
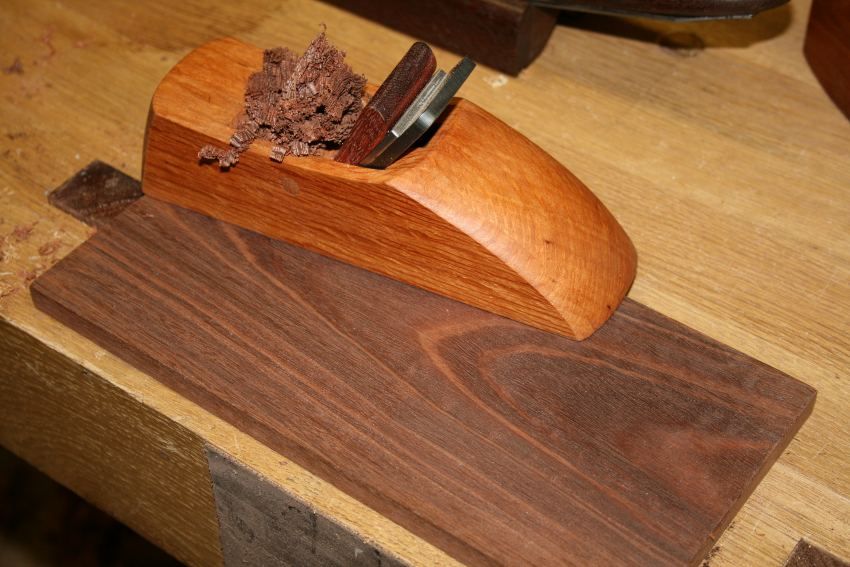
I built this coffin smoother today. The body is my favourite Tasmanian Blackwood (similar to Koa). The 1 3/4" iron is a (NOS) J.Herring & Sons, which is laminated and tapered. The body is 6 3/4" long.
You have seen the 15" Jarrah Strike Block Plane already ...
Here is the Krenov that can be pulled apart. Along side it is an example of the router plane post drilling and pre sawing ...
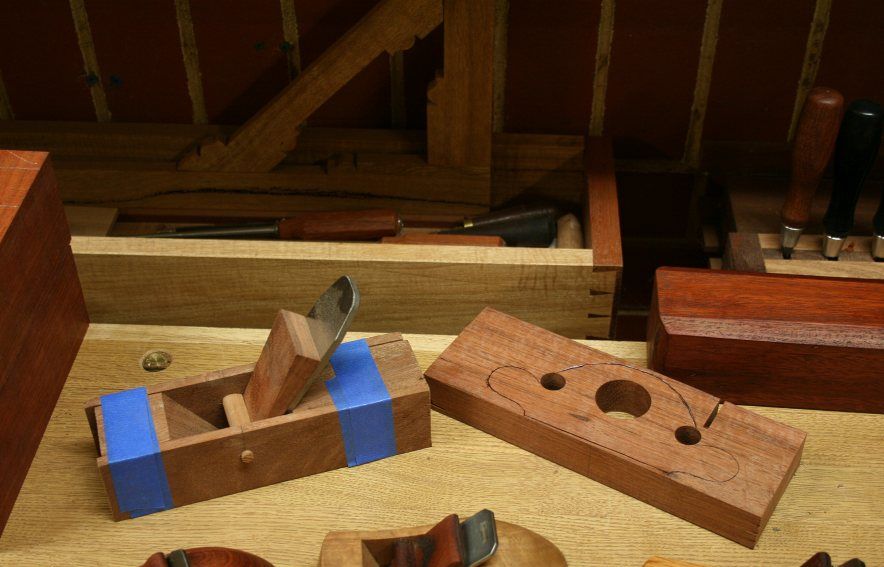
Lastly, there are blanks in various stages for building the smoothers ..
All suggestions welcomed.
Regards from Perth
DerekVisit www.inthewoodshop.com for tutorials on constructing handtools, handtool reviews, and my trials and tribulations with furniture builds.
-
8th April 2013 12:17 AM # ADSGoogle Adsense Advertisement
- Join Date
- Always
- Location
- Advertising world
- Posts
- Many
-
8th April 2013, 09:08 AM #2
GOLD MEMBER
- Join Date
- Mar 2004
- Location
- Brisbane (western suburbs)
- Age
- 77
- Posts
- 12,132
Nifty stuff Derek - you have run an industrious little factory, there! From my experience at wood shows, I reckon you should draw a good crowd with that lot - the punters will gather like honey-bees to nectar wherever they see a few chips fly. Seeing something like this done is a great motivator, it often demystifies something you thought was too difficult to attempt yourself. The throat of a solid-bodied plane is a good example. I know I avoided trying one for many years, but once I actually got down to it, it wasn't so bad. Could be an epidemic of wooden plane-making about to start in Perth....

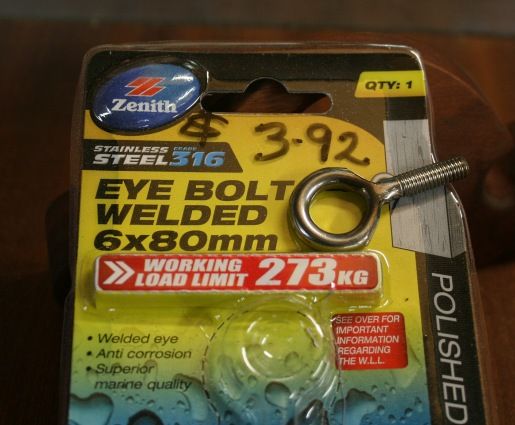
One question, is the eye-bolt holding the blade of your router a standard hardware-store item? You mention a 'curvy washer', to stop the blade falling out, but wouldn't the brass collar cum depth stop serve that purpose? I'm having trouble reconciling it all with the pics - can you show us a dis-assembled view to make it clearer to this dim old brain, please?
I've been 'getting around' to making myself one of these little routers for years, & I think you've just kick-started me at last.......
Cheers,IW
-
8th April 2013, 11:25 AM #3
.
- Join Date
- Feb 2006
- Location
- Perth
- Posts
- 27,794
Hi Derek - great work - I really do like that Blackwood CS.
Is there any particular reason why you use a series of small holes rather than a couple of larger (eg forester bit) holes to start the excavation of the mouth?
I realise you are generating a slope but I wonder if using a suitable wedge, clamps and DP vice would do it, or maybe the angles are a bit steep ?
Cheers
Bob
-
8th April 2013, 03:30 PM #4
GOLD MEMBER
- Join Date
- Mar 2009
- Location
- Sydney
- Age
- 37
- Posts
- 2,711
Nice work Derek. I'd love to see some shavings from your she-oak smoother

-
8th April 2013, 09:57 PM #5
Luddite Lite
- Join Date
- Jan 2009
- Location
- Brisbane
- Posts
- 800
Preparing for the Perth LN Tool Event
Oh god, I didn't know I needed a coffin smoother and medium router plane so badly.
 ...I'll just make the other bits smaller.
-
9th April 2013, 01:57 AM #6
Be inspired. Be creative. Be bold.
- Join Date
- Apr 2001
- Location
- Perth
- Posts
- 10,826
Hi Ian Originally Posted by IanW

I have a pictorial of the router plane in process. Here are a few details.
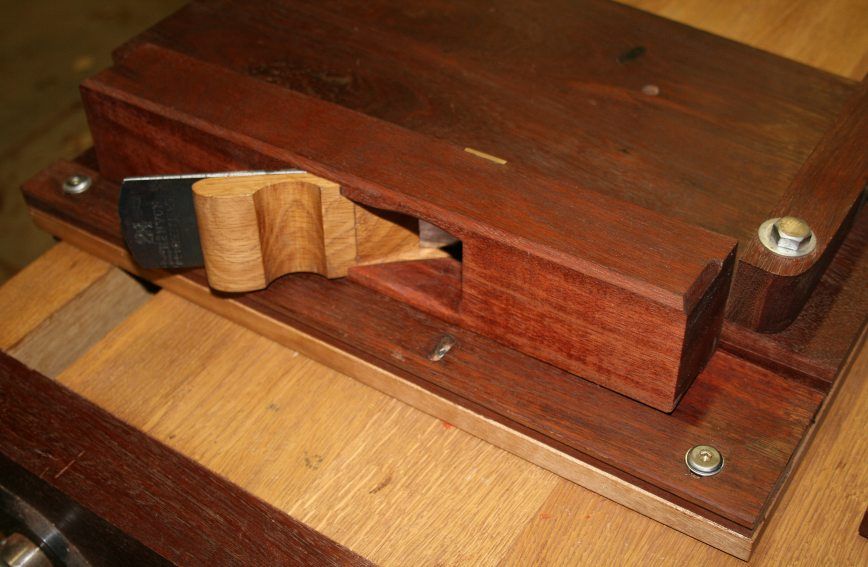
The eye bolt is stainless steel from Bunnings. When fitting it you will need to grind a relief at the underside to aid its bedding.
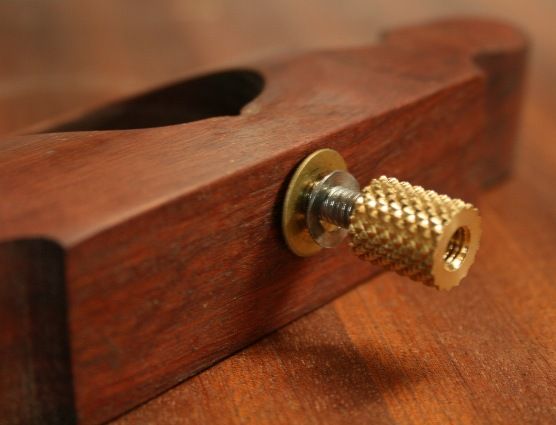
Before I show you the wavy washer, I must show you the new knurled knobs ("brass coupling knobs", from on ebay). They arrived today. I am so pleased with them!
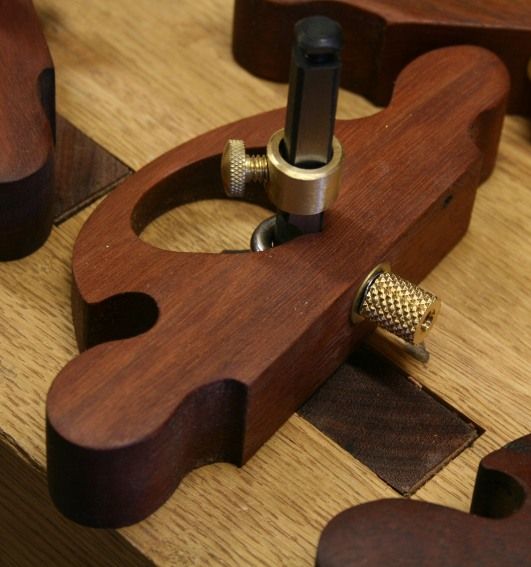
The wavy washer is a spring and it allows the knob to be loosened without losing all tension. So, when loosening off tension on the blade to move it, the blade remains under some tension, but can still be slid up or down. Here it is (between the knurled knob and the brass washer) ..
Regards from Perth
DerekVisit www.inthewoodshop.com for tutorials on constructing handtools, handtool reviews, and my trials and tribulations with furniture builds.
-
9th April 2013, 02:08 AM #7
Be inspired. Be creative. Be bold.
- Join Date
- Apr 2001
- Location
- Perth
- Posts
- 10,826
Hi Bob Originally Posted by BobL
The bed is 55 degrees. That makes it very difficult to access. Smaller holes allow more control and to follow the bed angle more closely. This is a picture that will apear in the pictorial ..
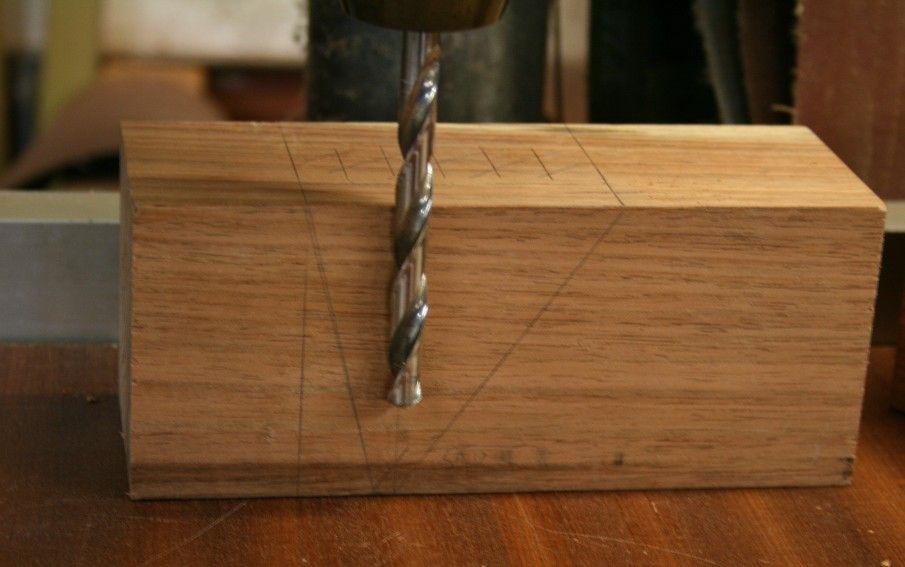
The Blackwood was very tricky to chop. It is beautiful wood to plane, but tends to chip when chiseling. Consequently, I had to make another brass mouth. (It's getting to the point where I shall have to use them as my signature!)
The mouth is very tight ...
Regards from Perth
DerekVisit www.inthewoodshop.com for tutorials on constructing handtools, handtool reviews, and my trials and tribulations with furniture builds.
-
9th April 2013, 02:13 AM #8
Be inspired. Be creative. Be bold.
- Join Date
- Apr 2001
- Location
- Perth
- Posts
- 10,826
Hi Andy Originally Posted by groeneaj
I did not have much in the way of choices for woods to test on. Both the Krenov and the coffin smoother produced identcal performances ..
This Jarrah board produced very curly shaving with both planes ..
Surfaces were left shiny. Nice smoothers.
Regards from Perth
DerekVisit www.inthewoodshop.com for tutorials on constructing handtools, handtool reviews, and my trials and tribulations with furniture builds.
-
9th April 2013, 02:17 AM #9
Be inspired. Be creative. Be bold.
- Join Date
- Apr 2001
- Location
- Perth
- Posts
- 10,826
I'm nor sure if this is helping or not Originally Posted by Berlin
Regards from Perth
DerekVisit www.inthewoodshop.com for tutorials on constructing handtools, handtool reviews, and my trials and tribulations with furniture builds.
-
9th April 2013, 09:15 AM #10
GOLD MEMBER
- Join Date
- Mar 2004
- Location
- Brisbane (western suburbs)
- Age
- 77
- Posts
- 12,132
Thankyou, all very clear now - I wasn't sure if there was something I was missing, but the extra pics show me all I need to plagiarise your design.. Originally Posted by derekcohen
A couple more questions (sorry to pester you, but it saves a lot of bother when someone else has already done the development work!)
1) I assume you've chosen the hole (throat) size as a balance between having support close enough to the blade to keep the tool stable, yet having a good a view of the action?
2) I guess your aim is to keep the job simple and dispense with any unnecessary extras, but do you see any advantage in adding a couple of knob handles, a la the Stanley 71?
The design that was kicking about in my own head was a metal version, which I still may make, eventually, but it's down the list a ways & in the meantime, your machine offers a way to be up & running in half an afternoon (once the necessary bits are in hand).
Hmmm, if you insist on making tools, me lad, you need to invest in a little metal lathe - making knobs like that is almost child's play. Of course it is a fairly substantial investment if that was all you used it for, but if you made 7,364 knobs like that, you'd be in front.... Originally Posted by derekcohen
")
Cheers,IW
-
10th April 2013, 02:00 AM #11
Be inspired. Be creative. Be bold.
- Join Date
- Apr 2001
- Location
- Perth
- Posts
- 10,826
Hi Ian Originally Posted by IanW
The tapered front of the body has two purposes: firstly, it offers great view of the action, as you described it. Secondly, it makes it possible to drill the mortice (for the eye bolt) from the front.
No knobs ala #71, please. This little router plane has the same footprint of a large router plane along its width. This gives it excellent registration. The handles are part of this (I had toyed with the idea of shaping their underside to create outrigger knobs, but realised that this would just reduce the registration area). Knobs would also lift the centre of gravity. The pleasure in this router plane comes from its low centre of gravity. It creates a lot of feedback and control.
A metal working lathe would be nice, but space is at a premium in the workshop. Perhaps kindly friends can help?
Regards from Perth
DerekVisit www.inthewoodshop.com for tutorials on constructing handtools, handtool reviews, and my trials and tribulations with furniture builds.
-
10th April 2013, 10:55 AM #12
Luddite Lite
- Join Date
- Jan 2009
- Location
- Brisbane
- Posts
- 800
Preparing for the Perth LN Tool Event
The Veritas cutters are obviously the best choice but for cheapskate like me, I was wondering whether maybe some big old Allen keys could be doctored to purpose, or would that steel be too grainy to take a good edge?
Either way I am making me a wee router plane. ...I'll just make the other bits smaller.
-
10th April 2013, 05:18 PM #13
Be inspired. Be creative. Be bold.
- Join Date
- Apr 2001
- Location
- Perth
- Posts
- 10,826
The connection for an allen key requires a different shaped groove. The Veritas blade is pointy at each end of the shaft (rear and front), but an allen key is flat. Otherwise it should work. The allen key blade needs to be shaped like the Veritas/Stanley in that the blade is angled. Originally Posted by Berlin
Regards from Perth
DerekVisit www.inthewoodshop.com for tutorials on constructing handtools, handtool reviews, and my trials and tribulations with furniture builds.
-
10th April 2013, 05:58 PM #14
Lignum Vexator
- Join Date
- May 2007
- Location
- North of the coathanger, Sydney
- Age
- 68
- Posts
- 9,417
Nice work Derek
now I fully appreciate what you were talking about the other nightregards
Nick
veni, vidi, tornavi
Without wood it's just ...
-
20th April 2013, 05:29 PM #15
GOLD MEMBER
- Join Date
- Aug 2009
- Location
- Armadale Perth WA
- Age
- 55
- Posts
- 4,524
I couldn't get there, so ... hey Derek, how was the day?
Thanks,
Paul


 Reply With Quote


Similar Threads
-
Tool & Techniques Event (NSW & ACT) 18 & 19 February
By ian in forum ANNOUNCEMENTSReplies: 3Last Post: 4th February 2012, 11:55 PM -
Perth LN Hand Tool Event - a short report
By derekcohen in forum HAND TOOLS - UNPOWEREDReplies: 6Last Post: 16th March 2011, 12:38 AM -
Lie-Nielsen Handtool Event in PERTH
By derekcohen in forum ANNOUNCEMENTSReplies: 17Last Post: 15th March 2011, 06:33 PM -
Lie-Nielson Hand tool event
By FRB Design in forum ANNOUNCEMENTSReplies: 32Last Post: 25th January 2011, 05:59 PM -
hand tool event
By mrmoon in forum HAND TOOLS - UNPOWEREDReplies: 2Last Post: 1st December 2010, 12:22 PM
