

 Thanks:
  Likes:
  Needs Pictures: 0
 Picture(s) thanks: 0
Results 16 to 30 of 44
-
23rd May 2020, 08:59 AM #16
 GOLD MEMBER


- Join Date
- Mar 2004
- Location
- Brisbane (western suburbs)
- Age
- 77
- Posts
- 12,127

Sounds like a plan, CK,and like most plans, it can be modified as you go, if necessary....

The sole would definitely be my first line of attack. The new sole needs to be in place and trued up before you can lay out & cut the mouth. That's the crucial bit; shut the phone off, close the workshop door, & take your time. The good news is, if something goes badly amiss, you can just cut off the new piece & start over, so no need to feel great pressure.
Cheers,IW
-
23rd May 2020 08:59 AM # ADSGoogle Adsense Advertisement
- Join Date
- Always
- Location
- Advertising world
- Age
- 2010
- Posts
- Many
-
25th May 2020, 08:34 PM #17
SENIOR MEMBER
- Join Date
- May 2019
- Location
- Brisbane
- Posts
- 836
Hi,
I have now glued a new sole to the plane and am about to start trueing it up and putting the bevel on the sole to match the dovetail I want it to cut later.
I am just not sure to which side the bevel shall lean. My maim source for how to convert this plane is this artical by Derek
Evolving a Dovetail Plane by Derek Cohen
Here it states:
"Of note, the sole has been angled such that the leading edge of the blade cut to the outside, while the trailing edge cut into the shoulder of the dovetail."
I noticed if I do that with my plane then I would either have to use it with my left hand or have a weird position of holding the workpiece.
My plane has the leading edge of the blade to the right side of the plane when looking from above the plane. The way I envisage to use the plane as right handed person would mean that the leading edge of the blade would be towards the shoulder of the dovetail.
From the pictures in Derek's article I think on his plane the blade was skewed to the other direction than mine.
Now I am asking myself if that is then merely a consequence of the plane you start to convert or if it has to be like that.
For now I can only foresee that in my case if I have the leading edge towards the shoulder that the block which supports the fence later will be in the way of the chip escapement. That maybe can be solved by having a cut out in the fence support for the shavings to get out.
Or am I missing something else? I need to think that through before I establish the bevel of the sole.
Sent from my SM-G950F using Tapatalk
-
25th May 2020, 08:56 PM #18
SENIOR MEMBER
- Join Date
- May 2019
- Location
- Brisbane
- Posts
- 836
Ok, I have to correct myself. I had another look at the article and actually Derek's plane has the blade skew the same way as mine. He just placed the workpiece different to what I used to do. I have the edge to put a rebate on parallel to the workbench front and he plane 90 degrees to that.
However it doesn't change my question if it important if the leading or the trailing edge of the blade is towards the shoulder?
In any case I think I will follow Derek's design here. I will maybe also try this workpiece orientation for cutting square rebates. So far I have issues cutting them square and maybe it is easier if I cam directly behind the plane rather than leaning over from the side or so. Better to sight along it I guess.
Sent from my SM-G950F using Tapatalk
-
25th May 2020, 10:04 PM #19
GOLD MEMBER
- Join Date
- Mar 2004
- Location
- Brisbane (western suburbs)
- Age
- 77
- Posts
- 12,127
Hmmm, can't help much with this one, CK. You are stuck with the configuration of the plane you are converting, & of course it's typical of the vast majority of rebate planes in being skewed to the left. Can't recall if I've ever seen a rebate plane with the leading edge oriented to the left, but a few must exist, because I've read that some were made that way.
Since I made my D/T plane from scratch I was able to skew the bed to the right, with the trailing edge against the shoulder in normal right-hand use. To be honest, if I'd followed my intuition, I would have "left skewed" the blade so the leading edge was toward the shoulder, but I was loosely following an article I found on line, & that person recommended the trailing edge should be at the shoulder side. There was no explanation of what might happen if you did it the "wrong" way. In fact, my plane had to be built that way because the left side of the escapement is closed. The blade has to be skewed to the right so it spills the shavings out of the open (shoulder) side. If the blade were oriented the other way, the closed escapement on that side would prevent the shavings being ejected & it would quickly choke up.
However, the plane you are converting is open both sides, so if you were to use it with the leading edge against the shoulder, I can't see it would make a huge amount of difference other than you would need to be very careful that the nicker scores a good line, & that the point of the blade is very carefully aligned to the nicker cut. It doesn't take much imagination to see that if the leading point were set too far to the outside of the nicker, you'd have a nasty splintered shoulder. If you set a trailing blade too wide, you are also in trouble, but it doesn't tear the wood about as much.
If I were in your shoes, I would probably take the conservative approach and make it a "left-handed" plane so you can have the trailing edge against the shoulder of the D/T. If you hang he board you are sticking over the right hand side of the bench, you will be able to work it comfortably enough with a "left handed" grip. You might find it slightly awkward at first, but I think you'd quickly adapt - I use my shoulder planes left & right & hardly notice the difference.
Cheers,IW
-
26th May 2020, 12:16 AM #20
Be inspired. Be creative. Be bold.
- Join Date
- Apr 2001
- Location
- Perth
- Posts
- 10,824
Just to be clear, it is a right-handed plane ...
Example from 2009: http://www.inthewoodshop.com/Furnitu...lsByHand1.html
Regards from Perth
DerekVisit www.inthewoodshop.com for tutorials on constructing handtools, handtool reviews, and my trials and tribulations with furniture builds.
-
26th May 2020, 05:54 PM #21
SENIOR MEMBER
- Join Date
- May 2019
- Location
- Brisbane
- Posts
- 836
Made some progress. Trued up the new sole and squared the plane body and then beveled to sole to a 1:6 ratio. I did follow the approach Derek had described and will have the fence on the right of the plane.
20200526_132105 (2).jpg20200526_132108 (2).jpg20200526_132115 (2).jpg
I then went ahead and cut the new moth. For that I just traced the edges of the bed and extended them and then connected the line from both sided across the sole. For the front of the mouth I just cut it enough for the blade to go through. I thought this will allow me to make the new wedge and adjust the bed and open the mouth as needed later. I think it came out ok.
20200526_132601 (2).jpg20200526_132606.jpg20200526_133206 (2).jpg
Still some tuning to do, but the blade could fit. Now the wedge is really too short.
20200526_135653.jpg
I wasn't sure if it is better to reshape the blade first or do a new wedge. I decided to redo the wedge first so I can see how the blade sits. Having the old wedge helped as I could take all the angles from there and just extend the new wedge.
20200526_155759.jpg
The new wedge is still too long I think. I am not sure where the tip of the wedge should sit. If as low as possible?
Also it does not actually press the blade onto the bed. There is quite some light coming through. I am not sure which way to correct that. I will have to do some research and thinking I guess. The tang of the blade is also quite beat up and a bit bendy. So I am thinking I need to flatten the tang more as well and maybe a combination.
20200526_154537 (2).jpg
I feel I want to sort that out first before I go and reshape the blade.
-
26th May 2020, 07:33 PM #22
GOLD MEMBER
- Join Date
- Mar 2004
- Location
- Brisbane (western suburbs)
- Age
- 77
- Posts
- 12,127
I would recommend getting the blade & wedge sorted before doing much more. You definitely want the wedge to bear on the business end of the blade or you're likely to get chatter. How close to the edge to have it is a matter of judgement, I try to get them as close as possible without causing any obstruction. Typically, the tip is shaped as a blunt wedge, which tends to push shavings one way or the other out of the escapement. I think you also need to cut the front of the escapement back at more of an angle than you have now, it gives better clearance for shavings & allows you to keep the wedge thicker towards the point.
That is a lot of daylight under the end of the wedge alright! I'd say it's either because of the wonky blade tang or the angle of the wedge is too steep, causing it to tighten at the top without applying any pressure further down. My first step would be to get the tang straight - they are usually dead soft, so you can hammer away on it without fear of snapping it (a quick pass or two with an old file will show you where the hardening ends).
Something I like to do with wedges is scrape a slight hollow in the bottom, from about 5-6mm back from the tip to just before it emerges from the body at the top. It doesn't need to be much, just enough to create a bit of an arch so the pressure is applied at the top & bottom.
It's coming along nicely...
Cheers,IW
-
28th May 2020, 08:17 PM #23
SENIOR MEMBER
- Join Date
- May 2019
- Location
- Brisbane
- Posts
- 836
Made some progress and flattened the blade and tang om both sides as good as I could.
I then went to flatten the bed first. Instead of smoking the blade I used whiteboard marker to cover the flat area of the blade and then pitting it in and rubbing slightly on the bed. Then I could attack the dirty areas where the marker rubbed off fit the bed to the blade.
Also fiddled with the wedge until I could not get an 0.03mm feeler gauge underneath the blade and the bed and between the wedge and the blade. Maybe needs some further tuning later.


Note I still kept the wedge fairly long and the mouth tight. I intend to adjust that as late as possible. First regrinding the blade.
I first took some material of from the side which will ride against the shoulder. I moved the blade all the way to the other side and then scribed a line to grind down to.this way I am sure the blade is narrow enough so I can set it with just a smidge proud from the shoulder side.
The other side does not matter so much I figure as for a dovetail plane it will always be in thin air.

After that I again covered the blade with a permanent marker this time and scribed a lone parallel to the sole to grind the cutting edge.

I was surprised that the new cutting edge will actually be square to the old factory edge on side of the blade. But I guess with some geometry one could prove that is has to be like this. The blade is scewed by around 10 degrees and the bevel on the sole is a smidge above 9.5 degrees. They seem to compensate each other. Should make sharpening later a bit easier....

Anyway, I will leave that step until I have a bit more time. In order to get it right.
Sent from my SM-G950F using Tapatalk
-
29th May 2020, 05:26 PM #24
SENIOR MEMBER
- Join Date
- May 2019
- Location
- Brisbane
- Posts
- 836
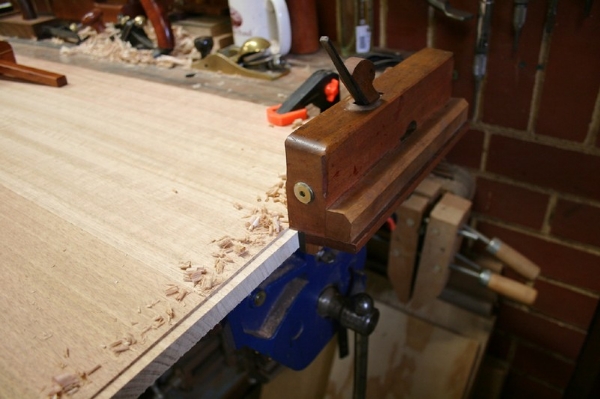
And there it is. Back in a working condition.
I finished the blade and gave it a test run.

Still needs some tuning and maybe need to further shape the blade. It's still a bit fiddly to get the blade even across the sole and sticking out a smidge on the shoulder side
It is also chatters a bit with the grain, bit runs nicely across the grain.
Made my first dovetail with it where I followed the approach of Wood by Wright. He used the plane body itself as saw guide. Works but I think a dedicated saw guide like Derek uses is better. You don't have to take the plane apart and loose the setting.

Don't judge the dovetail quality. I still need practise and the plane some optimisation. Off course a finish and shape of top of wedge.
I think next I will tackle the nicker, depth stop and fence. But in principle I have now a working dovetail plane and am pretty happy with my result so far.
Cheers
PS: This is the Wood by Wright video
YouTube
Sent from my SM-G950F using Tapatalk
-
29th May 2020, 10:58 PM #25
GOLD MEMBER

- Join Date
- Oct 2018
- Location
- Dandenong Ranges
- Posts
- 1,892
Hi CK. I have collected a few rebate planes. Maybe I need a dovetail one like yours. I'm looking forward to seeing how you add a nicker. Inspiring thread. Thanks
-
30th May 2020, 08:16 PM #26
SENIOR MEMBER
- Join Date
- May 2019
- Location
- Brisbane
- Posts
- 836
Thanks Mountain Ash. However, I don't want to take all the credit. I am just trying to follow what Derek and others have done before. See my earlier posts. Maybe the inspiration can be that if I can do it so can anyone [emoji6] Originally Posted by Mountain Ash

Anyway, today I just spend some time to clean and work the body slightly over amd finish shaping the top of the wedge. Also gave it a coat of BLO.

Next I will do the depth stop and fence. And during that time I will think of how to integrate a nicker. Not sure which design to follow. Derek had used 1/4" chisel like in his picture here

Or a slight variation of that with the holding screw to the side of the nicker

Or the more traditional version where the nicker is wedge shaped and sits in a dovetail in the side of the plane.

I have two pieces of scrap metal. One 3mm and the other 6mm thick.

I do not know what steel that really is, but since also the nickers on the stanley rebate planes are fairly soft I assume they'll be ok.
I could go with any of these designs. For now I lean towards the last option but leave it to think it over and see if someone here has some view as well.
Sent from my SM-G950F using Tapatalk
-
31st May 2020, 09:38 AM #27
GOLD MEMBER
- Join Date
- Mar 2004
- Location
- Brisbane (western suburbs)
- Age
- 77
- Posts
- 12,127
Ck, apart from being unnecessarily thick, I suspect both those bits are mild steel, and although nickers are usually softer than blades, they are a bit hrder than mild steel - about the same as saw-plate, which is fileable, but tough. To be honest, I think you'd probably get away with mild steel for occasional use, but a harder steel would be better. I've used an old hacksaw blade ground to about 6mm wide as a nicker & that worked well. On my current D/T plane I used a bit of old circular saw, which was about 1.5mm thick and ground nicely flat - I've got plenty 'spare' (don't think I'll be making many more D/T planes in this lifetime! Originally Posted by Cklett
 ), so if you'd like a bit of that, you're more than welcome.
My depth-stop is similar to Derek's but I was worried a single slot would allow it to slew, so I made two slots: D_T plane a.jpg
Probably overkill, you could put a brass dowel below the screw & that would serve the same purpose & prevent slewing. You could make a wooden depth stop along the same lines as the fence, but the brass looks spiffy. A bit of heavy brass angle is all you need - it's very easy & satisfying to work with hand tools. I can whip you up a nice knurled brass knob or two to add that professional touch...
Cheers,IW
-
31st May 2020, 11:43 AM #28
Be inspired. Be creative. Be bold.
- Join Date
- Apr 2001
- Location
- Perth
- Posts
- 10,824
Another idea: go without a nicker!
Now spelching (tearout) is a real danger of cutting across the grain, as this plane is designed to do. A nicker cuts the fibres ahead of the blade, thereby averting spelching. The disadvantage of a nicker is that one must align the edge of the blade with it, or it does not do its job.
The alternative is to use a cutting gauge and knife in the boundary line. In many case, we do this anyway, so the nicker becomes redundant. It is so much easier to move the cutter to a line than to set the fence to the perfect distance.
Regards from Perth
DerekVisit www.inthewoodshop.com for tutorials on constructing handtools, handtool reviews, and my trials and tribulations with furniture builds.
-
31st May 2020, 12:00 PM #29
SENIOR MEMBER
- Join Date
- May 2019
- Location
- Brisbane
- Posts
- 836
Thanks Derek, I think I will leave the nicker to last and use it first in a few test joints and see. When adding depth stop I just leave room to be able to fit one in later.
Ian, that is again an amazing looking plane and thanks the offer for knurled knobs. That would be great if the finished plane deserves such enhancements ;-)
Question. I noticed you have the depth stop behind the blade instead of in front. What is your experience with that?
Also I forgot to mention in my earlier post that the extra wood I put in, e.g. for sole and wedge and so on, came from this old plane.

I tried to save it, failed and declared it dead. Now it became a donor for this plane. That's why the new sole is from 2 pieces for example.
It also had this nice thick brass plate on the side, which I am now using to make the depth stop.
Sent from my SM-G950F using Tapatalk
-
31st May 2020, 04:44 PM #30
GOLD MEMBER
- Join Date
- Mar 2004
- Location
- Brisbane (western suburbs)
- Age
- 77
- Posts
- 12,127
I spent some time agonising over putting it in front as per "normal" vs putting it where it is. To put it in front of the blade would have made fitting the nicker (which of course has to come before the blade), a bit more difficult, though certainly not impossible. I the end I decided to try putting it behind the blade. With my (also unconventional) rear handle, the depth stop is pretty much at the centre of the plane. It works really well, at least as well as any plane I've used that had the depth stop up front. Serendipity rather than clever design! Originally Posted by Cklett
I agree with Derek that you don't need a nicker, I got by for several years with my first D/T plane - it was nicker-less, fence-less and depth-stop-less, but it did the job with a guide clamped on the work to define the shoulder, knifing shoulders and just cutting to a layout line on the edge of the board for depth. At the time I mostly cut sliding dovetails with a 'lectric router using a very simple guide, then finessed the fit with my simple plane (which was a quantum leap over the paring chisels I'd used up 'til then). But once I started cutting both trenches & tail by hand, I quickly got tired of the lack of aids! I considered adding the requisite extras to #1, but it was a rather short-bodied thing & it would've been a squeeze to fit it all on, so Vers 2.0 shown above was conceived.
I think it's worth the trouble to fit a nicker, myself. With some woods, you have to keep knifing the shoulder every 4 or 5 passes to stop the wood being torn away by the edge of the blade, & that soon becomes tedious. I reckon you're the sort of person who won't be able to resist having a go at it - nothing to lose & something to gain.....
Cheers,IW


 Reply With Quote

Similar Threads
-
VICTORIA Veritas Edge Plane and Luban Side Rebate Plane
By woodtryer in forum WOODWORK - Tools & MachineryReplies: 18Last Post: 7th January 2020, 03:55 PM -
VICTORIA ECE rebate plane
By Harmek in forum WOODWORK - Tools & MachineryReplies: 4Last Post: 20th June 2019, 03:21 PM -
Rebate Plane
By Birdie in forum HAND TOOLS - UNPOWEREDReplies: 5Last Post: 6th January 2008, 08:39 AM -
Rebate plane
By Andy Mac in forum HOMEMADE TOOLS AND JIGS ETC.Replies: 3Last Post: 2nd February 2006, 11:10 PM -
Old Rebate Plane
By Phil Spencer in forum HAND TOOLS - UNPOWEREDReplies: 1Last Post: 24th April 2005, 11:34 AM
