

 Thanks:
  Likes:
  Needs Pictures: 0
 Picture(s) thanks: 0
Results 1 to 15 of 44
-
1st May 2020, 09:14 PM #1
 SENIOR MEMBER


- Join Date
- May 2019
- Location
- Brisbane
- Posts
- 836
 Old rebate plane - how to improve
Hi,
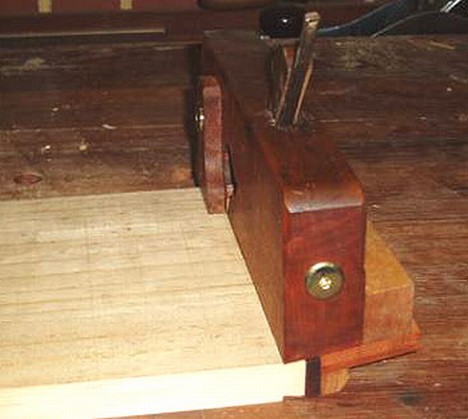
I have thus old rebate plane with skewed blade. I cleaned it up and squared the sole.
I think it already had received a new sole some time back.
The mouth seems quite wide (2 to 3mm) and the blade is also about 2 to 3 mm wider than the body.
The body is about 23mm wide and the blade cuts 1" wide.
After sharpening it works quite ok I think, but I am wondering if I should further improve it. E.g. retrofit a metal sole and close the mouth or even add also brass sides to the lower side of the body.
Further should I grind the blade slimmer a little? I am not sure if it is not too wide for the body.


Sent from my SM-G950F using Tapatalk
-
1st May 2020 09:14 PM # ADSGoogle Adsense Advertisement
- Join Date
- Always
- Location
- Advertising world
- Posts
- Many
-
1st May 2020, 09:48 PM #2
SENIOR MEMBER
- Join Date
- May 2019
- Location
- Brisbane
- Posts
- 836
Sorry, I forgot to end the subject with a "?". Hope I did not mislead anyone.
I can't figure out how to edit the title. My apologies.
Sent from my SM-G950F using Tapatalk
-
2nd May 2020, 02:44 AM #3
 Senior Member
- Join Date
- Apr 2020
- Location
- USA
- Posts
- 122
Hello, I'm in a similar situation. I got several skewd rabbet planes and got them cleaned, squared and sharpened. They're cutting, but I'm also wondering if there's more to do to them.
Cheers,
Rafael
-
2nd May 2020, 01:01 PM #4
GOLD MEMBER
- Join Date
- May 2007
- Location
- Sth Gippsland Vic
- Posts
- 4,389
Hi CKlett .
I like using those rebate planes when the need arises and I have a few different ones within reach .
If you want to spend the time on it
First thing Id do is get rid of the screws in the sole . The Beech could just be glued on and be OK . You could plug those screw holes or add completely new wood ?
Yeah , Grind the blade to match width.
The wedge looks a little short inside but if its holding the blade to its bed near the cutting edge then that's ok .
No , I wouldn't add a metal sole .
If it works well as it is except for the blade width then Id probably just touch up that and use it as is .
I normally just reach for my Stanley 78 for rebate adjustment , Or a shoulder plane . They are wide though and when doing work within a trench is when I'm usually reaching for these wooden rebate planes . I make a type of extension table and the extension rails run on 19mm rails . If they need adjustment then these wooden rebates are great . A more open mouth is what I prefer too . Not a fine super thin shaving type . I like to see and hear a decent shaving . I have other metal narrow Spiers Rebates with fine mouths if I need that and I hardly use them on the above sort of work .
Rob
-
2nd May 2020, 04:35 PM #5
GOLD MEMBER

- Join Date
- Oct 2018
- Location
- Dandenong Ranges
- Posts
- 1,892
Hi Cklett. Not wanting to disagree with Rob (I have seen his work bench!) but I think the blade should be wider than the body. Looking at the photos you might want to grind the sides of the blade so that they are parallel to the side of the plane. In use I thought that the blade (not the body) was supposed to reference off the side of the rebate otherwise you can get a step in the base of the rebate.
-
2nd May 2020, 04:49 PM #6
Be inspired. Be creative. Be bold.
- Join Date
- Apr 2001
- Location
- Perth
- Posts
- 10,821
As Rob said, remove the screws. I would go a step further ..
The first thing to do is determine if the blade is seated securely on the bed, and that the wedge also fits well - does not require a heavy hand to secure it. Generally, a well-fitting wedge only need to be pushed in firmly with thumb pressure. Also, a well-fitting wedge will release quickly when the tapered blade is tapped in (a reason to tap the wedge each time you extend the blade projection).
If the bed is not flat along its width and length, then it will require some filing or scraping (use a chisel with a squared off end). Determine high spots by smoking the back of the blade (after ensuring first that the blade is flat). Smoking refers to using candle smoke to add a fine layer of carbon.
Thirdly, I would add a new sole - a length of good Aussie hardwood will be durable and run smoothly. The mouth is very wide and worn, and this makes it harder to position the blade accurately. Do not make it so tight that you cannot get a decent thickness shaving through it. One to two mm is reasonable for this type of plane.
Fourthly, the blade may be a replacement as it is so wide. The idea blade needs to extend a smidgeon over the side of the body. It should not be flush with the sides, otherwise the plane cannot cut into a corner, and it will not be possible to create a square corner. It will, instead, slope away.
Lastly, I have turned planes like these into dovetail planes by reshaping the sole ...
Regards from Perth
DerekVisit www.inthewoodshop.com for tutorials on constructing handtools, handtool reviews, and my trials and tribulations with furniture builds.
-
2nd May 2020, 05:15 PM #7
Senior Member
- Join Date
- Apr 2004
- Posts
- 383
One idea for a new sole is to use a 1 inch x 1/8 brass strip.
I have a wooden rebate plane that has this for the front part of the sole and it makes the plane ideal for starting rebates as the brass sole keeps a sharp 90 degree edge that does not round over with wear (The brass strip is attached with 4 small countersunk brass screws).
Brass strip can be sourced from online model supply shops who cater to model steam engine makers.New Zealand
-
2nd May 2020, 08:01 PM #8
SENIOR MEMBER
- Join Date
- May 2019
- Location
- Brisbane
- Posts
- 836
I checked now a few more things.
The wedge is securing the blade well. Only need to push in firmly with my thumb, but it seems to not release that easy when tapping the blade. I nearly have to tap it all the way down.
I think the wedge once broke off and is now shorter than before.
Also the blade is not quite straight and when looking from the side there is light shining through on the upper part of the bed.


Sent from my SM-G950F using Tapatalk
-
2nd May 2020, 09:19 PM #9
GOLD MEMBER
- Join Date
- Mar 2004
- Location
- Brisbane (western suburbs)
- Age
- 77
- Posts
- 12,124
You're getting advice flowing in faster than a galloping horse, Ck!
I'll add my bit, though. First, I would re-make the wedge so that it comes down into the escapement area and can bear on the blade closer to its edge - you'll get far more solid blade-holding. I think the only reason the plane is working reasonably well with that short wedge is because of the bow in the blade, so that the wedge pressure way up there on the curve is making the blade sit better near the mouth than it otherwise would (someone may even have bent the tang deliberately for that very purpose).
I wouldn't be too concerned about the daylight at the top of the bed, but it looks like the blade isn't sitting on the bed right at the end, either. It may be an optical illusion caused by some barrel distortion in the pic., but the bed looks to be a bit curved? That's a very awkward thing to correct if you don't have suitable plane-making floats, and will make the mouth even wider if you have to take more than a shaving off the bed. If you make a longer wedge, and it holds the blade flat on the bed at the mouth, just leave it alone. Try to get a 0.001 feeler gauge blade in under the blade, if it won't go in, there's good enough contact between blade & bed.
Wide mouths on moulding planes isn't a big deal in the normal scheme of things, they were mostly used on soft, straight-grained woods taking pretty aggressive cuts, to get the job done!
If you make a new wedge, put a distinct bevel on the end to help deflect shavings - a square, blunt end can cause them to roll up & compact in the throat. This is less of a problem with skewed blades like yours which usually roll coiled-up shavings out on the trailing edge side in a most satisfying way.
And I'll add my vote to grinding the blade to a closer fit - just a teeny bit proud of the side as Derek suggests is my preferred setup, too. It's quite likely the blade is a ring-in, it's not at all uncommon to find wrong blades in old moulding planes. You may be able to tell by the edges of the blade. The original blade would have had the edges ground at an angle to make them co-planar with the sides - if the edges of your blade are perpendicular to the face (it's hard to tell on a 2-D picture, but they look square), then it's a ring-in, so you can go ahead & modify it with no qualms...

Cheers,IW
-
3rd May 2020, 03:27 PM #10
SENIOR MEMBER
- Join Date
- May 2019
- Location
- Brisbane
- Posts
- 836
Thanks a lot for all the good feedback.
I checked the bed again and it seems it hase a bump right underneath the square part of the blade. I can get a feeler gauge in all around. I think I can carefully correct that.
The blade is not ground parallel to the sides. I don't know how to describe it so I am attaching a sketch. I think the side edges of the blade would need a relief so that the front part of the blade side is against the wood and not the trailing edge, right?
Also the sole is not glued on. I had the screws off to square it with a plane. I thought first it is glued and left the screws off, but after few strokes it came off. So I did put the screws back on.
For the next steps I am thinking off:
1. Make a new wedge. I am a bit nervous on that as there are so many different angles. Might need a few attempts.
2. Make a new sole
I was also thinking of turning it into a dovetail plane. I already have a #78 and still planing to make a shoulder plane from Ian's manual. Maybe if I have to grind the sides of the blade anyway, might go further and grind it to the angle for a dovetail plane as well. Not sure. Thinking about it.
But steps 1 and 2 could be good first project on the mini bench I am building once that is done....
Sent from my SM-G950F using Tapatalk
-
3rd May 2020, 05:37 PM #11
Be inspired. Be creative. Be bold.
- Join Date
- Apr 2001
- Location
- Perth
- Posts
- 10,821
Ck, there is one more piece of advice I neglected to offer early on.
Place a straight edge along both sides of the body. I would wager that it is no longer straight. These planes tend to move and create a sight curve. If so, it will not work well until the sides have been straightened with some judicious planing. This will, in turn, affect the width of the blade, which now will need to be resized.
Regarding the screwed-on sole, I would remove it and add a complete new section, then shape to fit. This will enable you to deal with the mouth size at the same time.
If nothing else, all this work will teach you a great deal. Also why these planes languish in the corner.
Regards from Perth
DerekVisit www.inthewoodshop.com for tutorials on constructing handtools, handtool reviews, and my trials and tribulations with furniture builds.
-
3rd May 2020, 06:28 PM #12
SENIOR MEMBER
- Join Date
- May 2019
- Location
- Brisbane
- Posts
- 836
Thanks Derek, I remember you also described something similar in you build of the dovetail plane.
I shall take care of that as well.
Sent from my SM-G950F using Tapatalk
-
3rd May 2020, 07:23 PM #13
GOLD MEMBER
- Join Date
- Mar 2004
- Location
- Brisbane (western suburbs)
- Age
- 77
- Posts
- 12,124
Well, I'd make sure the sides of the blade were in the same plane as the sides, at least. For some reason, the blades on the old wooden planes never (or hardly ever) had relieved sides like on the later metal versions. However, it certainly won't do any harm to add a, extra bevel along the front of the trailing side, and a similar relief on the back of the leading side. Originally Posted by Cklett

Nah, it's usually a pretty simple job - old moulding planes often come with missing or mis-matched wedges (& blades as well, I've noticed several times!), but wedges are one of the easist parts to fix. You already have a wedge that will have the correct taper if it's the original, just plonk it on a piece of cardboard, extend the tapered bit to restore the missing portion, trace around the top, & you have a template. Originally Posted by Cklett
If the existing wedge is a ring-in & a poor match in the wedge slot, just measure the length of the wedge slot, then measure the height perpendicular to the bed at the beginning & end (you will probably have to fudge the height measurements a bit, I use a small stick rather than a ruler). Now use these to draw a wedge on a bit of cardboard. Trace the top of the existing wedge in the correct position, cut it out, & check it in the plane (don't forget to allow for the thickness of the blade when measuring the height of the slot). Your template should be pretty close first try, if not, make any necessary adjustments, & Bob's your aunty.
I've got plenty of bits of European Beech that I save for such purposes, if you can't lay your hands on some - you are welcome to as much as you need to have as many attempts as it takes....
Shoulder planes & rebate planes are different animals to me, and while a shoulder plane can do anything an old wooden rebate plane can do, wooden rebates with 45-50* beds don't do quite the same job as a heavy, low-angle shoulder plane, so you could still derive some benefit from keeping it as a rebate. But if you already have a metal rebate plane, it would be close to superfluous, and turning it into a dovetail plane would make sense & be a bit of fun. Since you already need to make a new sole-piece, I reckon you've nothing to lose.... Originally Posted by Cklett
Cheers,IW
-
16th May 2020, 01:47 PM #14
SENIOR MEMBER
- Join Date
- May 2019
- Location
- Brisbane
- Posts
- 836
Thanks Ian, sorry for late reply. Now where my mini bench is finished I am going to tackle this. I was actually thinking to use some Chinese elm. I have heaps of that from a tree we cut down ourselves a while back. It has a very pale nearly yellow color. I like the idea that you can see which parts are added. However not sure if it is the best choice.... So I will have a bit of a think and then might come back to your offer ;-) Originally Posted by IanW
Sent from my SM-G950F using Tapatalk
-
22nd May 2020, 08:15 PM #15
SENIOR MEMBER
- Join Date
- May 2019
- Location
- Brisbane
- Posts
- 836
Ok, I am going to tackle this now. I decided to turn it into a dovetail plane. From reading quite a bit I am thinking the following sequence of attack is the best.
1. Fix the sole by glueing on a new one, squaring the body and making a new mouth
2. Grind and fit the blade
3. Only now I would make a new wedge so I can make sure it's long enough
4. Make the fence
5. Make a depth stop
Or do I need to do something else inbetween?
Sent from my SM-G950F using Tapatalk


 Reply With Quote


Similar Threads
-
VICTORIA Veritas Edge Plane and Luban Side Rebate Plane
By woodtryer in forum WOODWORK - Tools & MachineryReplies: 18Last Post: 7th January 2020, 03:55 PM -
VICTORIA ECE rebate plane
By Harmek in forum WOODWORK - Tools & MachineryReplies: 4Last Post: 20th June 2019, 03:21 PM -
Rebate Plane
By Birdie in forum HAND TOOLS - UNPOWEREDReplies: 5Last Post: 6th January 2008, 08:39 AM -
Rebate plane
By Andy Mac in forum HOMEMADE TOOLS AND JIGS ETC.Replies: 3Last Post: 2nd February 2006, 11:10 PM -
Old Rebate Plane
By Phil Spencer in forum HAND TOOLS - UNPOWEREDReplies: 1Last Post: 24th April 2005, 11:34 AM
