

 Thanks: 0
 Likes: 0
 Needs Pictures: 0
 Picture(s) thanks: 0
Results 1 to 10 of 10
Thread: Saddle Square
-
9th September 2007, 02:41 AM #1
 Be inspired. Be creative. Be bold.


- Join Date
- Apr 2001
- Location
- Perth
- Posts
- 10,828
 Saddle Square
I have coveted the Bridge City SS-2 brass saddle square for sometime now. Unfortunately it is no longer in stock and my order will only be filled in January 2008 or so.
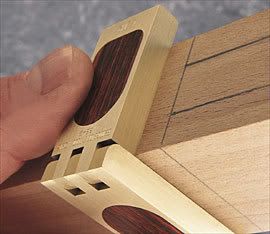
So in the meantime decided I would make one. Unfortunately I lacked a suitable piece of brass. So I made it out of Jarrah with brass wear strips.
This looks such a simple project, but it is deceptively difficult. To obtain the necessary accuracy everything must be spot on. There can be no lateral play in the joint. Every angle needs to end up perfectly square. With a little luck it turned out well.
Regards from Perth
DerekVisit www.inthewoodshop.com for tutorials on constructing handtools, handtool reviews, and my trials and tribulations with furniture builds.
-
9th September 2007 02:41 AM # ADSGoogle Adsense Advertisement
- Join Date
- Always
- Location
- Advertising world
- Posts
- Many
-
9th September 2007, 05:24 AM #2
 GOLD MEMBER
- Join Date
- Mar 2006
- Location
- Earth
- Posts
- 3,567
Nifty - I would be keen on a 1:8 dovetail marking guide.
Where do you get the brass?
Also how is the brass affixed to the wood? Do you file down screws for that finish?
-
9th September 2007, 09:28 AM #3
When the student is ready, the Teacher will appear
- Join Date
- Jan 2006
- Location
- Telegraph Point
- Posts
- 3,036
Hi TS, Originally Posted by thumbsucker

AWR make and market a beautiful dovetail marking gauge.
It is 1:7 and its price has been reduced at the moment.
See here:
http://shop.woodreview.com.au/details/163294.html
It comes as a pre-cut kit including brass strips and brass gauge, which you assemble yourself.
Have a look.
SG .... some old things are lovely
Warm still with the life of forgotten men who made them ........................D.H. Lawrence
https://thevillagewoodworker.blogspot.com/
-
9th September 2007, 11:38 AM #4
GOLD MEMBER
- Join Date
- Mar 2007
- Location
- Munruben, Qld
- Age
- 83
- Posts
- 10,027
You're being modest Dere. To finish something like that to that standard, takes more than luck. I think maybe just a little bit of skill, Originally Posted by derekcohen
 yes?
yes? Beautiful work as always.
Reality is no background music.
Beautiful work as always.
Reality is no background music.
Cheers John
-
9th September 2007, 11:57 AM #5
Retired
- Join Date
- Dec 2005
- Location
- Oz
- Posts
- 1,058
Well come on then! Lets here the process. The steel pins you used to secure the brass strips. What did you do there...
Looks good by the way.
-
9th September 2007, 01:59 PM #6
Be inspired. Be creative. Be bold.
- Join Date
- Apr 2001
- Location
- Perth
- Posts
- 10,828
Hi SG
This flexible saddle square is quite different from the AWR tool, the latter being aimed at marking dovetails.
For dovetails I have very nice dovetail saddle from Woodjoy (in the USA) ..

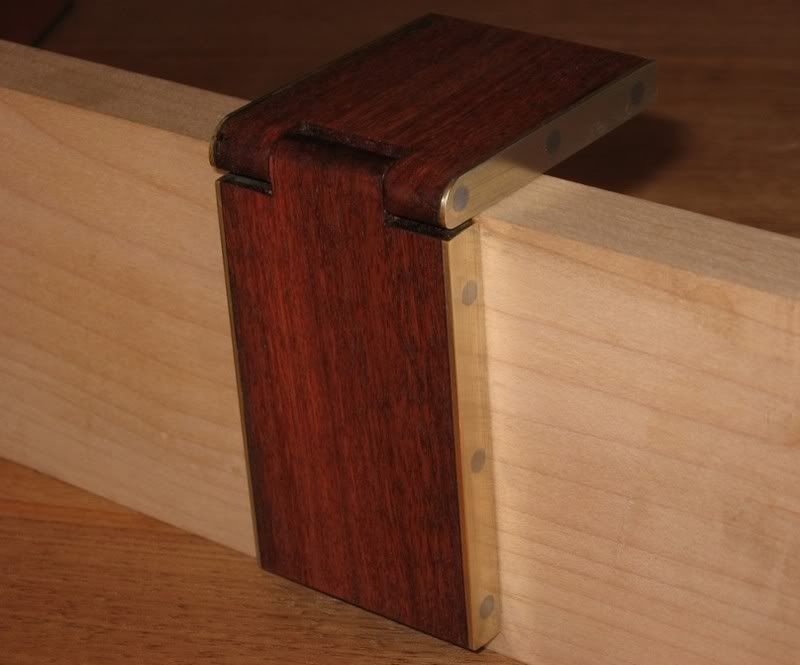
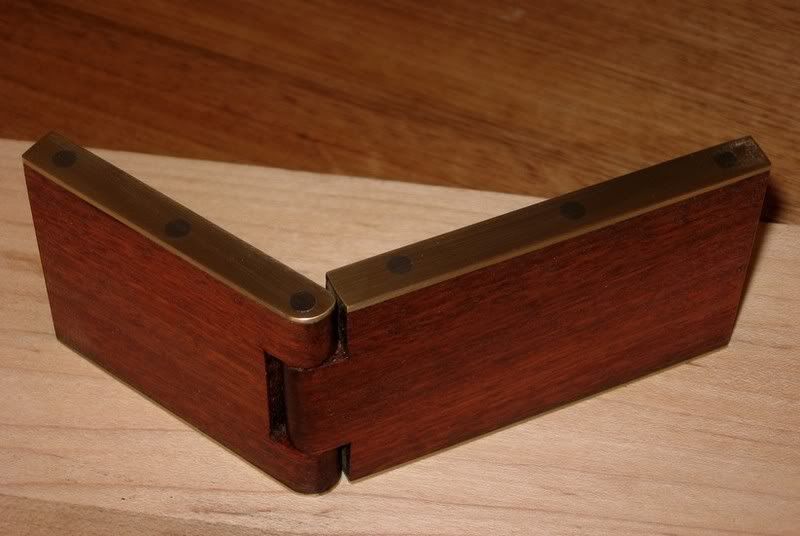
The saddle square I present here is also slightly different from the one from Lee Valley, which I have owned and used for some years.

The advantage of mine is that it can wrap around a non-square corner, has greater heft and does not unwittingly move as easily from its position, and the brass side makes it easier to see lines than a black side does.
TA
Construction was quite time consuming (for me) because of the need for absolute precision. It is not a useful tool if you are slightly off here. So you begin with a very, very tight joint, drill it out, then tweek the sides to make sure it remains square in all directions as it is moved.
Attaching the brass - I cut to size, then epoxied on the brass sides (brass from Bunnings). Then drilled this for the steel rod (stakes from the gardening section of Bunnings) - careful, the heat can soften the epoxy and the sides will lift off (DAMHIK). The rods go in about 1/2". The fit is very tight so a combination of epoxy and friction hold them together. Note that the pivot rod extends all the way across. Once done, the sides were trued and ground flush on my belt sander.
Easy peazy
Regards from Perth
DerekVisit www.inthewoodshop.com for tutorials on constructing handtools, handtool reviews, and my trials and tribulations with furniture builds.
-
9th September 2007, 08:45 PM #7
Senior Member
- Join Date
- Jun 2005
- Location
- Hallidays Point - the land of blackbutt and swamp mahogany
- Posts
- 412
great bit of kit
Very nice work, Derek.
I've never seen a hinged one before - looks very useful."... it is better to succeed in originality than to fail in imitation" (Herman Melville's letters)
-
9th September 2007, 09:02 PM #8
SENIOR MEMBER
- Join Date
- Sep 2003
- Location
- Elimbah, QLD
- Posts
- 3,336
Derek,
It doesn't look easy to me; I am in awe. I am afraid I just make do with the Lee Valley one. Have you considered improving on their sliding square? I have one of those, and find it very useful, but its design probably could be improved.
Rocker
-
9th September 2007, 09:14 PM #9
Retired
- Join Date
- Dec 2005
- Location
- Oz
- Posts
- 1,058
Originally Posted by derekcohen
Got to be honest with what you produced there why do you want a bridge city. Heck I want one!
-
9th September 2007, 09:43 PM #10
When the student is ready, the Teacher will appear
- Join Date
- Jan 2006
- Location
- Telegraph Point
- Posts
- 3,036
Beautiful work Derek.
Saddle squares are truly useful and just the ticket in some situations.
In the immortal words of Dale Kerrigan " You could sell that....."
Hi TS, Originally Posted by thumbsucker
Are you still after a dovetail marking guide?
If the AWR offering is not exactly what you are looking for, then you can of course make your own quite easily.
Rob Cosman, who is the hand cut dovetail guru, uses a simple home made one in his instructional videos.
Of course it doesn't look as professional as these here, but it has 1:7 and 1:8 ratios on each side and works a treat.
Happy dovetailing
SG")
Last edited by Scribbly Gum; 9th September 2007 at 10:04 PM. Reason: typo
.... some old things are lovely
Warm still with the life of forgotten men who made them ........................D.H. Lawrence
https://thevillagewoodworker.blogspot.com/


 Reply With Quote


Similar Threads
-
Thread on stainless steel square bar
By SBartleet in forum METALWORK FORUMReplies: 13Last Post: 30th October 2007, 11:47 PM -
Gifkins Pocket Square modification
By scooter in forum HAND TOOLS - UNPOWEREDReplies: 1Last Post: 8th November 2005, 10:18 PM -
Getting a square square
By Robert WA in forum WOODWORK - GENERALReplies: 23Last Post: 19th August 2005, 09:33 PM -
Review - Veritas Saddle Square
By Dean in forum WOODWORK - GENERALReplies: 1Last Post: 6th March 2005, 05:06 PM
