

 Thanks: 0
 Likes: 0
 Needs Pictures: 0
 Picture(s) thanks: 0
Results 16 to 30 of 78
-
27th February 2009, 12:10 AM #16
 GOLD MEMBER


- Join Date
- Jun 2008
- Location
- Victoria, Australia
- Age
- 74
- Posts
- 6,132
 Pretty poorly to be honest, I'm hoping that will improve when I cut some teeth...
 Originally Posted by BobL

Hey, just curious, I am an embedded systems hacker from way back, and I was
wondering why you have 2a in binary in your sig, then I thought, I wonder if he is a shooter?
Am I close..
Regards
Ray
-
27th February 2009 12:10 AM # ADSGoogle Adsense Advertisement
- Join Date
- Always
- Location
- Advertising world
- Age
- 2010
- Posts
- Many
-
27th February 2009, 10:07 AM #17
GOLD MEMBER
- Join Date
- Mar 2004
- Location
- Brisbane (western suburbs)
- Age
- 77
- Posts
- 12,136
Nah - that's part of the disease! Originally Posted by RayG
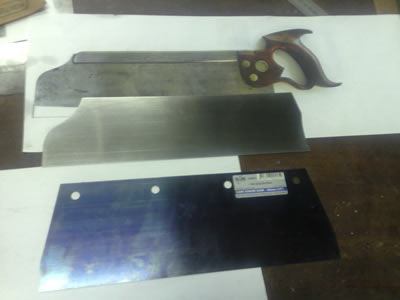
Here's my latest effort (pic 1), finished on the weekend. A small general-purpose saw (250 x 55 blade, 15 tpi). I polished the blade with wet & dry using kero as the lubricant. Tedious! The shim stock still has slight indentations from the roller that produced it, and it takes forever to clean them up unless you use very coarse grit, which I was reluctant to do. The 'Bunniebob' scraper was ground a bit flatter, but with more coarse grit marks, which were hard to polish out, too. On the next one I'll try acid, this one's already gone to its new home, with an old friend who has a few other of my home-made tools in his collection. If you get rid of them quickly, they are out of reach & you put all that effort into another one...
I concur with your point about having sharp lines to pick up shadow & light & give clear shapes & profiles. However, I don't like to see any lines on my grip (looks too much like those factory jobs) - I keep 'em all on the cheeks, where they go with the sharp lines on the blade & back. I might have ovedone it on the one in pic 2. This is just about the first handle I tried making, as a replacement for the apalling thing that came with the (new) saw. I keep the chamfers a little lighter now, and taper them, which looks better to me (and emphasises they are NOT machine-made!) It needs a bit of care to blend the sharp chamfer into the contoured grip without it all getting messy.
Ray - do you chamfer the brass back before final assembly? I finally got around to making a simple jig for the job, out of some scrap hardwood & an offcut from a "BunnieBob" scraper. Worked extremely well. Before that I was holding the brass in a metal vise, and working on a bit at a time, which was less than ideal. Much easier now that I can do the whole edge at once.
Cheers,IW
-
27th February 2009, 10:58 AM #18
SENIOR MEMBER
- Join Date
- Sep 2008
- Location
- Jimboomba Qld.
- Age
- 69
- Posts
- 594
Now Ray what would we do if we just were to leave things alone
 ???
???
Congratulations of your fine workmanship Wonderful info on the pdf also many thanks for sharing that.
Cheers
SteveDiscover your Passion and Patience follows.
www.fineboxes.com.au
-
27th February 2009, 11:20 AM #19
GOLD MEMBER
- Join Date
- Jun 2008
- Location
- Victoria, Australia
- Age
- 74
- Posts
- 6,132
Hi Ian,
Very nice, and I like the chamfer treatment, must try that on the next one.
I just freehand the brass chamfer on a linisher, I can only do 1 chamfer at a time as it gets hot pretty quickly.
I like the jig idea though.
I tried sanding to get rid of the bluing, but Mike W suggested in a post somewhere that he
uses phosphoric acid, so a week or so back I got some from Bunnies, and it's magic stuff.
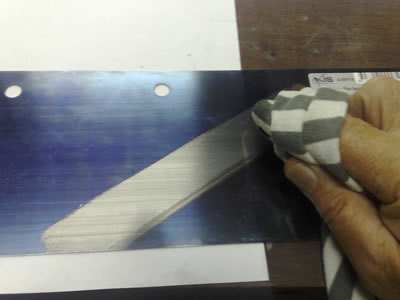
You just wipe it off. Only use the tiniest amount on a rag.
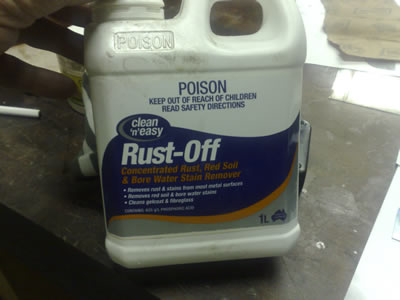
Check the label to make sure it's phosphoric acid based.
After wiping over I flush under running water and scrub, then immediately spray
with Inox (or wd40), to polish I put 1200 wet and dry on a random orbital pad and
smoothed both sides, then final buffing with a little wax on the buffing wheel.
This is the current project, when I can fit it in.
The BunnieBobD9. Coming soon
Regards
Ray
-
27th February 2009, 11:53 AM #20
GOLD MEMBER
- Join Date
- Jun 2008
- Location
- Victoria, Australia
- Age
- 74
- Posts
- 6,132
Hi Ian, Originally Posted by IanW
The shadow lines add a crisp sort of "new" look that I was trying to illustrate the technique for.
There are interesting parallels with tool handle styles and gunstock styles, the American preference
in gunstocks seems to be for sharp corners and clearly defined intersecting planes.
The English style generally seems to be for slightly more rounded "organic" shapes and where there
are sharp shadow lines it is to highlight the overall shape.
You tend to see the similar cultural preferences in tool handles.
I like that first one, I think that slightly softer look works well.
Regards
Ray
-
27th February 2009, 12:08 PM #21
GOLD MEMBER
- Join Date
- Mar 2004
- Location
- Brisbane (western suburbs)
- Age
- 77
- Posts
- 12,136
Ray - I didn't mean to bag your handle - I like it - everyone has slightly different interpretations, which is what makes it all so interesting. I suspect that a good deal of why I like the more 'organic' grip is simply because it has to be hand-done, or at least hand-finished, setting it clearly apart from the dreadful things manufacturers are sticking on their saws now (MikeW excluded!). Originally Posted by RayG
Yeah, well, that's the very first compared with the most recent handle. I'm getting to the point where I can almost get what I have in mind to materialise from the wood. But not every time! Originally Posted by RayG

WRT to chamfering the brass - you must be a lot better on the linisher than I could be (& I can imagine how warm it gets - they get warm enough polishing them on the cloth wheel with rouge!). Filing (I use a new double-cut to rough out & finish with a mill file) is quite quickly done, and much more controllable, in my hands...... Polishing rounds the crisp edges a little, but they are still reasonably sharp.
Cheers,IW
-
10th March 2009, 10:11 AM #22
GOLD MEMBER
- Join Date
- Mar 2004
- Location
- Brisbane (western suburbs)
- Age
- 77
- Posts
- 12,136
Ray - I tried the phosphoric acid cleanup last week. You're right, it's magic! Once you get the blueing off, it takes far less effort to polish the blade, too. I was a bit hesitant to take acid to my luverly sawblade at first, but it seems pretty safe. I cleaned a bit of scrap, and didn't wash it off after, just to see what would happen. It etched one small area, but the rest remained bright. So I took to my saw & had it shiny bright in no time. A good wash & waxing, & it's dazzling.
Cost $8 for a litre of the stuff - enough to un-blue about 1,000 saw blades, I estimate.
Pity I'm giving up sawmaking after these next couple......

")
Cheers,IW
-
11th March 2009, 07:38 AM #23
GOLD MEMBER
- Join Date
- Jun 2008
- Location
- Victoria, Australia
- Age
- 74
- Posts
- 6,132
Hi Ian,
How did the saw making weekend go? Any pictures?
I must book in for the next one.
Regards
Ray
-
11th March 2009, 08:16 AM #24
GOLD MEMBER
- Join Date
- Mar 2004
- Location
- Brisbane (western suburbs)
- Age
- 77
- Posts
- 12,136
Hi Ray - it went really quickly! No pics, I'm afraid - didn't think of them til after everyone had gone. I went through the saw-making process pretty quickly. I had foolishly imagined they might all leave with a partly-made saw, but by the time I demonstrated the main steps, the afternoon sort of vanished. We took a few diversions on the way, too, of course, like a brief discussion on burnishing card scrapers, & how to design the perfect toolbox & sundry other topics. (We talked a little about the complex art of saw-sharpening, but left the topic of sharpening in general alone - that would have completely diverted the afternoon! Originally Posted by RayG
)
I know now to allow a full day next time! It would be good to spend a day or a weekend with a bunch of keen toolmakers, swapping ideas with experienced people & helping others get started. Pity we're so scattered over this wide, brown land.
I hope Peter, Tony & Andrew found it useful, but I can report that I had fun, and it's always good to swap yarns with keen woodies....
IW
-
11th March 2009, 10:03 AM #25
GOLD MEMBER
- Join Date
- Dec 2007
- Location
- Gold Coast
- Posts
- 1,050
------------------------------------------------------------------------------------------------------------------------ Originally Posted by IanW
It was hard not to get distracted. Some of Ian's hand tools he has made are to lust over. I think I was in love again when I saw some of his work. For me it was great to get over there and see some great work.
Ian's ability to simplify and break down difficult tasks into small increments is exceptional. It possibly has something to do with his profession as a teaching Vet Pathologist at the University Vet Farm.
Ray and Derek and I can put in BobL as well have that special ability to explain and simplify difficult projects. Ian has the same ability the former guys are too far away but because Ian understands the concepts that these guys use his ability and patience to explain was really inspiring.
Thanks again Ian and to all who are involved in this great journey.
Peter.
-
11th March 2009, 09:33 PM #26
 Senior Member
- Join Date
- Jan 2008
- Location
- Sydney
- Posts
- 244
Hi all,
I made my first saw today. It's not too bad but also not extraordinary
Still, I'm pretty chuffed
I probably put up some pics in a few days.
Cheers!Sharp is Best!
-
12th March 2009, 11:42 PM #27
 .
.
- Join Date
- Feb 2006
- Location
- Perth
- Posts
- 27,796
Guys, How about arranging another one for September 26? I might be able to be in Brisy at that time - sorry to be pushy gotta take the opportunity when it comes along?
-
14th March 2009, 06:10 AM #28
almost a woodworker
- Join Date
- Feb 2007
- Location
- blue mountains
- Posts
- 4,891
The acid treatment is a good move. The funny thing is if you wipe it on bare steel and leave it then it turns black. The blue is a result of acid treatment in the first place so what better to remove it.
-
31st March 2009, 06:28 AM #29
Senior Member
- Join Date
- May 2008
- Location
- Vermont, VIC
- Posts
- 238
 Congratulations Ray
G'day mates,
Check out Ray's fine article here, http://www.wkfinetools.com/tMaking/s...andle-RG-1.asp
Cheers
GUNN
-
31st March 2009, 08:10 AM #30
What... you mean it's not 1792?
- Join Date
- Oct 2006
- Location
- Melbourne
- Posts
- 5,271
Very well done Ray. That will get a few fingers itching.
.
I know you believe you understand what you think I wrote, but I'm not sure you realize that what you just read is not what I meant.
Regards, Woodwould.


 Reply With Quote


Similar Threads
-
New Tenon Saw handle
By Lumber Bunker in forum HAND TOOLS - UNPOWEREDReplies: 19Last Post: 24th January 2008, 06:30 PM -
Mortise & Tenon - How to make it square, strong and clean
By thumbsucker in forum WOODWORK - GENERALReplies: 10Last Post: 7th June 2007, 02:12 PM -
Want to make some furniture in Mordialloc and make some money.
By Lignum in forum ANNOUNCEMENTSReplies: 8Last Post: 23rd April 2007, 12:04 AM -
Sash window bit.
By Joshua in forum ROUTING FORUMReplies: 3Last Post: 6th February 2004, 07:08 PM -
sash clamps?
By Biohazard in forum WOODWORK - GENERALReplies: 2Last Post: 14th August 2003, 08:59 PM
