

 Thanks:
  Likes:
  Needs Pictures: 0
 Picture(s) thanks:
Results 1 to 11 of 11
Thread: Saw setting 16 tpi
-
2nd August 2022, 02:22 PM #1
 Senior Member


- Join Date
- Dec 2013
- Location
- Blue Mountains NSW
- Posts
- 148
 Saw setting 16 tpi
OK here I go again,
can anyone help with advice etc. on setting the teeth on a 16 point saw.
I have the teeth reasonable sharp but am nervous to use my saw set to s set such small teeth, 13 point yeh OK but 16 point.
Has anyone any tips, tricks or suggestions that may help please.
cheers
-
2nd August 2022 02:22 PM # ADSGoogle Adsense Advertisement
- Join Date
- Always
- Location
- Advertising world
- Posts
- Many
-
2nd August 2022, 07:14 PM #2
GOLD MEMBER
- Join Date
- Mar 2004
- Location
- Brisbane (western suburbs)
- Age
- 77
- Posts
- 12,133
Yep, first make sure the "punch" or plunger of your saw-set is appropriate. Somax make a set (coloured blue) for small teeth, but most other saw-sets you'll come across, like the ubiquitous Eclipse 77 have plungers that are too wide for very small teeth. The metal of the plunger is soft & it's not difficult to file the tip down a bit. Ideally you want the plunger to be about the width of a tooth, 1/3rd to 1/2 way down from the point. You are supposed to bend only the top 3rd of the tooth over, but that's very difficult to do consistently on tiny teeth & you'll likely bend it from at best about 1/2 way, depending on how worn or how accurate the 'anvil' part is, but that is usually quite ok. If you are causing dimples at the bottom of the gullets, you are pushing the tooth too far or from too low down, & adjustments are needed. The plunger can be a teeny bit wider than the middle of the tooth, but you need to be very careful to place it squarely on each tooth to avoid hitting an adjacent tooth.
Of course once you modify the plunger, the tool is no longer suitable for larger teeth, so you need more than one saw-set if you also sharpen regular handsaws or large backsaws.
And one other tip, the usual recommendation is to set the teeth before final sharpening. Especially with small teeth, the setting may distort the edges of many of the teeth a bit. When sharpening a saw, I always check to see what condition the teeth are in first. If they look like they need topping & a bit of re-shaping & tidying up, I do that first, then set, then go over with one or two light strokes to sharpen them....
The "ideal" set gives a kerf that is about 15-20% wider than the saw plate (if you have calipers & a set of feeler gauges you can easily check that if you are interested), but this is just a rule of thumb for a start-point. The amount of set required varies a bit with the sawyer's experience & the wood being sawn. Neophytes usually prefer a bit of extra set, which makes the saw less likely to bind if forced; not-so-dry woods require extra set, & softwoods also typically need a bit more set than is ideal for dry hardwoods. Saws used for very shallow cuts (short tenons or tenon shoulders) can run on less set than saws used for deep cuts.
Finally, your first attempt or two at setting is likely to produce a less than perfect result; it takes a bit of practice to place the set accurately on every tooth & squeeze the same amount every time on 100-plus teeth. So don't be surprised if your saw wants to cut to left or right of a line. Unless you've really botched it, that's easily corrected by running a hard stone (i.e. NOT a water-stone, they are too soft) lightly along the teeth. Just one, or at most two light strokes, then test - that's often all it takes. As you get better & more consistent with your sharpening, this step is rarely needed....
Cheers,IW
-
2nd August 2022, 08:49 PM #3
Be inspired. Be creative. Be bold.
- Join Date
- Apr 2001
- Location
- Perth
- Posts
- 10,826
Brett, I would file the hammer on the sawset, if this is needed. It does not need to be super thin, just thin enough to depress one tooth at a time. I can use the same setter for 15-20 tpi. However, in practice I have a few setters, each for a little bit less or a little bit more set. Still, at the end of the day you will test the cut, and then fine tune by removing any wire edges with a fine diamond stone along the sides.
One of the difficulties in creating set with the setter is seeing the teeth! As you move along the saw plate, setting each alternate tooth, then flipping the saw over to set the other side, your eyes will glaze over, you will begin to see double, and the result will be that you lose track of what you have set. This is a problem since uneven set on each side of the plate will cause the teeth to cut inaccurately � more to one side than the other.
I have a method to make this easier to be consistent.
Take a fine Sharpie and mark each alternate tooth on one side �
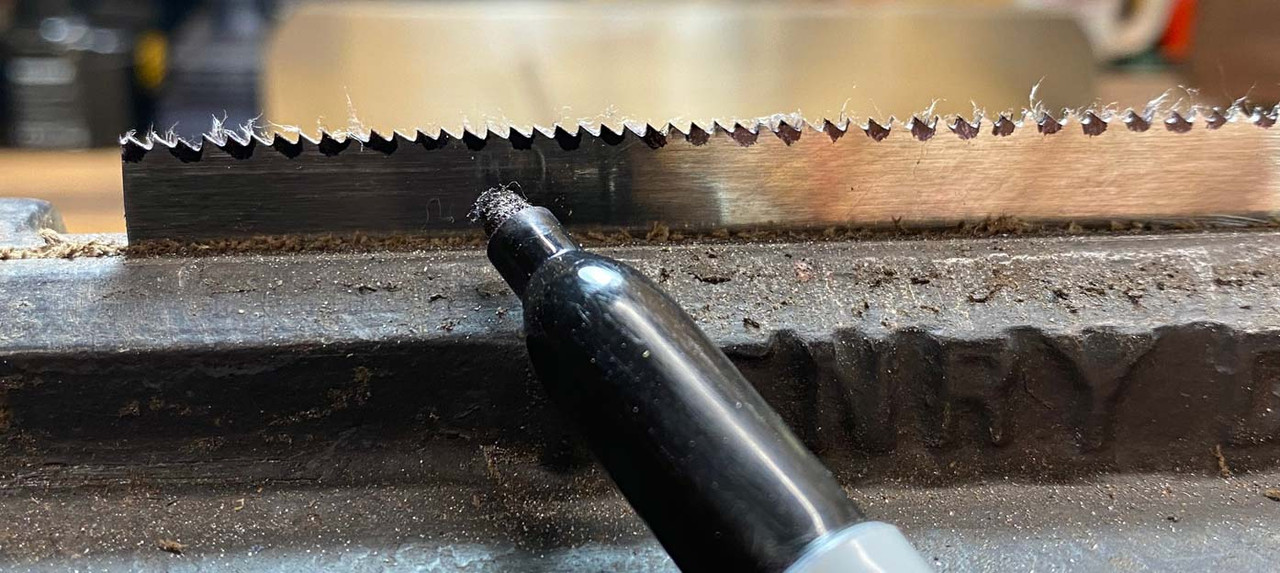
Now go ahead and set the teeth on that side. Once done, wipe the ink off with alcohol, and repeat on the other side of the plate.
This method is extremely helpful with setting new teeth. Teeth which have been set previously will retain some of the past set, and you can take a cue from this. It is not always necessary to reset the teeth each time you sharpen. An indication that setting is needed is when the teeth do not cut freely, acting as if dull, or the saw binds in the cut.
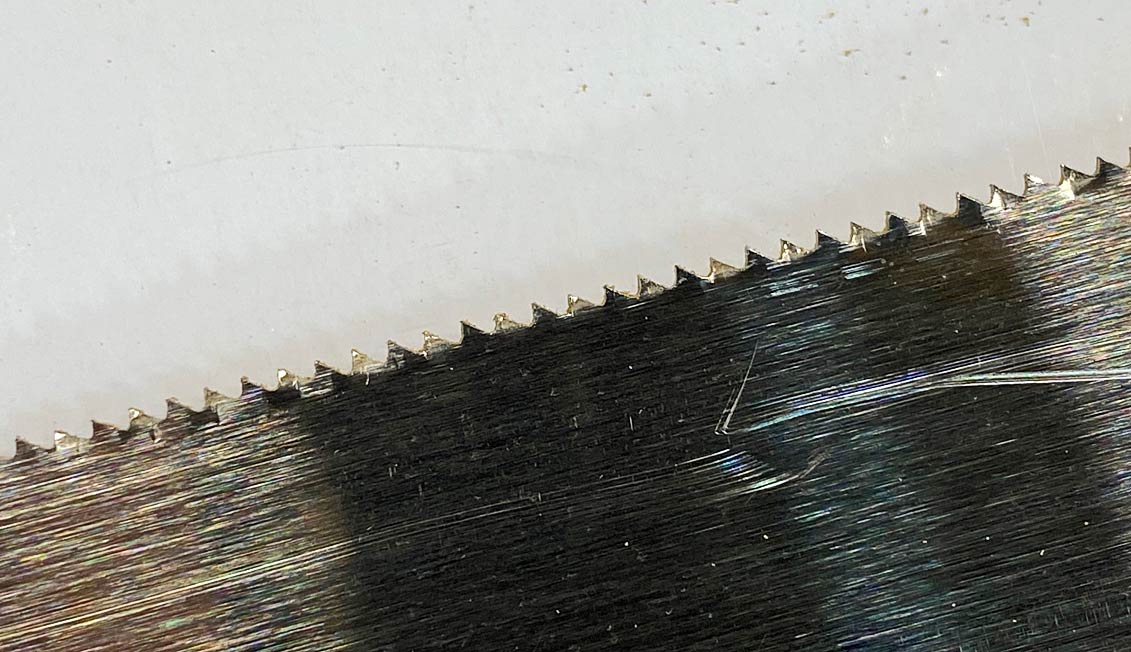
Here are the sharpened and set teeth. Look closely at the tips of the teeth to see a tiny dimple where the hammer left its mark �
Regards from Perth
DerekVisit www.inthewoodshop.com for tutorials on constructing handtools, handtool reviews, and my trials and tribulations with furniture builds.
-
2nd August 2022, 11:06 PM #4
 GOLD MEMBER
- Join Date
- Nov 2004
- Location
- Millmerran,QLD
- Age
- 73
- Posts
- 11,136
Brett
Ian and Derek have pretty much covered everything between them. If you don't have a suitable hard oilstone you could use a fine flat file gently for the same purpose of evening up any irregularity in the set. The only other thing I would add, and you probably know this already, is that there is not much mileage in filing these fine tooth saws crosscut. They are normally just filed rip (see Derek's pic), which is lucky as that reduces the complexity. These saws will normally be used in a ripping context such as for dovetails, but can be used to crosscut too on small work.
Regards
PaulBushmiller;
"Power tends to corrupt. Absolute power corrupts, absolutely!"
-
3rd August 2022, 12:26 AM #5
SENIOR MEMBER
- Join Date
- Mar 2018
- Location
- Sydney
- Posts
- 469
Can I ask, what's a good saw sei to get?
Regards,
Adam
Sent from my SM-S901E using Tapatalk
-
3rd August 2022, 01:40 AM #6
GOLD MEMBER
- Join Date
- Nov 2004
- Location
- Millmerran,QLD
- Age
- 73
- Posts
- 11,136
Adam Originally Posted by taz01

To some extent it depends on what style you prefer. The Eclipse 77 or the modern knockoff Somax are popular. In the pistol grip style the Stanley 42X finds favour. Both have disadvantages. In the Eclipse/Somax set the top lever moves, which results in movement of the whole hand, but people get used to that. In the Stanley pistol grip type the last teeth at the heel under the handle cannot be set without removing the handle as the handle gets in the way if it is an enclosed style.
This is a link to Eclipse 77
Eclipse No. 77 Saw Sets | The Bench Blog
Early 77s were made of brass. Later models were made of aluminium and as has been mentioned they come with either of two sizes of plunger. There are quite a few on Ebay at the moment, although some of these are in the UK.
Early Somax No.250 seem to be brass coloured whereas later versions are blue, but both are virtual copies of the Eclipse.
The Stanley 42X is less commonly found. Only a handful on Ebay and either overseas or more expensive or both.
StanleyPistolGripSawSetsNos42x43442_0003.jpg
Note that there are other Stanley No.42 models but the 42X was the latest in the line.
Only the Somax is produced today (I think).
This is a link to saw set identification that overseas Forum member Bill Houghton gave us a while back:
The Saw Set Collector's Resource (acmenet.net)
Regards
PaulBushmiller;
"Power tends to corrupt. Absolute power corrupts, absolutely!"
-
3rd August 2022, 08:47 AM #7
GOLD MEMBER
- Join Date
- Mar 2004
- Location
- Brisbane (western suburbs)
- Age
- 77
- Posts
- 12,133
Paul, I think you'll find the "brass-coloured" Somax hass the 'regular' sized plunger/hammer whatever you wish to call it, the blue one is the same but has a finer plunger/hammer.
That's a good point about filing all smaller teeth as crosscut. You have no less an authority for that recommendation than Tage Frid, who may not be as familiar to younger members but was one of the grand gurus of the craft revival in the 70s (before there were 'gurus'). I don't bother with crosscut on any saw more than 12 tpi - if there is any difference in speed of cut, it's very hard to impossible to detect in normal usage, and little or no increase in blow-out on the exit side. Filing regular fleam on tiny teeth requires much practice!
People use different methods when setting, but I like to sit on a comfortable stool at the door of the shed in good light. With the saw tucked under my left arm, I can look down on the row of teeth as I go along, holding the saw so as to best catch the light & see what I'm doing. Unless the teeth are very tiny (24 tpi +), it's fairly easy to see the set on each tooth, and with the Eclipse style of saw-set, there's enough space around the plunger that you can see the tooth either side of the one you are working on, which helps to avoid setting two consecutive teeth the same way (but doesn't infallibly prevent it!). If you do that, you have a conundrum - do you reset the opposite way or leave it? If you try pushing it back, there's an even chance it will break, but about half the time you'll get away with it. If you are doing the job 'properly' & only pushing over the top bit of tooth, and that breaks off, just leave it, it won't affect the cut all else being equall, & with a few more toppings & sharpenings, it will soon come back into line.
As Derek mentioned, it's very useful to use some sort of marking system when you begin. It's too easy to lose track of where you are, especially if interrupted in mid saw (turn off your phone & put up a sign on the shed door threatening dire consequences for anyone who disturbs you when saw-sharpening! ). Setting is not so bad as you can usually see the mark on each tooth left by the plunger & find your place again if forced to stop mid-stream. Sharpening is another matter, if you are just touching-up a saw that hasn't been sharpened in a while, the freshly-filed teeth are obvious, but when you have just re-formed the teeth, they are already shiny. I found it easier to mark the backs of each tooth with a fine marker. That shows you where you are up to & also shows if you are not filing evenly, which is very easy to do, we tend to bias the file a little one way or the other & a blackened back shows if your stroke is even. I sharpen enough saws that I usually don't need to mark any more but if you only sharpen at long intervals, don't be embarrassed to use all the help as you can get - a really well-sharpened saw is well worth a bit of extra fuss.
Some sort of file-guide is also handy when you start. Unless you intend filing a lot of saws & you like gadgets, you don't need a fancy commercial model, a piece of stick costs nothing & does the job equally well. The pic below shows a stick being used to maintain rake angle for crosscut teeth:
Rake angle guide.jpg
If filing fleamed teeth, either the file is jammed into the stick at the required fleam angle as well as the rake-angle, or if you use a wooden-jawed vise, draw a series of lines across the top of the jaws as a guide for the fleam angle. You really only need such help when forming teeth from scratch or correcting a very unevenly-sharpened saw (there are a few of those around!). If the existing teeth are in fairly good order & need nothing more than a light topping, you should be able to follow the existing gullets easily enough without extra help.
Apologies, that turned out to be much more long-winded than I intended!
Cheers,IW
-
3rd August 2022, 08:53 AM #8
GOLD MEMBER

- Join Date
- Oct 2018
- Location
- Dandenong Ranges
- Posts
- 1,895
Hi Adam. I have a few saw sets and though not an expert, I think they all work fine. The brass coloured Somax was my first (I have filed it's plunger down for small teeth - Paul Sellars had a good video on this), a Stanley 42, an Eclipse 77 and a Merill Apex. Oh and a plastic eclipse 77 - NOT recommend at all!! I tend to feel more comfortable using the Eclipse style, probably because that's what I started with
-
3rd August 2022, 09:31 AM #9
GOLD MEMBER
- Join Date
- Mar 2004
- Location
- Brisbane (western suburbs)
- Age
- 77
- Posts
- 12,133
Me too - for the same reason... Originally Posted by Mountain Ash
IW
-
3rd August 2022, 01:03 PM #10
Senior Member
- Join Date
- Dec 2013
- Location
- Blue Mountains NSW
- Posts
- 148
Many many thanks for all the feed back and ideas.
I will give it a go and get back to you all.
again thanks SO much, what a great community.
-
3rd August 2022, 05:54 PM #11
GOLD MEMBER
- Join Date
- Jan 2009
- Location
- Australia
- Posts
- 1,222
Hey brett57.
I'm in the process of doing a retooth on my handsaw too.
Check it out in the sharpening thread.
At first it seemed too daunting.. But with this forum and its' members help, I'm ready to give it a go. Even learnt a couple of tips here too.
Lyle.

 Reply With Quote


Similar Threads
-
Setting Up
By Geoff HQ in forum G'day mate - THE WELCOME WAGON -Introduce yourselfReplies: 3Last Post: 14th November 2008, 09:07 PM -
Setting up a Woodie with a Glass Blade Setting Block
By derekcohen in forum HAND TOOLS - UNPOWEREDReplies: 1Last Post: 14th October 2008, 06:20 PM -
BBQ setting
By Big Bod in forum WOODWORK - GENERALReplies: 4Last Post: 25th November 2007, 01:19 PM -
MTU setting
By chrisb691 in forum COMPUTERSReplies: 1Last Post: 2nd June 2007, 01:44 AM -
Got a MK3 given to me and need some help setting up etc.
By missionaryman in forum TRITON / GMCReplies: 15Last Post: 30th December 2006, 01:07 PM
