Thanks: 0
 Likes: 0
 Needs Pictures: 0
 Picture(s) thanks: 0
Results 1 to 15 of 34
Thread: Stanley #59 Doweling Jig
-
22nd June 2004, 04:43 AM #1
 Be inspired. Be creative. Be bold.


- Join Date
- Apr 2001
- Location
- Perth
- Posts
- 10,828
 Stanley #59 Doweling Jig
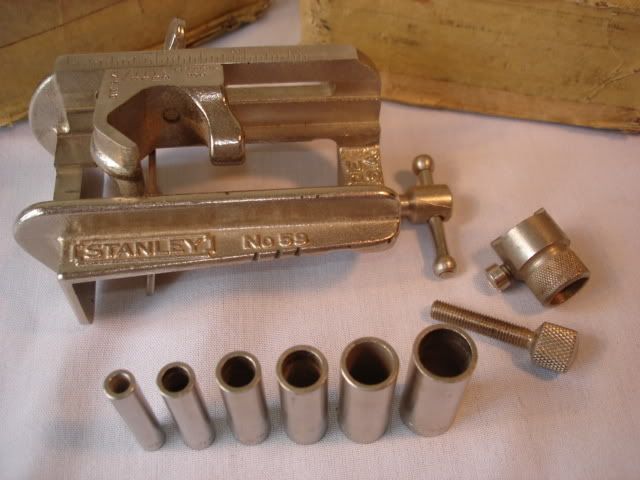
In past discussions about the virtues of dowels verses biscuits I have praised the Stanley #59 Doweling Jig for allignment when edge joining boards. Since this is no longer manufactured (mine is about 100 years old), I am sure that not many will recognise it or be aware of its strengths. I was using it today in my current project (a chest of drawers for my son), and managed to take a few pics for your interest.
This is a very easy-to-use doweling jig. It is supremely accurate. It is also very quick to set up and use. I estimated that it took about 15-20 seconds per hole.
Of course, it is "horses for courses". I own and use a biscuit cutter as well, but for alligning the edges of boards I prefer to use dowels. I just find them that tad more accurate.
The downside of dowelling is that they must be accurately drilled or else they will not fit. This jig is different, is easy to use, and will change your views about dowels.
While the #59 is only available now on eBay (they do come up every now and then), it is possible to buy a reasonable copy of it at Bunnings (and cheaply).
The pictures
(1) In the first picture the two boards are clamped back-to-back and a line is drawn across the two boards.
(2) In the second picture the jig is lined up on its inside.
(3) Drop in the chosen size drill guide (there are 9 to choose from), clamp it down, then drill out. Reverse the set up and drill the other board (as a mirror image).
(4) The fourth picture is an enlargement so that the markings can be seen.
Regards from Perth
Derek
-
22nd June 2004 04:43 AM # ADSGoogle Adsense Advertisement
- Join Date
- Always
- Location
- Advertising world
- Posts
- Many
-
22nd June 2004, 06:57 AM #2
SENIOR MEMBER
- Join Date
- Sep 2003
- Location
- Elimbah, QLD
- Posts
- 3,336
Derek,
I seem to remember owning one of those jigs about 40 years ago, but it must have got lost in the mists of time. Using dowels to edge-join softwood, as in your pictures, is fair enough, because any minor inaccuracies can readily be accommodated by the softness of the wood that the dowels are embedded in. I am more dubious about using them for a hardwood like jarrah, which would be far less forgiving, and would require that any error in matching of the holes along the length of the board be not much more than 0.2 mm, which would be hard to achieve consistently with a number of dowels along the joint. I prefer to use biscuits for edge-joining; I think that, so long as you are careful in your technique of cutting the biscuit slots, biscuit-joining should be able to yield pretty good results.
Rocker
-
22nd June 2004, 02:27 PM #3
Be inspired. Be creative. Be bold.
- Join Date
- Apr 2001
- Location
- Perth
- Posts
- 10,828
Rocker
The use of dowels here is for allignment. It has little to do with edge jointing, per se. In fact, the situation with edge jointing should be no different for dowels or biscuits.
I would go one step further and say that getting an invisible join between two boards is easier with a hard wood because there is less likelihood of damaging the edges, which will show up when two sides are mated. I was aware of this with the pine in the pictures.
Invisibility of edges is something that is down to how well you plane the edges. In the pictures you will see that the adjoining boards are sandwiched together, which is how they were handplaned. I get invisible joins when I do this, in both hard and soft woods.
Regards from Perth
Derek
-
22nd June 2004, 02:53 PM #4
SENIOR MEMBER
- Join Date
- Sep 2003
- Location
- Elimbah, QLD
- Posts
- 3,336
Derek,
I am not sure whether I made my point clearly in my last post. What I was trying to say was that with a hardwood like jarrah, the joint will not fit together properly unless the distance between the dowel holes matches precisely on either side of the joint. With a softwood there is a bit more latitude for error. By contrast, with biscuits, it is not critical for the centres of the biscuits to be precisely opposite one another, since biscuit slots are marginally deeper than half the width of the biscuit to give some room for error. I was not saying anything about planing the matching edges flat.
Rocker
-
22nd June 2004, 03:21 PM #5
SENIOR MEMBER
- Join Date
- Aug 2002
- Location
- Boyne Island, Queensland
- Age
- 51
- Posts
- 929
I see what you're saying Rocker. I've never seen a #59 up close but going by Dereks photos (#2) it looks like the little "V" that is used for (longitudinal) alignment is fairly fine and would let you make quite accurate holes. I think it would depend a lot on how fine the pencil line is, it might be better still to use a marking knife.
If you find your jig can I have it Dan
Dan
-
22nd June 2004, 03:27 PM #6
Be inspired. Be creative. Be bold.
- Join Date
- Apr 2001
- Location
- Perth
- Posts
- 10,828
Rocker
Dan is correct. One reason for my original post was just to show the gang what a #58 looks like. Just curiosity related. But the other was to make the point that this jig is very accurate. As I said earlier, "The downside of dowelling is that they must be accurately drilled or else they will not fit".
Regards from Perth
Derek
-
16th April 2007, 04:47 AM #7
New Member
- Join Date
- Apr 2007
- Location
- Orono, Maine, USA
- Age
- 83
- Posts
- 2
Hello,
Quite a while ago, my father gave me some of my grandfathers woodworking tools. I did not have an opportunity to use them before but am now retired and have hopes!
<O </O
</O
One tool I received was a Stanley No. 59 doweling jig like the one whose use Derek so nicely described. However, mine is different. For example, it has no scale. I am guessing it is older than his.
<O
Another puzzle is a scraper plane that looks very much like a Stanley No 80. The big difference is that there is no Stanley in raised letters. Also, in between the raised No and 80 there is a raised character that could be a 1. It is raised higher than the other characters and has no coating. If you look closely you can see it in the picture. Did they have knock-offs in the late 1800s?
<O
Does anyone have any information or a reference where I might learn more about these tools?
<O
I tried Google but didnt find any links to tools like the ones shown.
<O
Thanks for any help,
John
-
16th April 2007, 07:39 AM #8
SENIOR MEMBER
- Join Date
- Jan 2004
- Posts
- 686
HI Rocker, Originally Posted by Rocker

Yes it is a minor issue.
You draw a neat line across each joint with a pencil and a square and then ensure that the dowelling jig is accurate, using the tip of the 'V' notch to align the jig accurately.
It's simple enough - I've had kids in year 11 dowelling mitres in 6 x 2 with about 12 dowels (double row) in each one.
They can do it accurately with minimal assistance.
Cheers,
eddie
-
16th April 2007, 08:55 AM #9
SENIOR MEMBER
- Join Date
- Sep 2004
- Location
- Sydney
- Posts
- 590
John,
You are correct in guessing that your dowelling jig is older than Derek's. The scale, notched rectangle Stanley logo and the knurled thumb screw on Derek's jig all point to it being a later model. The shape of your jig and the wing nut places it further back in the line of No. 59 jigs, probably closer to 1900. I have a Stanley No. 60 dowelling jig that is the same shape as yours and has the wing nut. It is old, but I don't exactly know how old. I'll try to post some pictures of it tonight.
Edit: Just noticed the patent date on your jig, 4.6.09, so it's not as old as 1900. The jig had to be made after 6th April, 1909.Regards,
Ian.
A larger version of my avatar picture can be found here. It is a scan of the front cover of the May 1960 issue of Woodworker magazine.
-
16th April 2007, 10:55 AM #10
The Goldfish
- Join Date
- Mar 2006
- Location
- Bowral
- Posts
- 837
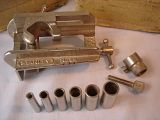
I've got one that was picked up for me at an auction. I haven't used it yet. I've been taught how to use a biscuit jointer and had a bias towards it because it was so incredibly easy, but after Derek's comments I'll have to give the dowell jig a go. Here is a pic of mine with the 5 guides that came with it (two of which are the same size), and another part that appears to be from a dowelling jig (but not this one).
Bob C.
Never give up.
-
16th April 2007, 11:42 AM #11
SENIOR MEMBER
- Join Date
- Sep 2004
- Location
- Sydney
- Posts
- 590
Bob,
The early Stanley 59 dowelling jigs were designed to be used with a brace and bit. The extra part that you refer to is the depth stop that you use by clamping it to the brace bit. The depth stop was redesigned in later dowelling jigs so that it was more suitable for use with power drills. The later version was a round kind of collar that slipped over the drill bit and was tightened in place with the aid of a screw (see picture below that I found on eBay). I'm sure you can imagine the vibration/imbalance that would result from using an old type depth stop on a power drill.
I've seen dowelling jigs on eBay that are the shape of the John's and your jig that apparently date from the WWII era (i.e. 1940's) as evidenced by the packaging and the black jappaned "War Finish". I've also seen jigs like Derek's on eBay that the sellers claim date from the 1950's. I don't know exactly when the change of styles occurred, but it must have been somewhere around the late 40's or early 50's.
The 1909 patent for the Stanley 59 can be viewed here.Last edited by Mirboo; 16th April 2007 at 11:48 AM. Reason: Forgot to add the picture first time round.
Regards,
Ian.
A larger version of my avatar picture can be found here. It is a scan of the front cover of the May 1960 issue of Woodworker magazine.
-
16th April 2007, 12:08 PM #12
Moderate Moderater
- Join Date
- Feb 2006
- Location
- Lindfield N.S.W.
- Age
- 62
- Posts
- 5,643
I inherited from my father a Silex dowelling jig made in Australia which looks very similar to the #59 that Derek has shown us. These are frequently on ebay for minimal prices.
I also have found it to be very accurate and to make dowelling very easy and accurate.
I find dowelling with the Silex easy to do - but it is an alignment thing more than a strength thing- the real strength of the joint is the glue, not the dowel.
Cheers
JeremyCheers
Jeremy
If it were done when 'tis done, then 'twere well it were done quickly
-
16th April 2007, 12:34 PM #13
SENIOR MEMBER
- Join Date
- Jan 2004
- Posts
- 686
Hi Bob,
The part is probably from your dowelling jig - appears to be a depth stop that fits onto the auger bit or drill bit.
CHeers,
eddie
-
16th April 2007, 12:47 PM #14
GOLD MEMBER
- Join Date
- Jun 2003
- Location
- Sunbury, Vic
- Age
- 84
- Posts
- 2,719
I have a KBC dowelling jig which I bought about 45 years ago.
It was made by/for KBC who used to make electric drills at that time and was probably inspired by the Stanley jig as it also relies on alignment of the V mark with pencil mark.
It has 4 inserts for 1/4, 3/8, 7/16 and 1/2 inch dowels and also a depth stop to clamp on the drill bit.
Mine has had a lot of use over years and always produced good results.Tom
"It's good enough" is low aim
-
16th April 2007, 05:43 PM #15
The Goldfish
- Join Date
- Mar 2006
- Location
- Bowral
- Posts
- 837
Mirboo, eddie, thanks very much for that. I'd have put it in a different box somewhere and then lost it. Now that I know what it is I'll be sure to keep it with the jig. Glad there are folks like you about to stop idiots like me from throwing stuff out!

Mine came in the original box (I think), but without a lid for the box. It also came with some very worn and torn instructions. According to the instructions the No 59 jig came with only 5 guides, being 1/4, 5/16, 3/8, 7/16, and 1/2 inch. The No 60 came with 9 guides, the above plus 9/16, 5/8, 11/16, and 3/4 inch (according to the instruction sheet). I guess they might have changed this at some time and included all the guides with the 59 and just marketed the one product. I was afraid that the instructions I got would deteriorate further, so I laminated them (which I realise might be sacreligious, but I use my tools!). I can't find a patent number or anything similar on the jig, although there is the number 789 stamped on the sliding guide holder thingy and the number 790 stamped on the depth stop.Bob C.
Never give up.


 Reply With Quote