

 Thanks: 0
 Likes: 0
 Needs Pictures: 0
 Picture(s) thanks: 0
Results 1 to 15 of 16
-
9th August 2014, 01:34 AM #1
 Senior Member


- Join Date
- Aug 2008
- Location
- Melbourne
- Posts
- 166
 What tool to form this shape? Moulding plane?
Hey guys,
I'm building a bridge for a guitar that I'm working on, to look something like this:
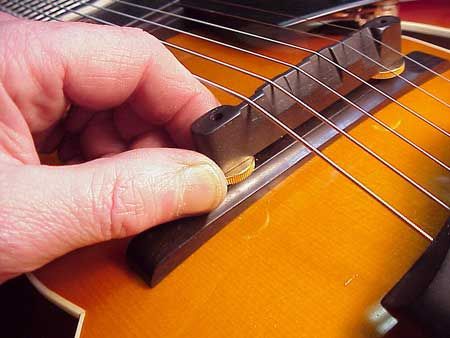
How would you form the cove shape along the length of the bottom of the 2 pieces of rosewood? I've never waded into the world of moulding planes, but would this be a good opportunity to get my feet wet?
Cheers
Will
-
9th August 2014 01:34 AM # ADSGoogle Adsense Advertisement
- Join Date
- Always
- Location
- Advertising world
- Posts
- Many
-
9th August 2014, 09:43 AM #2
 The Laird
- Join Date
- Jan 2007
- Location
- Katoomba NSW
- Posts
- 4,772
A bit small for a moulding plane. I'd just hand cut it with a gouge. Pay close attention to grain direction.
-
9th August 2014, 11:31 AM #3
Be inspired. Be creative. Be bold.
- Join Date
- Apr 2001
- Location
- Perth
- Posts
- 10,820
There are small moulding planes that will do the job. You can get them from Japanese Tools. They are quite cheap. I have a few.
Planes | Japanese Tools
My first thought, nonetheless, would be to make a scraper in the desired shape.
I'd probably use both.
Regards from Perth
DerekVisit www.inthewoodshop.com for tutorials on constructing handtools, handtool reviews, and my trials and tribulations with furniture builds.
-
9th August 2014, 04:05 PM #4
Deceased
- Join Date
- May 2008
- Location
- Australia
- Posts
- 2,357
I agree with Derek. The best option is a scraper shaped to suit the profile your after.
-
9th August 2014, 04:42 PM #5
Senior Member
- Join Date
- Aug 2008
- Location
- Melbourne
- Posts
- 166
Thanks for all the thoughts so far. When you say scraper - do mean just a hand held card scraper that's been shaped to the profile, or a "cabinet scraper" type mounted arrangement?
To follow the scraper route, is the done thing to rough out a chamfer or a rebate along the edge first to remove some waste?
Cheers
Will
-
9th August 2014, 05:08 PM #6
Deceased
- Join Date
- May 2008
- Location
- Australia
- Posts
- 2,357
a hand held card scraper that's been shaped to the profile
-
9th August 2014, 05:49 PM #7
Senior Member
- Join Date
- Nov 2008
- Location
- usa
- Posts
- 161
looks like a pretty good application for a scratch stock
-
9th August 2014, 07:03 PM #8
GOLD MEMBER
- Join Date
- Mar 2004
- Location
- Brisbane (western suburbs)
- Age
- 77
- Posts
- 12,117
What bridger said. Definitely a scratch stock job!
There are several ways to make a scratch stock, this is one: QB scratchstock.jpg
But this style wouldn't be suitable for your bridge, the 'arm' would get in the way, so I would use a straight piece of wood. Saw a kerf halfway down, insert a suitably-shaped blade (a piece cut off a cabinet scraper or old saw blade) and clamp it in place with a bolt or screws.
Shape your blade with a smooth-cut file, and try to make the cutter as square as possible. You can either use it straight off the file, or raise a small burr on the edge. You will be amazed at how quickly & easily you can cut a clean profile with such a simple tool.....
Cheers,IW
-
9th August 2014, 07:34 PM #9
Be inspired. Be creative. Be bold.
- Join Date
- Apr 2001
- Location
- Perth
- Posts
- 10,820
Scratch stock - scraper with fence
One cannot use a scratch stock alone here since the moulding is not "regular", assuming that the top of the guitar is relatively flat. One needs both, with the emphasis on a scraper used freehand once the shape is roughed in. A scratch stop may be more dominant if the guitar top is rounded, since the taper would then be created by sawing/spokeshaving away the lower side.
Regards from Perth
DerekVisit www.inthewoodshop.com for tutorials on constructing handtools, handtool reviews, and my trials and tribulations with furniture builds.
-
10th August 2014, 12:39 AM #10
GOLD MEMBER
- Join Date
- May 2007
- Location
- Sth Gippsland Vic
- Posts
- 4,372
Ian's scratch stock in his picture is the way to go .
Scratch stocks produce lovely accurate moulds like that , the mould can get a bit rough at the start and the finish of a run so it makes it easier if you have the work a little longer and cut off the ends later, some times .
You would have to first glue your Rosewood down to a piece of wood the same width as the bridge, with a reversible joint, which means gluing it down with a single sheet of news paper in between . This is so you can firmly hold it in a vise ,and give the fence of the scratch stock more wood to guide it . So the rose wood has to be glued flush to the working side. create what ever shaping, and the cove mould to the top surface . it would probably help to rebate some of the wood out where the cove will be first, then pry it off with a chisel from one end , it will just peel off at the news paper . Then shape and sand the under side to match the radius of your Arch top.
Rob
-
10th August 2014, 09:48 AM #11
GOLD MEMBER
- Join Date
- Mar 2004
- Location
- Brisbane (western suburbs)
- Age
- 77
- Posts
- 12,117
I'm not with you, Derek? The cove in the pic looks pretty regular to me. It appears to taper at the ends, but I thought that was just as it runs out into the ogee shape across each end. In any case, a scratch-stock easily follows curves; single, double, varying, no sweat. As Rob says, though, it's often difficult to impossible, depending on the wood, to cut perfect ends with a scratch stock. That shouldn't be a problem with this piece. After looking at the pic properly ( Originally Posted by derekcohen

 ) I realise it's two separate pieces, so a standard scratch-stock should do nicely. I'd make the coves first, then cut the ogees on each end, which will eliminate any ragged bits. As he also points out, the main difficulty will be how to hold the foot piece while working on it, if it's already roughed-out as a small piece. I'd most likely do exactly what he suggests; glue it to a piece of scrap, with a bit of newspaper in-between. A very useful 'trick' in this type of situation...
Rosewoods usually scrape beautifully, but however you decide to do it, I suggest you practice on some scrap before getting stuck into your bridge piece, - that stuff's too expensive to turn into firewood!
Cheers,IW
-
10th August 2014, 12:31 PM #12
Be inspired. Be creative. Be bold.
- Join Date
- Apr 2001
- Location
- Perth
- Posts
- 10,820
Hi Ian
Perhaps I am over-thinking this - which is something I never do There is a taper from the ends towards the centre ...
My concern with a scratch stock alone was that it may not follow the differing section heights and maintain a straight line. Now that I have taken my medication I do not think the same way. The scratch stock fence will ensure that it is aligned. And since it is referenced from one side, the depth created is up to the user.
Back to corner I go with my Dunce hat!
Regards from Perth
DerekVisit www.inthewoodshop.com for tutorials on constructing handtools, handtool reviews, and my trials and tribulations with furniture builds.
-
10th August 2014, 06:47 PM #13
GOLD MEMBER
- Join Date
- Mar 2004
- Location
- Brisbane (western suburbs)
- Age
- 77
- Posts
- 12,117
Derek, I think that's an optical delusion caused by what appears to be the concave bottom of the piece. To my eye, the cove looks straight, and it peters out into the ogeed ends. Alternatively the apparent curve in the bottom could be due to distortion in the image, since guitars are usually flat-topped. Originally Posted by derekcohen

We could all be wrong - a single pic doesn't always tell the full story! Originally Posted by derekcohen

Cheers,IW
-
11th August 2014, 01:10 PM #14
Senior Member
- Join Date
- Aug 2008
- Location
- Melbourne
- Posts
- 166
Thanks for all the ideas guys, I hope no one is stressing too much about it!
I'll try help clarify some points that have arisen:
- The guitar's top is arched, and the bridge is floating - not attached
- The top of the bit of wood in question is flat, and as such, the cove will be flat and then "blended" into the Ogee shape on the ends.
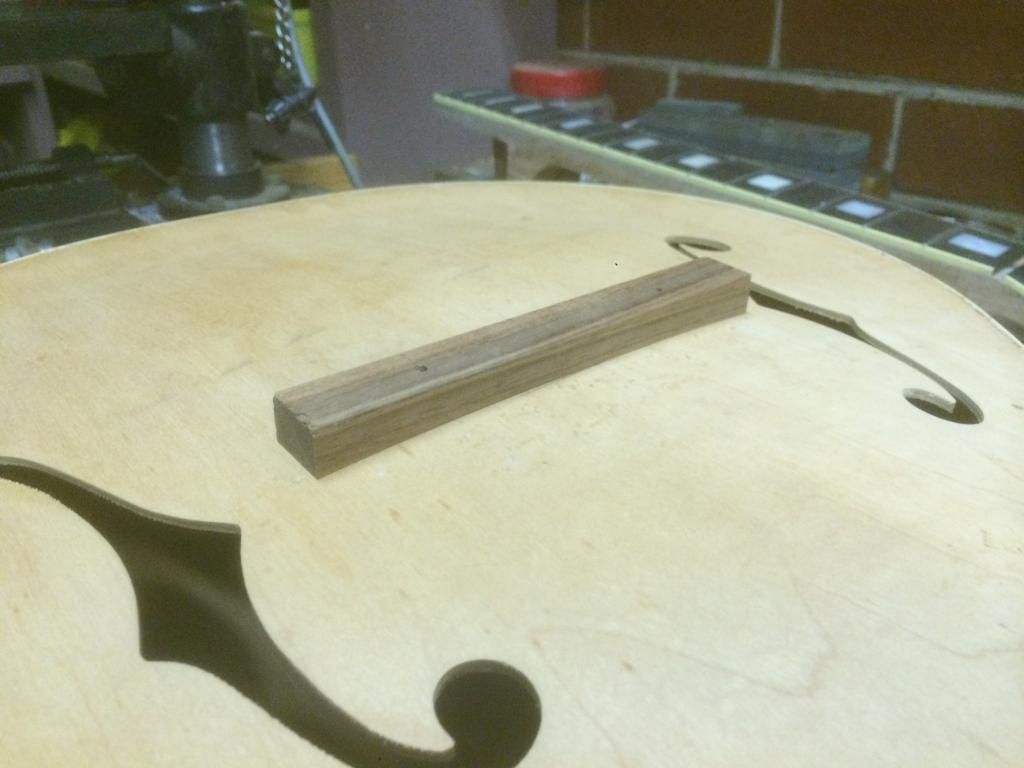
Here's a photo of my bit of blackwood that I'm using in its current state:
My plan, based on all your suggestions is to chamfer the edges with a block plane first, then use a scratch stock to cut out the cove. Then, I'll shape the ends and blend it all by hand.
I like the sound of the newspaper glue joint (haven't tried it before) - is that done with PVA/Titebond/___?
-
11th August 2014, 01:32 PM #15
GOLD MEMBER
- Join Date
- May 2007
- Location
- Sth Gippsland Vic
- Posts
- 4,372
Yeah , pva , titebond Hide glue , and super glue are the ones I have used, all good .


 Reply With Quote


Similar Threads
-
Flexible ply that can be formed wet & retians shape of form once dry
By plyquest in forum WOODWORK - GENERALReplies: 5Last Post: 27th December 2012, 09:03 AM -
fly cutter tool shape
By morrisman in forum METALWORK FORUMReplies: 24Last Post: 9th February 2012, 05:06 PM -
Turning tool shape
By morrisman in forum METALWORK FORUMReplies: 22Last Post: 14th October 2011, 07:49 AM -
Plane to shape an alaia?
By kristian in forum HAND TOOLS - UNPOWEREDReplies: 14Last Post: 4th March 2009, 01:23 AM -
shape and form
By hughie in forum WOODTURNING - GENERALReplies: 10Last Post: 10th August 2006, 01:40 AM
