

 Thanks: 0
 Likes:
  Needs Pictures: 0
 Picture(s) thanks: 0
Results 1 to 13 of 13
Thread: My New Old Tools
-
16th June 2013, 08:28 PM #1
 Senior Member


- Join Date
- Apr 2013
- Location
- Macksville
- Age
- 62
- Posts
- 391
 My New Old Tools
Hi there, I have been checking out this site for a few weeks & this is my first post. I have just started to get a bit more serious about woodwork & am getting a few decent tools together. I mentioned this to SWMBO's brother & he said he had a few tools that belonged to their father & grandfather, that I could have.
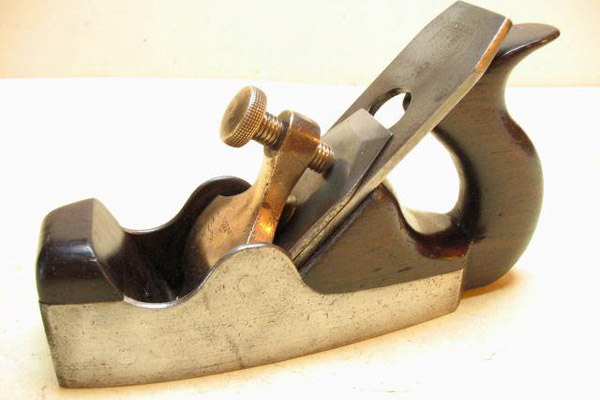
I got them yesterday & the first was a No. 5 Turner plane that looks like it has only been used once or twice, with only a few scuff marks on the base. There were also the tools shown in the photos, an old Stearns saw set (in original box), an Irwin expanding bit & a very old plane. Can anyone tell me about the plane. It is a Spiers Ayr plane with an Alex Mathieson Iron & cap. It has "R.LEMON" stamped into the timber on the front & side of the frog. I have searched the interweb for a photo to find out what the front timber looked like, but can't find anything. It looks like it had a fair bit of use after it broke, as broken timber is worn smooth. The tote is loose in the frog & I cant see how it is attached, can any one tell me how it is fitted & can it be fixed. I am still deciding whether to give it a bit of a clean for a display piece or try to fix it & use it.
IMG_1345.jpgIMG_1349.jpgIMG_1346.jpgIMG_1348.jpg
-
16th June 2013 08:28 PM # ADSGoogle Adsense Advertisement
- Join Date
- Always
- Location
- Advertising world
- Age
- 2010
- Posts
- Many
-
16th June 2013, 09:25 PM #2
GOLD MEMBER
- Join Date
- Sep 2008
- Location
- Petone, NZ
- Age
- 68
- Posts
- 2,823
Hi. Welcome to the forum.
Nice haul. Turners have a good name (at least in Australia ). But that Spiers plane is the best part. I wish I knew more about them, but I can tell you it has the potential to be both very valuable and a very good user. Don't rush into repairing it - you don't want to undermine its potential.
The "R LEMON" will be a previous owner.
Cheers, Vann.Gatherer of rustyplanestools...
Proud member of the Wadkin Blockhead Club .
.
-
16th June 2013, 10:02 PM #3
GOLD MEMBER
- Join Date
- Aug 2009
- Location
- Armadale Perth WA
- Age
- 55
- Posts
- 4,524
Peter McBride for one would be a great source of info.
For similar looking items ...
McLaren planes Melbourne
Mathieson Plane - Forgery
Infill Planes marked "STEEL"
(Mathieson Panel Plane)
History
Stewart Spiers � Plane maker of Ayr, Scotland
Antique British Metal Planes & Infill Planes at The Best Things
Examples
Wood Infill Planes - Oldtools.co.uk
Misc
https://www.woodworkforums.com/f152/s...r-work-165155/
Infills, infills ... somebody stop me ...
Cheers,
Paul
ok - 1 more - Spiers - The Infill Planes Showcase
-
17th June 2013, 02:03 AM #4
Peter McBride
- Join Date
- Nov 2007
- Location
- Melbourne
- Posts
- 1,139
62wb, Originally Posted by 62woollybugger

Welcome to the forum ... nice get!!
First thing about the plane I see is that it is a later plane, made after Stewart Spiers had died in 1899. The rear infill isn't over the side of the plane, and the steel edge is chamfered.
Next, a closed handle smoother is not often seen, they are mostly either un-handled, or open-handled. The blade set is a replacement.
There looks like a wedge has been added under the blade set to increase the blade angle. That will be a user modification.
I'm not certain how the closed handle of that vintage will be fitted. The earlier ones I have are made with the handle morticed into the block of wood in the body that follows the top edge of the steel sides, and a piece of wood was glued on top of those to go over the top of the sides. That may be visible as a small split at the back, or behind that after-market wedge under the blade.
Here is a story on how I fixed an open handle Spiers smoother many years ago.
Spiers handle repair
You can see the split in the rear infill on that plane, and how the wood is over the top of the steel sides.
I have some of the closed handle smoothers, but none are the same vintage as yours, so I'm not certain how the rear infill on yours has been made.
You might have to drill or punch the pins out of the infill to repair it. That kind of work is pretty challenging, and without knowing the skill level or experience you have, I don't know if I would recommend you try it.
In good un-restored, and un-modified condition these planes are a good bit more valuable than a closed handle type, but in the condition yours is in, I would not hesitate to restore it to use.
Andy Stephens in the UK has an OK one for sale...he wants �350 for it
Tool Bazaar DEALER IN ANTIQUE AND QUALITY OLD WOODWORKING TOOLS
If you plan to collect these, the one you have been given might be a nice one to sit on a shelf until a better example comes along....and it might also be nice to keep that one .... the first infill plane you ever owned.
Here are a few more Spiers planes.
Spiers Planes
Regards,
Peter


-
17th June 2013, 08:49 PM #5
Senior Member
- Join Date
- Apr 2013
- Location
- Macksville
- Age
- 62
- Posts
- 391
Thanks for the replies. This plane was used by my wife's grandfather up until he passed away in the early 1970's & has been stored away since then. I think I will give it a light clean & sharpen and use it. Where the timber is broken at the front, I think I will just smooth it off for now & maybe fix it properly later.
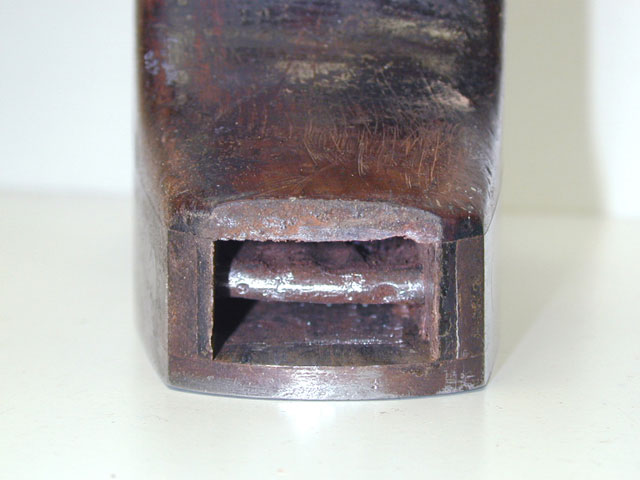
John, the handle rocks back & forth, with the pivot point being the end rivet. I think it must be keyed into the frog & the rivet then put through to hold it together. Do you think the pins are straight & could be knocked out, or would they be peened into countersunk holes? If I can't get it apart, do you think it would work if I was to flush out the joint & inject glue into the gap?
Close-up of handle
IMG_1350.jpg
-
18th June 2013, 07:16 PM #6
Peter McBride
- Join Date
- Nov 2007
- Location
- Melbourne
- Posts
- 1,139
62wb, Originally Posted by 62woollybugger
I will answer for John..hehehe....
I cant see a split in the infill at the back. So it looks like one piece with a hole receiving the closed handle.
Here is an open handle plane. Posted earlier today, on another forum. The top has lifted off.
www.mobypicture.com/user/maxwellarm/view/15488725
On yours, fitting the infill inside the two sides was a much easier way to make the infill. The planes I have made are like yours. It is much easier to fit it within the walls, rather than over the top.
Yes. The holes are countersunk, and the pins are peened over.
There is also a possibility that the pin is bent inside the body. I've seen that more than a couple of times on Spiers planes.
( It makes a mess of the front knob when you try and push those out.)
One that I did a while ago...I drilled the center of the pin right up near to the edge...enough to put a punch in, and the peened over part collapsed a little as it was pushed in. Then I punched it through a little, and carefully cut the other side off without marking the body, and punched it back the other way. That way I got back to original pin diameter, and less risk of breaking up the wood.
I'm not too confident about getting glue into the handle mortice without taking it out. However what you suggest might work....?? Blast it in with compressed air perhaps, with the handle held firmly forward ...might work??
What is the throat opening like with the blade angle lifted by the wedge? What angle did he get from that mod?
Don't know if it might have been done to suite an extra thick blade and maintain a tight throat, or was it to open up the throat...It may have been just to get a steeper angle to help reduce tear out on gnarly grain.
Regards,
Peter
-
19th June 2013, 10:35 AM #7
GOLD MEMBER
- Join Date
- Mar 2004
- Location
- Brisbane (western suburbs)
- Age
- 77
- Posts
- 12,132
I was waiting for Peter to reply first, in case there was a way of preserving those rivets, but I see his method of removal is much the same as mine. So you will have to find suitable replacements in the right metal if you remove them. When it's time to reassemble, I'd advise practising peening & levelling a couple of rivets before tackling the real thing, if you haven't done it before. When building my own dovetailed plane I mis-hit a few times, which wasn't a big deal as I needed to clean it all up afterwards, but you don't want to mark the body on your oldie if you can help it.
I also think taking the rear stuffing out is the only way to make a proper, lasting repair. It might be possible to effect a repair in situ if the handle was glued up originally with hide glue - you could get moderately dilute, hot glue to penetrate the gap a fair way if you warmed-up the whole plane, and old hide glue will bond to new. However, such an approach would be pretty dodgy, particularly if someone has already tried to get something else in there. The main attraction in trying that way is that it's relatively easy & won't do any permanent harm if it doesn't work - hide glue is easy to remove. However, cleaning all of the matching surfaces thoroughly is the best way to ensure a good glue bond. I am concerned that wear & shrinkage might have left you with a bit too much gap for a good bond, too - you may need to shim it with some paper, or a shaving of wood, on reassembly.
From the photos, it looks like the front bun could be repaired by levelling it and glueing on a new piece that you could blend into the old. A bit tricky, but may be easier than having to remove & replace rivets. You may have quite a search to find a piece of Rosewood to match - some instrument-maker might have a suitable scrap?
As Peter says, the blade angle may have been changed to gain a higher cutting angle, but it may also have been simply to chock up the blade enough to get the lever cap to work with the thinner blade & cap- iron assembly. The current blade is quite a bit thinner than an original, so it wasn't a case of needing to make it fit through the mouth. A wide mouth is ok with higher cutting angles, but the hefty blade added much to the performance of these planes, & it might benefit by being returned to a more original state. You could put out the call, or keep your eyes open for a blade that is closer to the original thickness, with a fair chance of finding something. You will probably have to remove the chock to get it to fit under the lever cap (the mouth will be ok), but I suspect you would end up with a much better all-round tool by going that route.
I'm sure this old girl can be brought back to her former glory, just take it slowly & carefully & don't do anything too drastic 'til you're confident with each step & you'll be right.
Cheers,IW
-
19th June 2013, 02:30 PM #8
GOLD MEMBER
- Join Date
- Aug 2009
- Location
- Armadale Perth WA
- Age
- 55
- Posts
- 4,524
Would the original be a taper-iron ... or parallel do you think? Originally Posted by IanW
Paul
-
19th June 2013, 06:25 PM #9
GOLD MEMBER
- Join Date
- Mar 2004
- Location
- Brisbane (western suburbs)
- Age
- 77
- Posts
- 12,132
Don't know, Paul. I would assume they used parallel blades for screw-tightened lever caps as there would be no advantage in having a tapered blade, as it can't jamb itself the way a wedged blade can. All you have to do to loosen the blade is unscrew the thumbscrew. But I may be dead wrong - Peter will tell us.... Originally Posted by pmcgee
Cheers,IW
-
19th June 2013, 06:47 PM #10
Peter McBride
- Join Date
- Nov 2007
- Location
- Melbourne
- Posts
- 1,139
Paul, Originally Posted by pmcgee
It would have been parallel, the very early ones I have seen (those that look original), from around the mid 1800s, had some tapered blades.
Sorry Folks, I thought I had typed that answer with the rest....but I was remembering wrongly. I had answered another Spiers question on the OldTools list on the same day.
Was wondering why you were asking... ...
...
Had bad thoughts about folk not reading..
now...after re-reading my writing...
bad thoughts about myself for not writing......and ashamed about thinking bad thoughts...
Regards,
Peter
-
19th June 2013, 09:40 PM #11
Senior Member
- Join Date
- Jun 2007
- Location
- Queanbeyan NSW
- Posts
- 231
Old spiers
One of mine has a tapered blade - it makes it a lot earlier than I thought - if it is original. Doesnt matter cos it works very well Originally Posted by lightwood
Neil
-
20th June 2013, 11:22 AM #12
Peter McBride
- Join Date
- Nov 2007
- Location
- Melbourne
- Posts
- 1,139
Neil, Originally Posted by brontehls
The parallel blade will maintain the same throat opening for the life of the blade. A tapered one will open up the throat as it's shortened after many sharpenings. However, most often these planes were used sparingly, and only got out to smooth certain timbers. So the blades are often almost full length, compared to other planes from the same tool chest which have been used up...sometimes more than one blade per plane.
Here is a Spiers plane with original blade set. Have a look at your plane for the numbers stamped on the plane and blade set. This plane belonged to George L Collings, an Organ maker working for Finsham in Melbourne.
Does yours have this set of numbers?
When I pulled apart a Spiers plane I found the number on the inside of body parts also.
Regards,
Peter

On the infill under the blades..."5" upside-down.

under the lever cap, hard to photograph, "5" upside-down again

and on the blade set, "5"

-
25th June 2013, 10:49 PM #13
Senior Member
- Join Date
- Apr 2013
- Location
- Macksville
- Age
- 62
- Posts
- 391
Hi, Thanks all for the advice. There is about a 1mm gap between the front of the handle & the frog (if that's what it's called on this style of plane). I will make a wedge & glue it in there to fix the loose handle. As I think it will be very difficult to find a piece of rosewood to repair the front bun, I will either use a piece of Jarrah or just smooth whats there & use it like that. From the way the broken surfaces are worn, it looks like it was used for some time as it is. I don't want to change it too much, as this is how it was when my wifes grandfather put it away the last time he used it.
We have looked at the wifes family history & there is no "R. Lemon" anywhere, so we figure her grandfather got the plane 2nd hand. He worked as a french polisher from around the mid 1920s in the Leichhardt area of Sydney & made furniture as a hobby.
Here are some photo's of the other tools that I was given.
IMG_1352.jpg An old brace & bits. The 3 on the right are Mathieson, the ones with the blue tangs just have "Japan" on them. The others are Snells, Alfrid of Shefield & Titan.
IMG_1353.jpgIMG_1356.jpgStanley 71 & 75 planes in boxes
IMG_1359.jpgIMG_1358.jpgThe almost unused Turner No.5
There were also a couple of old A E Berg chisels. I splashed out & bought a new Veritas low angle block plane & now I just have to get some saws and I should be ready to murder some timber.


 Reply With Quote


Similar Threads
-
Dieter Schmid/fine-tools.com your experience with the tools they sell
By Andreas87 in forum JAPANESE HAND TOOLSReplies: 16Last Post: 31st May 2011, 12:17 AM
