

 Thanks: 0
 Likes: 0
 Needs Pictures: 0
 Picture(s) thanks: 0
Results 1 to 15 of 18
-
18th November 2007, 06:06 PM #1

 GOLD MEMBER


- Join Date
- Mar 2006
- Location
- Earth
- Posts
- 3,567
 Hand tools for Shaping Surfaces & Constructing reamed M&T for Windsor Style Chairs
To date, I have found myself repeatedly in need of shaping planes, and tools due to an inclination towards the soft curves and gentle lines. On many occasions I have been in need of a tools to shape a piece of wood beyond square. Therefore this post is not a question of a single chair or project, but rather a strong aesthetic disposition that insights me to find more then a makeshift or haphazard solution as I have done to date. The Windsor is simple my means to solicit the discussion on the tools that gives form and life to wood. Finally this is a venture to the darkside in which I seek to shape, plane and joint everything by the means of darkside.
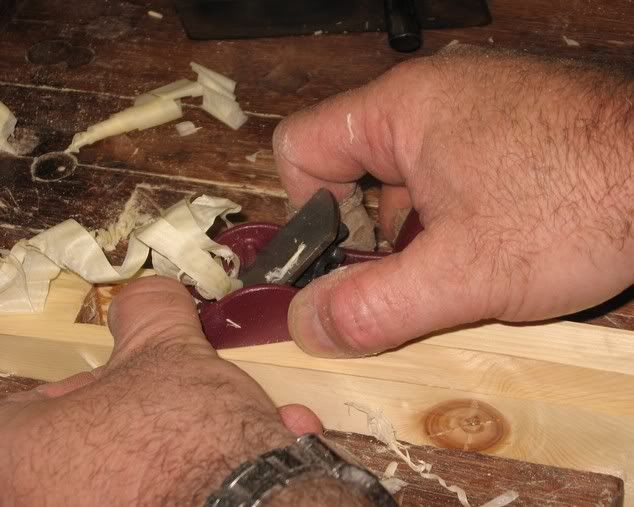
Starting at the 07 Working Wood show in Melbourne, I picked up a small slab of crotch wood Crows Ash. I decided to make a seat inspired by the Windsor Chair and George Nakashima.
After hand planing planing out some major tear-out from the mill saw I hand cut two butterfly key joints along two major splits out of seat. My next step is to drill the legs, rails, and spindles. I will also be carving the seat with a pommel.
I have read extensively on the hand tools used to form the carved seat as well as the tapered round mortise and tenon joints, focusing predominately on the Windsor Chair.
To carve the seat most people bar some variation go from adze, to scorp, to compass plane, to travisher. While ebay was my first first stop in my search an adze was the only tool that routinely turns up, these however seem to be pitted and poor samples. My search turned to new tools which unleashed a kettle of fish. While their are American companies that sells these tools I have a few concerns.
Firstly traditional Windsor chair seats are made from very soft woods like pine and poplar. Will such tools be feasible and durable in Australian hardwoods, since most of these tools are only high carbon steel?
My reading has pointed also to the fact that most commercial scorp's/inshaves compass planes, and travishers like two Cherries and stuff out of China, are incorrectly constructed often having a far to large curve to their cutting edge making them unsuitable to shape the gentle curves of a Windsor. This leads to the great secret list of Mike Dunbar of tools that Mike recommends for his course and students. I have discovered the names of some these tools, many of these tools cost in the hundreds of dollars each and all are manufactured in the U.S..
I have read that some people use a large gouge and then a Convex Sole Block Plane by Lie-Nielsen or a Squirrel-Tail Palm Planes by Lee Valley. A third option is for a HNT Gordon Block Plane which could have the Convex sole shaped into it. However this options has been questioned by some because again of Australian hardwoods, while it was possible it was going to "bloody hard work mate" I have read. I am also not confident in how these small low angle planes would handle a piece of nasty crows ash crotch wood, the HNT may have more success as it would be closer to a traditional compass plane.
The other thing that I notices was that often these custom tools were very basic for example the North bay Forge Adze is just a billet of high carbon steel flattened with slight curve at the cutting edge and then attached to a shaped handle. All for the small sum of U.S. $144 - $180 per adze. This being such a simple tool, I could just get a local blacksmith to make the blade for me. It surly would cost less. The same could be said for any good scorp's/inshaves likes these Country Workshops
I have a friend who wants to get into blacksmithing, maybe I can buy her a forge and some hammers for xmas and some hints for possible first projects.
Then their is the question of Tapered and Parallel Spoon Bits, and Tapered Tenon Cutters and Tapered Reamer. While the choice outside the U.S. is more limited as their seems to be a large number of Windsor Tool Makers in the U.S. examples are available from Veritas/Lee Valley and Clinton. The choice is still confusing. Not being able to ascertain the functionality of any of these tools.
Veritas/Lee Valley has an interesting Tapered Reamer, with an easy to sharpen removable blade. My reading indicated that a Tapered Reamer is more of a scraper then a cutter, so do you turn a bur on a Reamer? Lee Valley also sells some Spoon Bits, these however are no name brand and do not look as well finished as the Clifton the Clifton Tapered Reamer and the Clifton Spoon Bits are however twice the price.
Then the question of a Tapered Tenon Cutters, Veritas makes one however this seems to realistically to be used with a power drill. It is meant to secured in a vice and powered feed via a drill. I have come across wooden versions with handles which would not be hard to make if you had the reamer to match it with.
Here are some interesting links for Windsor Tools.
Clifton Tenon Cutters, and Spoons
A non Veritas/Clifton reamer
A non Veritas/Clifton spoons
http://www.fine-tools.com/bohr2.htm
http://www.fine-tools.com/duebelherstellung.htm
Maker of custom Windsor Planes
Wooden Low Angle Spokeshaves
Windsor Beader and Wooden Low Angle Spokeshaves
Woodjoy Tools Beautiful Spokeshaves, Scrapers, Marking Tools Etc.
Great first stop for searching on Windsor's
British Maker of very functional industrial looking Reamers and tenon cutters
Course but also makes tools for sale
Mike Dunbars - Windsor Institute
A Windsor Chair Maker, teacher and Blogger Peter Galbert who is a wealth of information
The Cheapest Set of Three rounder, reamer, travishers
All in all I am overwhelmed with choices and what seems to be very little applicable information and tools to the Australian darkside experience. If anyone can contribute to understanding of these tools and subject, it would be much appreciated.Last edited by thumbsucker; 18th November 2007 at 07:33 PM. Reason: For Reasons of Clarity
-
18th November 2007 06:06 PM # ADSGoogle Adsense Advertisement
- Join Date
- Always
- Location
- Advertising world
- Posts
- Many
-
18th November 2007, 06:23 PM #2
SENIOR MEMBER
- Join Date
- Feb 2003
- Location
- Garvoc VIC AUSTRALIA
- Posts
- 11,464
Well you are working with harder timbers so maybe you will need to sharpen your tools more often.
If I was making only one or two chairs I wouldn't bother with all the fancy gear.
I'd just use some chisels and gouges and clean up the shape & finish it with a 7" panel beaters sander.
You could also consider an arbortech wheel on a grinder
As for tapered holes you could make up timber reamers the right shape and fit a single cutter in a slot. Disposable electric plane blades might be the go there but you can always make blades out of an old sawblade. Just drill holes in the timber with a spade bit and use the tapered reamer to open them to the right shape.
-
18th November 2007, 06:41 PM #3
Bricoleur
- Join Date
- Jul 2005
- Location
- Toowoomba Qld.
- Age
- 65
- Posts
- 2,792
I agree with Echidna, if you are only making one chair its just as easy to carve the seat using a gouge. I have done one with a home made adze, followed by a gouge and a home made plane. A "buckhorn" scraper could be used to finish off- again make it yourself, I think Shopnotes had a pattern for one. Alternatively, if you want to go real low-tech, use broken glass as a scraper, a rock and/or a broken brick to finish it off...I'm not kidding! Rub the high spots off using a rudimentry abrasive.
I tried making a tapered reamer which I posted some time back, worked fairly indifferently. As for the tenon, use a drawknife and a spokeshave.
I'd love to able to afford all that fancy kit, but I think its more for small production runs, and anyway people made furniture for themselves for generations without all that!
Cheers,Andy Mac
Change is inevitable, growth is optional.
-
18th November 2007, 07:00 PM #4
GOLD MEMBER
- Join Date
- Mar 2006
- Location
- Earth
- Posts
- 3,567
That is the thing most are very simple tools just over priced, in my view. I think their must a big market for hobbiest reclaiming a slice of Americana by building Windsor chairs. An interestingly fact is that their are more Windsor Chair makers and their chairs today then their was at they height of the Windsor Chairs popularity. Originally Posted by echnidna

I do not have a 7" panel beaters sander or arbortech wheel on a grinder, would cost more buy them then to buy a good set of hand tools. Originally Posted by echnidna
I have seen this, it is a question of getting a access to a lathe to turn the reamer shape, also what kind of taper would I need, I could not have it as fine as the metal reamers at 4 mm to 20 mm taper, but that would be way cool. I just have so many tools to make the list just keeps growing. Originally Posted by echnidna

Just found this Lee Valley Standard Taper Reamers and it is cheap.
How did you make the Adze? Originally Posted by Andy Mac
A "buckhorn" scraper is on my todo list, I think that as soon as the D2 blades are done then I will make a compass plane, followed by a "buckhorn" scraper.
The other option that looks quit handy is a Veritas Pullshave
I will look it up - indifferently? code for? Originally Posted by Andy Mac
What I have read is that the Windsor is able to support a person weight in contradiction to the fact that is so light in construction by the means of its construction. The strength comes from a 2" thick seat with long through tenons which gives the most face glue surface, and a tenon that must be tapered to absorb the weight of the person. The greater the weigh the more the tapered tenon is forced into the socket as the legs have no shoulders. I would not be confident in making a suitable strong enough joint perfect in its circumference and taper so as to match the tapered mortice. Originally Posted by Andy Mac
-
18th November 2007, 07:57 PM #5
Retired
- Join Date
- Dec 2005
- Location
- Oz
- Posts
- 1,058
If I were making a chair this is what I'd be looking at. I've just bought one but haven't had the chance to use it yet. It's a Veritas pullshave
-
18th November 2007, 10:38 PM #6
GOLD MEMBER
- Join Date
- Mar 2006
- Location
- Earth
- Posts
- 3,567
Toolin please do so and write up a review. I wonder how heavy a cut could it take could it really hack away at a seat. What kind of finish it would give in figured wood. Originally Posted by Toolin Around
-
18th November 2007, 11:01 PM #7
Bricoleur
- Join Date
- Jul 2005
- Location
- Toowoomba Qld.
- Age
- 65
- Posts
- 2,792
Hi thumbsucker,
When I say indifferently I mean the tool didn't seem to do the job overly well. You could perservere and get a job of sorts done, but not efficiently. It seemed to tear the cross grain section a bit, much like the tenon rounders I made! There's a pattern emerging here
As for the adze, it was made from a short length of leaf spring steel, using oxy acet to cut and shape it, & knocked a hole through it for the handle to fit. Welded a pipe collar around the underside of the hole, then finished it with grinder and files before heat treating it with the oxy acet. It works OK, could do with more of a hooked curve on it.
Cheers,Andy Mac
Change is inevitable, growth is optional.
-
19th November 2007, 12:39 AM #8
Senior Member
- Join Date
- May 2005
- Location
- Forest Grove, Oregon USA
- Posts
- 496
The LV spoon bits are made by them. Originally Posted by thumbsucker
If I needed spoon bits (meaning I didn't have my vintage ones) I would buy the LV ones. Spoon bits are rather simple tools. Clifton hasn't had any competition concerning spoon bits. LV can simply make them for less.
Take care, Mike
-
19th November 2007, 12:52 AM #9
Be inspired. Be creative. Be bold.
- Join Date
- Apr 2001
- Location
- Perth
- Posts
- 10,826
Hi Helmut
I have the two LV squirrel-tailed planes for review. So far I have only used the flat-bottomed block plane. Still looking for a project for the round bottomed one. Both are great little planes.
Regards from Perth
DerekVisit www.inthewoodshop.com for tutorials on constructing handtools, handtool reviews, and my trials and tribulations with furniture builds.
-
19th November 2007, 06:41 PM #10
GOLD MEMBER
- Join Date
- Mar 2006
- Location
- Earth
- Posts
- 3,567
Mike that is what I wanted to know Originally Posted by MikeW

I think it would be great for derekcohen and Toolin Around to do some reviews of these shaping tools.
I think the Veritas pullshave would be better at hocking out material, the Veritas guide even says it is more a ruffing tool that will need scraping and sanding afterwards. The pullshave keeps your hand out of the hole that you are shaping and I think you could create more leverage with that long handle, hacking out material as you go. The squirrel-tailed planes look more like finishing tools to be used after you have established the depth and shape with the pullshave.
It maybe time to make some Veritas purchase for myself and a Wenzloff Carcass Saws for xmas thanks to SWMBO.
-
19th November 2007, 08:43 PM #11
 Franklin Ferrier
- Join Date
- May 2007
- Location
- Gold Coast
- Age
- 70
- Posts
- 2,735
Hi TS,
I've haven't got any useful insights to add since I haven't actually made anything relevant yet, but I've been squirreling away info and the occasional garage sale tool for the eventual day I get around to making a Windsor chair or maybe an English style pub/smokers chair myself.
Years ago I read Dunbar's book on Windsor chair making, which I think was responsible for setting me on the downward spiral of collecting old tools. Later I asked a question about Windsor chair making on a news group and got a response which was basically "Ignore all that, Mike doesn't make chairs that way anymore. You gotta go to one of his classes!"
Some time later I picked up a book by Jack Hill - Country Chair making. It had a lot of different details and said it was fair and reasonable to use either green or dry stuff to start with, while noting it was going to be a lot harder with dry wood but not to be deterred.
When it came to shaping seats Jack simply suggested - use whatever method suits you and/or the tools on hand. Adze, 'shave, travisher, gouge whatever. It did however go on to give a brief idea of how to apply each tool. This appealed to me since I often think I get too concerned about having the RIGHT tool for the job. It's undeniable a lot of furniture has been made throughout history without the benefit of fancy tool steels and other 21st century technology. What it usually doesn't say is how much experience, skill, aerobic fitness and patience play in producing a final result.
How many failed projects are we prepared to practice on before getting a decent result? How much does the cost of timber come into consideration and how much the cost of our own time? How much do the tools really affect the outcome?
One tool suggested in the Jack Hill book is a Roundering machine for making spindles. It was based on providing a low speed driver to apply a rounder to the blanks at a user friendly speed rather than the higher speed of a lathe. It's design is based on running a washing machine motor through a small car's 3 speed gear box, I expect an Austin A40 or similar gearbox at that! Nowadays the front wheel drive thing is probably going to make even that machine difficult to reproduce. Back to the treadle lathe.....
-
21st November 2007, 09:35 PM #12
SENIOR MEMBER
- Join Date
- Oct 2001
- Location
- ACT
- Posts
- 455
Hi TS
Not sure if you have heard of the guy who runs this placehttp://www.rarechairs.com.au/Gallery.html
Howards a great guy with a great philosophy on his woodworking and making traditional chairs. I have done a short course of his. There's no real need to use tapered tennons and taper reamers and all the like. just turn a shoulder in the right place, tennons are also wedged anyway.
Last wood show here I got a $10 wooden compass plane from McJings in Sydney. All it needed was a good regrind of the rough blade and its great for smoothing chair seats. roughing out can be roughly done with a scorp or reforged adze (can get them cheap just reforge em to a curve).
Wouldn't really bother with spoon bits and shell augers although normal brace type bits with side spurs will cut a clean hole and won't wander like a spoon bit. Dont forget the old wooden spoke shave (witha tightish mouth) its low cutting angle is great for end grain while shaping the edge of chair seats.
Steve
-
21st November 2007, 11:29 PM #13
GOLD MEMBER
- Join Date
- Mar 2006
- Location
- Earth
- Posts
- 3,567
Thank you Zsteve and Fuzzie for your thoughts. Interesting how Mike Dunbar has changed his method. I think the spoon bits are less of a concern however I think that the tapered tenon are very important because the tapered forms an integral component in the strength and durability of the legs. Without shoulder the tenon would eventually break its glue bond and ride up and through the through mortice.
I have not had much luck at garage sails however I keep an eye out on ebay. I am however keen to explore tool making and blacksmithing in the near future and to make my own tools.
I do think however that a Veritas pullshave and a Square plane would do a fine job.
-
22nd November 2007, 08:38 PM #14
SENIOR MEMBER
- Join Date
- Oct 2001
- Location
- ACT
- Posts
- 455
If you are keen on the idea of tapered tennons and taper reamers make one - http://www.greenwoodworking.com/reamer.htm
-
4th September 2008, 05:51 PM #15
What... you mean it's not 1792?
- Join Date
- Oct 2006
- Location
- Melbourne
- Posts
- 5,271
Any progress with your venture thumbsucker?
There are many ways to go about making Windsor chairs and a fair bit of it depends on whether you're into the whole antique tools/traditional way of working or whether you just want to make an attractive and functional chair.
I bought Dunbar's first book in 1976 after I'd made a few Windsors and got the bug. For all his research and 'authentic' woodworking practices, there's a picture of him in the book hollowing out a seat with an adze along the grain!
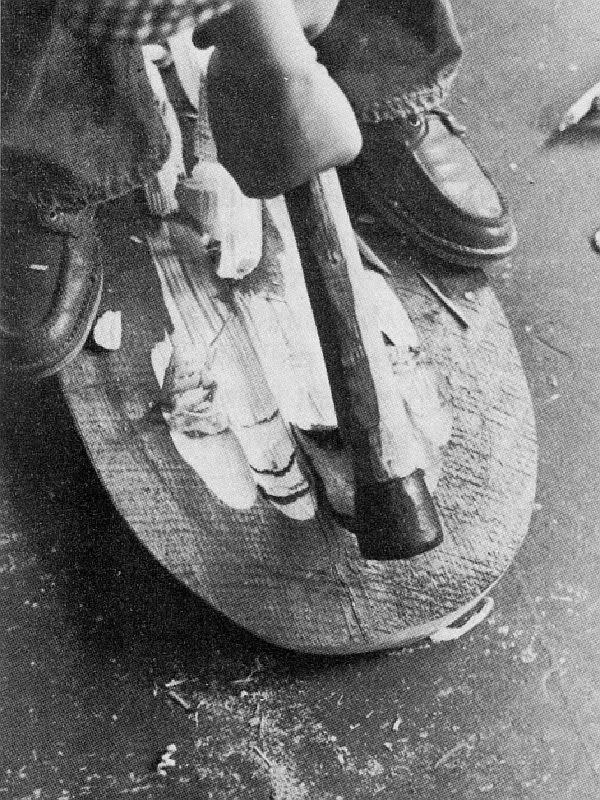
The very action of an adze blade swinging through an arc means that during each cut, the blade will first go 'with' the grain and as it exits the wood, will go 'against' the grain.
This picture illustrates how 'bottoming' should be performed.
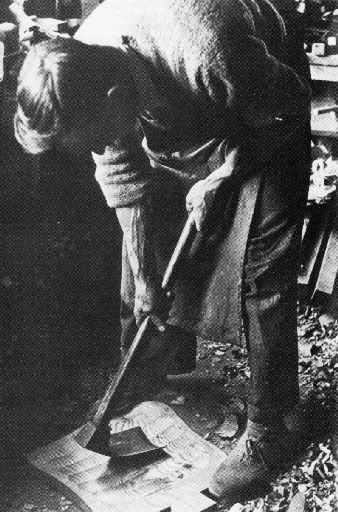
This all just goes to prove that even executed incorrectly, a seat can be successfully hollowed out by whatever means.
I admit to owning a full compliment of antique Windsor chairmaking tools, but I don't honestly remember if I ever used them when making a Windsor chair, or if I did use any of them, I don't think I used them exclusively.
My main tool for bottoming was a (Sandvik?) chainsaw-toothed disc a predecessor to the Arbortech Pro-4 Woodcarver, which was followed by a rubber backing pad and various grades of sanding discs and finally hand scraping/papering. You could also get by with one of these Kutzall Sanding Discs.
You would need more than an adze to shape this seat!

As Zsteve mentioned, tapered sockets aren't necessary. It's traditional to insert wedges into through-tennons for leg-to-seat holes. As long as there's even a slight register, the legs won't move either way.
You can often see more than a slight register at the juncture of leg and seat if you upturn an old Windsor. The step that forms the register is present partly because oversize legs were bought in from bodgers and were intentionally left there when the tennons were finally turned by the chair framer.
There's such a variety of superb power bits available these days that you wouldn't even consider using a spoon bit for any of the holes in a Windsor.
If you're shaving the legs to shape and don't have a lathe to prepare the leg tennons, then one of the Veritas Power Tennon Cutters and a couple of power bits would get you by..
I know you believe you understand what you think I wrote, but I'm not sure you realize that what you just read is not what I meant.
Regards, Woodwould.

 Reply With Quote


