

 Thanks: 0
 Likes: 0
 Needs Pictures: 0
 Picture(s) thanks: 0
Results 1 to 15 of 33
-
21st November 2005, 04:45 PM #1
 Banned


- Join Date
- Apr 2005
- Location
- kyogle N.S.W
- Age
- 50
- Posts
- 4,844
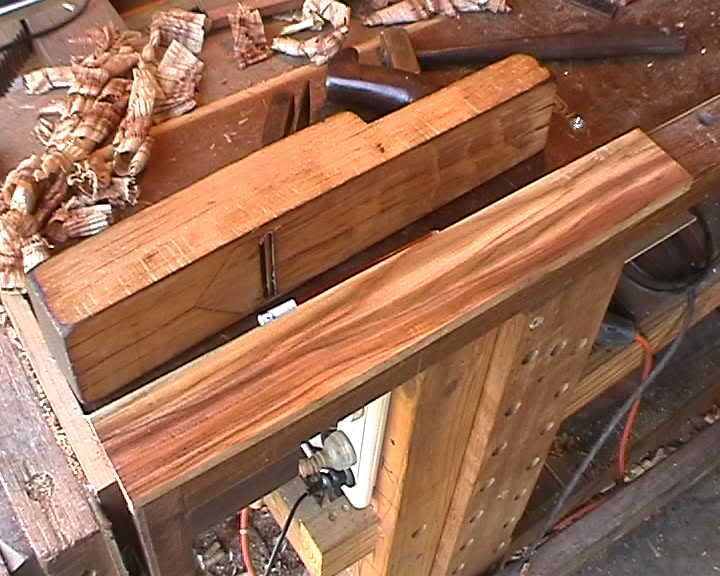
 My Wooden CJS handplane on Camphor Laurel
Just continuing from that thread 'Tuning an old wooden plane'.
I'll try and be objective. .....I will, I promise
My point from that thread was, that its unnecessary having to buy a modern expensive plane to get consistantly good results. So I did up a beat up plane, and trialled it. Made a reasonable point I guess.....
Then, the point was raised that on irregular grain like Jarrah and Camphor Laurel that my CJS wooden plane (Caveman Jake Special, , yeh I know, kinda funny though, yes?) wouldn't hack it. That Bevel up planes and HNT Gordons would lead the way. .....WELL, that sounded like a challenge to me !!!
  My CJS can hold its own ....and, by god I'm going to prove it !! ...at least help to resolve the debate some , with a few pictures.
I don't have any Jarrah lying about. Shame. Love the red wood. But I do have a little Camphor, which I don't like the look of. But its got the best smell. So I've used a strip of this for the test. Sort of tried to set it up like that those tests you did from your article Derek.
First this is the stuff we're trying to avoid, right ? Bloody Tear with a capital 'T'.
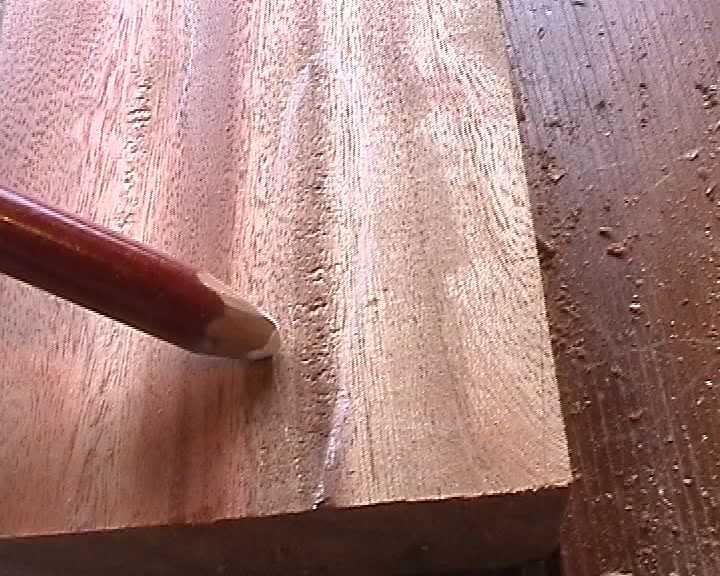
Ok, with the blade still set the same from the previous test. Thats 45 degree bed with about a 2 degree backbevel. Big ugly gaping mouth. Planed up the Camphor. This is what I got....I've tried to show where its torn with a white pencil. A few big lines of tear. Definetly not good enough, I agree.
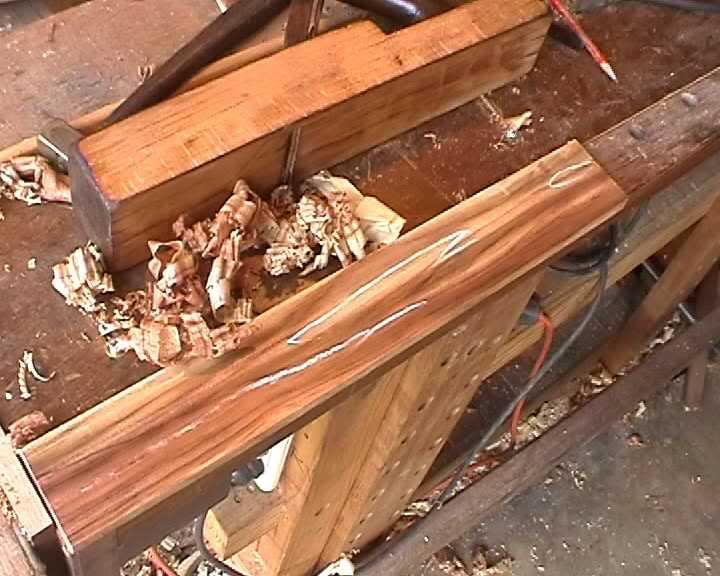
So, I backbeveled it 10 degrees. Thats about 55 degrees effective pitch. Just straight in the eclypse guide onto the polishing stone. Planed it up again. Marked the remaining tear this time. It cleared up a lot of the tear. Still not really good enough.
Backbevelled it a little more. Added another 5 degrees. Thats 60 degrees effective pitch. All gone, except for this last little bit. Not torn, but still a little hazy if you know what I mean. I normally wouldn't worry about this. Be good enough for me. Card scraper should deal with it.
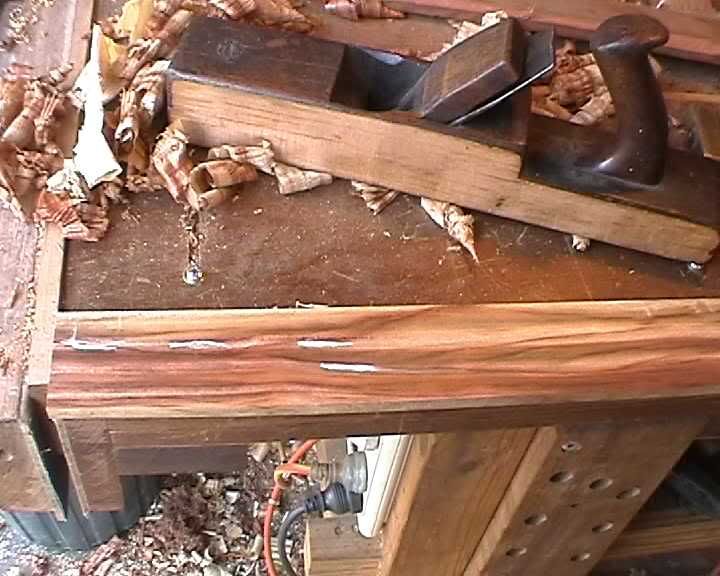
But I'll keep going. Add another 5 degrees. Thats 65 degrees Effective pitch. Similar to a HNT gordon bed right ?........Clean. Its all clear. My CJS can hold its own,,,,,after all!!!! .....See, see, See my point.
All I had to do was increase the backbevel angle.....But, regardless, this is an unusual situation anyway, at least for me. This Camphor is tough stuff. Most timber I come accross doesn't have to be delt this way.
There you go. What you think ? ....Who wants to buy my CJS. Think its worth at least $100US. I mean, just look, it can plane Camphor successfully.
-
21st November 2005 04:45 PM # ADSGoogle Adsense Advertisement
- Join Date
- Always
- Location
- Advertising world
- Age
- 2010
- Posts
- Many
-
21st November 2005, 04:57 PM #2
Bricoleur
- Join Date
- Jul 2005
- Location
- Toowoomba Qld.
- Age
- 65
- Posts
- 2,792
Hi Jake,
I'm impressed, and will now go back over that thread that spoke of back bevel on plane blades...which I'll admit I glossed over as it seemed to go against everything I'd learned about sharpening!! Obviously it works...
Cheers!Andy Mac
Change is inevitable, growth is optional.
-
21st November 2005, 05:02 PM #3
Cool dude
- Join Date
- Oct 2001
- Location
- Warwick, QLD
- Age
- 45
- Posts
- 3,462
Jake, thanks for the posts on this plane of yours! I have found it very informative and most interesting.
Thanks
Have a nice day - Cheers
-
21st November 2005, 05:19 PM #4
Be inspired. Be creative. Be bold.
- Join Date
- Apr 2001
- Location
- Perth
- Posts
- 10,826
Hi Jake
Terrific stuff! Nice execution of the sequenced results of using a standard angle to high angle blade.
I should point out some support for you with regard the large mouth issue. I think it was Steve Knight (who builds woodies in the USA, similar to HNT Gordon) who said that the mouth was far less important with cutting angles over 60 degrees. Essentially there is more of a scraping action than a cutting action, as you noted. Another bit: the "mouth" of a #80 or #112 scraping plane is enormous.
Regards from Perth
Derek
-
21st November 2005, 05:37 PM #5
Senior Member
- Join Date
- May 2005
- Location
- New Zealand (Palmerston North)
- Age
- 62
- Posts
- 238
Oh, you have got me all keen and excited to go and take to my woodie I bought a while back but couldn't get to work well. I thought it made a nice decoration in the shed and used my Clifton for tricky woods and my old Records for easy stuff. Maybe there is a real use for it after all.
Only trouble is, being a complete ignoramus, I really don't know how to increase the back bevel to 65 degrees. Could you please explain the process you used in very simple words. I usually bevel my plane blades to 20-30 degrees. Are we talking the same thing?? I guess not.
Of course, if it doesn't work, I have thought of another use for it. I'll glue some sandpaper on the bottom and use it as a push block for my jointer .
Cheers from NZ
Richard
-
21st November 2005, 07:02 PM #6
Senior Member
- Join Date
- May 2005
- Location
- New Zealand (Palmerston North)
- Age
- 62
- Posts
- 238
Just got back from doing part one of your woodie tune up - ran the bottom over the jointer! I also tickled up the blade. I'm not sure which worked, but for the first time, my old woodie takes nice shavings. Ok it is on Rimu, but that is a start. Now for the back bevel (when I understand what it means...) and a try on some maple or mahogany that I have had trouble with. Originally Posted by RichardL
As far as adjusting the blade depth, is there a better way of doing it than whacking it (jently) with a mallet? There must be some trick to getting it just right which I have stumbled on , never to be repeated.Cheers from NZ
Richard
-
21st November 2005, 07:11 PM #7
Banned
- Join Date
- Apr 2005
- Location
- kyogle N.S.W
- Age
- 50
- Posts
- 4,844
hello richard.
I'll definetly show you one way with some pictures. Can't right now. Screaming kids and all that. Give me a couple of days..
Seeya
Jake
-
21st November 2005, 07:34 PM #8
Senior Member
- Join Date
- May 2005
- Location
- New Zealand (Palmerston North)
- Age
- 62
- Posts
- 238
Thanks Jake - look forward to it. My kids are asleep - mind you it is 9.30 here Originally Posted by apricotripper
Cheers from NZ
Richard
-
22nd November 2005, 03:23 AM #9
Still with 10 fingers!
- Join Date
- Nov 2005
- Location
- Frisco, TX
- Age
- 64
- Posts
- 20
Here's my approach, perhaps it will be useful? Originally Posted by RichardL
With scrap/waste wood (planed flat already), set the plane (sole downwards) flat on the board with a loose cutter. Let the cutter drop to the surface of the board, then anchor it with the wedge. It helps if you're letting the edge lay ACROSS the wood fibers, as you would normally do for surface planing. If you set it parallel to the fibers, the edge might have a tendency to sink into the wood under the weight of the cutter itself.
At this point (hopefully) the edge is exactly at the level of the sole, and parallel with it.
Now, here's where you still have to do a bit of tapping with a mallot.
Lift the plane and hold it by the cheeks right next to the cutter. I prefer to hold mine from the underside (my palm facing the sole of the plane and fingers on one cheek, my thumb on the other).
Give it a tap on the toe. Just a minor tap. And squarely, too. Don't hit one side/edge of the toe. Hit it full on. But lightly.
Take a practice pass. If not cutting deeply enough, repeat the tap.
I'm sure there are other ways, but this is how I learned. Takes all of about 1 minute for me, including the initial time to set the plane down on a scrap board with its cutter loose. But I'll admit I've had a few years of practice.
P.J.
-
22nd November 2005, 04:54 AM #10
Senior Member
- Join Date
- May 2005
- Location
- New Zealand (Palmerston North)
- Age
- 62
- Posts
- 238
Thanks Pond-Jumper. Sounds like I'm on the right track. I think I have probably been thumping it too hard in the past. Originally Posted by pond-jumper
Cheers from NZ
Richard
-
22nd November 2005, 06:28 PM #11
Banned
- Join Date
- Apr 2005
- Location
- kyogle N.S.W
- Age
- 50
- Posts
- 4,844
Hello again, I got some pictures from the shed. On backbeveling and setting the blade.
First, gota say. I doubt I can match PJ's experience with handplanes. He's clearly very experienced and well trained. Cause I'm only self taught. See, I'm worried that I look pretentious with all these...'in your face'.. pictures I'm about to show.
Just, that I feel the pictures clearify things. Besides I'm really enjoying filming this stuff. Quite amazed with this little camera and the detail it can pick up, especially in the hands of a complete amatuer. I'm finding myself holding the camera in my teeth :eek: by the hand strap, so that I can film what 'I see' when working ,,,,you know, filming both hands in action, not just one, as you would normally see when one hands preoccupied with the camera. Must look a little strange walking around with a camera in my mouth. Freaked the wife out.....
Anyway, here we go. PLEASE, by all means, tell me what you think is wrong with any part of my technique. I don't mind critizism.
First gota Sharpen your blade with the corners feathered, ie. edge swells in the middle and falls away at the corners so that no corner protrudes out the sole, else it will leave little lines in your work. Want a slight, almost unnoticeable swell if you want a very thin tissue like shaving. A big swell for a coarse shaving....you know, like the way a scrub plane blade is sharpened. I do that on the stones by pressuring the corners for a few strokes. Checking my progress by lining up the edge with a ruler up to the light,,,,and a lot of squinting.
Once the main bevel has been sharpened and feathered I flip the guide and backbevel.
The guide I use is the cheapo 'eclypse' model. About $12. The problem with the guide is it won't hone a plane blade to an angle much less than 20 degrees, cause the blades just arn't long enough, and the wheel the guide runs on, is just too far away from the blade.
So what I've done is drilled then tapped a hole to bolt on a small bearing. The bearings are easily obtainable. I got mine from skateboard and scooter wheels that kids ride. But you can also get them off router bits.
The bolt is countersunk, so it will take up any play that you will no doubt have between the bolt and the inner diameter of the bearing. So the bearing won't bind, between the guide and the bearing there's a washer.
Ok, this bearing is bolted so that its outer diameter just protrudes out the bottom of the guide. This is basically the wheel your going to use for the guide to sharpen below 20 degrees. It can because its so much closer to the blade. It allows you to sharpen a blade as low as 2 degrees. That's how I backbevel.
Here's the guide with the bearing attached.
<div><img src="http://i33.photobucket.com/albums/d74/apricotripper/1d.jpg" border="0" alt="" /><br />
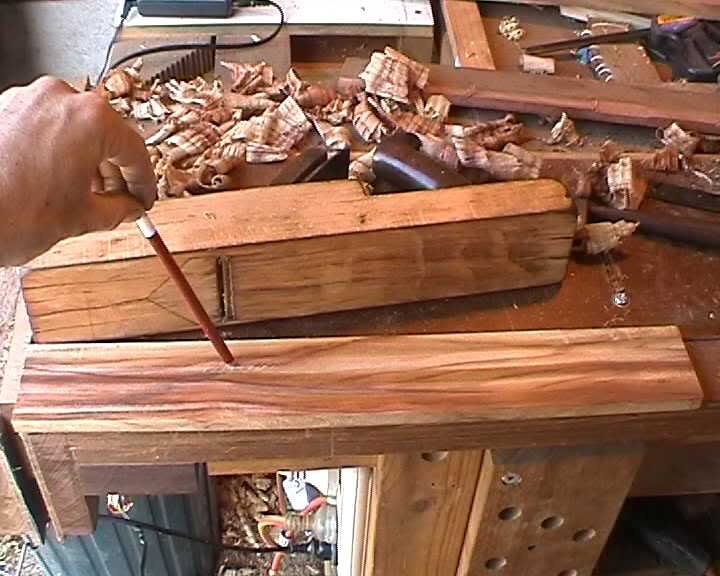
Now I set the angle with from a previously marked board that shows all the angles. Same way as setting the angle with honing the main bevel. I used transperent plastic for the board, unfortunetly cause its hard to see the writing in the picture... Can use anything. I just line up the blades edge to the line that says the angle I want, with the guide butting tight against the boards edge. Ranging from 2 to 20 degrees. So, if I wanted to backbevel 10 degrees I just line it up to the line that says that.
<div><img src="http://i33.photobucket.com/albums/d74/apricotripper/3d.jpg" border="0" alt="" /><br />
Then straight onto the polishing stone. The guide is naturally unstable with it balanced on just one wheel on the side. But really its fine, cause not much work is needed to backbevel,,,just a few small back and forth strokes with your fingers along all of the edge. Works fine to ensure your sharpening at a consistant angle.
<div><img src="http://i33.photobucket.com/albums/d74/apricotripper/4d.jpg" border="0" alt="" /><br />
Sharpening done. Chipbreaker on. Time to set the blade in the plane.
How I do it seems similar to PJ's.
First, lie the plane down on pre-planed timber, and let blade sit naturally on the bed with the edge touching the timber beneath. Then put the wedge in while holding the blade steady.....
<div><img src="http://i33.photobucket.com/albums/d74/apricotripper/1a.jpg" border="0" alt="" /><br />
BUT, what I think needs to be remembered is that with a lot of planes, when you knock the wedge home the blade tends to drop a little with it. So, I pull back on the blade a few mill before I push the wedge in. This way I know it probably wont protrude below the sole when that wedge is knocked in....which is what you want before you start adjusting the blade, cause if its below, chances are its set too coarse, and you'll have to start all over...pulling the wedge out etc.
<div><img src="http://i33.photobucket.com/albums/d74/apricotripper/2a.jpg" border="0" alt="" /><br />
Now knock the wedge home. Not too hard, just so its snug.....knowing the blades edge is still up a bit in the body, away from the sole. The wedge doesn't need to be touched from here on...
<div><img src="http://i33.photobucket.com/albums/d74/apricotripper/3a.jpg" border="0" alt="" /><br />
Now, time to drop the blade. What I do is push the plane along the wood slowly, and as I do so make a lot of little light taps, until I feel the blade faintly bite the timber. Subtle stuff.
<div><img src="http://i33.photobucket.com/albums/d74/apricotripper/4a.jpg" border="0" alt="" /><br />
So, the blades just touching the timber, and you'll see a little thin shaving appear around the mouth, looking in from the top. Though often, its not centred, its taking shavings at the corners. This is whats happened here. The shavings coming up from the right corner.
<div><img src="http://i33.photobucket.com/albums/d74/apricotripper/5a.jpg" border="0" alt="" /><br />
So to fix this problem, I taped the right side of the blade, lightly with the hammer. But, I taped it too hard. Cause when I pushed the plane again the shaving was coming up on the left corner. Bugger.
<div><img src="http://i33.photobucket.com/albums/d74/apricotripper/6a.jpg" border="0" alt="" /><br />
So, I have to tap the side of the blade again, but this time from the left, but not as hard as before, cause I want the shaving to come up through the middle.
<div><img src="http://i33.photobucket.com/albums/d74/apricotripper/7a.jpg" border="0" alt="" /><br />
Centred !
<div><img src="http://i33.photobucket.com/albums/d74/apricotripper/8a.jpg" border="0" alt="" /><br />
Now, I give it proper test. No longer pushing the plane along lightly, I'm pushing down hard, as you do to plane normally. So, that light shaving will widen naturally.
If the shavings still too thin. Lightly tap it down again.
If you tap it down too hard, it'll get too coarse and you'll have to remove the wedge and start over.
The process probably sounds too hit and miss, and no doubt you'll stuff it up a few times at first, but really, with practise, like everything, it becomes very quick and easy like PJ says. And much more rewarding than making a metal plane work. In my opinion.
-
22nd November 2005, 06:57 PM #12
Dextrophobe

- Join Date
- Mar 2004
- Location
- Perth hills
- Age
- 45
- Posts
- 1,060
You're an absolute champ Jake. Great post. Have a greenie!
Basically the same process I use. Sliding the plane on the timber and giving microtaps until it starts shaving. Even started doing it with baileys (adjusting, not tapping).
As a bit of help, I've got a mallet that I custom made for plane setting. I dont have a piccy but I thinks its in the backgroudn of another post....
Anyway one side is curved, in one plane only, so you get good force concentration but not enough to dent your plane. I found that a rounded mallet tended to dent things with all the force going through a single point
Secondly, the other side is flat but sloped in towards the handle slightly. This feels "ergoniomcal" when tappign the wdge and gives you good even force across its width. I need a pic!Cheers,
Adam
------------------------------------------
I can cure you of your Sinistrophobia
-
22nd November 2005, 07:08 PM #13
Dextrophobe
- Join Date
- Mar 2004
- Location
- Perth hills
- Age
- 45
- Posts
- 1,060
A pic:
This is what I meant. Works and absolute charm for getting flat contact with the wedge. A right angle hammer makes it akward to do so.......trust me!
Cheers,
Adam
------------------------------------------
I can cure you of your Sinistrophobia
-
22nd November 2005, 07:12 PM #14
GOLD MEMBER
- Join Date
- Aug 2002
- Location
- Perth, WA
- Age
- 76
- Posts
- 2,078
Jake
That's one of the best and most informative posts we've had in these forums. Thanks for taking so much trouble to explain things so clearly.
I can't wait for that old plane to arrive so I can give it a go!
Cheers,
ColDriver of the Forums
Lord of the Manor of Upper Legover
-
22nd November 2005, 07:50 PM #15
Senior Member
- Join Date
- May 2005
- Location
- New Zealand (Palmerston North)
- Age
- 62
- Posts
- 238
Hi Jake
thanks for all your efforts to explain things , that was great. A greenie from me too - if I can figure out what button to push. Posting photos is a great way to explain things - as you say, so easy with digital cameras. So, in summary, you put a 20 degree back bevel on the blade to get the 65 degrees to the timber surface. In that case, the eclipse honing guide probably will do un-modified, correct, just move the blade back a bit more? More subtle bevels reqire the mod.
I'll try it out tomorrow.
Thanks again.Cheers from NZ
Richard


 Reply With Quote


Similar Threads
-
wooden fascia - repair or colourbond it?
By ryan23 in forum WOODWORK - GENERALReplies: 15Last Post: 24th June 2006, 11:38 PM -
Design for simple wooden latch for jewellery box
By Samson13 in forum DESIGNS & PLANS FOR PROJECTSReplies: 0Last Post: 7th June 2005, 06:09 PM -
Bali Wooden Craft
By baliwoodencraft in forum ANNOUNCEMENTSReplies: 0Last Post: 19th December 2004, 12:56 AM -
Old wooden planes
By Matto in forum HAND TOOLS - UNPOWEREDReplies: 2Last Post: 1st May 2004, 04:42 AM
