

 Thanks: 0
 Likes: 0
 Needs Pictures: 0
 Picture(s) thanks: 0
Results 1 to 15 of 19
Thread: Wooden Thread Profiles
-
19th January 2011, 11:35 AM #1
 GOLD MEMBER


- Join Date
- Jun 2008
- Location
- Victoria, Australia
- Age
- 74
- Posts
- 6,132
 Wooden Thread Profiles
After reading all the fuss about Moxon/Schwarz twin screw presses/vises, I have succumbed to fashion and decided to make one..
The screws will be 2" diameter 3 tpi, still deciding on what wood to use, I have some english oak, that might be suitable, but walnut with it's crosslinked grain might be less liable to split across the threads...
I'm making the tap first, it's just mild steel but I'm thinking of making provision for an O1 cutting insert.
Now the question. What is the best profile for wooden threads, I see the commercial taps are all 60 degrees, whereas I understand the traditional profile is a 90 degree form, what about square or "acme like" trapezoidal?
The shaker style vises with wooden threads used 90 degrees I believe, but I just watched a Roy Underhill video where he makes a thread box using a 60 degree cutter?
The commerically available Beal threading kits use a 60 degree cutter?
Did they all get it wrong or is 60 degrees just as good as 90? Maybe I'm just easily confused.. (don't answer that)
I searched the archives here and found lots of good information, IanW has a good write up on making a router based thread box. ( Hopefully Ian is still "working from home" and can provide some pointers)
Regards
Ray
-
19th January 2011 11:35 AM # ADSGoogle Adsense Advertisement
- Join Date
- Always
- Location
- Advertising world
- Age
- 2010
- Posts
- Many
-
19th January 2011, 02:40 PM #2
GOLD MEMBER
- Join Date
- Mar 2004
- Location
- Brisbane (western suburbs)
- Age
- 77
- Posts
- 12,117
Hi Ray,
Actually, I'm at work - my retirement has been put back a couple of weeks, thanks to the recent upheavals up here. Anyhow, I just sat down with a sandwich & thought I'd browse the forum, so am delighted to address those of your questions I can:
The Oak my be ok, haven't tried it myself, but have seen screws made of American Red oak, which is similar. We have quite a few suitable threading woods if you choose to use a router threadbox. With a carbide bit, you can thread anything short of cast iron (& you could probably do that if you could slow the router enough & organise a drip for cutting fluid! Originally Posted by RayG

 ). If you want to go with a 'traditional' threadbox, you have to be more choosy - you need a wood that will 'peel' rather than just crumble away from the vee cutter. "Peeling" woods that you could probably get hold of easily in your parts are Ash & Apple. Apple is a superb wood for screws if you can get some in suitable sizes. I have made good clamp screws out of Desert Ash.
Local woods I've tried with great success include Bull-oak, Belah, Spotted Gum, river oak, & Red Gum. Not every piece goes well, but if you've got a bit of the right tree, you will get an excellent & durable thread on any of these.
That is the correct order to do it, IMO. Mild steel is perfectly adequate on its own; forget about the cutting insert. For starters, you would need several, and they would complicate your tap-making, and they are quite unnecessary. A good friend made me a mild-steel 2" 4tpi tap a long time ago - it has cut a mile of thread and shows no sign of giving up any time soon. You should taper up the thread lands of the tap from root diameter to full thread over at least 4 turns - 6 is better. You cut two faces along these (on opposite sides, for balance) and each faced land is a 'cutter', when you relieve the thread in front. Make the faces parallel to, or slightly negatively-raked to the radius of the tap - they work better as a scraper, rather than "cutters". My tap is made from a piece of very thick-walled tubing (no idea where he got it) and is a brilliant piece of practical engineering, the way he did it, with excellent chip-clearance slots. I don't have any decent pics on the computer, but can certainly get you some when I get home, if you like. Originally Posted by RayG
Be warned! A 2" wood tap is a behemoth of a thing - mine has a 5/8" thick tommy bar, close to 3 feet long, & takes two people to turn once it is fully engaged in the pilot hole. A little paraffin wax rubbed on before starting helps (a bit!). The old style taps used a different principle. The tap was driven by an angled piece of steel that fitted into a spiral slot on the shaft, which was turned to the root diameter of the thread. You cut the thread in multiple passes, advancing the single cutter a little at a time. Obviously, you have to remove all the waste wood in a single pass with a tap like we are discussing, and it don't give up easy!!
As to this question, I too, have no idea! Originally Posted by RayG
I use 60 degrees now, 'cos I could easily get a nice 60 deg. carbide cutter for the router (highly recommended, as tool steels don't take happily to our siliceous woods). However, I have made 90 degree threads using an old English tap as the basis, and even Acme style threads, just for fun. The 60 degree and 90 degree works equally well as far as I can tell. I have used clamps with both types of threads for 30 plus years & both have stood up well to heavy use. You should truncate wood threads much more than steel ones (allows for moisture movement as well as removing those fragile thread tops), and the 90* threads look a bit odd til you get used to them. Perhaps I would steer clear of the square (acme) style threads for wood. Intuitively, they seem less mechanically sound compared with the angled ones, but that is pure opinion. The single square screw I made was for someone else, and I haven't seen it since he went happily off with it....
In summary - I would go with an angle for which you can readily get a cutter, if you are going to use the router-box method for cutting the screws. I have used threadboxes a bit, and they work well when properly set-up & the cutter sharp, and applied to a suitable wood species. But the cutters are hard to resharpen, and getting them replaced in the exact right position requires the patience of Job & the fine hand skills of a miniature watch-maker...
Woops - I think my lunch-break just expired....
Happy to help any way I can, Ray - least I can do to return the sawmaking help...
Cheers,IW
-
19th January 2011, 03:49 PM #3
GOLD MEMBER
- Join Date
- Jun 2008
- Location
- Victoria, Australia
- Age
- 74
- Posts
- 6,132
Hi Ian,
Sorry to hear that "R" day has been washed away in the flood..
Hopefully you will be back on track to gainful unemployment before too long,
I have a 3/4 shaft driving the tap, and planning make a fitting that will use a big 1" square drive socket. I haven't cut the thread yet, still trying to work out how to set up the change gears to get the 3 tpi.
I would be very interested to see a picture of your 2" tap, do the chips go into the center of the tube, or is the chip clearance slots (like a normal metal tap)
Regards
Ray
-
19th January 2011, 04:03 PM #4
GOLD MEMBER
- Join Date
- Mar 2004
- Location
- Brisbane (western suburbs)
- Age
- 77
- Posts
- 12,117
OK Ray - will try to get some useful pics for you if I get home in time tonight. Originally Posted by RayG
The slots are cut through the wall of the tube, so the chips go through & fall out of the tube. A couple of pics will tell all.
I would recommend putting a hole in the top & using a tommy bar, rather than a socket wrench. That way you can keep a balanced torque on the tap, especially if you have two people driving it. Mine has a very long un-threaded pilot, but still likes to start off-track if I don't consciously keep it even at the start - wood seems worse than metal in that respect.
Cheers,
IanIW
-
19th January 2011, 05:31 PM #5
SENIOR MEMBER
- Join Date
- Jan 2008
- Location
- NSW southern Highlands
- Posts
- 548
Ray
There is an article by David Charlesworth in the Dec 2010 edition of Furniture & Cabinetmaking discussing the use of a screw box which you may find helpful.
Regards
-
19th January 2011, 06:51 PM #6
GOLD MEMBER
- Join Date
- Mar 2004
- Location
- Brisbane (western suburbs)
- Age
- 77
- Posts
- 12,117
tap pics
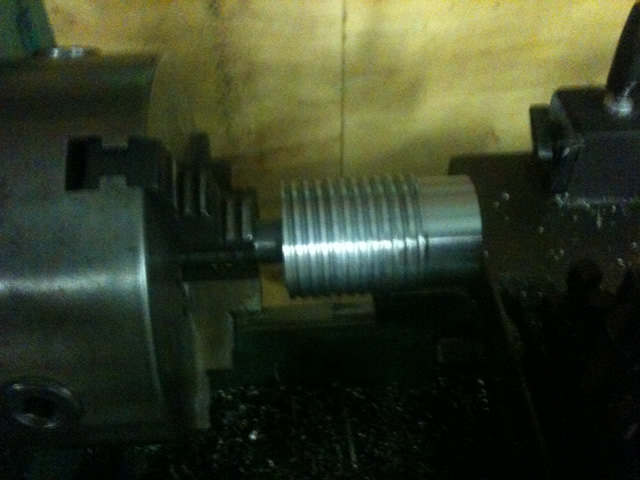
OK - I made it!
Here is the beast - I think the pics are self explanatory.
My apologies - I remebered it as having 2 slots, but as you see, it has 4. I suspect 2 would work just as well. The thicker tube has a smaller tube welded into it for the shaft. I don't know if my friend found tubing of the right diameters, or bored the larger one out, but I think I remember him saying he was lucky & 'found' just the right bits on the scrap pile.
You can see how the thread lands have been relieved a little on the leading side of the slots to allow the trailing side to be "cutters". The threads go from root diameter to full diameter over 6 threads.
Once you get the thing driven through the 'nut', it leaves a beautiful thread - and a pretty sweaty old bloke....
Cheers,IW
-
19th January 2011, 10:13 PM #7
GOLD MEMBER
- Join Date
- Jun 2008
- Location
- Victoria, Australia
- Age
- 74
- Posts
- 6,132
Hi Ian,
Thanks for that, mine is solid through the center at present, and I couldn't get the 3 tpi I wanted with the change gears, best I could get is 5 tpi
The 3/4 rod is welded into the 2" tap section, so I could bore out the middle and cut slots like yours.
Just a couple of questions, what is the pitch and thread angle for your tap?
Regards
Ray
-
19th January 2011, 11:13 PM #8
Peter McBride
- Join Date
- Nov 2007
- Location
- Melbourne
- Posts
- 1,139
Ray,
I have a 2inch (50mm) tap and thread box by Peugeot Freres.
Attachment 159175
Here are some close up pictures of the tap. It is 7 threads per 55mm.
I used the last pic to get an angle...72 - 75 degrees
It worked in blackwood ok making both the male and female threads. Somewhere I have pictures of them....I think I posted them here once....will search ...edit...here it is
Attachment 159177
Attachment 159168 Attachment 159169
The first thread is tapered and has 4 holes with a cocky beak type cutter in each one.
Attachment 159170 Attachment 159171
Attachment 159172 Attachment 159173
Regards,
Peter
-
20th January 2011, 12:59 AM #9
GOLD MEMBER
- Join Date
- Jun 2008
- Location
- Victoria, Australia
- Age
- 74
- Posts
- 6,132
Hi Peter,
Wow, another 2 inch monster tap to match Ian's. That thread box is a beauty as well.
Thanks for the pictures, I now have a clearer picture of what it should look like.
This is what it looks like so far. I have to get some change gears to be able to do 3.5 tpi but meantime this one is about 5 tpi to see how it goes.
I like the cockies beak cutters, I'm thinking maybe I could put those style cutters on the first few tapered threads.
Thanks Ian and Peter, much appreciated.
Regards
Ray
-
20th January 2011, 09:41 AM #10
GOLD MEMBER
- Join Date
- Mar 2004
- Location
- Brisbane (western suburbs)
- Age
- 77
- Posts
- 12,117
Hi Ray - 4 tpi for the 2" tap, and the angle is 60*. Originally Posted by RayG
Three tpi would have been good, but 5 should work, though it's getting a bit fine. I have a 6 tpi 1.5" tap, which I consider too fine for most purposes. You want to save as many turns as you can!
While boring it out would be good, you can get away with just having a decent chip slot. On my 1.5" , there are two coved slots about 5-7mm deep. They work fine.
Cheers,IW
-
20th January 2011, 02:17 PM #11
GOLD MEMBER
- Join Date
- Jun 2008
- Location
- Victoria, Australia
- Age
- 74
- Posts
- 6,132
Thanks Ian,
I should have been able to get 4 tpi but I recut the idler gear after a lathe crash and now the diameter is too small for the ratio I need...
In a rare moment of clarity, , having realised (finally) that I would need a custom drill bit of some sort to drill the holes. I re-machined the root diameter down a bit to suit an 1 3/4 forstner bit, and recut the threads a bit deeper..
I did toy with the idea (for at least a millisecond) of making the lead-in section into a hole saw, thus making the whole process a "one step" drill and tap.. But I think that would required hardened steel... maybe next time on a smaller diameter, like 3/4 or 1".
Should finish it later tonight, so I'll post a picture then.
Regards
Ray
-
20th January 2011, 02:35 PM #12
GOLD MEMBER
- Join Date
- Mar 2004
- Location
- Brisbane (western suburbs)
- Age
- 77
- Posts
- 12,117
Ray - while the hole-saw idea sounds interesting, I just can't see it working very well. Each rotation of the tap would have to cut one thread's worth deep. And where is the plug of wood going to go? Or more to the point, perhaps, how will you remove it from the tap so the chips from the threading part can go somewhere? Originally Posted by RayG
I'm just musing 'out loud' because me & hole-saws never did get along very well. IMO, they are only good for making poor quality holes in material you don't want to subject your good bits to - fibro & the like. For straight, round holes, stick with Forstners, augers, or even a (decent quality) spade bit, methinks. If you make the pilot long enough to saw the hole before any threads engage, it might be ok.
Sorry to dump on your idea - now you'll go & prove me wrong on all counts, no doubt...
Cheers,IW
-
20th January 2011, 02:59 PM #13
GOLD MEMBER
- Join Date
- Jun 2008
- Location
- Victoria, Australia
- Age
- 74
- Posts
- 6,132
Hi Ian,
Yes the hole saw thought is a dumb idea, I was trying to resolve the issue of determining the root diameter while juggling the outside diameter, thread angle and profile, and making both the root diameter and the clearance hole sizes sizes that I have forstner bits for.
Then I thought, maybe just make a big spade bit... or what about a hole saw? Then to compound the stupidity I thought of making the lead-in portion of the tap into a hole saw, at least it would be the correct size..
I've ended up 1 3/4 root diameter, not sure about clearance diameter, ( a bit less than 2")
Ah well....
Regards
Ray
-
20th January 2011, 07:01 PM #14
GOLD MEMBER
- Join Date
- Mar 2004
- Location
- Brisbane (western suburbs)
- Age
- 77
- Posts
- 12,117
Ray - that sounds about right to me. I drill a 1 3/4" pilot hole for my tap & that works ok, except in very tough woods like Ironbark, which would be better drilled a little larger, but I don't have any bits that size. Making (or modifying) a spade bit just a wee bit bigger than 1 3/4" is something I have also had on the 'to do' list for some time. Originally Posted by RayG
You need a fair bit of clearance for wood screws - otherwise you'll get binding in the wetter months. They seem to work well if slightly sloppier than you would tolerate for a metal thread.
All coming along....
Cheers,IW
-
20th January 2011, 11:24 PM #15
Peter McBride
- Join Date
- Nov 2007
- Location
- Melbourne
- Posts
- 1,139
Ray, Originally Posted by RayG
would one of these do the job?
File:Adjustable drill bit closeup.jpg - Wikipedia, the free encyclopedia
An expansive spur bit
I'm sure I have a couple of them...some even in the wrapper unused
Regards,
Peter


 Reply With Quote


Similar Threads
-
Aluminium profiles
By GWH74 in forum CNC MachinesReplies: 31Last Post: 22nd November 2011, 09:08 PM -
Sanding profiles
By Sculptured Box in forum WOODWORK - GENERALReplies: 1Last Post: 10th April 2009, 09:16 AM -
After some knob profiles to download.
By JDarvall in forum WOODTURNING - GENERALReplies: 12Last Post: 11th July 2006, 09:15 AM
