

 Thanks: 0
 Likes: 0
 Needs Pictures: 0
 Picture(s) thanks: 0
Results 1 to 9 of 9
-
17th March 2020, 02:46 AM #1
 Be inspired. Be creative. Be bold.


- Join Date
- Apr 2001
- Location
- Perth
- Posts
- 10,824
 Reversed Fritz and Franz Jig Mk 2
Those who understand how a Fritz and Frans jig can revolutionise a sliding table saw, generally use a long slider table, and push the work piece against the far fence.
This one is courtesy of Google ...

If you have no experience with this jig, view this short video ...
YouTube
Those with a shorter slider table, such as mine (1250mm/49"), can still use the slider to rip, however this is less simple. For a start, the crosscut fence is at the beginning of the slider table ...
... and attempts to replicate the larger sliders involve building a crosscut fence at the end. This was my Fritz & Frans jig ...
It worked for ripping ...

... but it was a pain to have to set up the far crosscut fence each time.
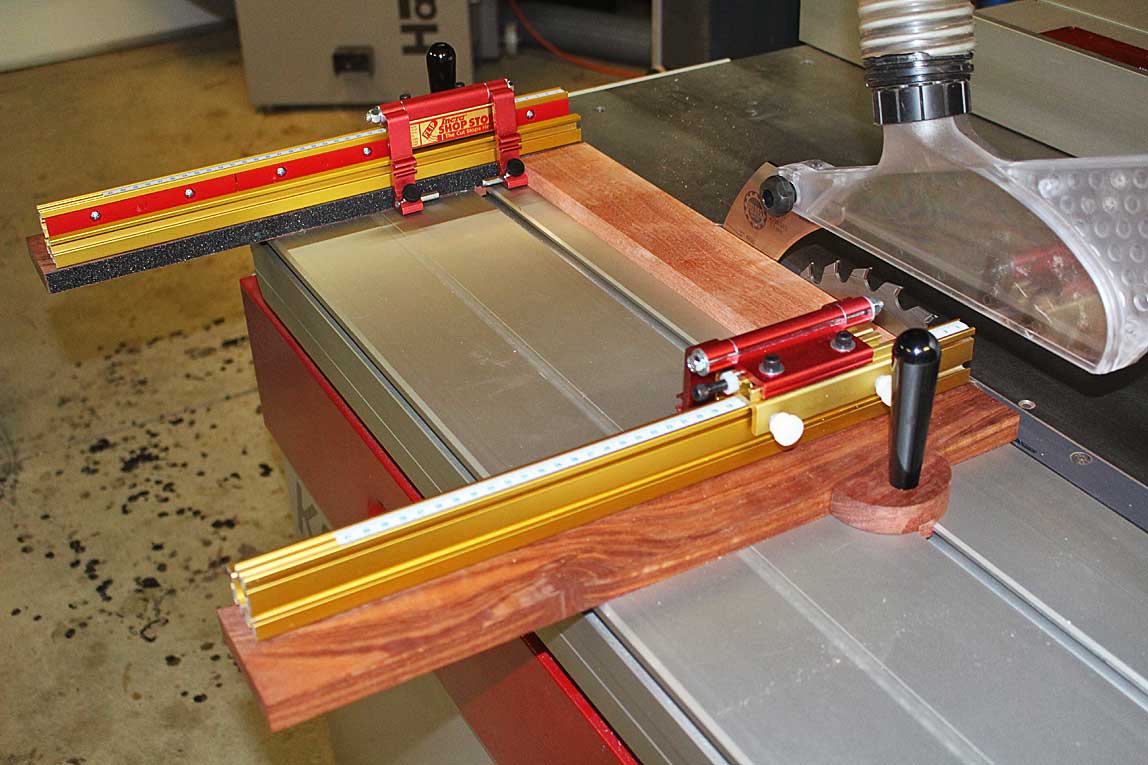
It occurred to me that I was doing this all wrong. What was suitable for a long sliding table was not suitable for a short sliding table. Their crosscut fences were at opposite ends. Therefore I decided to build a reversed F&F jig, that is, where the work piece was pushed against the crosscut fence at the beginning of the sliding table. The first build was to test the idea. This worked well enough to build the current version ...
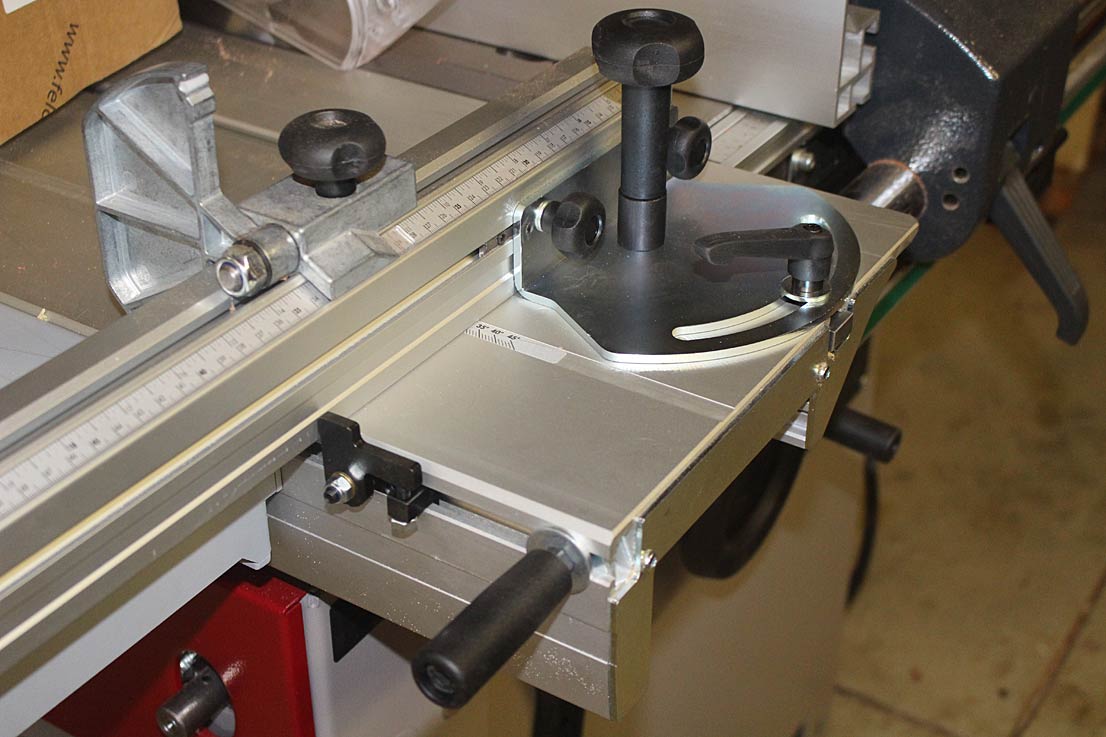
This is the sliding section ...

The Incra fence has stops for accurate measurement of width. The front edge has non-slip.
There is a scale to set the stops ..

The handle at the rear is important ...

I suspect that no one else has built a reversed F&F, and the reason for not doing so is that pushing the work piece against the front fence, and also pulling the slider past the fence, are incompatible actions.
For this reason the handle at the rear serves to control the entire action: Push the work piece against the fence, then twist the handle and lock it in place ...

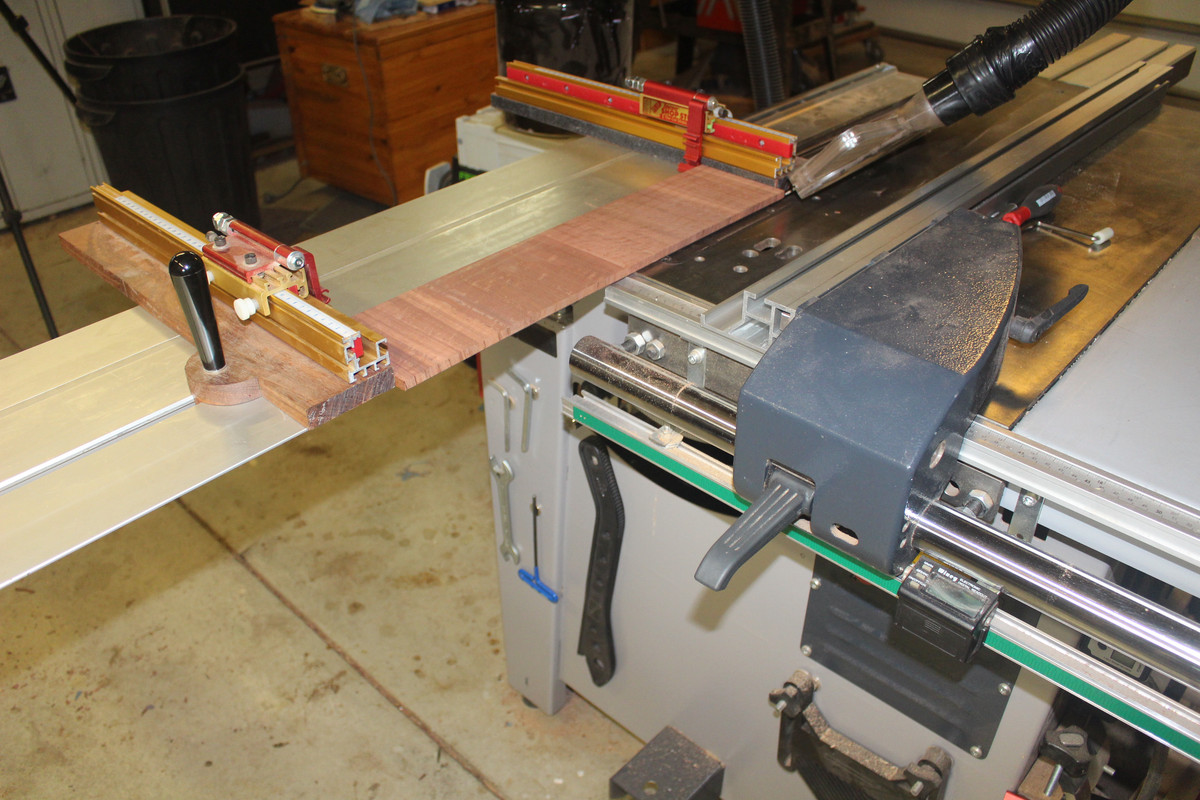
A little while ago, I began working towards this design by adding a zero clearance extension to the crosscut fence ...
Now this enables very accurate rips using the sliding table ...
Regards from Perth
DerekVisit www.inthewoodshop.com for tutorials on constructing handtools, handtool reviews, and my trials and tribulations with furniture builds.
-
17th March 2020 02:46 AM # ADSGoogle Adsense Advertisement
- Join Date
- Always
- Location
- Advertising world
- Posts
- Many
-
17th March 2020, 09:42 AM #2
GOLD MEMBER
- Join Date
- Jun 2005
- Location
- Helensburgh
- Posts
- 7,696
Derek do you not use the rip fence/Wixey as a measuring stop? It is far quicker than adjusting two stop on the F&F jig but is a hindrance if the rip fence is the stock length because no matter how it is set you either have to walk around it or it intrudes onto the table. I will take some photos of mine and post them later. I rarely use the F&F jig I made with the Incra on it but it still comes in useful for the odd cuts. When I did not have the outrigger my approach was to have the CC fence permanently on the front of the table and is was never moved. I like your end piece to the CC fence, I have been thinking along similar lines so I can change it as needed to suit the blade I am using. I am also going to put replaceable ends on the F&F jigs I have made for the same reason.
CHRIS
-
17th March 2020, 08:17 PM #3
GOLD MEMBER
- Join Date
- Jun 2005
- Location
- Helensburgh
- Posts
- 7,696
These photos show the fence mounted on the front of the table for those who do not have an out rigger. I did this when the F&F jig first came to be shown on SMC many years ago and I wanted to use one. When I decided to move the CC fence to the other end of the table I bought duplicate parts from Felder so I could leave move the fence from one end to the other in less than a minute and it always stayed square when moved.
Fence on the Front of the Table 2.jpg Fence Mounted On the Front of the Table.JPG
My F&F jig with the short rip fence, this is the one I use day to day.
IMG_1941.jpg
One similar to Derek's, again not my idea, it came from SMC as well. I don't use it much as I explained above because I use the rip fence with the Wixey on it combined with a fine adjustment on the rip fence head. If anyone is think of buying a K3 definitely get the fine rip fence adjustment and combine it with a Wixey or similar, no bumping needed at all with that combination.
IMG_1898.JPGCHRIS
-
17th March 2020, 08:53 PM #4
Be inspired. Be creative. Be bold.
- Join Date
- Apr 2001
- Location
- Perth
- Posts
- 10,824
Thanks Chris. I recall your photos, and that you also purchased an outrigger, which enables you to use the far end of the slider wagon.
What length is your slider? I have a feeling that it is longer than mine (1250mm/49").
In response to your first post, there are many ways to use the rip fence. What you are suggesting (about using the rip fence as a stop) is demonstrated in that short video.
I do this as well: either with the fence pulled back (so the waste can exit without being jammed between the blade and fence), or an attached sub-fence.
Keep in mind that I am set up to use the rip fence as well, really effectively now ... since adding the Jessem Clear Cut Saw Guides, which are really excellent and actively add to sawing accurately and cleanly (because they pull the work piece against the fence) ...

Keep an eye out for my next post about the K3 - something that you are going to love!
Regards from Perth
DerekVisit www.inthewoodshop.com for tutorials on constructing handtools, handtool reviews, and my trials and tribulations with furniture builds.
-
17th March 2020, 09:52 PM #5
GOLD MEMBER
- Join Date
- Jun 2005
- Location
- Helensburgh
- Posts
- 7,696
Mine is a 55" stroke, not much bigger than yours but it will cross cut a 1200 x 2400 panel which I know is of no interest to you with your kind of use. The only problem with loading a panel of that size is I can't do it on my own and I should build a helper trolley I posted some time ago but as it is an infrequent event I just yell for help. I found the full length fence just gets in the way so it got the chop so to speak. In fact I bought a full fence and cut it up, kept one piece and a few other members here bought the rest. I think it made four short fence pieces. After I did that I found I hardly ever used the full length fence as I have mentioned before. I await further developments with baited breath.
CHRIS
-
18th March 2020, 12:00 AM #6
Be inspired. Be creative. Be bold.
- Join Date
- Apr 2001
- Location
- Perth
- Posts
- 10,824
Chris, you will recall that I have the Hammer N4400 bandsaw. Well the fence is half the K3 rip fence. It is quick to change over and use as you use yours. Another option. (They abound!).
Regards from Perth
DerekVisit www.inthewoodshop.com for tutorials on constructing handtools, handtool reviews, and my trials and tribulations with furniture builds.
-
18th March 2020, 12:23 AM #7
GOLD MEMBER
- Join Date
- Jun 2005
- Location
- Helensburgh
- Posts
- 7,696
My K3 fence fits my Minimax band saw which is handy.
CHRIS
-
20th March 2020, 11:21 PM #8
Be inspired. Be creative. Be bold.
- Join Date
- Apr 2001
- Location
- Perth
- Posts
- 10,824
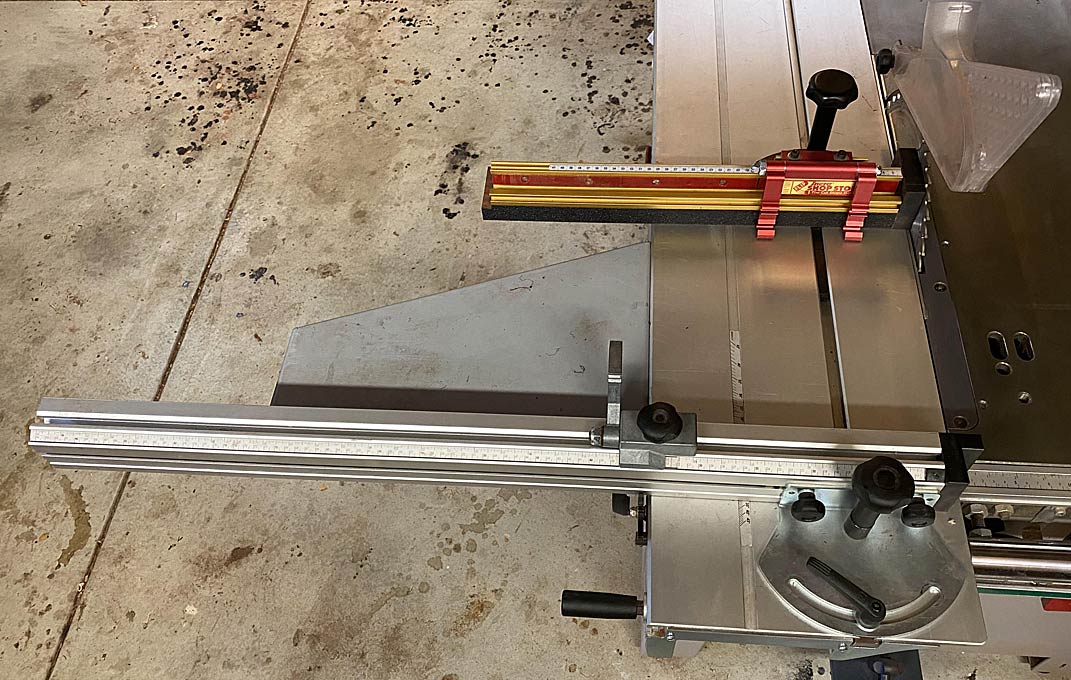
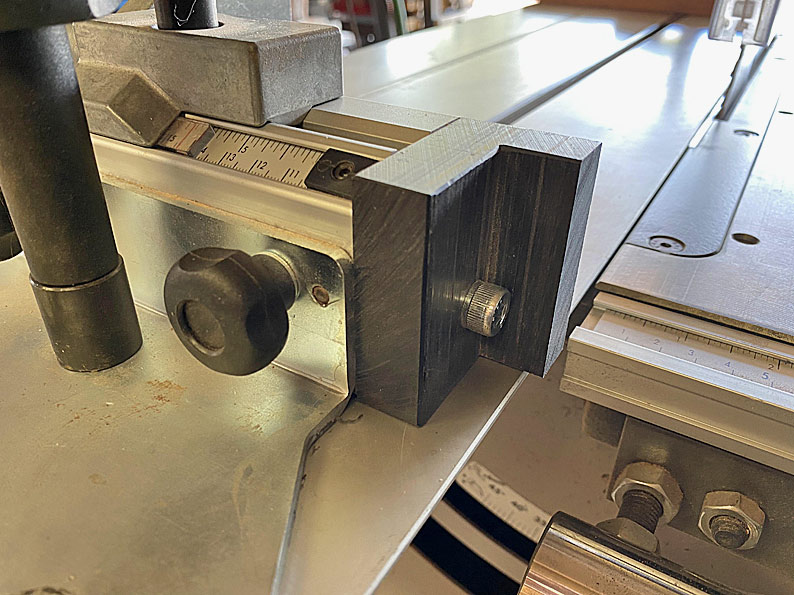
Just a quick update on the zero clearance ends for the crosscut fence and also the F&F jig. Note that these ends are not intended to prevent spelching (breakout), but rather to aid in lining up the ends of a board.
Just a reminder, the ZC ends are UHMW. They are held in with a steel hex bolt, which is recessed out of harm's way.
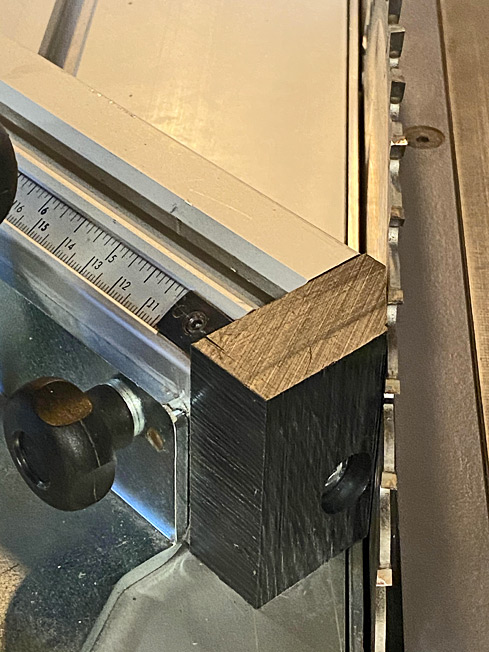
The ends of the crosscut fence at 90 degrees ...

The purpose of reducing the height was to enable the blade to be lowered and also to clear the side of the blade guard.

The F&F jig was treated similarly ...

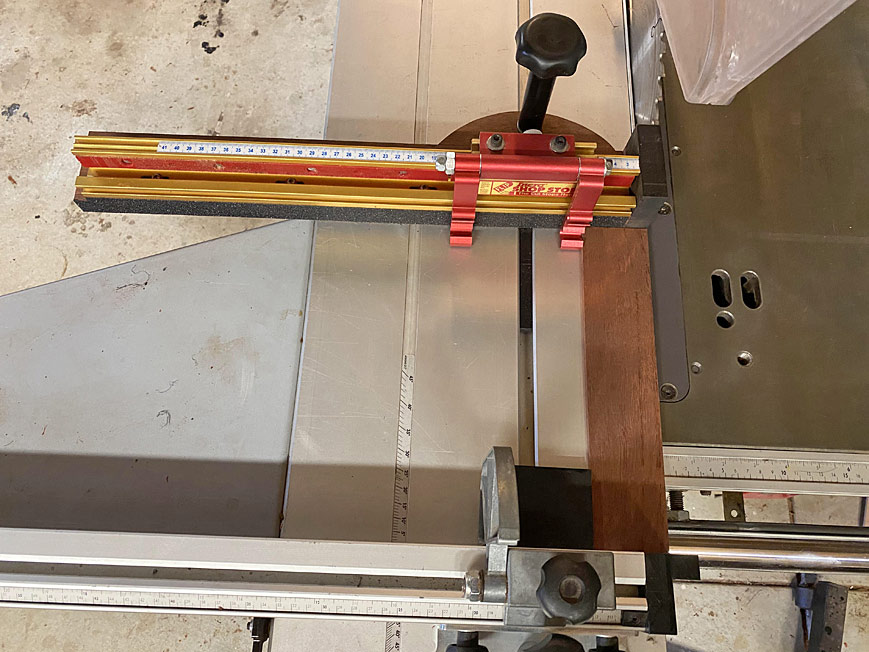
A ZI end was also made for the crosscut fence when sawing at 45 degrees ...

The bolt looks close, but it is not in danger of being struck by the blade ..

Regards from Perth
DerekVisit www.inthewoodshop.com for tutorials on constructing handtools, handtool reviews, and my trials and tribulations with furniture builds.
-
21st March 2020, 10:42 AM #9
GOLD MEMBER
- Join Date
- Jun 2005
- Location
- Helensburgh
- Posts
- 7,696
I have worked out how to change the face of the F&F jig to allow for different blades or simply replacing it due to wear or special cuts. I will make one shortly but as I am in the middle of home renovations and other stuff it may be a bit protracted. The change over will take about 10 seconds I think which for me will be very handy because I use different kerf blades as needed. Basically it will be a horizontal lap joint and the replacement face will be fastened by two vertical fasteners through the overlap with knobs onto two vertical threaded inserts, undo the knobs and replace the face to suit the blade.
CHRIS


 Reply With Quote
Similar Threads
-
Reversed Fritz and Franz jig for a smaller Hammer K3
By derekcohen in forum GENERAL & SMALL MACHINERYReplies: 0Last Post: 2nd March 2020, 12:18 PM -
Fritz & Franz Jig
By Chris Parks in forum TABLE SAWS & COMBINATIONSReplies: 9Last Post: 2nd September 2017, 01:39 PM -
Hafco Hm52 on the fritz again
By Retromilling in forum METALWORK FORUMReplies: 25Last Post: 12th August 2009, 11:14 AM -
Reversed a cigar pen. What to do now?
By clinch in forum WOODTURNING - PEN TURNINGReplies: 12Last Post: 9th October 2008, 09:03 PM -
A/C on the fritz
By Honorary Bloke in forum NOTHING AT ALL TO DO WITH WOODWORKReplies: 0Last Post: 7th June 2007, 08:49 AM
